


CUBRID is a free and open source relational database management engine. The power of CUBRID lies in its capability to support enterprise level features. It provides certain novel features in the form of object-oriented database element relations, a native middleware broker, and data caching with high performance. Moreover, it has production quality compatibility with many popular databases such as MySQL.
Databases are an integral part of any software application. The persistence that the databases bring in to the applications enable efficient retrievability of relevant data from non-volatile storage. There are a large number of databases such as MySQL, MariaDB, CouchDB, etc. This article provides an overview of a powerful enterprise-ready database management engine, termed CUBRID (pronounced ‘cube-rid’).
The first appearance of CUBRID was in November 2008. The latest stable release is CUBRID 10.1, which was released in July 2017. It is written in the C language and supports two major operating systems—GNU/Linux and Windows.
The major features of CUBRID are:
- Free and open source
- Powerful
- Offers enterprise features
CUBRID is completely free of cost. As it is open source, you can choose to customise it to your specific requirements. Its enterprise features are listed below.
- High availability: The high availability of CUBRID is attributed to its powerful Heartbeat native engine. It works very accurately and has automatic fail-over technology, built in.
- Globalisation: CUBRID has excellent I18N (internationalisation) and L10N (localisation) features.
- Scalability and Big Data optimisation: CUBRID offers automatic volume expansion with support for multiple volumes.
- High performance optimised for Web services: CUBRID has support for multi-threaded and multi-server architecture. It has native broker middleware. The intensive caching feature that CUBRID offers is excellent.
Getting started with CUBRID
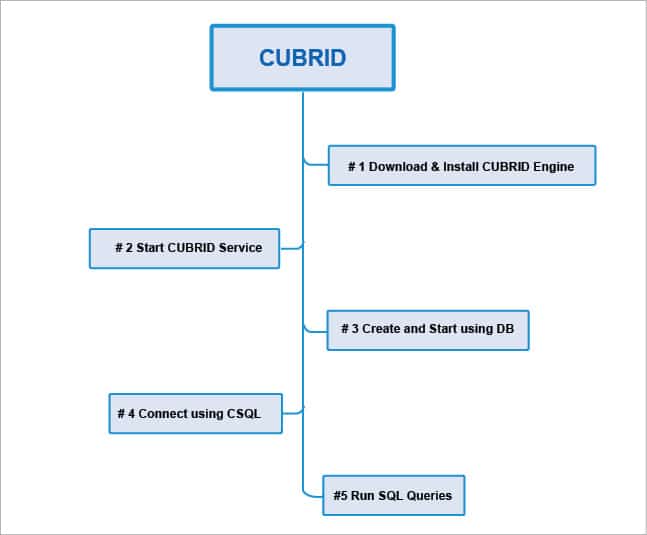
This section details the steps required to get started with the CUBRID database management engine. The overall process is illustrated in Figure 3.
Step 1: The first step is to download and install the CUBRID engine. The official Web page provides download links for both GNU/Linux and Windows (https://www.cubrid.org/downloads/os-select/64-bit/engine). You can download the latest stable release of CUBRID 10.1 and execute the installer.
Step 2: After successful installation, you can start the CUBRID service by executing the following command in a terminal:
<span style="color: #000000;">cubrid service start</span>
Step 3: Once the CUBRID service is started, you can create and start using the databases. Two sample commands are shown below:
<span style="color: #000000;">cubrid createdb osfytest en_US</span>
<span style="color: #000000;">cubrid server start osfytest</span>
Step 4: The next step is to connect to the database using CSQL. The command for doing that is as follows:
<span style="color: #000000;">csql –user PUBLIC osfytest</span>
Step 5: After the completion of all the above steps, you can run the required SQL queries.
CUBRID vs MySQL
As MySQL is a leading open source database management system (DBMS), you may get asked about their relative merits. First and foremost, CUBRID is not derived from MySQL. It is a separate RDBMS tool which has around 20 years of development history, as mentioned earlier.
Regarding performance, the official CUBRID documentation claims that it is faster than MySQL in scenarios when there are many concurrent requests. Unlike some other RDBMSs, CUBRID has no separate enterprise licence. It has only one flavour, which is under GPL version 2 or higher. Hence, CUBRID is completely free with all its enterprise level features.

CUBRID language support
CUBRID supports many popular programming languages. It does so by providing language-specific APIs (Application Programming Interfaces). CUBRID is written in C and hence there is a native C driver. This driver is referred to as CCI. Apart from this, CUBRID has support for the following programming languages:
- Java
- PHP
- Ruby
- Python
- Perl
- Node.js
- ADO.NET driver for .NET programming languages
In this article, examples with two popular programming languages — Java and Python — are given.
A simple CUBRID example with Java
This section introduces you to a compact and standalone Java program that interacts with CUBRID. For this program to work, you should have already installed CUBRID, having followed the steps mentioned earlier, and it requires the JDBC driver as well. If your system doesn’t have it, then do install it. The installer is available at https://www.cubrid.org/downloads/os-select/64-bit/drivers/jdbc–
<span style="color: #000000;">package org.cubrid.demo;</span>
<span style="color: #000000;">    import java.sql.Connection;</span>
<span style="color: #000000;">    import java.sql.ResultSet;</span>
<span style="color: #000000;">    import java.sql.Statement;</span>
<span style="color: #000000;">    import static java.sql.DriverManager.getConnection;</span>
<span style="color: #000000;">    public class Main {</span>
<span style="color: #000000;">      public static void main(String[] args) {</span>
<span style="color: #000000;">        String url = “jdbc:cubrid:localhost:33000:demodb:public::?charSet=utf8”;</span>
<span style="color: #000000;">        try {</span>
<span style="color: #000000;">          Class.forName(“cubrid.jdbc.driver.CUBRIDDriver”);</span>
<span style="color: #000000;">          Connection conn = getConnection(url, null, null);</span>
<span style="color: #000000;">          conn.setAutoCommit(false);</span>
<span style="color: #000000;">          try (Statement stmt = conn.createStatement()) {</span>
<span style="color: #000000;">            // Create a new table and insert some data</span>
<span style="color: #000000;">            stmt.execute(“drop table if exists mytable”);</span>
<span style="color: #000000;">            stmt.execute(“create table mytable(mycolumn string)”);</span>
<span style="color: #000000;">            stmt.execute(“insert into mytable values(‘This is my first inserted string’)”);</span>
<span style="color: #000000;">            ResultSet rs = stmt.executeQuery(“select * from mytable”);</span>
<span style="color: #000000;">            // Retrieve and output the table data</span>
<span style="color: #000000;">            while (rs.next()) {</span>
<span style="color: #000000;">              System.out.println(rs.getString(“mycolumn”));</span>
<span style="color: #000000;">            }</span>
<span style="color: #000000;">          }</span>
<span style="color: #000000;">          conn.close();</span>
<span style="color: #000000;">        } catch (Exception e) {</span>
<span style="color: #000000;">          e.printStackTrace();</span>
<span style="color: #000000;">        }</span>
<span style="color: #000000;">      }</span>
<span style="color: #000000;">    }</span>
This program can be compiled and executed, with the following two commands:
<span style="color: #000000;">javac TestCUBRID.java</span>
<span style="color: #000000;">java TestCUBRID</span>
It can be easily inferred from the code that connecting and handling CUBRID is very similar to other databases. So, if you have programmed for other databases in Java, you don’t need to learn anything extraordinary in order to work with CUBRID.
An example in Python
To manipulate the CUBRID database with Python, you need CUBRIDdb, which is the Python extension package. The CUBRID Python driver can be installed in various ways. The easiest of them is to go with easy_install. The simple command for performing this task is shown below:
<span style="color: #000000;">easy_install CUBRID-Python</span>
A complete example with Python is shown below:
<span style="color: #000000;">import CUBRIDdb</span>
<span style="color: #000000;">conn = CUBRIDdb.connect(‘CUBRID:localhost:33000:demodb’, ‘public’, ‘’)</span>
<span style="color: #000000;">cur = conn.cursor()</span>

<span style="color: #000000;"># Plain insert statement</span>
<span style="color: #000000;">cur.execute(“INSERT INTO posts (id, title, body, last_updated) VALUES (1, ‘Title 1’, ‘Test body #1’, CURRENT_TIMESTAMP)”)</span>

<span style="color: #000000;"># Parameterized insert statement</span>
<span style="color: #000000;">args = (2, ‘Title 2’, ‘Test body #2’)</span>
<span style="color: #000000;">cur.execute(“INSERT INTO posts (id, title, body, last_updated) VALUES (?, ?, ?, CURRENT_TIMESTAMP)”, args)</span>

<span style="color: #000000;">conn.commit()</span>
The complete information about handling CUBRID with Python is available at https://www.python.org/dev/peps/pep-0249/.
GUI tools for CUBRID
There are various graphical user interface tools available for handling CUBRID in an easier manner. These are listed in Table 1.
CUBRID HA
What ‘HA’ refers to is ‘high availability’. This is a feature that enables uninterrupted service in scenarios when there is failure in either the hardware, software or the network. CUBRID HA includes more than one server system. These are used to provide uninterrupted services when an individual server fails. CUBRID HA synchronises databases among multiple servers. This feature can be enabled for mission-critical applications when there is a need for 24/7 availability of service. More information on CUBRID HA is available at https://www.cubrid.org/manual/en/10.1/ha.html.
If you want to contribute to CUBRID RDBMS, then check out the source from https://github.com/CUBRID. Based on your expertise, you can get involved in contributing to the development of drivers, tools, content management systems (CMS), etc. Even as just a user, you can report bugs by opening issues in JIRA or by simply sending an email to bug@cubrid.org.
CUBRID is an actively maintained relational database engine. Recent updates on it are available at https://www.cubrid.org/blog.


