


Let’s learn how to build a facial expression recognition app on the TensorFlow.js framework.
TensorFlow is a free and open source software library for data flow and differentiable programming across a range of tasks. It is a symbolic math library, also used for machine learning applications such as deep learning and neural networks. It is used by Google, both in research and in production. It was developed by the Google Brain team for internal use only. On November 9, 2015, it was released under the Apache Licence 2.0 for public use.
TensorFlow can run on multiple CPUs and GPUs (with optional CUDA and SYCL extensions for general purpose computing on GPUs). It is available on 64-bit Linux, MacOS, Windows and mobile computing platforms including Android and iOS. Its flexible architecture allows for the easy deployment of computation across a variety of platforms (CPUs, GPUs and TPUs), and from desktops to clusters of servers, as well as mobile and edge devices.
TensorFlow provides stable APIs for Python and C, without the API backward-compatibility guarantee for C++, Go, Java, JavaScript and Swift.
TensorFlow.js
TensorFlow.js is an open source hardware accelerated JavaScript library for training and deploying machine learning models.
Features
- Develops machine learning (ML) in the Web browser: Uses flexible and intuitive APIs in a Web browser to build models from scratch with the aid of the low-level JavaScript linear algebra library or the high-level layers API.
- Develops ML in Node.js: Using Node.js runtime, we can execute native TensorFlow with the same TensorFlow.js API
- Runs existing models: With TensorFlow.js model converters, we can run pre-existing TensorFlow models right in the browser
- Retrains existing models: Allows retraining of the pre-existing ML models using sensor data connected to the browser or other client-side data
With over 13,000 stars and almost 1,100 forks at the time of writing this article, it is also one of the most popular and actively maintained ML frameworks on GitHub.
Note: The TensorFlow.js framework is open source and the source code of the framework is available on GitHub. Developers/programmers are encouraged to participate and contribute to the project.
face-api.js
face-api.js is a JavaScript module that implements convolutional neural networking to solutions in the face detection and recognition space as well as for facial landmarks. face-api.js leverages TensorFlow.js and is optimised for the desktop and mobile Web. With over 9,400 stars and 1,700 forks, it is also one of the popular face detection and face recognition open source JavaScript APIs on GitHub.
There are several pre-trained models available with face-api.js, including face detection, facial landmark detection, face recognition, facial expression recognition, age estimation and gender recognition. We will use some of them in our app.
Installing the prerequisites
Before we start developing the app using TensorFlow.js or face-api.js, we need to install Node.js as the TensorFlow.js and the face-api.js framework, which we are going to use to detect a face and its expressions. It is also distributed as an npm package, and this makes it easy to set up the project’s structures to develop ML apps.
Note: It is assumed that you have some basic knowledge of Web technologies like HTML, CSS and JavaScript. If you don’t, W3Schools (http://www.w3schools.com/) is a good place to start. The site has some great tutorials for Web technologies, and they are easy to follow.
Installing Node.js
Download and install Node.js (https://nodejs.org/). TensorFlow.js and face-api.js are also distributed as npm packages, so we will use Node and npm to install the TensorFlow.js and face-api.js frameworks.
Creating the app folder
Create a folder for your project, and change the directory to it. Run the following commands at the prompt or in the terminal:
mkdir face-detect
cd face-detect
Initialise the folder using the following npm command:
npm init -y
This will create a package.json manifest file with important default information about the project, and will add the necessary node modules.
Installing face-api.js
We can install face-api.js as a node package in the project folder. Just run the following command in the terminal or at the command prompt:
npm install face-api.js --save-dev
Installing HTTP server
To run the project, we need to install an HTTP server. Run the following command in a terminal or at the command prompt:
npm install http-server --save-dev
Setting up the folder structure for the project
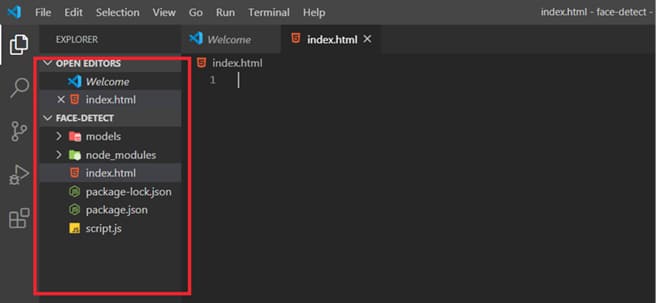
Create the following files and folders, some of which will have been automatically created by the commands run above.
- index.html – In this folder, we will create the UI of the app.
- script.js – In this folder, we will add the logic of the app.
- models – In this folder, we will add pre-trained models for face detection and face expression recognition. You should end up with the file/folder structure shown in Figure 1.
Testing if everything is installed properly
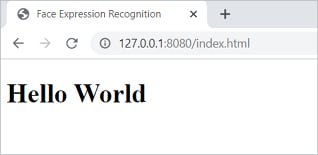
Now open the index.html file and add the following code to it:
<!doctype html>

<head>
<title>Face Expression Recognition</title>
<script type=”text/javascript” src=”node_modules/face-api.js/dist/face-api.min.js”></script>
</head>

<body>
<h1>Hello World</h1>
</body>

</html>
Finally, start the server by running the following command at the prompt:
http-server ./
This command will start the HTTP server. Now, load http://127.0.0.1:8080/index.html in your browser to run the project. If you see the output screen shown in Figure 2, then you have successfully installed all the dependencies required.
Creating the app
Now, let’s create a facial expression recognition app, which will detect the faces and expressions of the user. We are going to use pre-trained models to detect the face and recognise expressions. You can download these from http://www.aniket.co/labs/face/models.zip. We will use these models in the app. You need to extract these into the ‘Models’ folder inside your project directory.
Note: A webcam is needed for this project, as we are detecting the face live from video. So it is recommended that you try this project on a laptop with a webcam.
Now, open index.html and copy the following HTML code:
<!DOCTYPE html>
<html lang=”en”>

<head>
<meta charset=”UTF-8”>
<meta name=”viewport” content=”width=device-width, initial-scale=1.0”>
<meta http-equiv=”X-UA-Compatible” content=”ie=edge”>
<title>Face Expression Recognition</title>
<script defer src=”node_modules/face-api.js/dist/face-api.min.js”></script>
<script defer src=”script.js”></script>
<style>
body {
margin: 0;
padding: 0;
width: 100vw;
height: 100vh;
display: flex;
justify-content: centre
align-items: centre
}

canvas {
position: absolute;
}
</style>
</head>

<body>
<video id=”video” width=”720” height=”560” autoplay muted></video>
</body>
</html>
As you can see in the HTML code above, we have used the <script> tag to import face-api and script.js files. In the <style> tag we have added some styling to the elements; basically, we have centred the UI. And finally, we have used the <video> tag, which will display that a face has been detected and recognised via webcam.
Note: We have added auto-play and muted the attribute to the video tag (since we don’t need audio) with this webcam, which will start capturing videos as soon as the app is launched.
Now open script.js and add the following JavaScript code:
const video = document.getElementById(‘video’)

Promise.all([
faceapi.nets.tinyFaceDetector.loadFromUri(‘/models’),
faceapi.nets.faceLandmark68Net.loadFromUri(‘/models’),
faceapi.nets.faceRecognitionNet.loadFromUri(‘/models’),
faceapi.nets.faceExpressionNet.loadFromUri(‘/models’)
]).then(startVideo)

function startVideo() {
navigator.getUserMedia({ video: {} },
stream => video.srcObject = stream,
err => console.error(err)
)
}

video.addEventListener(‘play’, () => {
const canvas = faceapi.createCanvasFromMedia(video)
document.body.append(canvas)
const displaySize = { width: video.width, height: video.height }
faceapi.matchDimensions(canvas, displaySize)
setInterval(async() => {
const detections = await faceapi.detectAllFaces(video, new faceapi.TinyFaceDetectorOptions()).withFaceLandmarks().withFaceExpressions()
const resizedDetections = faceapi.resizeResults(detections, displaySize)
canvas.getContext(‘2d’).clearRect(0, 0, canvas.width, canvas.height)
faceapi.draw.drawDetections(canvas, resizedDetections)
faceapi.draw.drawFaceLandmarks(canvas, resizedDetections)
faceapi.draw.drawFaceExpressions(canvas, resizedDetections)
}, 100)
})
In the above code, we load the pre-trained models using face-api. We are using four models: tinyFaceDetector, faceLandmark68Net, faceRecognitionNet and faceExpressionNet. Once these models are loaded, we call the startVideo() function, which starts capturing video from the webcam. The navigator.getUserMedia API is used to capture a video stream which we then assign to video.srcObject. Then we add an event listener to the video tag, which is fired when the video gets played. Using face-api, we get the video, detect the face, facial landmark and expression. We draw a rectangle around the detected face and facial landmark to denote eyebrows, eyes, nose and lips, and display the facial expressions of the user with text, under the drawn rectangle, with a detection accuracy score.
Testing the app
Now that we have added the code, let us start the server and test the final outcome. Run the following command in the same directory:
http-server ./
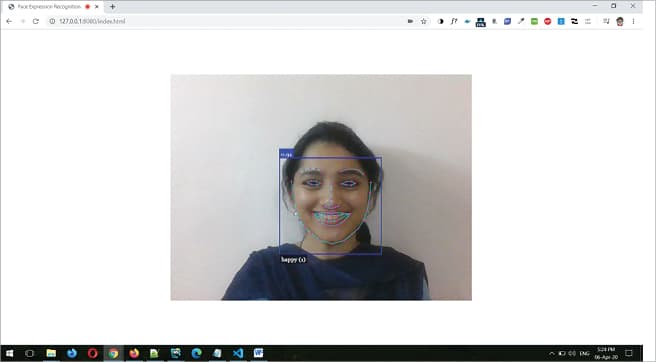
This command will start the HTTP server. Now, load http://127.0.0.1:8080/index.html in your browser to run the project. If you see the output screen as shown in Figure 3, then you have successfully created a facial expression recognition app. You can now try detecting different facial expressions like happy, sad or angry.
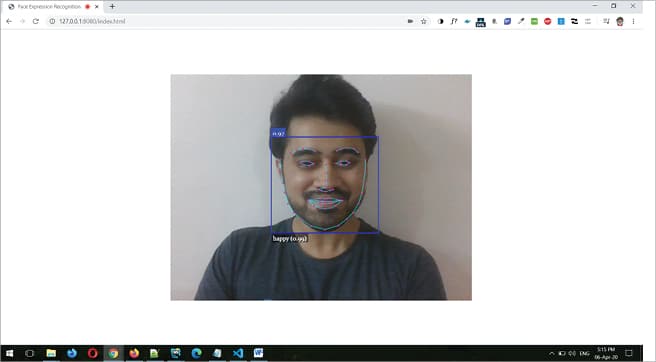
As you can see in Figure 4, my face shows a happy expression. It detected and recognised my face and the expression I made, and displayed it with a rectangle and text in the webcam video.
I have uploaded this sample project to my GitHub repository at https://github.com/aniketkudale/face-expression-recognition. You may download it for reference.


