


This two-part series is all about understanding what happens behind the scenes when we run a docker run <image> command. Let us uncover the magic of container technology by building a container from scratch.
Ever since Docker released its first version back in 2013, it triggered a major shift in the way the software industry works. Lightweight VMs suddenly caught the attention of the world and opened opportunities for unlimited possibilities. Containers provided a way to get a grip on software that was built. Docker containers could be used to wrap up an application in such a way that deployment and runtime issues like how to expose them on a network; how to manage their use of storage, memory and I/O; how to control access permissions, etc, were handled outside of the application itself, and in a way that was consistent across all containerised apps.
Containers offer many other benefits besides just handy encapsulation, isolation, portability and control. They are small in size (megabytes) and can start instantly. They have their own built-in mechanisms for versioning and component reuse. They can be easily shared via public or private repositories.
Today, containers are an essential component of the software development process. Many of us use them on a day-to-day basis. Despite this, there is still a lot of magic involved for many who want to venture into the world of containers in general. To date, there is a lot of ambiguity about how exactly a container works. The two articles in this series will try to demystify the working of containers. But before that, I believe we must understand how containers came to be.
The world before containers
For many years now, enterprise software has typically been deployed either on bare metal (i.e., installed on an operating system that has complete control over the underlying hardware) or in a virtual machine (i.e., installed on an operating system that shares the underlying hardware with other guest operating systems). Naturally, installing on bare metal made the software painfully difficult to move around and difficult to update — two constraints that made it hard for IT teams to respond nimbly to changes in business needs.
Then virtualisation came along. Virtualisation platforms (also known as hypervisors) allowed multiple virtual machines to share a single physical system — each virtual machine emulating the behaviour of an entire system, complete with its own operating system, storage and I/O, in an isolated fashion. IT infra could now respond more effectively to changes in business requirements, because VMs could be cloned, copied, migrated, and spun up or down to meet demand or conserve resources.
Virtual machines also helped cut costs, because more VMs could be consolidated onto fewer physical machines. Legacy systems running older applications could be turned into VMs and physically decommissioned to save even more money.
But virtual machines still have their share of problems. They are large in size (gigabytes), and each one contains a full operating system. Only some virtualised apps can be consolidated onto a single system. Provisioning a VM still takes a fair amount of time. Finally, the portability of VMs is limited. After a certain point, VMs are not able to deliver the kind of speed, agility and savings that fast-moving businesses are demanding these days.
Containers
Containers work a little like VMs, but in a far more specific and granular way. They isolate a single application and its dependencies — all of the external software libraries the app requires to run — both from the underlying operating system and from other containers. All of the containerised apps share a single, common operating system, but they are compartmentalised from one another and from the system at large.
Taking an example of Docker, if you run docker run -it ubuntu bash in your terminal, you can see that like your host OS, your container too, has its own hostname and its own set of processes.
What this means is that your Ubuntu container is running in an isolated environment. PID 1 confirms this fact. Similarly, we can provide a mounted storage to our container, or allocate a particular number of processes or a certain amount of RAM to run with. But what exactly is all this? What exactly is process isolation? What is a containerised environment? What do metered resources mean?
We will try to make sense of all this jargon. We will try to replicate the behaviour of docker run <image> as close as possible. To make it all happen, we will be using Go as a language. There is no specific reason behind the selection of Go, though. You can choose any language like Rust, Python, Node, etc, too. The only requirement is that the language should support syscalls and namespaces. I picked Go because I have a personal preference for it. The fact that Docker is built on Go also helps my case.
Building a container from scratch
As mentioned earlier, we will try to replicate something as close to Docker as possible. Just like docker run <image> cmd args, we will go for go run main.go cmd args. To start with, we will proceed with the basic snippet that most Go plugins of all the major editors have to offer.
package main

func main() {

}
Now we will add support for the execution of basic commands like echo and cat:
func must(err error) {
// If error exists, panic and exit
if err != nil {
panic(err)
}
}

func run() {
fmt.Printf(“Running %v\n”, os.Args[2:])

// Execute the commands that follow ‘go run main.go run’
cmd := exec.Command(os.Args[2], os.Args[3:]...)
cmd.Stdin = os.Stdin
cmd.Stdout = os.Stdout
cmd.Stderr = os.Stderr

must(cmd.Run())
}

func main() {
// Make sure that the first argument after ‘go run main.go’ is ‘run’
switch os.Args[1] {
case “run”:
run()
default:
panic(“I’m sorry, what?”)
}
}
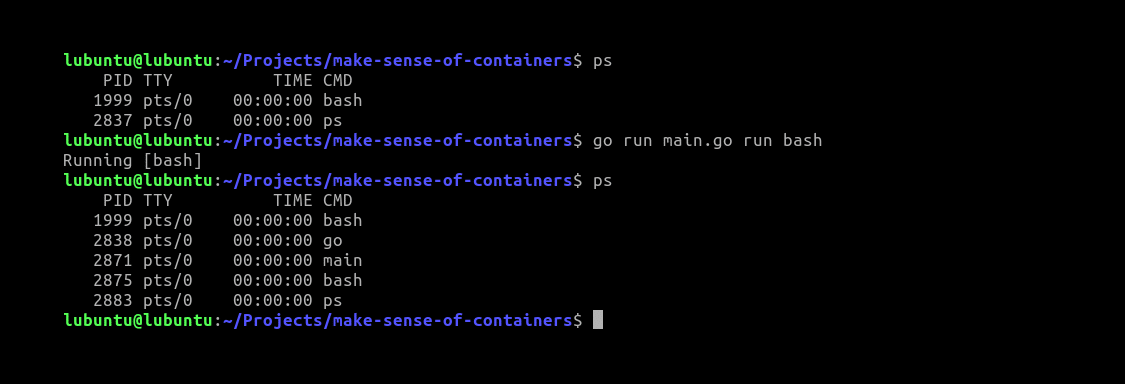
Figure 1 shows what that boils down to.

Now that we can run simple commands with our script, as can be confirmed in Figure 1, we will now try running a bash shell. Since it can get confusing as we are already in a shell, we will try to run ps before and after running our script.
Based on Figure 2, it is still difficult to say anything. To confirm if we have isolation like an actual container, let us simply change the hostname from within our bash shell launched using our script. To modify or make any change in the hostname, we need to be a root:
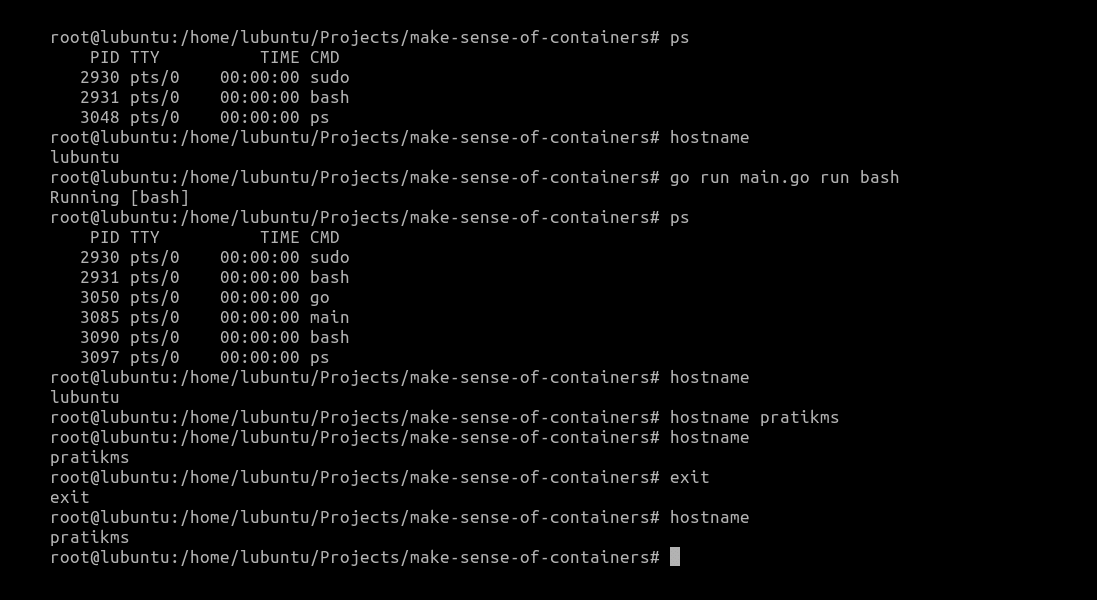
The results in Figure 3 mean that we do not have isolation yet. To address this, we need the help of namespaces.
Namespaces
Namespaces provide the isolation needed to run multiple containers on one machine while giving each what appears like its own environment. There are six namespaces, and each can be independently requested.
PID: The PID namespace gives a process and its children their own view of a subset of the processes in the system. This is analogous to a mapping table. When a process of a PID namespace asks the kernel for a list of processes, the kernel looks at the mapping table. If the process exists in the table, the mapped ID is used instead of the real ID. If it doesn’t exist in the mapping table, the kernel pretends it doesn’t exist at all. The PID namespace makes the first process created within it PID 1 (by mapping whatever its host ID is to 1), giving the appearance of an isolated process tree in the container. This is a really interesting concept.
MNT: In a way, this one is the most important. The mount namespace gives the processes contained within it their own mount table. This means they can mount and unmount directories without affecting other namespaces including the host namespace. More importantly, in combination with the pivot_root syscall, it allows a process to have its own file system. This is how we can have a process think it’s running on Ubuntu, CentOS, Alpine, etc — by swapping out the file system that the container sees.
NET: The network namespace gives the processes that use it their own network stack. In general, only the main network namespace (the one that the processes start when you start your computer use) will have any real physical network cards attached. But we can create virtual Ethernet pairs — linked Ethernet cards where one end can be placed in one network namespace and one in another, creating a virtual link between the network namespaces. This is like having multiple IP stacks talking to each other on one host. With a bit of routing magic, this allows each container to talk to the real world while isolating each to its own network stack.
UTS: The UTS namespace gives its processes their own view of the system’s hostname and domain name. After entering a UTS namespace, setting the hostname or the domain name will not affect other processes.
IPS: The IPC namespace isolates various inter-process communication mechanisms such as message queues. This particular namespace deserves a blog post of its own. There’s so much to IPC than what I can comprehend myself. This is why I will encourage you to check out the namespace docs (https://www.man7.org/linux/man-pages/man7/namespaces.7.html) for more details.
USER: The user namespace was the most recently added and is likely the most powerful from a security perspective. This namespace maps the UIDs to different sets of UIDs (and GIDs) on the host, which is extremely useful. Using a user namespace we can map the container’s root user ID (i.e., 0) to an arbitrary and unprivileged UID on the host. This means we can let a container think it has root access without actually giving it any privileges in the root namespace. The container is free to run processes as uid 0 — which normally would be synonymous with having root permissions, but the kernel is actually mapping that UID under the covers to an unprivileged real UID belonging to the host OS.
Most container technologies place a user’s process into all of the above namespaces and initialise them to provide a standard environment. This amounts to, for example, creating an initial Internet card in the isolated network namespace of the container, with connectivity to a real network on the host. In our case, for satisfying our immediate requirement, we will add the UTS namespace to our script so that we can modify the hostname.
func run() {
// Stuff that we previously went over

cmd.SysProcAttr = &syscall.SysProcAttr{
Cloneflags: syscall.CLONE_NEWUTS,
}

must(cmd.Run())
}
Running it returns what is shown in Figure 4.
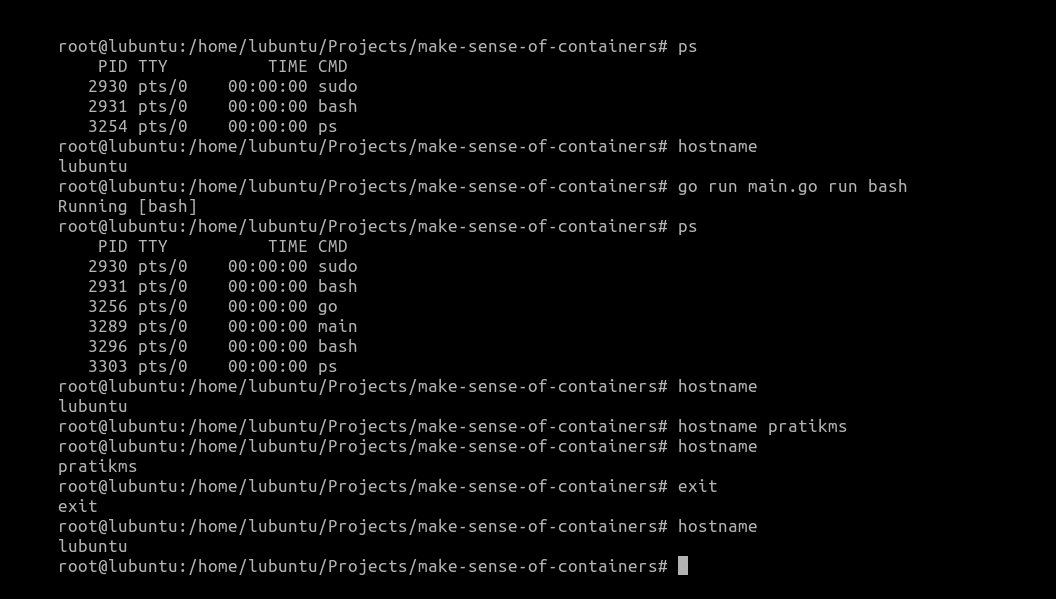
Awesome! As per Figure 4, we now can modify the hostname in our container-like environment without letting the host environment change.
But if we observe closely, our process IDs within the container are still the same. We’re able to see the processes running in our host OS even from within our container.
To fix this, we need to use the PID namespace. As discussed above, the PID namespace will allow us process isolation.
func run() {
// Stuff that we previously went over

cmd.SysProcAttr = &syscall.SysProcAttr{
Cloneflags: syscall.CLONE_NEWUTS | syscall.CLONE_NEWPID,
}

must(cmd.Run())
}
However, unlike the case of UTS namespace, simply adding the PID namespace here like this won’t help. We will have to create another copy of our process so that it can be run with PID 1:
func run() {
cmd := exec.Command(“/proc/self/exe”, append([]string{“child”}, os.Args[2:]...)...)
cmd.Stdin = os.Stdin
cmd.Stdout = os.Stdout
cmd.Stderr = os.Stderr

cmd.SysProcAttr = &syscall.SysProcAttr{
Cloneflags: syscall.CLONE_NEWUTS | syscall.CLONE_NEWPID,
}

must(cmd.Run())
}

func child() {
fmt.Printf(“Running %v as PID %d\n”, os.Args[2:], os.Getpid())

cmd := exec.Command(os.Args[2], os.Args[3:]...)
cmd.Stdin = os.Stdin
cmd.Stdout = os.Stdout
cmd.Stderr = os.Stderr

must(cmd.Run())
}

func main() {
switch os.Args[1] {
case “run”:
run()
case “child”:
child()
default:
panic(“I’m sorry, what?”)
}
}
What we are doing is that whenever we run go run main.go run bash, our main() function will be called. As the value of os.Args[1] will be ‘run’ at this instance, it will call our run() function. Within run(), we are using /proc/self/exe to create a copy of our current process. We are essentially creating a copy and calling it again by appending the string ‘child’ to it, followed by the rest of the arguments that we received in run(). When we do this, our main() function will be invoked again, with the difference being that the value of os.Args[1] will be ‘child’ this time. From there on, the rest of the script executes as we saw before.
But, even after all this, do we really have process isolation? Do we have resource limiting? Answers to that and more will be covered in the next part of this series. Watch out for this space!


