


These new FFmpeg tricks fill up some gaps in an article carried on this subject in OSFY in 2016.
This is a follow-up to the article ‘Cool FFmpeg Tricks’ (https://www.opensourceforu.com/ 2016/05/cool-ffmpeg-tricks/) I wrote for the readers of OSFY in 2016. Early this year, I found that the number of FFmpeg-related options in my Nautilus context menu had increased so much that there was enough material to write another FFmpeg article.
Then, I thought, why not combine the two and write a book on FFmpeg? I then started on a self-publishing spree that lasted until I had six books to my name. (My book publishing process is entirely powered by FOSS — Eclipse, MarkDown/ CommonMark, KHTMLToPDF, GIMP, Inkscape, Itext, ImageMagick and Calibre. I did not spend a paisa on anything other than Internet and electricity.) You can find my books at https://www.amazon.com/author/vsubhash.
FFmpeg installation
FFmpeg now includes three programs — ffmpeg, ffprobe and ffplay. In 2018, ffserver was removed.
- Build from source: It is best if you compile the source code and build the FFmpeg programs on your OS. FFmpeg.org provides guides for several operating systems (https://trac.ffmpeg.org/wiki/CompilationGuide/Ubuntu).
- Download binaries: Compiled binaries (executable files of the three programs) are available from https://ffmpeg.zeranoe.com/builds/.
- Statically built binaries: I am still on Ubuntu 10.10, and I am unable to compile the FFmpeg source code on it. However, I was able to write the book using the latest build thanks to statically built binaries from the site https://johnvansickle.com/ffmpeg/.[The grubs in my Ubuntu 10.10 and Ubuntu 20 are unable to boot each other. Anyone who knows the fix can email info@vsubhash.com.]
Concatenate videos
When I wrote my original article, I was an FFmpeg newbie. Cutting and pasting together videos is not as troublefree as the article may have suggested. All input videos have to have the same codec, dimensions and frame rate. Although FFmpeg may try its best, the conversion can fail or the final video may not be playable.
echo “file ‘tank-cut-recoded.mp4’” > file-list.txt
echo “file ‘tank.mp4’” >> file-list.txt
ffmpeg -f concat -i file-list.txt -c copy tank-mix.mp4
When you try to individually convert the input videos down to a common codec, dimensions and frame rate, and then convert them all into a single file, the lossy algorithm does damage twice. To limit the loss, it is best if you use the raw uncompressed video of each input video. This is rarely the case.
Convert to MP4
While I have no problems with using Ogg video on my Linux systems, my electronic devices do not support it. (This is ironic because they run on Linux.) As I am unable to stream videos because of poor Internet connectivity, I have to convert all non-MP4 videos. The conversion I had suggested in the original article was based on constant bit rate. A better goal is constant quality. FFmpeg’s native x264 codec has several presets, ranging from ‘veryslow’ to ‘ultrafast’. You also need to use the constant rate factor option ‘crf’, whose value ranges from 0 (lossless) to 63 (worst).
ffmpeg -i elastigirl.mp4 \
       -c:v libx264 -crf 31 -preset slow \
       -c:a copy \
       incredible.mp4
Although FFmpeg continues to support several other x264 codecs, the native encoder (libx264) is now the preferred option. An advantage with constant quality is that multiple passes are not required (used to achieve the correct bit rate).

Cut a video
When a raw uncompressed video is converted using a video codec, the compression algorithm creates keyframes to eliminate redundant data. When you cut a video at a particular timestamp, the frames near that location may not have all the information because they are not keyframes. (In other words, clean cuts are not possible with highly compressed videos.) Some frames will have to be eliminated and ‘video jumps’ become noticeable. The audio and video may also go out of sync.
To limit these problems, whenever you cut a video, fix the timestamps of the frames before further processing.
ffmpeg -y -i barbara.mp4 \
-filter_complex \
“[0:v:0]trim=start=0:end=16, setpts=PTS-STARTPTS[lv];
[0:v:0]trim=start=36:end=44, setpts=PTS-STARTPTS[rv];
[0:a:0]atrim=start=0:end=16, asetpts=N/SAMPLE_RATE/TB[la];
[0:a:0]atrim=start=36:end=44, asetpts=N/SAMPLE_RATE/TB[ra];
[lv][rv]concat=n=2:v=1:a=0[v];
[la][ra]concat=n=2:v=0:a=1[a]” \
-map ‘[v]’ -map ‘[a]’ barb-cut.mp4
In this example, the audio and video from seconds 16 to 44 are removed, and the timestamps of the remaining segments are counted again before being provided to the concat filters.
Rotate a video
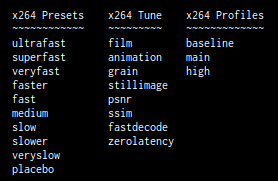
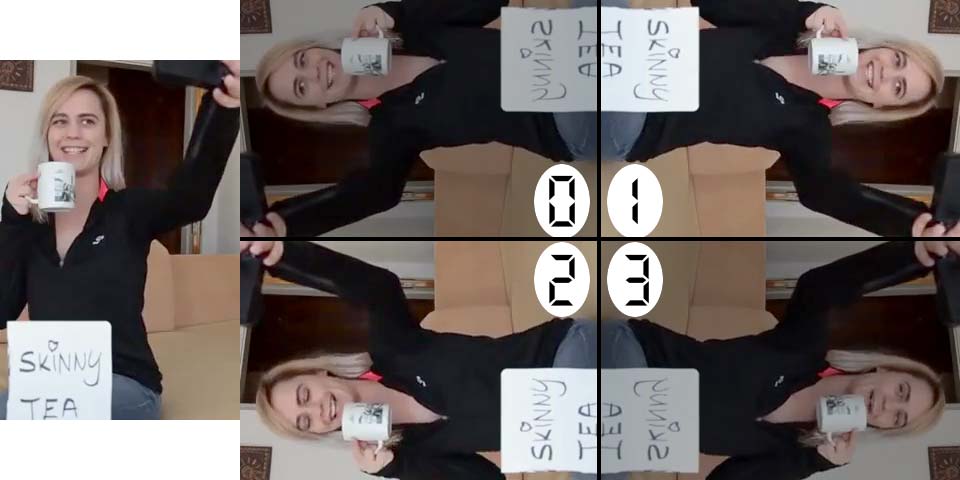
In the original article, you learned that a video can be rotated in spans of 90°. Values 0 and 3 flip the video in addition to the rotation.
ffmpeg -i barb.mp4 \
-filter:video “transpose=1” \
barb-rotated.mp4
Figure 3 shows the transpose filter; filter values 1 and 2 rotate the video right and left. The values 0 and 3 cause rotation but also flip the video.
More discrete levels of rotation are possible with the rotate filter.
ffmpeg -y -i barbara.mp4 \
-vf rotate=angle=-20*PI/180:fillcolor=brown
barb20.mp4
If you want to simply flip the video, use vflip and hflip filters.

ffmpeg -i lucas.mp4 \
-filter:v “vflip” \
lucas-upside-down.mp4
ffmpeg -i lucas.mp4 \
-filter:v “hflip” \
lucas-half-crazy.mp4
ffmpeg -i lucas.mp4 \
-filter:v “hflip,vflip” \
lucas-totally-flipped.mp4
Normalise audio
You can increase or decrease the volume level in an audio or video file using the volume filter. You set the filter value to a multiple of the input volume or specify the maximum loudness level in decibels.
ffmpeg -i low.mp3 -af ‘volume=3’ high.mp3
Adjusting the volume in this manner may not work all the time. Sometimes, the audio is so low that even doubling it does not make a difference. The correct solution involves two steps. First, use the volumedetect filter to determine the loudness of audio samples in the file. Then, apply the volume filter based on what you learnt in the first step.
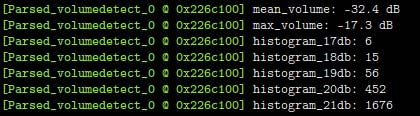
ffmpeg -i low.mp3 -af “volumedetect” -f null -
In Figure 6, the volumedetect filter shows that maximum loudness of all samples is at 17dB. The histogram shows the number of samples that would get clipped if the volume was taken any higher than 17. For example, increasing the volume to 18dB would clip the waveform in six samples.
After studying this, it is clear that the loudness needs to be raised to a maximum of 17dB.
ffmpeg -i low.mp3 \
-af ‘volume=17dB’ -f ogg \
normalized.ogg
Normalisation preserves the original waveform while increasing only the loudness.
Slipstream audio to a video
Sometimes, I encounter a video where the audio has some problems. I usually extract the audio stream to an MP3 file so that I can examine it in Audacity. After I fix the problem, I export the corrected audio to another MP3 file. Then, I remove the original audio from the video and add this corrected MP3 stream as its audio. I use maps to accomplish this.
#Extract the audio
ffmpeg -i original-video.mp4 \
-map 0:1 \
problem-audio.mp3

# Fix the problem in problem-audio.mp3 using Audacity and create
# corrected-audio.mp3

#Replace existing audio with fixed audio from mp3
ffmpeg -i original-video.mp4 -i corrected-audio.mp3 \
-map 0:0 -map 1:0 \
-codec copy \
video-with-corrected-audio.mp4
In the first command, -map 0:1 refers to the first input file’s or the video’s second stream, which happens to be the audio stream. (The -map option may be redundant but it helps in debugging more complex commands.) In the second ffmpeg command, -map 0:0 refers to the first input file’s or the video file’s first stream, which is the video stream. The map in -map 1:0 refers to the second input file’s or the audio file’s first stream, which is the corrected audio stream.
Slipstream subtitles to video
Subtitles were very useful to me when I had to create a book-read video for my first book. The audio had issues and I decided to create subtitles and burn them into the video. (I used the GNOME subtitles program to transcribe the video and save to a subtitle file. It has simple keyboard shortcuts for controlling the playback [play/pause/rewind/fast forward] of the video while typing the subtitles. No need to use the mouse.)
I did not like the tiny font used by YouTube so I burned my subtitles into the video. Such subtitles become part of the video and cannot be turned off.
ffmpeg -y -i book-read.mp4 \
-filter_complex “subtitles=transcript.ass” \
-c:a copy \
read-subtitled.mp4
While burning subtitles into the video is a failsafe alternative, your first option should be to add a subtitle stream (analogous to a video stream or an audio stream) in the multimedia file container. (MP4, MOV, MKV and other formats are just file containers. The actual codecs can be anything in the wild.) For Matroska videos, you can even add a custom subtitle display font file as a stream.
ffmpeg -i sarah.mp4 -i subtitle.ass \
-map 0:v -map 0:a -map 1:s \
-c:v copy -c:a copy -c:s ass \
-metadata:s:s:0 language=eng \
-attach Florentia.ttf \
-metadata:s:3 mimetype=application/x-truetype-font \
sarah-subtitled.mkv
In this command, the -map 1:s ensures that the subtitles will be from the second file (the SubStation Alpha file). Even if the MP4 file had a subtitle stream, it will not be included in the MKV file.
SRT is the most popular subtitle format. SubStation Alpha (SSA) is the most feature-rich subtitle format because it supports a custom font, text colour, outline colour, shadow colour, background box and even rotation. All of this SSA awesomeness is supported only by the Matroska format.
The specification of the endearing but difficult SSA format is available on the https://www.matroska.org website (Technical Info » Subtitles » SSA). However, I will risk a description here for the style statement.
Style: Name, Fontname, Fontsize, PrimaryColour, SecondaryColour, OutlineColour, BackColour, Bold, Italic, Underline, StrikeOut, ScaleX, ScaleY, Spacing, Angle, BorderStyle, Outline, Shadow, Alignment, MarginL, MarginR, MarginV, Encoding
Name refers to a subtitle display style. You can define and use many different styles, not just the default. The colours are in hexadecimal AABBGGRR format! PrimaryColour is the colour of the subtitle text. OutlineColour is for the outline of the text. BackColour is the colour of the shadow behind the text. SecondaryColour and OutlineColour are automatically used when timestamps collide. Bold, Italic, et al, are -1 for true and 0 for false. (Yeah, I know.) ScaleX and ScaleY specify magnification (1-100). Spacing is additional pixel space between letters.
Angle is about rotation (0-360) and controlled by Alignment. BorderStyle uses 1 (outline and drop-shadow) and 3 (outline box). If BorderStyle is 1, then Outline represents pixel space width (0-4) of its outline. In the same case, Shadow represents pixel space (0-4) below the text and shadow. Alignment takes 1 (left), 2 (centre) and 3 (right). If you add 4 to them, the subtitle appears at the top of the screen. If you add 8, it goes to the middle. Then, we have Margin from the left, right and bottom edges of the screen. Encoding is 0 for ANSI Latin and 1 for Unicode (I think).
I have a Caja Actions Configuration script that changes the style statement in a SSA file to:
Style: Default,Florentia,30,&H2200CCCC,&H000000FF,&H2200 00EE,&HAA00CCCC,-1,-1,0,0,100,100,0, 30.00,3,2,3,1,20,20,40,1.


