


This article explores MLOps pipelines that can be used in machine learning systems for model deployment. It also investigates why MLOps is necessary in today’s machine learning system development, which demands faster model deployments, and how it helps to accomplish that.
Deeplearning.ai reports that only 22 per cent of the companies using machine learning for solving their problems are actually able to deploy the model. In traditional software engineering projects, only the code keeps changing with new requirements and the addition of functionalities. On the other hand, in machine learning (ML) projects, data also keeps changing along with the code. Distribution of data also changes with this. For example, let’s say we are building a machine learning model for predicting the total daily sales of an e-commerce platform. The distribution of data as well as predictions for non-sale days will be very different from that of sale days. Thus, our model needs to be re-trained for the new data so that it can predict total sales on non-sale days as well. Thus, we see that as data and code change, the model too needs to be changed.
There are many other challenges that come with frequently changing data and models. These are as follows:
- We need to continuously monitor model performance and automate retraining of models when there is deterioration in performance.
- We need to develop processes to version models as well as data, and keep records of how each version of the model performed with each version of data.
- We need a mechanism to quickly deploy new models, and to integrate the model changes with the code of the applications using it.
MLOps helps us solve these problems with ease. MLOps translates to ML + DevOps. DevOps is a set of software engineering practices that allows us to deploy newer versions of software with agility. We need to deploy ML models with agility. That’s where MLOps comes into the picture. It is a field that applies DevOps principles to ML systems.
In this article, we try to develop a model that analyses taxi rides in the US city of Chicago, and then makes predictions whether a passenger will offer a tip to the driver or not. The model is then deployed using a MLOps pipeline. We use TFX and Apache Airflow for running the pipeline.
The system used for building the MLOps pipeline in this article is a Ubuntu 20.04.1 machine with Intel Core i5 processor and 4 GB RAM.
Installing TFX and Apache Airflow
Apache Airflow: Apache Airflow is an open source platform for managing workflows, developed by Airbnb. It allows us to create, schedule and monitor workflows for cron jobs, data fetching jobs, data processing tasks, and so on. Airflow can be used either with CLI or a Web based interface. The latter allows us to see the live status of workflows, in a fashion similar to Jenkins. Figure 1 shows the main dashboard of Apache Airflow.
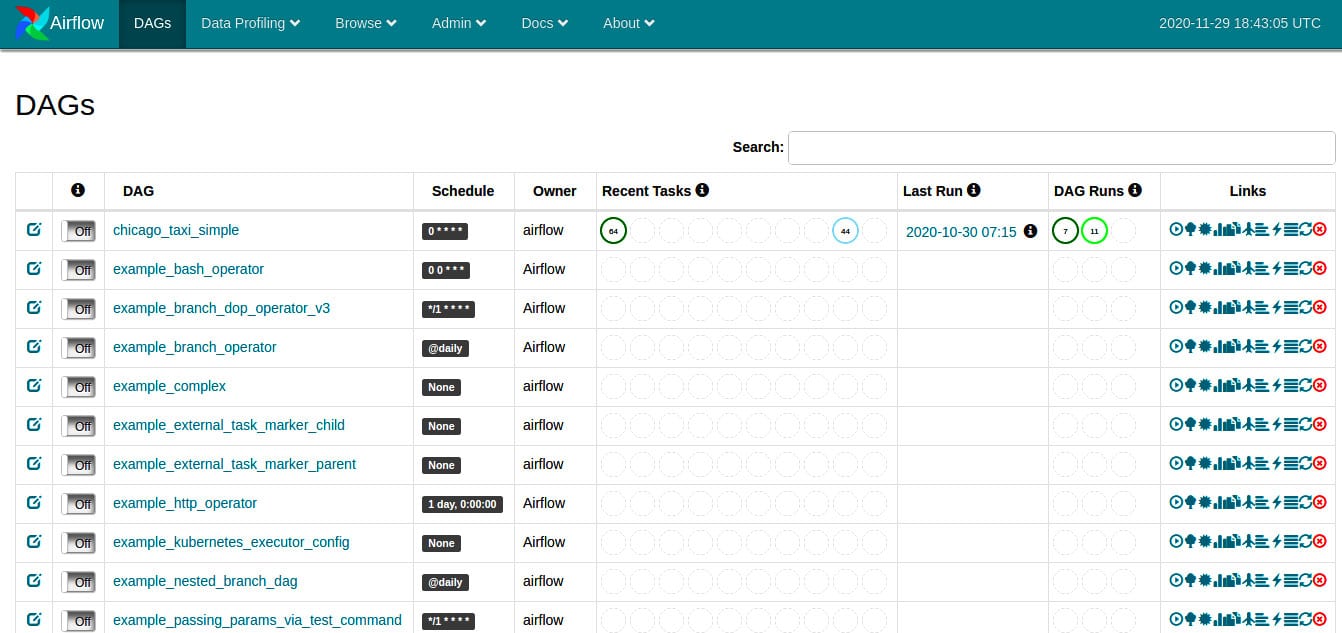
Airflow workflows are written in the form of Directed Acyclic Graphs (DAGs) of tasks. In each DAG, a node represents a specific operation, which is performed using an operator. Other DevOps tools such as Jenkins can also integrate with Airflow using these operators. Thus, in a DAG, the first task could be running a Python script and the next one could be running a Bash script.
TensorFlow Extended: TensorFlow Extended (TFX) is an open source framework written in Python that allows us to build complete ML pipelines. A typical pipeline consists of the following stages.
- Data collection: Raw data is collected from its original source in this stage.
- Data analysis: Exploratory data analysis on the data received is done in this stage. Various aspects of the data such as data types, schema, distribution, etc, are studied.
- Data validation: This stage validates whether the data follows the distribution of previous data and matches the expected data schema.
- Data transformation: Here, we apply transformations for feature engineering to the data.
- Model training: The transformed data is fed to the appropriate ML algorithm so that it can learn the distribution of the data.
- Model evaluation and validation: In this stage, we first evaluate and then validate the performance of the model to check whether it matches the expected benchmarks. We cannot push the model and serve it if it does not do so.
- Pusher: The last step is to push the model to production so that other applications can use it to make predictions.
TFX allows us to define end-to-end ML pipelines that cover all the above steps. This helps, as it allows ML engineers to focus on actual model development rather than the other steps in the pipeline. It greatly automates the process of model deployment and hence allows us to perform continuous integration, continuous deployment and continuous training of newer models with ease. The TFX libraries that help us in achieving this are listed below:
- TensorFlow Data Validation
- TensorFlow Transform
- TensorFlow Model Analysis
- TensorFlow Serving
- Machine Learning Metadata
To install Apache Airflow and TFX, use the following commands:
$export AIRFLOW_HOME=~/airflow
$export TFX_DIR=~/tfx
$pip install apache-airflow==1.10.12 --no-cache-dir
$pip uninstall cattrs==1.1.1
$pip install cattrs==1.0.0 --no-cache-dir
$pip install tfx==0.24.1 --no-cache-dir
Code walkthrough
In this article we use one of the TFX pipeline examples given in the TFX library itself. The dataset consists of taxi rides taken in Chicago city in the US. The model built is used to predict whether a passenger will offer a tip to the taxi driver.
The TFX pipeline first takes the data in the form of CSV files and then converts it into the TensorFlow format. Next, various statistics such as the frequency distribution of categorical features and arithmetic means of numerical features are calculated. If no schema is given as input, then the schema of the data is also inferred. Otherwise, the data is validated against the schema given as input. It is then transformed to perform feature engineering, and given to the trainer which trains a ML model on the data. The model is then evaluated and if it passes the benchmarks set by us, it is given to the pusher. The pusher saves the model to a predefined folder. To see the pipeline as a DAG in Airflow, click on the workflow and then on Graph View on the Airflow dashboard. Figure 2 shows the model pipeline visualised in Apache Airflow.
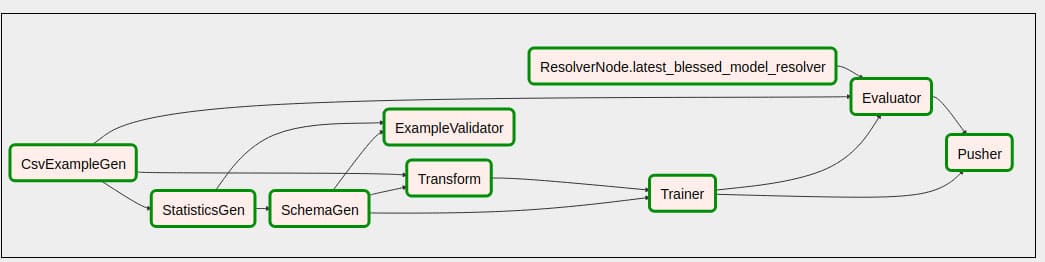
There are also other viewing options in Airflow such as Tree View. The advantage of the workflow being a graph is that nodes (operations) that do not depend on each other can be scheduled and executed in parallel.
Once we have saved the model, it’s time to serve it using the TensorFlow Serving API so that it can be used by other applications. We use shell script for automating this process. The script runs the model in a Docker container. It first pulls the tensorflow-serving-api image and then adds the model to the container. Thus, the container behaves as a model server, and we can send gRPC requests to get predictions from the model using a client script. Code snippets of the server and client scripts are shown in Figures 3 and 4, respectively.
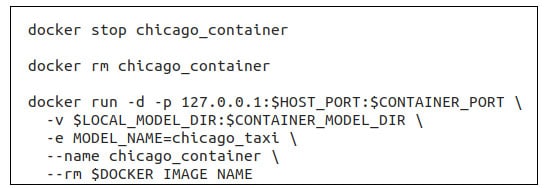
The server script shown in Figure 3 first stops and removes any currently running model containers. It then creates a new container from the tensorflow-serving-api image, and maps ports so that the model can receive gRPC requests. Once the container is up, it is ready to receive inference requests from applications that need to use it for making predictions.
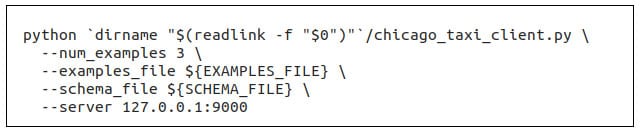
The client script shown in Figure 4 takes three examples from a file containing these in CSV format, and sends them to the server container. It receives a list of class predictions in JSON format, as shown in Figure 7.
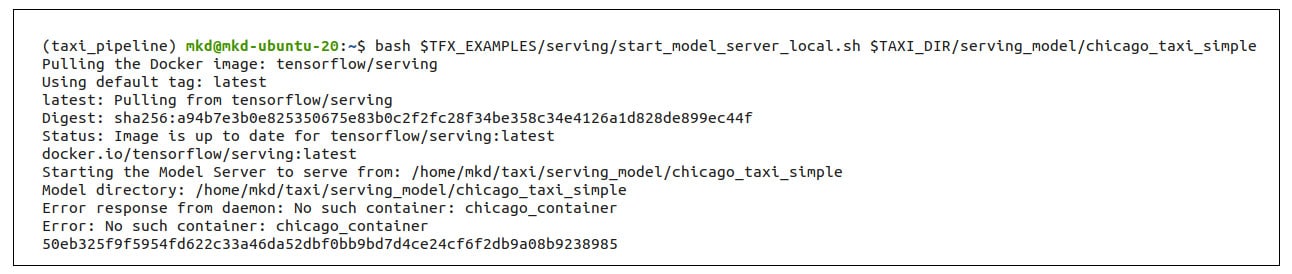
Model deployment to the server can be done manually as well as by using Jenkins. We have explored both options in this article. To run the script manually, enter the following command in a terminal:
$bash <path to start_model_server_local.sh> <path_to_model_directory>
The output is shown in Figure 5.
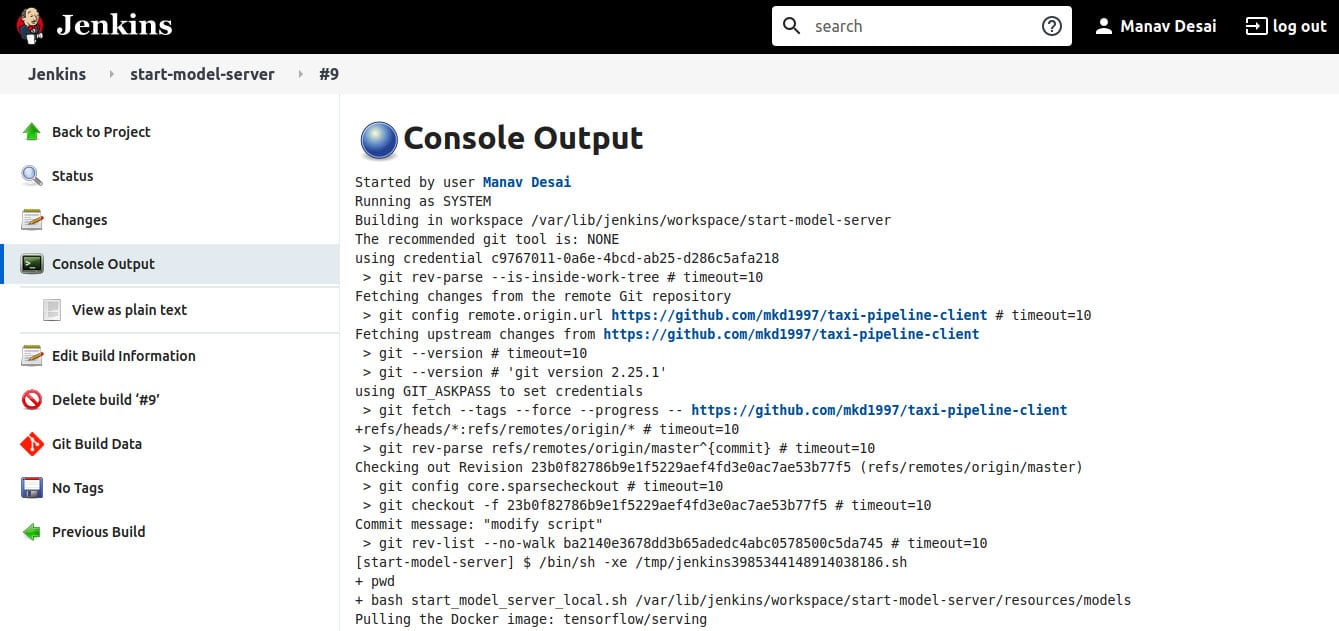
The model deployment using the bash script can also be done using Jenkins. To do so, first initialise a Git repository in the folder containing the server script, and then push the repository to GitHub. Also add the model and schema files to the repository. Then, start the Jenkins service and open the Jenkins dashboard in a browser. Create a new Freestyle project and enter the configuration fields as follows:
- Source code management: Git
- Repositories: URL to your GitHub repository
Then add a build step to execute shell and in the command section, enter the following command:
$bash start_model_server_local.sh <path_to_model_directory>
The console output of the Jenkins job is shown in Figure 6.
Now, to run inference on the deployed model and to run the client script, give the following command:
$bash <path to classify_local.sh> <path to data file> <path to schema file>
The output of running the inference on three examples is shown in Figure 7.
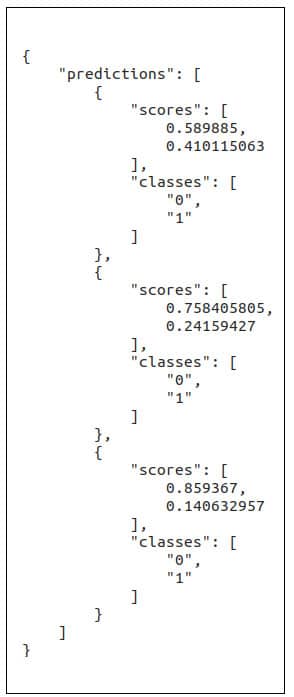
Since the problem that this project deals with comprises binary classification – predicting whether the passenger will tip the driver or not, given the details about the taxi ride, we get class probabilities as output for each example sent as a request. The result sent is in the form of a JSON object, which in turn consists of a list of JSON objects. Each individual JSON object has two parameters – list of output classes and also a list of individual class probabilities. The final output of the sample is the class with more class probability. Class ‘0’ refers to the class of passengers who don’t tip the driver and class ‘1’ refers to the class of passengers who tip the driver. As can be seen from Figure 7, it is evident that according to the model, all three passengers won’t offer a tip to the driver.
Results and discussion
In this article, we built an end-to-end pipeline to automate the workflow of deploying a machine learning model. The main advantage of the approach described in this project is that the entire pipeline can be described as a Python script. The output is a model running in a container that works as a server. It can hence be used by any other software application for making predictions by simply sending gRPC or JSON requests.
We have seen how ML models can be taken from the prototyping stage to deployment and then used in production. The field of MLOps is still young and there is a lot of research still going on.
This experimental work only explores a part of the automation of ML model deployment. There are many other things that can be automated using DevOps. The pipeline can be made to retrain models as soon as new data is available or there is a drop in performance of the existing model. Also, many other orchestrators (such as KubeFlow) can be used in place of Apache Airflow. The article can also be taken forward to include versioning of the data and model, as this is very important in the field of machine learning.
| Note: The source code files used in this project are available at https://github.com/mkd1997/taxi-pipeline-client. |


