


Spring is one of the most popular frameworks for Java based systems, and with good reason. The Spring environment is vast, and thousands of man-hours have gone into making it a success. Spring allows developers to create modern enterprise-grade apps without having to worry about underlying systems, allowing them to focus on the application’s business logic. It can be leveraged to build very powerful applications without writing too much boilerplate.
Spring has strong opinions about how components should function. As part of the Spring Core module, it provides an application context as well as a bean factory for creating Spring-managed objects known as ‘Spring Beans’.
To allow inversion of control, a dependency injection container offered by Spring is used to handle dependencies. The process of injecting objects into Spring modules is known as ‘Autowiring’, and it is accomplished by tagging dependencies with the ‘@Autowired’ annotation. Annotations are used a lot in Spring to offer settings. Spring Boot services, for example, can be annotated with ‘@Service’, while data access repositories can be annotated with ‘@Repository’.
Spring Boot allows you to quickly create Spring based applications with little configuration and boilerplate code. It uses the ‘just works’ technique, which allows a Spring Boot application to be initialised and deployed in under a minute with only a few clicks.
This has allowed enterprises to build a large number of little apps known as microservices on top of Spring Boot in order to segregate concerns and perform them effectively, while connecting them together brings the complete application to the user.
Initialising a Spring Boot project
It’s very easy to get started with a Spring Boot application. For developers, there is a Web application called Spring Initializr that builds a bare bones Spring Boot application, which is preconfigured in its opinionated design architecture. It can be found at https://start.spring.io/ and has modern IDE connectors such as Intellij IDEA.
Spring Initializr lets you select the Java project type (Maven or Gradle), language (Java, Kotlin, or Groovy) and project details. After that, the project’s dependencies can be chosen.
A new Spring Boot project is created when you complete the steps. The project structure for Spring Boot projects is explained below.
Details of layers
Spring divides a project into layers for all developers to follow, allowing for a convention-over-configuration approach. This allows for a clear understanding of each component and the separation of concerns by isolating their functionality. Spring does this by managing the objects that will be utilised in a Spring application and allowing them to communicate with one another in a seamless and methodical manner. Spring Beans and dependency injection are used to accomplish this.
A Spring Bean is an object which, along with other beans, forms the application’s backbone. It is created automatically using configuration metadata in the Spring context, and for its lifetime, it is contained in the Spring IoC container. Spring managed beans include controllers, services, repositories and components, which can be injected as dependencies for other Spring beans with the @Autowired annotation, either on field variables or on top of constructors. This enables inversion of control and separation of concerns.
Field injections are not generally recommended for use but preferably injected as dependencies in the constructors. This makes it easier to write unit tests without loading the Spring application context. Let’s understand the layers used in a typical Spring Boot application in depth.

Controllers: As Spring Boot projects are generally Web projects, either working as backends for REST services or server-side rendered UI, the points of contact between the client (browsers/REST consumers) are the controllers. Controllers expose endpoints for API consumers to use. Spring provides automatic serialisation and deserialisation of request and response objects from JSON to POJOs, which can be essentially treated as Data Transfer Objects. Spring comes bundled with Jackson — a powerful JSON to POJO serialisation library. Controllers are the entry and exit points for the outside world to interact with our application. They are generally logicless and only deal with data transfer to service layers with some transformation.
The @Controller or @RestController annotations define a controller. @Controller returns a server rendered view with data in the form of request body or request parameters, whereas @RestController produces a ResponseBody object, which is essentially domain or data transfer objects converted to a content type like JSON. A controller has methods that are mapped to distinct REST methods and request pathways. The @RequestMapping annotation, as well as more specific annotations like @PostMapping, @GetMapping, and others, specify them.
The methods can accept inputs as arguments with annotations indicating how they should be passed, and return responses as output. In a POST request, @RequestBody is used to pass a request body. The @RequestParam is used to transmit request parameters from the URI as inputs to methods, while @PathVariable is used to extract data from the URI. The response type is usually a ResponseEntity> object with the domain object’s class as its type. A ResponseEntity can be used to return a response code as well as change the request and response body.
Let’s take a newsfeed timeline service as an example. The service can add a post to a user’s timeline, delete a post from this timeline, show a user’s timeline, and fan a post out to other timelines. The controller exposes endpoints for other services to access a user’s timeline. The controller may look like this:
@GetMapping(“/posts”)
public ResponseEntity<List<Post>> getPosts() {
    return ResponseEntity.ok(service.getAllPosts());
}
In the example, /posts is the path where the GET request is made and it returns a ResponseEntity with 200 OK status, with the list of all posts available in the service.
To return a specific post with an ID, we can write something like:
@GetMapping(“/posts/{id}”)
public ResponseEntity<List<Post>> getPostById(@PathVariable String id) {
   return ResponseEntity.ok(service.getPostById(id));
}
Here, we’re passing a specific ID as a path variable as a parameter to the request. A sample request would be:
GET localhost:8080/posts/bP13xxAd9
We can also pass request parameters in the URI:
 @GetMapping(“/posts/filter”)
    public ResponseEntity<List<Post>> getPostByFilters(@RequestParam String tag, @RequestParam String type) {
        return ResponseEntity.ok(service.getByTagsAndType(tag, type));
}
This will allow us to construct URIs like:
GET localhost:8080/posts/filter?tag=sports&type=latest
To post something on the timeline service we can use the @PostMapping annotation:
@PostMapping(“/posts”)
public ResponseEntity<Data> addPost(@RequestBody post) {
return ResponseEntity.ok(service.addPostToTimeline(post));
}
Evidently, we’re going to avoid writing any business logic in the request response layer and rather take it to the domain layer, which is essentially the service and repository layer.
Let’s put all of it together:
Evidently, we’re going to avoid writing any business logic in the request response layer and rather take it to the domain layer, which is essentially the service and repository layer.
Let’s put all of it together:

@RestController
class NewsFeedController {

    private final TimelineService service;

    @Autowired
    public NewsFeedController(TimelineService service) {
        this.service = service;
    }

    @GetMapping(“/posts”)
    public ResponseEntity<List<Post>> getPosts() {
        return ResponseEntity.ok(service.getAllPosts());
    }

    @GetMapping(“/posts/{id}”)
    public ResponseEntity<List<Post>> getPostById(@PathVariable String id) {
        return ResponseEntity.ok(service.getPostById(id));
    }

    @GetMapping(“/posts/filter”)
    public ResponseEntity<List<Post>> getPostByFilters(@RequestParam String tag, @RequestParam String type) {
        return ResponseEntity.ok(service.getByTagsAndType(tag, type));
    }

    @PostMapping(“/posts”)
    public ResponseEntity<Data> addPost(@RequestBody post) {
        return ResponseEntity.ok(service.addPostToTimeline(post));
    }
}
Services: The domain or business logic resides in the service layer. It takes inputs from the controller layer and processes it based on the requirements of the application at a business level. This may include something as complex as initiating a banking transaction or a simple follow feature in a social media application. The service layer talks to the data layer to create, read, update, or delete data.
Services are defined by the @Service annotation on top of a class in Spring. A service can make use of other services, components, repositories and other dependencies to get something done.
In our example system, we have an auth service that is called by the controller to ensure that the request being made is authenticated. There are many ways to achieve this. One of them is using JWT authentication, which is quite popular in microservices based systems. There are many libraries like Spring Security that make it easy and systematic for us.
The Fan Out service or the timeline service is responsible for talking to the repository layer to read or persist data. It calls the analysis service to perform some data analysis to understand the user’s taste and preferences in order to suggest better ads or articles to them.
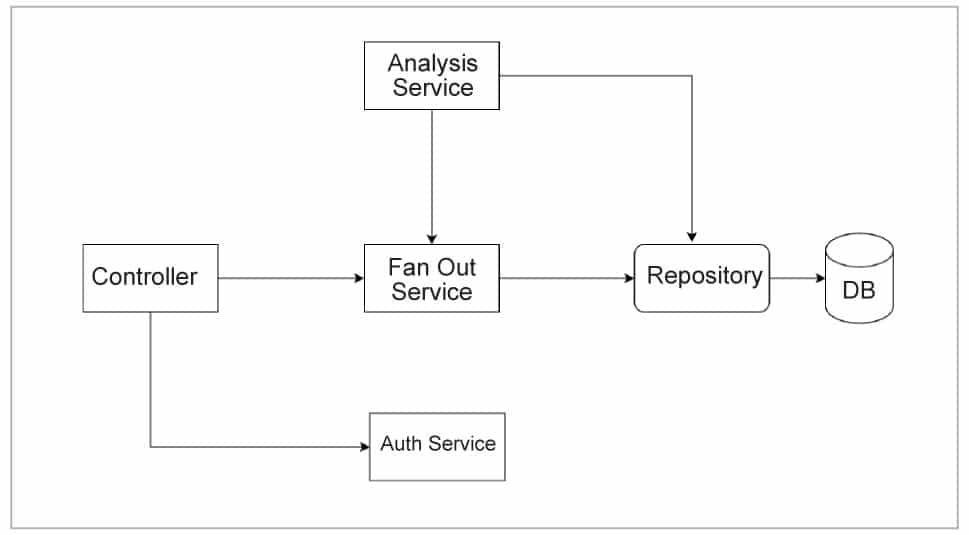
Repositories: To access data, Spring has repository interfaces that talk to the database either with a data mapper like JPA’s entity manager or raw JDBC connections. Spring, on the other hand, abstracts this out and provides convenience repositories for doing typical CRUD activities.
Repositories are annotated with the @Repository on top of the class or interface. A typical SQL based system can leverage Spring’s JPA repository without writing too much code. This is done by extending the JpaRepository interface.
A JPA repository operates on domain objects known as entities. These are plain old Java objects that have a business value and have a direct mapping as a table in a database. For example, a user can be an entity that has a mapping to a table in the SQL database.
This is defined with the @Entity annotation on a data class:
@Entity
public class User {

  @Id
  @GeneratedValue(strategy = GenerationType.AUTO)
  private Long id;

  private String firstname;
  private String lastname;
}
The @Id annotation says that the field ID should be used to uniquely identify the entity. And the @GeneratedValue(strategy = GenerationType.AUTO) annotation says that it will be automatically generated during persistence for the first time by Spring or the database, and doesn’t have to be handled by the user.
This entity can then be used with a JPA repository:
@Repository
public interface UserRepository extends Repository<User, Long> {

  List<User> findByEmailAddressAndLastname(String emailAddress, String lastname);
}
The above code automatically creates a mapping between the user entity and the database, and generates convenience CRUD methods like save() and findById() without any more code. In fact, the method declared in the above example interface doesn’t even require the user to provide an implementation for the method. Spring does it for you!
Although this is convenient, there are times when we do need to take control of the database logic. We can do this in two ways.
1. By using the @Query annotation: This allows us to write JPQL queries:
 @Query(“select u from User u where u.firstname LIKE ?1”)
List<User> findUsersWithNamesLike(String name);
We can also use native queries like this:
@Query(“select  * FROM USERS WHERE FirstName LIKE ?1”,  nativeQuery = true)
List<User> findUsersWithNamesLike(String name);
And we can use named parameters for clarity:
@Query(“select u from User u where u.firstname LIKE :firstname”)
List<User> findUsersWithNamesLike(@Param(“firstname”) String name);
The above examples only allow us to query data but not modify it. We can do that by using the @Modifying annotation.
@Modifying
@Query(“update User u set u.firstname = ?1”)
int changeFirstName(@Param(“firstname”) String name);
2. By creating an implementation of the repository for more control, especially when we need to perform complex operations. We can create custom implementations of repositories for finer control. To achieve this, we’ll have to create a separate interface that has our custom methods declared, and we’ll have to implement it and have our repository extend both JpaRepository and our custom repository.
interface CustomizedUserRepository {
  void doSomethingTricky(User user);
}
…
class CustomizedUserRepositoryImpl implements CustomizedUserRepository {

  public void doSomethingTricky(User user) {
    // Custom implementations go here
  }
}
As we have our custom interface and implementation ready, we can now attach it to our actual user repository by utilising Java interface’s multiple inheritance property:
@Repository
interface UserRepository extends JavaRepository<User, Long>, CustomizedUserRepository {
	// ...
}
Now we can use it in a service in the way we need to.
There are more features to Spring data repositories like transactions, sorting, projections, named queries, and stored procedure usage, etc, that can be found at https://docs.spring.io/spring-data/jpa/docs/2.5.1/reference/html/.
However, to make the JPA repository work, we have to enable it from the Spring configuration with the @EnableJpaRepositories annotation — we can put it on the SpringBootApplication class, which contains the main class of the application.
Components: Spring will handle a component, which is a generic bean. Repositories, services, and controllers are, in fact, specialised components. Components can be used for items that don’t exactly fit into the categories of repositories, services, or controllers. The @Component annotation on a class defines it. A class that changes data from one form to another is an example. It doesn’t have any explicit business implications, but it does add functionality to the program that is required by the business logic.
Configuration: Spring enables component-level tweaking and configurability to meet a variety of requirements. A database connection, for example, may require a certain IP address and port. Spring features a properties file that may be used to change the behaviour of specific beans at a global level. This can be done by modifying src/main/resources/application.properties in the src/main/resources/application.properties file. Consider the following scenario: By modifying the server.port property, we can change the default port that Spring listens to, or we can enable lazy initialisation of Spring components:
server.port=80
spring.main.lazy-initialization=true
We can have different application properties that can be based on the environment we’re working on. We can create a separate application-dev.properties file and we can ask Spring to read that by adding the spring.profiles.active property.
spring.profiles.active=dev
Spring also allows YAML to be used for setting properties. This can be done by creating an application.yml file in the src/main/resources/ directory and following the same naming scheme but in YAML:
spring:
    application:
        name: timeline
    datasource:
        driverClassName: com.mysql.jdbc.Driver
        url: jdbc:mysql://localhost/test
server:
    port: 80
For advanced bean configuration, we can use XML and Java. XML based configuration is generally not recommended, as it can grow big and unreadable really quick, but then again this would depend on preferences.
For this article, we’ll use the Java based configuration for a sample Redis application. The @Configuration annotation allows for a class to be loaded as a configuration object. This configures a library called Jedis to be used with the given server host and port. The @Value annotation can be used to read values from the environment’s properties file.
The @Bean annotation says that a JedisConnectionFactory has to be treated as a Spring Bean and is instantiated by the method:
@Configuration
class RedisConfiguration {

    @Value(“${redis.server.host}”)
    private String server;


    @Value(“${redis.server.port}”)
    private Integer port;

    @Bean
    public JedisConnectionFactory redisConnectionFactory() {
        RedisStandaloneConfiguration config = new RedisStandaloneConfiguration(server, port);
        return new JedisConnectionFactory(config);
    }
}
Exception handling: Applications have errors and exceptional cases that may not always be possible to be handled by developers. If an issue occurs, we’d like it to pop up and inform the user that something has gone wrong without divulging too much information about the system. Spring has a number of options for dealing with this.
Prior to Spring 3.2, these were bundled with HandlerExceptionResolver and @ExceptionHandler; however, both of them had downsides of usability.
The @ExceptionHandler annotation may be added to a controller method, but it can only handle exceptions for that particular controller. As a result, all exceptions in all controllers have to be handled individually. The HandlerExceptionResolver is modular and functional, but it still relies on the older ModelView design and isn’t a popular solution for REST apps that don’t have views developed.
From Spring 3.2, we have the @ControllerAdvice annotation that allows us to easily handle all exceptions in a RESTful way. This can be defined once and will work globally for all exceptions in all controllers.
@ControllerAdvice
public class RestResponseEntityExceptionHandler
  extends ResponseEntityExceptionHandler {


    @ExceptionHandler(Exception.class)
    protected ResponseEntity<Object> handleError(
      RuntimeException ex, WebRequest request) {
        String bodyOfResponse = “Something went wrong”;
        return handleExceptionInternal(ex, bodyOfResponse,
          new HttpHeaders(), HttpStatus.ERROR, request);
    }

}
We can also mention specific exceptions to be handled by specific handlers; for example, we can send a 409 CONFLICT response for a DataIntegrityViolation exception by specifying a value parameter in the ExceptionHandler annotation.
@ResponseStatus(value=HttpStatus.CONFLICT,
                  reason=”Data integrity violation”)
  @ExceptionHandler(DataIntegrityViolationException.class)
  public void conflict() {
	// log it

  }
In this article, we looked at how Spring operates and understood how the code is structured. Spring’s capabilities can be leveraged to build very powerful applications without writing too much boilerplate.
There is more to study about Spring, and understanding its intricacies can help make the best out of what Spring has to offer. More can be found at Spring’s extensive official documentation at https://docs.spring.io/spring-framework/docs/current/reference/html/.


