


Microservices are polyglot. Developers choose different platforms for building different microservices, as appropriate. Java is still the top choice for developing microservices for enterprises and Spring Boot is the numero uno framework for the Java platform. In this sixth part of ‘The Design Odyssey’ series, we will explore the design aspects of Java microservices by building AddService of UMS using the Spring Boot framework.
Once upon a time, software was built and deployed as a single monolith unit. It was difficult to maintain such a monolith in terms of adding and removing features, and fixing the defects. Over a period of time, modular systems replaced monolith systems. However, the modularity was maintained only during the development and not the deployment of software.
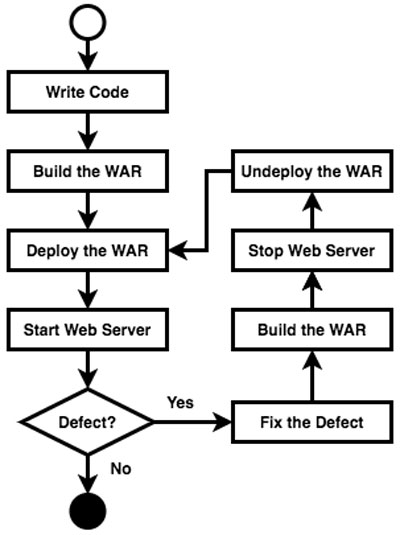
For instance, a team of Java developers builds a large e-commerce application as a set of multiple modules like order management, catalogue management, etc. But, the whole code is built together and packaged as a single WAR file. Then the team deploys the WAR file into a Web server like Apache Tomcat. As shown in Figure 1, the monolith WAR needs to be rebuilt and redeployed as a whole, for every change. Because of this, the end user experiences frequent disruptions whenever the team reboots the server for rolling out new features. To avoid this, teams usually delay the feature rollout for weeks and months. Such a delay obviously results in business loss.
The root cause for all this lies in deploying the application as a single monolith WAR. What is the solution?
Microservices
As indicated in the previous part in this series, the solution to the above problem lies in the microservices architecture. If the modules of order management, catalogue management, etc, are not only coded independently but also built and deployed independently as microservices, the problems cited above will automatically be resolved. This approach allows the team to build and deploy a given microservice any number of times, as frequently as it wishes. The end user will never experience a total shutdown of the e-commerce application.
Java microservices
The enterprise market has been traditionally dominated by Web architecture. The Java platform has been the automatic choice for developing enterprise Web applications because of the proven servlet technology, along with numerous frameworks ranging from the old Struts and JSF to the current day Spring. Figure 2 shows the architecture of a traditional Java Web application deployment.
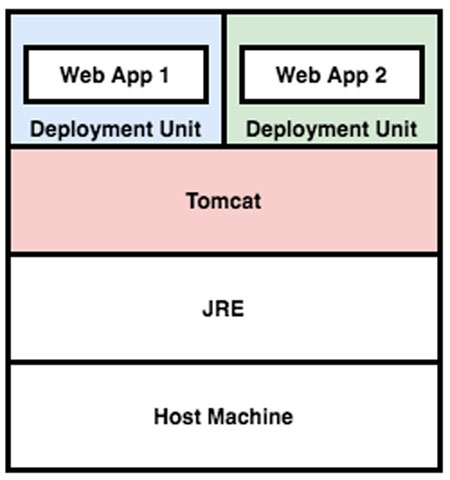
In the traditional approach, the Tomcat Web server had to be installed and provisioned before deploying the Web application. Moreover, multiple Web applications used to be deployed on a single Tomcat Web server. In other words, the deployment unit consists of just the application code. This approach is not compatible with the microservices architecture. Why?
Since microservices are expected to be deployed frequently (several times a day in some cases), the deployment process should be short, automatic, and smooth! This implies that the process of pre-installing and provisioning the Web server is clearly not an option anymore. On the other hand, as the microservices are independent of each other, co-hosting multiple services on the same Web server is also ruled out. Then, what is the way out?
Spring Boot framework
There are several frameworks available for building microservices on the Java platform including DropWizard and Vert.x. However, Spring Boot is the most popular framework in the community. It is built on top of the time-tested Spring framework and comes with all of the latter’s proven features like dependency injection (IoC), aspect injection (AOP), Web context (MVC), JPA integration (ORM), etc. Naturally, it is very easy to adopt Spring Boot if you have worked with Spring earlier.
So, what is the value-add that Spring Boot offers? Spring Boot is an opinionated framework that prefers convention over configuration or coding. In other words, it simplifies the job of the developer.
It also comes with an extension to the Maven. This extension packages a microservice as a JAR, as opposed to a WAR file. Not only that, the JAR file even consists of an embedded Tomcat Web server. What does this mean? As long as you have a JRE, you can simply place the JAR file in the classpath and start the service. Spring Boot takes care of starting the Web server and mapping it to the service endpoints.
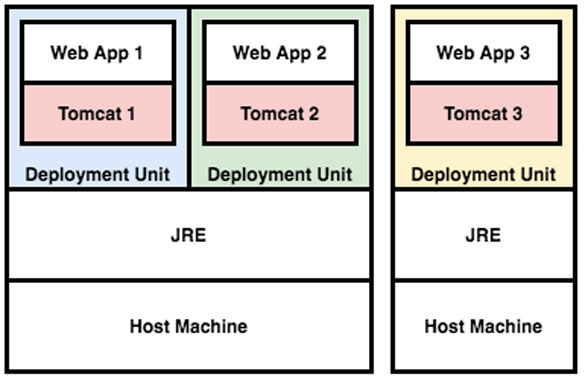
In other words, with Spring Boot, you no longer pre-install the Tomcat, no longer pre-provision the Tomcat and no longer co-host several applications in the same Tomcat. Instead, each application is self-sufficient with its own Web server, as shown in Figure 3. To summarise, the deployment unit consists of application code along with all the required libraries and Tomcat. Naturally, you are free to deploy the applications on the same machine or on multiple machines without worrying about setting up the server beforehand.
Let us build a Spring Boot microservice to demonstrate this.
UMS AddService
In the previous article in this series, we have developed a design for AddService as part of UMS. That design proposed a domain model, application layer, and infrastructure layer on the lines of the Onion model of domain-driven design. Though we can implement the proposed design completely on our own, why should we do it when a framework like Spring Boot offers some of those components out-of-the-box? After all, Spring and Spring Boot offer ready-to-use factories, proxy generators, weavers of responsibility chains, adapters, etc.
As you know, AddService offers only one functionality — to add a user to the system. In line with the contemporary style, let the AddService expose the functionality via REST interface over HTTP. The following can be the REST API for adding a user:
POST /user
This API accepts the user data in the format of application/json in the HTTP request, and returns the newly created user data in the application/json format along with usual HTTP headers.
Let us do this one step at a time.
Generate the Spring Boot project
Visit the https://start.spring.io/ and choose options, as shown in Figure 4. The following are some of the important options selected.
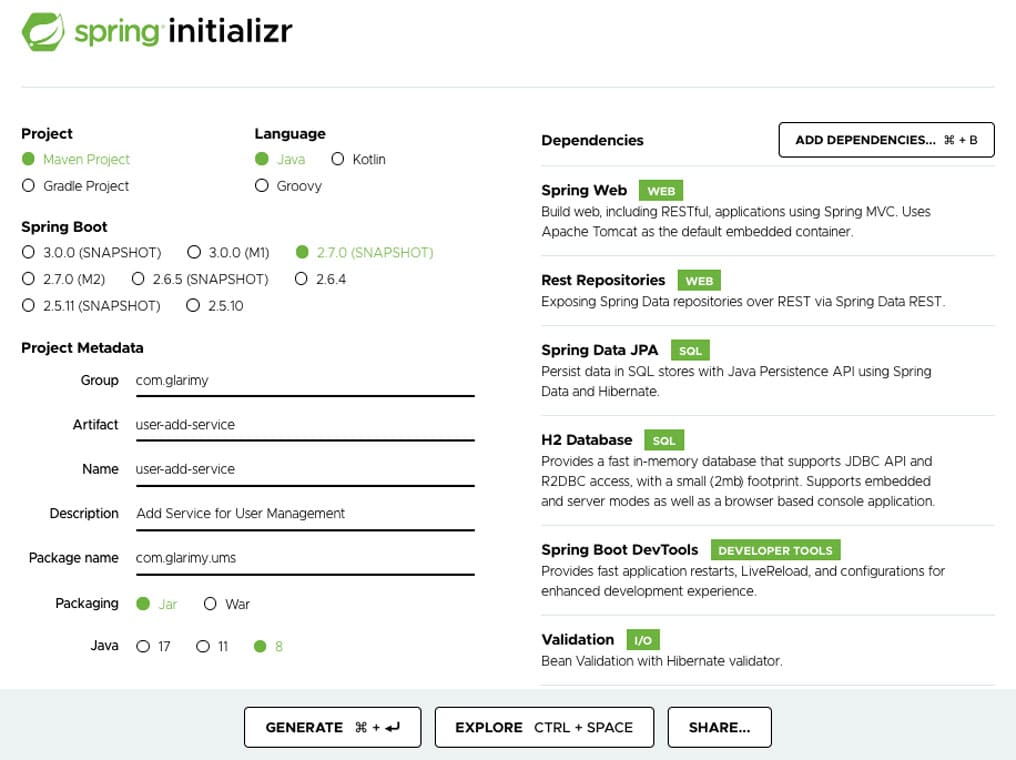
Project type: Maven
Language: Java
Spring Boot version: 2.7.0
Project metadata:
Group: com.glarimy
Artifact: ums-add-service
Package name: com.glarimy.ums
Packaging: JAR
Java version: 8
Dependencies: Spring Web, Rest Repositories, Spring Data JPA, H2 Database, Spring Boot Dev Tools, and Validation
Click on the Generate button and you will get the Maven project downloaded as an archive. Extract it and export the project into any IDE of your choice.
Manifest
As you know, the Maven tool uses the manifest file pom.xml to curate the build process. The following part is self-explanatory.
<parent>
<groupId>org.springframework.boot</groupId>
<artifactId>spring-boot-starter-parent</artifactId>
<version>2.7.0-SNAPSHOT</version>
<relativePath/>
</parent>
<groupId>com.glarimy</groupId>
<artifactId>ums-add-service</artifactId>
<version>0.0.1-SNAPSHOT</version>
<name>ums-add-service</name>
<properties>
<java.version>1.8</java.version>
</properties>
From this snippet, you can find that we are on the way to building an artifact named ums-add-service under the group com.glarimy. It is also clear that we prefer version 2.7.0. of Spring Boot. Different versions of Spring Boot support different versions of Java, and this one supports the time-tested version 1.8.
Now let’s explore the dependencies.
The spring-boot-starter-web adds an embedded Tomcat Web server along with HTTP-based MVC framework and REST capabilities.
The spring-boot-starter-data-rest adds the capabilities to generate the repositories (recollect the Repository pattern of domain-driven design). The repositories can be backed by various storage technologies.
The spring-boot-starter-data-jpa adds capabilities to connect to JDBC data sources using JPA API on top of Hibernate ORM implementation. With this, Spring Boot automatically chooses JPA to build the repositories. However, the JPA must be backed by an RDBMS. The h2 artifact adds the H2 in-memory all-Java RDBMS. You may choose any other database like MySQL to support JPA. We want to keep it simple and hence chose this embedded database server, for now!
The spring-boot-starter-validation adds the validation framework on top of the Hibernate Validator libraries.
The spring-boot-start-test adds test capabilities. The spring-boot-devtools adds a few useful development tools. For example, one of the tools watches the source code, and automatically rebuilds and reruns the whole service every time you edit the code.
The following build section instruments the Maven plugin that is specifically developed for Spring Boot.
<plugin>
<groupId>org.springframework.boot</groupId>
<artifactId>spring-boot-maven-plugin</artifactId>
</plugin>
It generates a fat JAR with compiled class files, libraries and, most importantly, the embedded Tomcat Web server.
That’s all about pom.xml. Let us move on to the code.
The domain model
The domain model we developed in the previous part consists of the classes Name, PhoneNumber, User, and UserRepository. These fundamentally remain the same. However, we are decorating them to inject a few capabilities of Spring Boot like validation and persistence. This reduces the amount of code that we otherwise have to write.
Recollect that the User is modelled as an Entity class on the lines of domain-driven design. The AddService is supposed to persist the User objects using UserRepository (into H2 RDBMS, in this case). Instead of writing a lot of code for that, we decorate the User with JPA annotations and generate the UserRepository with the help of Spring Boot.
Here is the annotated User class:
@Entity(name = “ums_users”)
public class User {
@EmbeddedId
@Valid
@NotNull
private Name name;
@Embedded
@Valid
@NotNull
private PhoneNumber phone;
private Date since;
User() {}
...
}
With the @Entity annotation, we are mapping the objects of the User to the rows of a table named UMS_USERS. The properties of Name act as the columns of the primary key because of the @EmbeddedId annotation. And the properties of PhoneNumber are included in the UMS_USERS table because of @Embedded annotation. In other words, the properties of User, Name, and PhoneNumber are all part of a single table named UMS_USERS.
The @Valid, @NotNull annotations come from the validation framework. The @NotNull annotations make sure that the name and phone are not null. And @Valid annotation makes sure that Name and Phone objects are also validated.
It can be observed that we also added a default constructor to the User class with package visibility to satisfy the JPA requirements. However, it still sticks to the domain model. Remember that the domain model is technology-agnostic. It should remain the same with or without Spring Boot.
The following is the decorated Name class:
@Embeddable
public class Name implements Serializable {
private static final long serialVersionUID = -5928119910862624448L;
@Column(name = “name”)
@Size(min = 8, max = 32)
@NotBlank
private String value;
Name() {}
...
}
As you can recollect, it follows the immutable ValueObject pattern. The annotation @Embeddable marks the properties of Name to be part of another table, which is UMS_USERS in our case. To satisfy the JPA requirements, the Name is made to implement the Serializable interface along with a package-specific default constructor. The remaining decorations are self-explanatory.
The following is the decorated PhoneNumber class and there is nothing special about it. This is also an immutable ValueObject with appropriate JPA and validation annotations.
@Embeddable
public class PhoneNumber {
@Column(name = “phone”)
@Min(9000000000L)
private long value;
PhoneNumber() {}
...
}
Finally, we come to the UserRepository. SpringBoot generates repositories with standard capabilities to save, find and delete the objects based on mere interface definition. You need not really implement this interface. Here is the decorated UserRepository:
@Repository
public interface UserRepository extends JpaRepository<User, Name> {
}
We are done with implementing the domain layer of AddService.
Application layer
As you know, the application layer acts as the intermediary between the domain layers and the external clients, like REST clients in our case. It is responsible for receiving data transfer objects (DTOs) from the client and delegating the work to the appropriate domain objects. It is also responsible for doing the opposite while rendering the response.
The application layer of AddService consists of UserController along with a couple of DTOs. The DTOs do not require any sort of decoration.
Here is the decorated UserController with implementation:
@RestController
public class UserController {
@Autowired
private UserRepository repo;
@Autowired
private Validator validator;
@PostMapping(“/user”)
public ResponseEntity<UserRecord> add(@RequestBody NewUser newUser) {
Name name = new Name(newUser.name);
PhoneNumber phoneNumber = new PhoneNumber(newUser.phone);
User user = new User(name, phoneNumber);
Set<ConstraintViolation<User>> violations = validator.validate(user);
ResponseEntity<UserRecord> response;
if (!violations.isEmpty())
response = new ResponseEntity<>(HttpStatus.BAD_REQUEST);
else {
repo.save(user);
UserRecord record = new UserRecord(
user.getName().getValue(),
user.getPhone().getValue(),
user.getSince());
response = new ResponseEntity<>(record, HttpStatus.OK);
}
return response;
}
}
The annotation @RestController makes the UserController capable of handling the HTTP and JSON out-of-the-box. This is injected with UserRepository and Validator for the obvious purpose.
The annotation @PostMapping(“/user”) maps the POST REST API to the add() method. The Spring Boot takes care of marshalling the HTTP Request POST body to the NewUser DTO because of the @RequestBody annotation. The implementation of the add() method is self-explanatory.
Note that we skipped the messaging feature in the controller. We will refactor the controller to integrate it with a message broker like Kafka in the future.
Bootstrapping
And, finally, the AddService acts as the bootstrap for the whole microservice. As already discussed, the Spring Boot microservices are modelled as self-sufficient Java applications with a main() method that initialises everything, including an embedded Web server. The @SpringBootApplication annotations are just enough to get all the required bootstrap.
@SpringBootApplication
public class UserAddService {
public static void main(String[] args) {
SpringApplication.run(UserAddService.class, args);
}
}
Configuration
Apart from the code we have seen so far, we also need to supply configuration. Though Spring Boot prefers convention over configuration, it works only for defaults. Whenever we want to override the defaults, we need to supply those overrides as configurations in the application.properties file. Here is the configuration for AddService:
spring.datasource.url=jdbc:h2:mem:glarimy
spring.jpa.database-platform=org.hibernate.dialect.H2Dialect
spring.h2.console.enabled=true
This configuration enables a Web based GUI console to interact with the H2 database. It also indicates the hibernate DDL processor to create a database named glarimy as per the annotations.
That’s all.
A well-designed Spring Boot application thus requires these basic constructs: domain objects, repositories, DTOs, and controllers. This is exactly what domain-driven design proposed, isn’t it? With the powerful annotations of Spring Boot, we get all the technological support like REST, persistence, validations, etc, without deviating from this design.
Building and running the microservice
Let us build the microservice and package it with the following command:
mvn clean package
It generates a fat JAR named ums-add-service-0.0.1-SNAPSHOT.jar under the target folder. Run the application using the usual Java command. You don’t require any special skills and tools to run the microservice.
java -jar target/ums-add-service-0.0.1-SNAPSHOT.jar
Observe the console, and wait till the service is up and running. Since we do not have any Web interface for this service, you can use CURL to post a new user to the system.
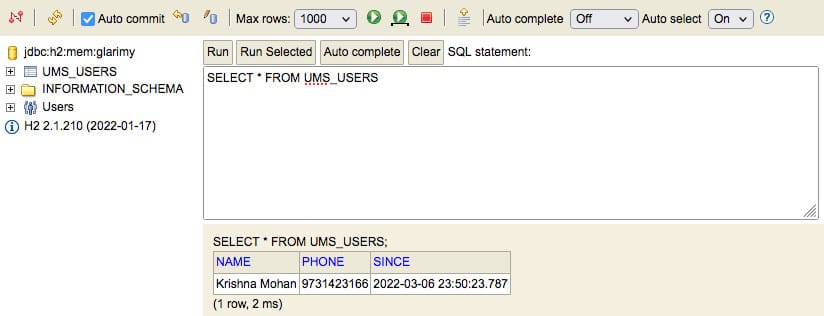
However, just before doing that, verify the database by opening the link to the H2 database console at the URL http://localhost:8080/h2-console. Enter jdbc:h2:mem:glarimy as the JDBC URL in the dialogue and click Connect. Find the database table named UMS_USERS and click on it. It displays the query SELECT * from UMS_USERS. You do not get any records by running the query as we are yet to post any users.
Now open a terminal and run the CURL command to add a new user:
curl -X POST -H ‘Content-Type: application/json’ -i http://localhost:8080/user --data ‘{“name”:”Krishna Mohan”, “phone”:9731423166}’
You should receive a success response. You can also check the database console to find the newly added record, as shown in Figure 5.
Road ahead
This part of ‘The Design Odyssey’ series illustrates a way to build microservices on the Java platform using the Spring Boot framework. It demonstrates that microservices are essentially modelled based on the concepts we have covered under domain-driven design. And the fundamental object-oriented patterns are sprinkled all over, thanks to the plumbing done by the framework. The biggest difference between a traditional Java Web application and a modern Java microservice is that we no longer package them as WAR files; instead, we package them as standard JAR files with an embedded Web server.
However, the Spring Boot microservice cannot be termed as self-sufficient yet, as it still requires a JRE pre-installed. Installing a JRE on every machine where the microservice is to be deployed is quite a task. How about including the JRE also into the deployment unit so that it truly becomes self-sufficient?
That’s exactly what containerisation is. In the next part of this series of articles, we will containerise the Spring Boot service using Dockers and deploy it on a Kubernetes cluster.


