


This article gives the fundamentals of generating APIs using Django Rest Framework with Insomnia. It’s aimed at absolute beginners.
This article will familiarise you with the basic structural layout and features that come with creating a Django project for API generation. It will help you understand what models, serialisers and views are, how they are interconnected, and how we can use Insomnia to test the functioning of CRUD (create, read, update and delete) operations on our APIs.
Initial setup
You will be required to use the command prompt or carry out the initial steps needed to create a Django project. Check the version of Python you have installed on your system:
python --version
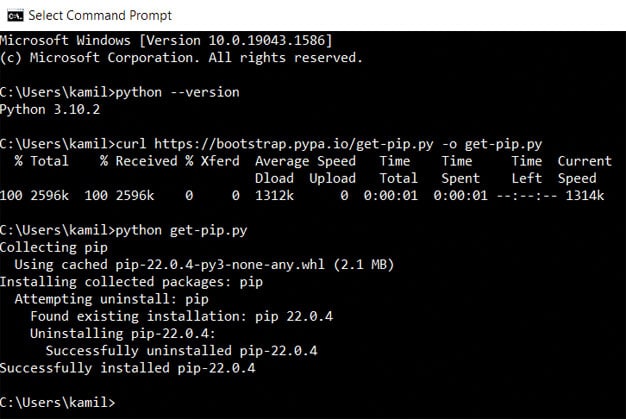
Pip can be defined as an installation manager for packages/libraries that are written in Python. Let’s download a file called get-pip.py:
curl https://bootstrap.pypa.io/get-pip.py -o get-pip.py
To install pip, give the following command:
python get-pip.py
| Note: Figure 1 shows pip as being uninstalled first and then reinstalled, because I already had pip installed on my system. |
Now let us understand what ‘virtual environments’ are before we create a Django project. To state bluntly, virtual environments are environments that can have distinct versions of packages/libraries installed within them, respectively. Let me explain that with an example. We are in April 2022, and we intend to create a project (to be dealt with in VS Code). Let’s say the latest version of Python is 3.1 (which we have installed in our system and no virtual environments have been created) having libraries a, b, c, d, e and f. Assume that our project requires libraries a, b and c, all of which are in Python 3.1; hence our project will work without any hindrances.
Now let’s say Python’s new version 3.2 comes out a few weeks or a few months later which has libraries a, d, e, f, g and h. We install this new version on our system (having created no virtual environments). Our project will not function properly now since it required libraries b and c to do so, which are now not present in 3.2. This is where virtual environments come in. Assume we create a virtual environment ‘venv1’. Within this, we’ll install Python 3.1 and create our project. In another virtual environment ‘venv2’, we can install Python 3.2. Note that the project we created in ‘venv1’ will not work in ‘venv2’ since ‘venv2’ has Python 3.2 installed within it, which does not encompass all the libraries that the project requires. The purpose of this elaborate explanation is to give you an idea of how virtual environments work.
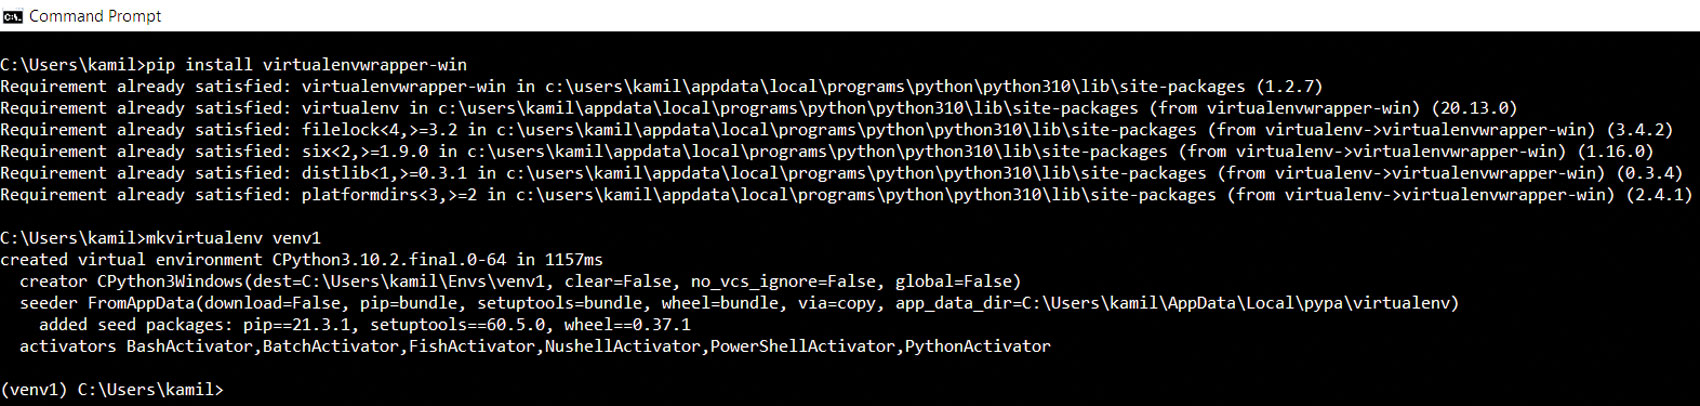
To install a virtual environment wrapper (does not create a virtual environment immediately), type:
pip install virtualenvwrapper-win
To create a virtual environment ‘venv1’, give the following command:
mkvirtualenv venv1
| Note: The ‘(venv1)’ observed towards the left of the latest command line indicates that we are inside a virtual environment. |
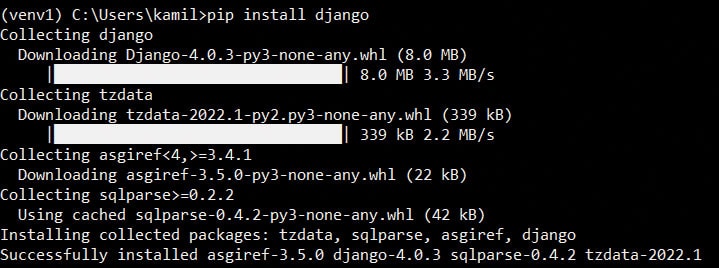
Now, install Django:
pip install Django
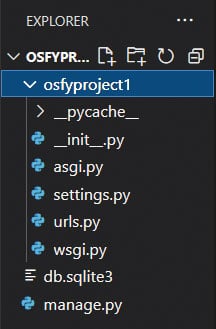
Next, create a new directory, access it and then create a Django project within the directory:
Syntax for creating a directory: mkdir (name of directory)
Syntax for accessing a created directory: cd (name of directory)
Syntax for creating a django project: django-admin startproject osfyproject1

(venv1) C:\Users\kamil>mkdir osfydir
(venv1) C:\Users\kamil>cd osfydir
(venv1) C:\Users\kamil\osfydir>django-admin startproject osfyproject1
Now that the Django project has been created, let us run the server within our newly created project. The command prompt is:
(venv1) C:\Users\kamil\osfydir>cd osfyproject1
(venv1) C:\Users\kamil\osfydir\osfyproject1>python manage.py runserver

Watching for file changes with StatReloader
Performing system checks...

System check identified no issues (0 silenced).

You have 18 unapplied migration(s). Your project may not work properly until you apply the migrations for app(s): admin, auth, contenttypes, sessions.
Run ‘python manage.py migrate’ to apply them.
April 12, 2022 - 16:18:22
Django version 4.0.3, using settings ‘osfyproject1.settings’
Starting development server at http://127.0.0.1:8000/
Quit the server with CTRL-BREAK.
The http://127.0.0.1:8000/ observed in the second last line of the above code is the base URL of all the operations we wish to perform. We will observe how we generate separate URLs as an extension of this for carrying out CRUD operations, in later sections.
Now let’s head to VS Code and open our project by selecting it within the directory, the file path of which is C:\Users\kamil\osfydir.
Let us activate our virtual environment within the terminal of VS Code:
Microsoft Windows [Version 10.0.19043.1586]
(c) Microsoft Corporation. All rights reserved.

C:\Users\kamil\osfydir\osfyproject1>workon venv1
(venv1) C:\Users\kamil\osfydir\osfyproject1>
We now create an app within our project. Let’s say that your ‘project’ is a website on the whole and the ‘apps’ are specific Web pages within the website. Since you wish to write the logics for APIs of different Web pages, you will want to write them in their respective views.py files. You will understand as we go further.
(venv1) C:\Users\kamil\osfydir\osfyproject1>python manage.py startapp firstapp

(venv1) C:\Users\kamil\osfydir\osfyproject1>
Instead of getting an overview of the various purposes the different files within the app and the project serve, which might confuse you in the beginning, let’s go about it step-by-step as we move along the path of obtaining the end goal of our task. First, let’s create a table in our database with different kinds of fields. But hang on, we first need to establish a connection with the database in order to create a table within it. We will be using pgAdmin (PostgreSQL) for our task.
We first need to establish a connection between our project and the osfyproject1 database. We need psycopg2 to do so. Let’s install psycopg2 by entering a command within the prompt in VS Code. The following section of code shows the output of the installation operation.
(venv1) C:\Users\kamil\osfydir\osfyproject1>pip install psycopg2
Collecting psycopg2
Using cached psycopg2-2.9.3-cp310-cp310-win_amd64.whl (1.2 MB)
Installing collected packages: psycopg2
Successfully installed psycopg2-2.9.3
WARNING: You are using pip version 21.3.1; however, version 22.0.4 is available.
You should consider upgrading via the ‘C:\Users\kamil\Envs\venv1\Scripts\python.exe -m pip install --upgrade pip’ command.
Let us now create a table in our database. These ‘tables’ are referred to, as per the terminology of a Django project, as ‘models’, and are defined within the ‘models.py’ file in the app. Within ‘models.py’ of firstapp, let’s write the following:
from django.db import models

# Create your models here.

class Studentinfo(models.Model):
First_name=models.CharField(max_length=50,blank=False,null=False)
Last_name=models.CharField(max_length=50,blank=False,null=False)
Student_ID=models.IntegerField(blank=False,null=False)
Email_ID=models.EmailField(blank=False,null=False)
Our idea is to create a simple table/model taking in the information of a student. The fields ‘First_name’ and ‘Last_name’ are character fields, which allow a maximum length of 50 characters. The ‘Required=True’ parameter implies that you cannot discard this field (this will be covered in a case scenario later). The ‘null=False’ means that these fields will not accept null values. There are many different types of fields and parameters for Django models, which you can find in the official documentation of Django.
We now need to ‘send’ our defined model/table to our database. For this, let’s make a few changes to the ‘DATABASES’ section within the settings.py file of ‘osfyproject1’ in VS Code. The pre-existing section looks as follows:
DATABASES = {
‘default’: {
‘ENGINE’: ‘django.db.backends.sqlite3’,
‘NAME’: BASE_DIR / ‘db.sqlite3’,
}
}
By default, it considers sqlite3 as its database platform, but in our case, we are using PostgreSQL. The modified section should appear like this:
DATABASES = {
‘default’: {
‘ENGINE’: ‘django.db.backends.postgresql’,
‘NAME’: ‘osfyproject1’,
‘USER’:’postgres’,
‘PASSWORD’:’password’,
‘HOST’:’localhost’,
}
}
The ‘PASSWORD’ will be the password you set when you installed PostgreSQL on your system (mine was simply ‘password’ itself).
Another section within ‘settings.py’ which requires an addition is the ‘INSTALLED_APPS’ section.
INSTALLED_APPS = [
‘firstapp’,
‘django.contrib.admin’,
‘django.contrib.auth’,
‘django.contrib.contenttypes’,
‘django.contrib.sessions’,
‘django.contrib.messages’,
‘django.contrib.staticfiles’,
]
Kindly add ‘firstapp’ in the above list.
Now, we must send our table to the database, which in this terminology is ‘migrating’ our models. Migrating our defined model to our PostgreSQL database involves two simple steps:
(venv1) C:\Users\kamil\osfydir\osfyproject1>python manage.py makemigrations
Migrations for ‘firstapp’:
firstapp\migrations\0001_initial.py
- Create model Studentinfo
The ‘makemigrations’ step automatically creates a file called ‘0001_initial.py’ in the migrations folder within our ‘firstapp’. This file has code written in Python, which inculcates the definition of our model in a way that PostgreSQL will understand. Let’s take a peek at how this looks:
f
rom django.db import migrations, models

class Migration(migrations.Migration):
initial = True
dependencies = [
]
operations = [
migrations.CreateModel(
name=’Studentinfo’,
fields=[
(‘id’, models.BigAutoField(auto_created=True, primary_key=True, serialize=False, verbose_name=’ID’)),
(‘First_name’, models.CharField(max_length=50)),
(‘Last_name’, models.CharField(max_length=50)),
(‘Student_ID’, models.IntegerField()),
(‘Email_ID’, models.EmailField(max_length=254)),
],
),
]
For the next step, we simply use the keyword ‘migrate’, which results in a table called ‘Studentinfo’ being created in our database:
(venv1) C:\Users\kamil\osfydir\osfyproject1>python manage.py migrate
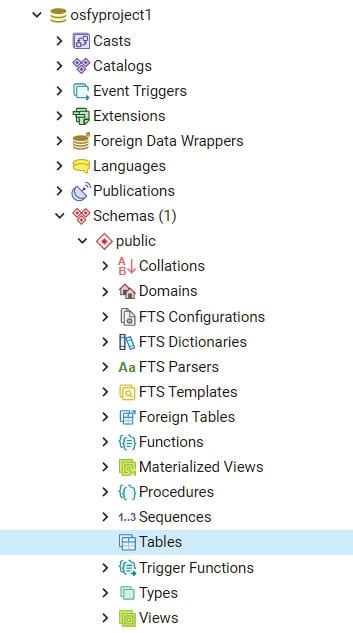
The output of the above command shows around 15 items being checked as ‘OK’. If you take a look at the ‘Tables’ tab in the ‘osfyproject1’ database, you will find a ‘firstapp_studentinfo’ table, which is shown in Figure 7.

The ‘id’ field has been assigned as the primary key of the table by default. You can set another field as the primary key by including ‘primary_key=True’ as one of the parameters of the field within the model definition in ‘models.py’. Now let’s jump into performing CRUD operations for this model.
Create a new file within ‘firstapp’ called ‘serializers.py’ and write the following:
from rest_framework import serializers
from .models import Studentinfo

class Studentserializer(serializers.ModelSerializer):
class Meta:
model=Studentinfo
fields=’__all__’
A serializer is defined on the Web as follows: “Serializers allow complex data such as query sets and model instances to be converted to native Python datatypes that can then be easily rendered into JSON.” Simply put, it converts the object(s) entered into JSON format.
Let’s take an example. Say, we have a simple logic for entering new data into the database in our ‘views.py’, which does not include checks for any errors. Now, if we were to make an entry into our table in the format below:
# create a student object
>>> student = Studentinfo(First_name=’Kamil’, Last_name=’Khan’, Student_ID=085, Email_ID=’kamil123@gmail.com’)

# serialize the data
>>> serializer = Studentserializer(student)

# print serialized data
>>> serializer.data
…the output of ‘serializer.data’ would have been as follows:
{‘First_name’: ‘Kamil’, ‘Last_name’: ’Khan’, ‘Student_ID’: 085, ‘Email_ID’: ‘kamilpaigah@gmail.com’}
The aim of covering the above code was to provide a practical explanation of the definition found on the Web, but since we will be using Insomnia here onwards, we will not be required to enter data in the format we just observed. We will be entering data in JSON format itself. In simple terms, a serializer creates a serializer class, which maps the fields of the model it is associated with. You may ask, if that’s the case, what’s the difference between a model and a serializer? From what I have observed, a serializer has the capability to check the validity of the data entered, such as checking if the value entered for field(s) is of the type defined in the model; if not, it will show errors. Now let’s move on to views.py, wherein we will cover the logic for ‘Create’ and ‘Read’.
from firstapp.models import Studentinfo
from .serializers import Studentserializer
from rest_framework.response import Response
from rest_framework import status
# Create your views here. ---(5)

class Student_post_get_view (APIView):
def post(self,request):
serializer=Studentserializer(data=request.data)
if serializer.is_valid(): ---(10)
serializer.save()
return Response(serializer.data,status=status.HTTP_201_CREATED)
return Response(serializer.errors,status=status.HTTP_400_BAD_REQUEST)

def get(self,request): ---(15)
getting_data=Studentinfo.objects.all()
serializer=Studentserializer(getting_data,many=True)
return Response(serializer.data)
The function ‘post’ corresponds to ‘Create’ operation, while the ‘get’ function aligns with the ‘Read’ operation. In line (9), the ‘request.data’ is a representation of the data we ‘POST’ in JSON format. ‘request.data’ being assigned to the ‘data’ parameter within the Studentserializer implies that the entered data is passed to the serializer. Line (10) checks the validation of the data entered for the constituting fields within the model that the ‘Studentserializer’ is associated with, i.e., Studentinfo. Line (12) displays the entered data itself, indicating that there are no validation errors, post the saving mentioned in line (11). Line (13) helps return the errors (if any). As per line (16), all the objects present within the ‘Studentinfo’ model (the existing data) are assigned to ‘getting_data’ variable. These objects are then passed through the serializer to be presented in JSON format as per line (18). Just one step remains before we can initiate inserting values for our table. In ‘urls.py’ within ‘osfyproject1’, insert the following:
from django.contrib import admin
from django.urls import path
from firstapp.views import Student_post_get_view

urlpatterns = [ ---(5)
path(‘admin/’, admin.site.urls),
path(‘student_post_get/’,Student_post_get_view.as_view()),
]
The URL path we entered in line (7) helps us in carrying out the operations present within ‘Student_post_get_view’, i.e., the ‘POST’ and ‘GET’. In the prompt, type:
python manage.py runserver
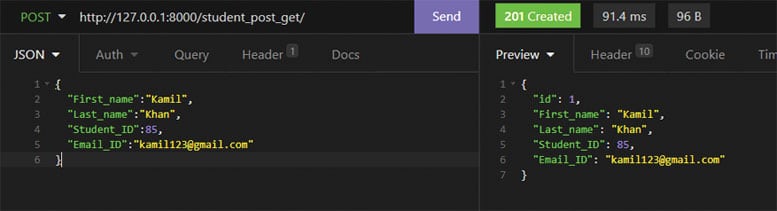
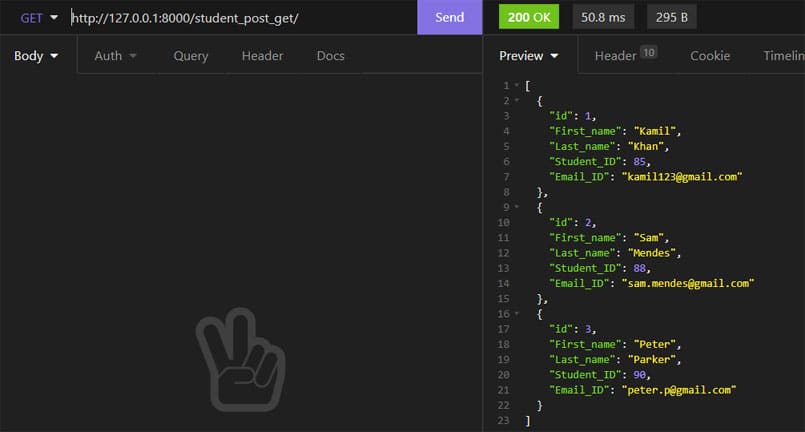
You should be able to see the link http://127.0.0.1:8000/ in the output, implying that the server is running. We can now head to Insomnia to carry out the ‘POST’ and ‘GET’ operations (Figure 8)!
Now let’s try botching these up to see how validation errors are displayed.
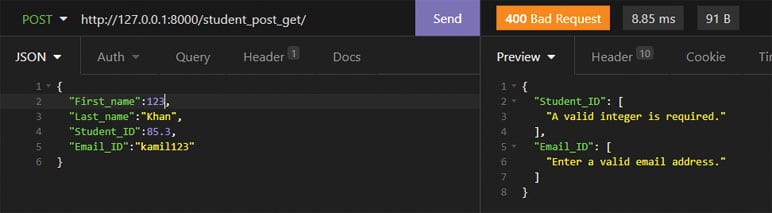
As observed in Figure 9, we entered incorrect types of values for ‘First_name’, ‘Student_ID’ and ‘Email_ID’ fields, but why is it that we got error messages for only two of them? This is because a serializer takes the values that you enter for the fields and tries converting them to the field types you defined in the model, and checks for successful conversion. Generally, in Python, a number of any type — be it float, string, etc — can be converted to a string. Since it is possible for the number 123 to be converted to string in Python, no error message is displayed for the same. We will enter valid data for two more students and then perform the ‘GET’ operation to see the information of all three students (Figure 10).
Let’s move on to the ‘views.py’ code for ‘PUT’ and ‘DELETE’ operations, which correspond to the ‘Update’ and ‘Delete’ operations in CRUD:
class StudentDetails(APIView):
def get_object(self,pk):
try:
return Studentinfo.objects.get(pk=pk)
except Studentinfo.DoesNotExist:
return HttpResponse(status=status.HTTP_404_NOT_FOUND)

def get(self,request,pk):
article=self.get_object(pk)
serializer=Studentserializer(article)
return Response(serializer.data)

def put(self,request,pk):
article=self.get_object(pk)
serializer=Studentserializer(article,data=request.data)
if serializer.is_valid():
serializer.save()
return Response(serializer.data)
return Response(serializer.errors,status=status.HTTP_400_BAD_REQUEST)

def delete(self,request,pk):
article=self.get_object(pk)
article.delete()
return Response(status=status.HTTP_204_NO_CONTENT)
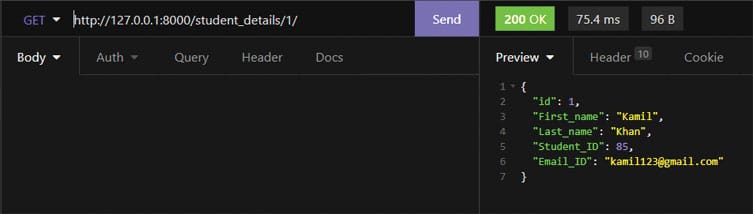
The ‘get_object’ function aims to obtain the object within the existing table having the same primary key value, i.e., ‘pk’ as the one entered in the URL. It will return an error message if no entry in our model exists with the entered primary key value. The ‘get’ function simply displays the model entry with the given ‘pk’. ‘get’, ‘put’ and ‘delete’ functions make use of the ‘get_object’ function and treat it as the first step in trying to obtain the required individual value. Add the required URL in ‘urls.py’:
path(“student_details/<int:pk>/”,StudentDetails.as_view(),
),
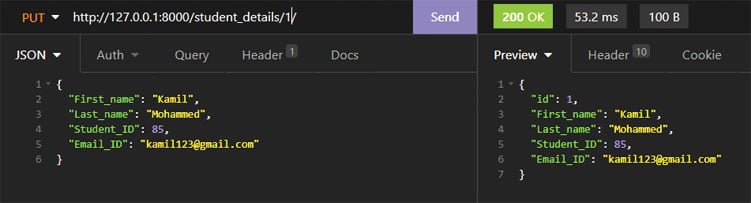
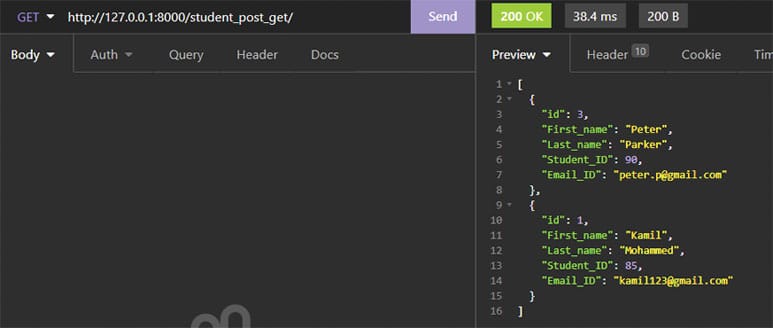
In Figure 12, I aimed to change just the ‘Last_name’ of the student with pk=1. The change will be reflected when you ‘GET’ all student info.
We will now delete the entry in the model having pk=2. All you have to do is enter 2 in the URL as ‘http://127.0.0.1:8000/student_details/2/’ and perform the ‘DELETE’ operation. Let’s see if the same is reflected in the model.
Having gone through the article, you would have grasped an idea of the absolute basics of generating APIs; specifically, how to perform CRUD operations.


