


Scalability and resilience are two of the most important reasons to move from monoliths to microservices. The Kubernetes platform offers both while orchestrating containers. In this Part 9 of the series, reference architecture for a user management system is presented and demonstrated around Kubernetes. This architecture includes Spring Boot microservices, Apache Kafka and MySQL.
look at any e-commerce business. It flourishes during the weekends and on special days. The business is normally low till noon and peaks in the evenings. So the systems that back such e-commerce, banking and government services, etc, experience different loads at different points of time, and need to be scaled up or down as automatically as possible. Such systems require appropriate deployment architecture and orchestration tooling.
In the previous part of this series of articles, we have seen how docker-compose is useful in deploying multiple containerised services all at once, on a single machine. Though docker-compose is good enough for container deployment, it falls short when it comes to container orchestration. It cannot track the containers and maintain the stability of the infrastructure. That’s where Kubernetes comes to our rescue.
Kubernetes can deploy containerised services not just on one machine but also on a cluster of any number of machines. It can deploy multiple instances of the same service across the cluster. Kubernetes keeps track of each of the deployed containers. And in case of crashes, it manages the scalability levels by automatically bringing up replacement containers without any manual intervention.
Let us architect the UMS (user management system) deployment with the help of Kubernetes.
Reference architecture
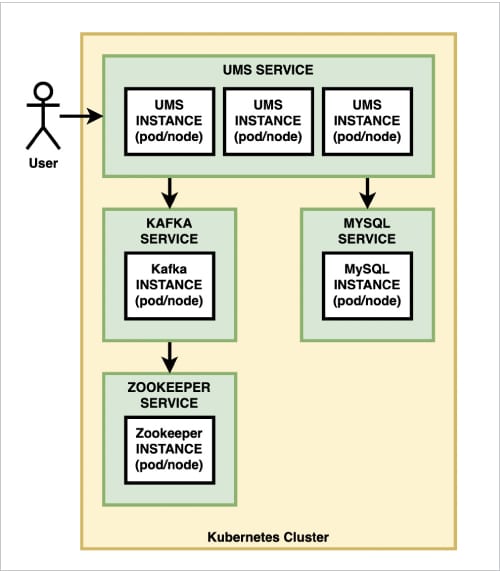
We have already decomposed our UMS into four microservices, namely: AddService, FindService, SearchService and JournalService. These use H2 relational databases for storage and Apache Kafka for asynchronous inter-service collaboration. Now, let’s refactor the architecture to achieve the following:
- Replace H2 with MySQL so that the data is saved persistently and shared across all the service instances.
- Deploy Kafka cluster.
- Deploy three instances of AddService.
- Deploy six instances of FindService and SearchService.
- Deploy one instance of JournalService.
Since we have only developed AddService so far, we will cover the first three goals in this part. Figure 1 gives our reference architecture.
Spring Boot and MySQL
The AddService is currently using the H2 database. As you know, H2 is an in-memory database engine. The data is lost once the engine is restarted. Such behaviour is not desired in the production. We need a database that is persistent. It can be an RDBMS or a NoSQL database like Mongo, etc. We chose MySQL for this illustration.
Since SpringBoot does not offer the MySQL connector out-of-the-box, we need to add it as a dependency in the pom.xml of the AddService.
<dependency>
<groupId>mysql</groupId>
<artifactId>mysql-connector-java</artifactId>
<scope>runtime</scope>
</dependency>
We also need to update application.properties to specify the JDBC driver along with a connection string and access details for the MySQL database engine.
spring.datasource.driver-class-name=com.mysql.cj.jdbc.Driver
spring.datasource.url=jdbc:mysql://mysqldb:3306/glarimy?allowPublicKeyRetrieval=true&useSSL=false
spring.datasource.username=root
spring.datasource.password=admin
Because of the above configuration, the repository of AddService attempts to connect to the glarimy database on a machine named mysqldb on port number 3306. We are recording the password in clear text in this configuration, only for simplicity. We will find a better way later!
A few other JPA-specific configurations may also be provided as needed. For example, the following will direct the Hibernate system to scan the code for JPA annotations and keep the schema on the database updated at the time of bootstrapping:
spring.jpa.hibernate.ddl-auto=update
spring.jpa.properties.hibernate.dialect=org.hibernate.dialect.MySQL5Dialect
MySQL as a Docker container
Since the AddService depends on MySQL, we can update the existing docker-compose.yml for deploying and linking it:
mysqldb:
image: mysql:latest
networks:
- glarimy
environment:
- MYSQL_ROOT_PASSWORD=admin
- MYSQL_DATABASE=glarimy
volumes:
- “mysql_data:/glarimy”mysqldb:
The above manifest pulls mysql:latest image from the Docker Hub and runs the container. The name of the container must be mysqldb as the AddService is looking for the database engine on a machine named mysqldb. Also, both must run on the same network to resolve the name. Since the AddService was configured to run on glarimy network (in the previous part), mysqldb is also configured to run on the same network.
The above configuration is also directing the container to create a database named glarimy since the AddService is configured to use that database.
However, this is still not sufficient. The MySQL container writes the data on to the file system that is mapped to the container. Once the container is restarted, the files are gone! That is not good for us. We want the data to be written on to the disk in such a way that it outlives the containers. In other words, we want to mount a volume so that the container uses only that mount point. The last line in the above configuration is meant for that.
The following is the resulting full manifest in docker-compose.yml:
version: “2”
networks:
glarimy:
driver: bridge
services:
zookeeper:
image: docker.io/bitnami/zookeeper:3.8
ports:
- “2181:2181”
volumes:
- “zookeeper_data:/glarimy”
environment:
- ALLOW_ANONYMOUS_LOGIN=yes
networks:
- glarimy
kafka:
image: docker.io/bitnami/kafka:3.1
ports:
- “9092:9092”
volumes:
- “kafka_data:/glarimy”
environment:
- KAFKA_CFG_ZOOKEEPER_CONNECT=zookeeper:2181
- ALLOW_PLAINTEXT_LISTENER=yes
networks:
- glarimy
depends_on:
- zookeeper
mysqldb:
image: mysql:latest
networks:
- glarimy
environment:
- MYSQL_ROOT_PASSWORD=admin
- MYSQL_DATABASE=glarimy
volumes:
- “mysql_data:/glarimy”
ums:
image: glarimy/ums-add-service
networks:
- glarimy
depends_on:
- zookeeper
- mysqldb
volumes:
zookeeper_data:
driver: local
kafka_data:
driver: local
mysql_data:
driver: local
Run the following command to deploy the containers, like we did in the previous part:
$ docker-compose up
However, this is not our actual goal. The docker-compose can deploy multiple containers in one go, only on a single machine. It does not offer resilience and does not offer cluster deployment.
Kubernetes and Minikube
The production infrastructure of microservices consists of several machines forming a cluster. The containers are expected to be distributed fairly across the machines (aka nodes) in the cluster. New nodes may be added to the cluster and existing nodes may be removed from it at any time. Yet, the containers are expected to be rescheduled on the current set of nodes.
Kubernetes does take care of such an orchestration. It deploys the containers across the cluster and redistributes them whenever needed — all without any manual intervention.
Figure 2 is a high-level presentation of Kubernetes architecture.
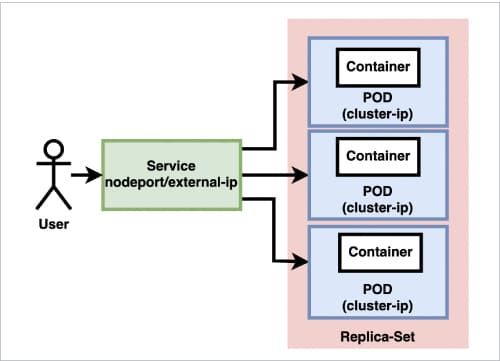
The Kubernetes cluster consists of one or more nodes, which may be physical or virtual machines. Each node can run several pods. A pod is a group of containers. Each pod gets an ephemeral IP address that is known as cluster-ip address. This address is local to the cluster and visible to all other pods across it. In other words, the pods within the cluster can reach out to each other using the cluster-ip address.
Normally, a pod consists of only one application container that runs a microservice. Besides this, a pod may also run several other infrastructure containers that take on tasks such as monitoring, logging, etc.
A deployment unit in Kubernetes consists of a set of such pods. This set is known as a replica-set. For example, you can create a deployment unit for AddService in such a way that three pods are scheduled in the cluster with each pod running an AddService container. If any of the pods crash for whatever reason, Kubernetes schedules another pod on the cluster in such a way that three pods of AddService are always running. Note that the pods of a replica-set do not necessarily run on a single node.
Though this is sufficient for the containers on different pods/nodes to collaborate with each other, it is very cumbersome for a pod to address another pod based on an ephemeral address. To solve this problem, we can create a front-end to each of the replica-sets. Such a front-end is called a service. Each service is exposed with an address that is not ephemeral. The address is called node-port if it is made visible only within the cluster or external-ip if exposed outside the cluster. A service can also be configured with a load balancer so that the incoming calls can be routed to the end-points (pods) in a fairly balanced manner.
This is Kubernetes in a nutshell. There are several tools available in the market to set up a Kubernetes cluster. Minikube is one such tool that helps in setting up single-node clusters. The instructions given below can be followed to set up the Minikube cluster on an Ubuntu machine that has Docker engine running.
Download Minikube distribution.
$ curl -LO https://storage.googleapis.com/minikube/releases/latest/minikube-linux-amd64
Give the following command to install Minikube:
$ sudo install minikube-linux-amd64 /usr/local/bin/minikube
Create a group named docker and add the user:
$ sudo usermod -aG docker <user> && newgrp docker
Start the cluster:
$ minikube start
Create this handy alias:
$ alias kubectl=”minikube kubectl --”
A single-node Kubernetes cluster is now up and running on the local machine.
Deploying MySQL on Kubernetes
Let us deploy a replica-set consisting of just one pod of MySQL. The service is exposed by the name mysqldb. Other pods must use this name in order to access the database service. The port 3306 is exposed only within the cluster. We don’t want any one from outside the cluster to log in to our database server. The deployment also mandates to create a schema by the name glarimy and to use a mounted volume.
apiVersion: v1
kind: Service
metadata:
name: mysqldb
spec:
ports:
- port: 3306
selector:
app: mysqldb
clusterIP: None
---
apiVersion: apps/v1
kind: Deployment
metadata:
name: mysqldb
spec:
selector:
matchLabels:
app: mysqldb
strategy:
type: Recreate
template:
metadata:
labels:
app: mysqldb
spec:
containers:
- image: mysql:5.6
name: mysqldb
env:
- name: MYSQL_ROOT_PASSWORD
value: admin
- name: “MYSQL_DATABASE”
value: “glarimy”
ports:
- containerPort: 3306
name: mysqldb
volumeMounts:
- name: mysql-persistent-storage
mountPath: /var/lib/mysql
volumes:
- name: mysql-persistent-storage
persistentVolumeClaim:
claimName: mysqldb
---
apiVersion: v1
kind: PersistentVolume
metadata:
name: mysqldb
labels:
type: local
spec:
storageClassName: manual
capacity:
storage: 20Gi
accessModes:
- ReadWriteOnce
hostPath:
path: “/mnt/data”
---
apiVersion: v1
kind: PersistentVolumeClaim
metadata:
name: mysqldb
spec:
storageClassName: manual
accessModes:
- ReadWriteOnce
resources:
requests:
storage: 2Gi
Deploying Kafka on Kubernetes
Apache Kafka cluster requires Zookeeper for internal management. So we need to deploy both. Since Kafka and Zookeeper have their own discovery protocol, we expose them on NodePort and connect them.
apiVersion: v1
kind: Service
metadata:
labels:
app: zookeeper
name: zookeeper
spec:
type: NodePort
ports:
- name: zookeeper-port
port: 2181
nodePort: 30181
targetPort: 2181
selector:
app: zookeeper
---
apiVersion: apps/v1
kind: Deployment
metadata:
labels:
app: zookeeper
name: zookeeper
spec:
selector:
matchLabels:
app: zookeeper
replicas: 1
template:
metadata:
labels:
app: zookeeper
spec:
containers:
- image: bitnami/zookeeper
name: zookeeper
ports:
- containerPort: 2181
env:
- name: ZOOKEEPER_ID
value: “1”
- name: ZOOKEEPER_SERVER_1
value: zookeeper
- name: ALLOW_ANONYMOUS_LOGIN
value: “yes”
---
apiVersion: v1
kind: Service
metadata:
labels:
app: kafka
name: kafka
spec:
type: NodePort
ports:
- name: kafka-port
port: 9092
nodePort: 30092
targetPort: 9092
selector:
app: kafka
---
apiVersion: apps/v1
kind: Deployment
metadata:
labels:
app: kafka
name: kafka
spec:
selector:
matchLabels:
app: kafka
replicas: 1
template:
metadata:
labels:
app: kafka
spec:
containers:
- name: kafka
image: bitnami/kafka
ports:
- containerPort: 9092
env:
- name: KAFKA_BROKER_ID
value: “1”
- name: MY_MINIKUBE_IP
valueFrom:
fieldRef:
fieldPath: status.hostIP
- name: KAFKA_ZOOKEEPER_CONNECT
value: “$(MY_MINIKUBE_IP):30181”
- name: KAFKA_LISTENERS
value: “PLAINTEXT://:9092”
- name: MY_POD_IP
valueFrom:
fieldRef:
fieldPath: status.podIP
- name: KAFKA_ADVERTISED_LISTENERS
value: “PLAINTEXT://$(MY_POD_IP):9092”
- name: ALLOW_PLAINTEXT_LISTENER
value: “yes”
Deploying AddService on Kubernetes
And, finally, we want to deploy three instances of AddService and expose them to the outside world through a load balancer with an external-ip.
apiVersion: apps/v1
kind: Deployment
metadata:
name: ums-add-service
labels:
app: ums-add-service
spec:
replicas: 3
selector:
matchLabels:
app: ums-add-service
template:
metadata:
labels:
app: ums-add-service
spec:
containers:
- name: ums-add-service
image: glarimy/ums-add-service
ports:
- containerPort: 8080
---
apiVersion: v1
kind: Service
metadata:
name: ums-add-service
labels:
name: ums-add-service
spec:
type: LoadBalancer
ports:
- port: 8080
selector:
app: ums-add-service
This whole configuration can be written in one single manifest file and deployed with one single command:
$ kubectl create -f <manifest-file-name>.yml
In order to run the load balancer, the following command also needs to run on a separate terminal:
$ minikube tunnel
You can check the deployed service using the following command:
$ kubectl get services
It gives an output that looks like Figure 3. It lists the services, their addresses, etc.

The following command lists the deployments, which show the number of pods of each deployment that is running:
$ kubectl get deployments
The output looks like Figure 4.

And, finally, to see the real pods that run the containers, use the following command:
$ kubectl get pods
Figure 5 shows that there are three pods running for AddService, and one pod running for Zookeeper, Kafka and MySQL each.

Since the AddService is exposed with an external-ip, it can be accessed using the following command:
$ curl -X POST -H ‘Content-Type: application/json’ -i http://<service-external-ip>:8080/user --data ‘{“name”:”Krishna Mohan”, “phone”:9731423166}’
Why is this reference architecture?
Irrespective of the nature of the application, number of microservices, platforms on which they are developed, services like databases, brokers, etc, the overall architecture remains the same like what has been described here.
The development architecture focuses on service decomposition, platform selection, framework selection, design of API, repositories, etc. This part was addressed using our understanding of domain driven design, object-oriented patterns, frameworks like SpringBoot, Flask, Express, etc.
The deployment architecture focuses on number of machines, nodes, replica-sets, pods, address-mechanisms, volumes, etc. This part is addressed using our understanding of container technology and Kubernetes. We will dwell into design patterns associated exclusively with microservices like gateways, circuit breakers, registries, etc, in future. The good thing is that Kubernetes and other such tools implement many of these patterns out-of-the-box.
Before going that far, we will develop the FindService, SearchService and JournalService on Python and Node platforms in the next parts of this series of articles so that we take UMS to a conclusion.


