


Microservices follow domain driven design (DDD), irrespective of the platform on which they are developed. Python microservices are not an exception. The object-oriented features of Python 3 make it even easier to model services on the lines of DDD. Part 10 of this series demonstrates how to deploy FindService of user management system as a Python microservice on Kubernetes.
The power of microservices architecture lies partly in its polyglot nature. The enterprises decompose their functionality into a set of microservices and each team chooses a platform of its choice.
Our user management system was already decomposed into four microservices, namely, AddService, FindService, SearchService and JournalService. The AddService was developed on the Java platform and deployed on the Kubernetes cluster for resilience and scalability. This doesn’t mean that the remaining services are also developed on Java. We are free to choose a suitable platform for individual services.
Let us pick Python as the platform for developing the FindService. The model for FindService has already been designed (refer to the March 2022 issue of Open Source For You). We only need to convert this model into code and configuration.
The Pythonic approach
Python is a general-purpose programming language that has been around for about three decades. In the early days, it was the first choice for automation scripting. However, with frameworks like Django and Flask, its popularity has been growing and it is now adopted in various other domains like enterprise application development. Data science and machine learning pushed the envelope further and Python is now one of the top three programming languages.
Many people attribute the success of Python to its ease of coding. This is only partially true. As long as your objective is to develop small scripts, Python is just like a toy. You love it. However, the moment you enter the domain of serious large-scale application development, you will have to handle lots of ifs and buts, and Python becomes as good as or as bad as any other platform. For example, take an object-oriented approach! Many Python developers may not even be aware of the fact that Python supports classes, inheritance, etc. Python does support full-blown object-oriented development, but in its own way — the Pythonic way! Let us explore it!
The domain model
AddService adds the users to the system by saving the data into a MySQL database. The objective of the FindService is to offer a REST API to find the users by their name. The domain model is reproduced in Figure 1. It primarily consists of value objects like Name, PhoneNumber along with User entity and UserRepository.
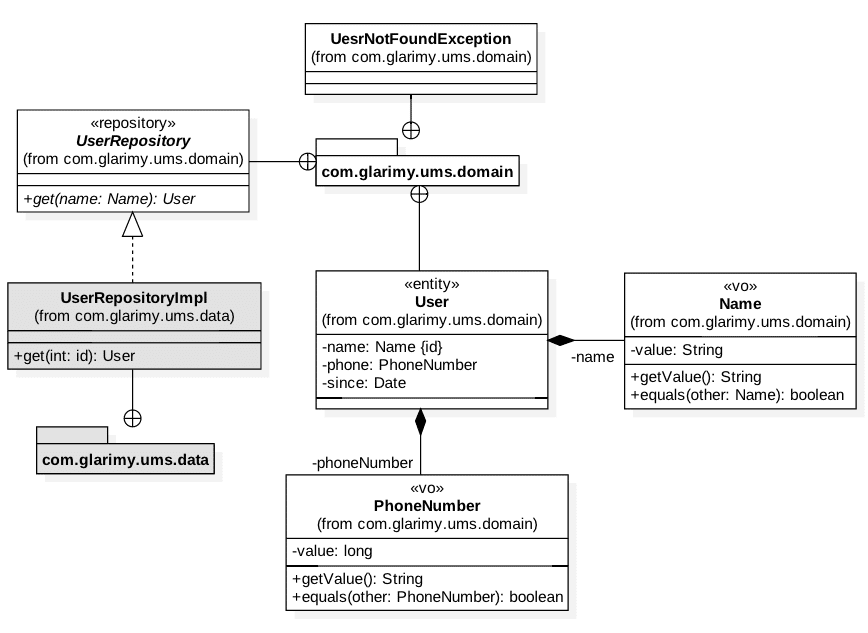
Let us begin with the Name. Since it is a value object, it must be validated by the time it is created and must remain immutable. The basic structure looks like this:
class Name:
value: str
def __post_init__(self):
if self.value is None or len(self.value.strip()) < 8 or len(self.value.strip()) > 32:
raise ValueError(“Invalid Name”)
As you can see, the Name consists of a value attribute of type str. As part of the post initialization, the value is validated.
Python 3.7 offers @dataclass decorator, which offers many features of a data-carrying class out-of-the-box like constructors, comparison operators, etc.
Following is the decorated Name:
from dataclasses import dataclass

@dataclass
class Name:
value: str
def __post_init__(self):
if self.value is None or len(self.value.strip()) < 8 or len(self.value.strip()) > 32:
raise ValueError(“Invalid Name”)
The following code can create an object Name:
name = Name(“Krishna”)
The value attribute can be read or written as follows:
name.value = “Mohan”
print(name.value)
Another Name object can be compared as easily as follows:
other = Name(“Mohan)
if name == other: print(“same”)
As you can see, the objects are compared by their values, not by their references. This is all out-of-the-box. We can also make the object immutable, by freezing. Here is the final version of Name as a value object:
from dataclasses import dataclass

@dataclass(frozen=True)
class Name:
value: str
def __post_init__(self):
if self.value is None or len(self.value.strip()) < 8 or len(self.value.strip()) > 32:
raise ValueError(“Invalid Name”)
The PhoneNumber also follows a similar approach, as it is also a value object:
@dataclass(frozen=True)
class PhoneNumber:
value: int
def __post_init__(self):
if self.value < 9000000000:
raise ValueError(“Invalid Phone Number”)
The User class is an entity, not a value object. In other words, the User is not immutable. Here is the structure:
from dataclasses import dataclass
import datetime

@dataclass
class User:
_name: Name
_phone: PhoneNumber
_since: datetime.datetime

def __post_init__(self):
if self._name is None or self._phone is None:
raise ValueError(“Invalid user”)
if self._since is None:
self.since = datetime.datetime.now()
You can observe that the User is not frozen as we want it to be mutable. However, we do not want all the properties mutable. The identity field like _name and fields like _since are not expected to be modified. Then, how can this be controlled?
Python 3 offers the so-called Descriptor protocol. It helps us in defining the getters and setters appropriately. Let us add the getters to all the three fields of User using the @property decorator:
@property
def name(self) -> Name:
return self._name

@property
def phone(self) -> PhoneNumber:
return self._phone

@property
def since(self) -> datetime.datetime:
return self._since
And the setter for the phone field can be added using @<field>.setter decoration:
@phone.setter
def phone(self, phone: PhoneNumber) -> None:
if phone is None:
raise ValueError(“Invalid phone”)
self._phone = phone
The User can also be given a method for easy print representation by overriding the __str__() function:
def __str__(self):
return self.name.value + “ [“ + str(self.phone.value) + “] since “ + str(self.since)
With this the entities and the value objects of the domain model are ready. Creating an exception class is as easy as follows:
class UserNotFoundException(Exception):
pass
The only other one remaining in the domain model is the UserRepository. Python offers a useful module called abc for building abstract methods and abstract classes. Since UserRepository is only an interface, we can use the abc package.
Any Python class that extends abc.ABC becomes abstract. Any function with the @abc.abstractmethod decorator becomes an abstract function. Here is the resultant structure of UserRepository:
from abc import ABC, abstractmethod

class UserRepository(ABC):
@abstractmethod
def fetch(self, name:Name) -> User:
pass
The UserRepository follows the repository pattern. In other words, it offers appropriate CRUD operations on the User entity without exposing the underlying data storage semantics. In our case, we need only fetch() operation since FindService only finds the users.
Since the UserRepository is an abstract class, we cannot create instance objects from this class. A concrete class must implement this abstract class for object creation.The data layer
The UserRepositoryImpl offers the concrete implementation of UserRepository:
class UserRepositoryImpl(UserRepository):
def fetch(self, name:Name) -> User: pass
Since the AddService stores the data of the users in a MySQL database server, the UserRepositoryImpl also must connect to the same database server to retrieve the data. The code for connecting to the database is given below. Observe that we are using the connector library of MySQL.
from mysql.connector import connect, Error
class UserRepositoryImpl(UserRepository):
def fetch(self, name:Name) -> User:
try:
with connect(
host=”mysqldb”,
user=”root”,
password=”admin”,
database=”glarimy”,
) as connection:
with connection.cursor() as cursor:
cursor.execute(“SELECT * FROM ums_users where name=%s”, (name.value,))
row = cursor.fetchone()
if cursor.rowcount == -1:
raise UserNotFoundException()
else:
return User(Name(row[0]), PhoneNumber(row[1]), row[2])
except Error as e:
raise e
In the above snippet, we are connecting to a database server named mysqldb using root as the user and admin as the password, in order to use the database schema named glarimy. It is fine to have such information in the code for an illustration, but surely not a suggested approach in production as it exposes sensitive information.
The logic of the fetch() operation is quite intuitive. It executes a SELECT query against the ums_users table. Recollect that the AddService was writing the user data into the same table. In case the SELECT query returns no records, the fetch() function throws UserNotFoundException. Otherwise, it constructs the User entity from the record and returns it to the caller. Nothing unusual.
The application layer
And finally, we need to build the application layer. The model is reproduced in Figure 2. It consists of just two classes: a controller and a DTO.
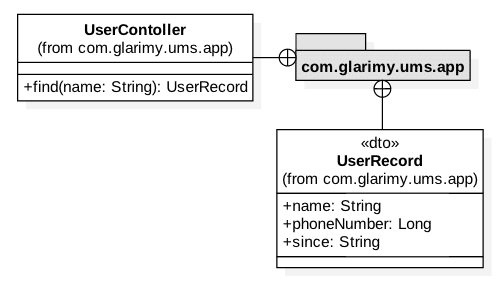
As we already know, a DTO is just a data container without any business logic. It is primarily used for carrying data between the FindService and the outside world. We just offer a way to convert the UserRecord into a dictionary for JSON marshalling in the REST layer:
class UserRecord:
def toJSON(self):
return {
“name”: self.name,
“phone”: self.phone,
“since”: self.since
}
The job of a controller is to convert DTOs to domain objects for invoking the domain services and vice versa, as can be observed in the find() operation.
class UserController:

def __init__(self):
self._repo = UserRepositoryImpl()

def find(self, name: str):
try:
user: User = self._repo.fetch(Name(name))
record: UserRecord = UserRecord()
record.name = user.name.value
record.phone = user.phone.value
record.since = user.since
return record
except UserNotFoundException as e:
return None
The find() operation receives a string as a name, converts it as a Name object and invokes the UserRepository to fetch the corresponding User object. If it is found, a UserRecord is created by using the retrieved User object. Recollect that it is necessary to convert the domain objects as DTO to hide the domain model from the external world.
The UserController need not have multiple instances. It can be a singleton as well. By overriding the __new__ operation, it can be modelled as a singleton:
class UserController:
def __new__(self):
if not hasattr(self, ‘instance’):
self.instance = super().__new__(self)
return self.instance

def __init__(self):
self._repo = UserRepositoryImpl()

def find(self, name: str):
try:
user: User = self._repo.fetch(Name(name))
record: UserRecord = UserRecord()
record.name = user.name.getValue()
record.phone = user.phone.getValue()
record.since = user.since
return record
except UserNotFoundException as e:
return None
We are done with implementing the model of the FindService fully. The only task remaining is to expose it as a REST service.
The REST API
Our FindService offers only one API and that is to find a user by name. The obvious URI is as follows:
GET /user/{name}
This API is expected to find the user with the supplied name and returns the details of phone number, etc, of the user in JSON format. In case no such user is found, the API is expected to return a 404 status.
We can use the Flask framework to build the REST API. This framework was originally built for developing Web applications using Python. It is further extended to support the REST views besides the HTML views. We pick this framework for its simplicity.
Start by creating a Flask application:
from flask import Flask
app = Flask(__name__)
Then define the routes for the Flask application as simple functions:
@app.route(‘/user/<name>’)
def get(name): pass
Observe that the @app.route is mapped to the API /user/<name> on one side and to the function get() on the other side.
As you may already have figured out, this get() function will be invoked every time the user accesses the API with a URI like http://server:port/user/Krishna. Flask is intelligent enough to extract ‘Krishna’ as the name from the URI and pass it to the get() function.
The get() function is straightforward. It asks the controller to find the user and returns the same after marshalling it to the JSON format along with the usual HTTP headers. In case the controller returns None, the get() function returns the response with an appropriate HTTP status.
from flask import jsonify, abort

controller = UserController()
record = controller.find(name)
if record is None:
abort(404)
else:
resp = jsonify(record.toJSON())
resp.status_code = 200
return resp
And, finally, the Flask app needs to be served. We can use the waitress server for this purpose.
from waitress import serve
serve(app, host=”0.0.0.0”, port=8080)
In the above snippet, the app is served on port 8080 on the local host.
The final code looks like this:
from flask import Flask, jsonify, abort
from waitress import serve

app = Flask(__name__)

@app.route(‘/user/<name>’)
def get(name):
controller = UserController()
record = controller.find(name)
if record is None:
abort(404)
else:
resp = jsonify(record.toJSON())
resp.status_code = 200
return resp

serve(app, host=”0.0.0.0”, port=8080)
Deployment
The FindService is now ready with code. It has its domain model, data layer, and application layer besides the REST API. The next step is to build the service, containerise it, and then deploy it on Kubernetes. The process is in no way different from any other service, though there are some Python-specific steps.
Before proceeding further, let us have a look at the folder/file structure:
+ ums-find-service
+ ums
- domain.py
- data.py
- app.py
- Dockerfile
- requirements.txt
- kube-find-deployment.yml
As you can observe, the whole work is under the ums-find-service folder. It contains the code in the ums folder and configurations in Dockerfile, requirements.txt and kube-find-deployment.yml files.
The domain.py consists of the domain model classes, data.py consists of UserRepositoryImpl and app.py consists of the rest of the code. Since we have seen the code already, let us move on to the configuration files.
The first one is the file named requirements.txt. It declares the external dependencies for the Python system to download and install. We need to populate it with every external Python module that we use in the FindService. As you know, we used MySQL connector, Flask and Waitress modules. Hence the following is the content of the requirements.txt.
Flask==2.1.1
Flask_RESTful
mysql-connector-python
waitress
The second step is to declare the manifestation for dockerisation in Dockerfile. Here it is:
FROM python:3.8-slim-buster

WORKDIR /ums
ADD ums /ums
ADD requirements.txt requirements.txt
RUN pip3 install -r requirements.txt

EXPOSE 8080
ENTRYPOINT [“python”]
CMD [“/ums/app.py”]
In summary, we used Python 3.8 as the baseline and moved our code from the ums folder to a corresponding folder in the Docker container, besides moving the requirements.txt. Then we instructed the container to run the pip3 install command. And, finally, we exposed port 8080 (since the waitress was running on that port).
In order to run the service, we instructed the container to use the following command:
python /ums/app.py
Once the Dockerfile is ready, run the following command from within the ums-find-service folder to create the Dockerised image:
docker build -t glarimy/ums-find-service
It creates the Docker image, which can be found using the following command:
docker images
Try pushing the image to the Docker Hub as appropriate. You may log in to Docker as well.
docker login
docker push glarimy/ums-find-service
And the last step is to build the manifest for the Kubernetes deployment.
We have already covered the way to set up the Kubernetes cluster, and deploy and use services, in the previous part. I am assuming that we still have the manifest file we used in the previous part for deploying the AddService, MySQL, Kafka and Zookeeper. We only need to add the following entries into the kube-find-deployment.yml file:
apiVersion: apps/v1
kind: Deployment
metadata:
name: ums-find-service
labels:
app: ums-find-service
spec:
replicas: 3
selector:
matchLabels:
app: ums-find-service
template:
metadata:
labels:
app: ums-find-service
spec:
containers:
- name: ums-find-service
image: glarimy/ums-find-service
ports:
- containerPort: 8080
---
apiVersion: v1
kind: Service
metadata:
name: ums-find-service
labels:
name: ums-find-service
spec:
type: LoadBalancer
ports:
- port: 8080
selector:
app: ums-find-service
The first part of the above manifest declares a deployment of FindService from the image glarimy/ums-find-service with three replicas. It also exposes port 8080. And the latter part of the manifest declares a Kubernetes service as the front-end for the FindService deployment. Recollect that the MySQL service in the name of mysqldb was already part of the above manifest from the previous part.
Run the following command to deploy the manifest on a Kubernetes cluster:
kubectl create -f kube-find-deployment.yml
Once the deployment is finished, you can verify the pods and services using the following command:
kubectl get services
It gives an output as shown in Figure 3.

It lists all the services running on the cluster. Make a note of the external-ip of the FindService and use the curl command to invoke the service:
curl http://10.98.45.187:8080/user/KrishnaMohan
Note that the IP address 10.98.45.187 corresponds to the FindService, as found in Figure 3.
If we have used the AddService to create a user by the name KrishnaMohan, the above curl command looks like what is shown in Figure 4.

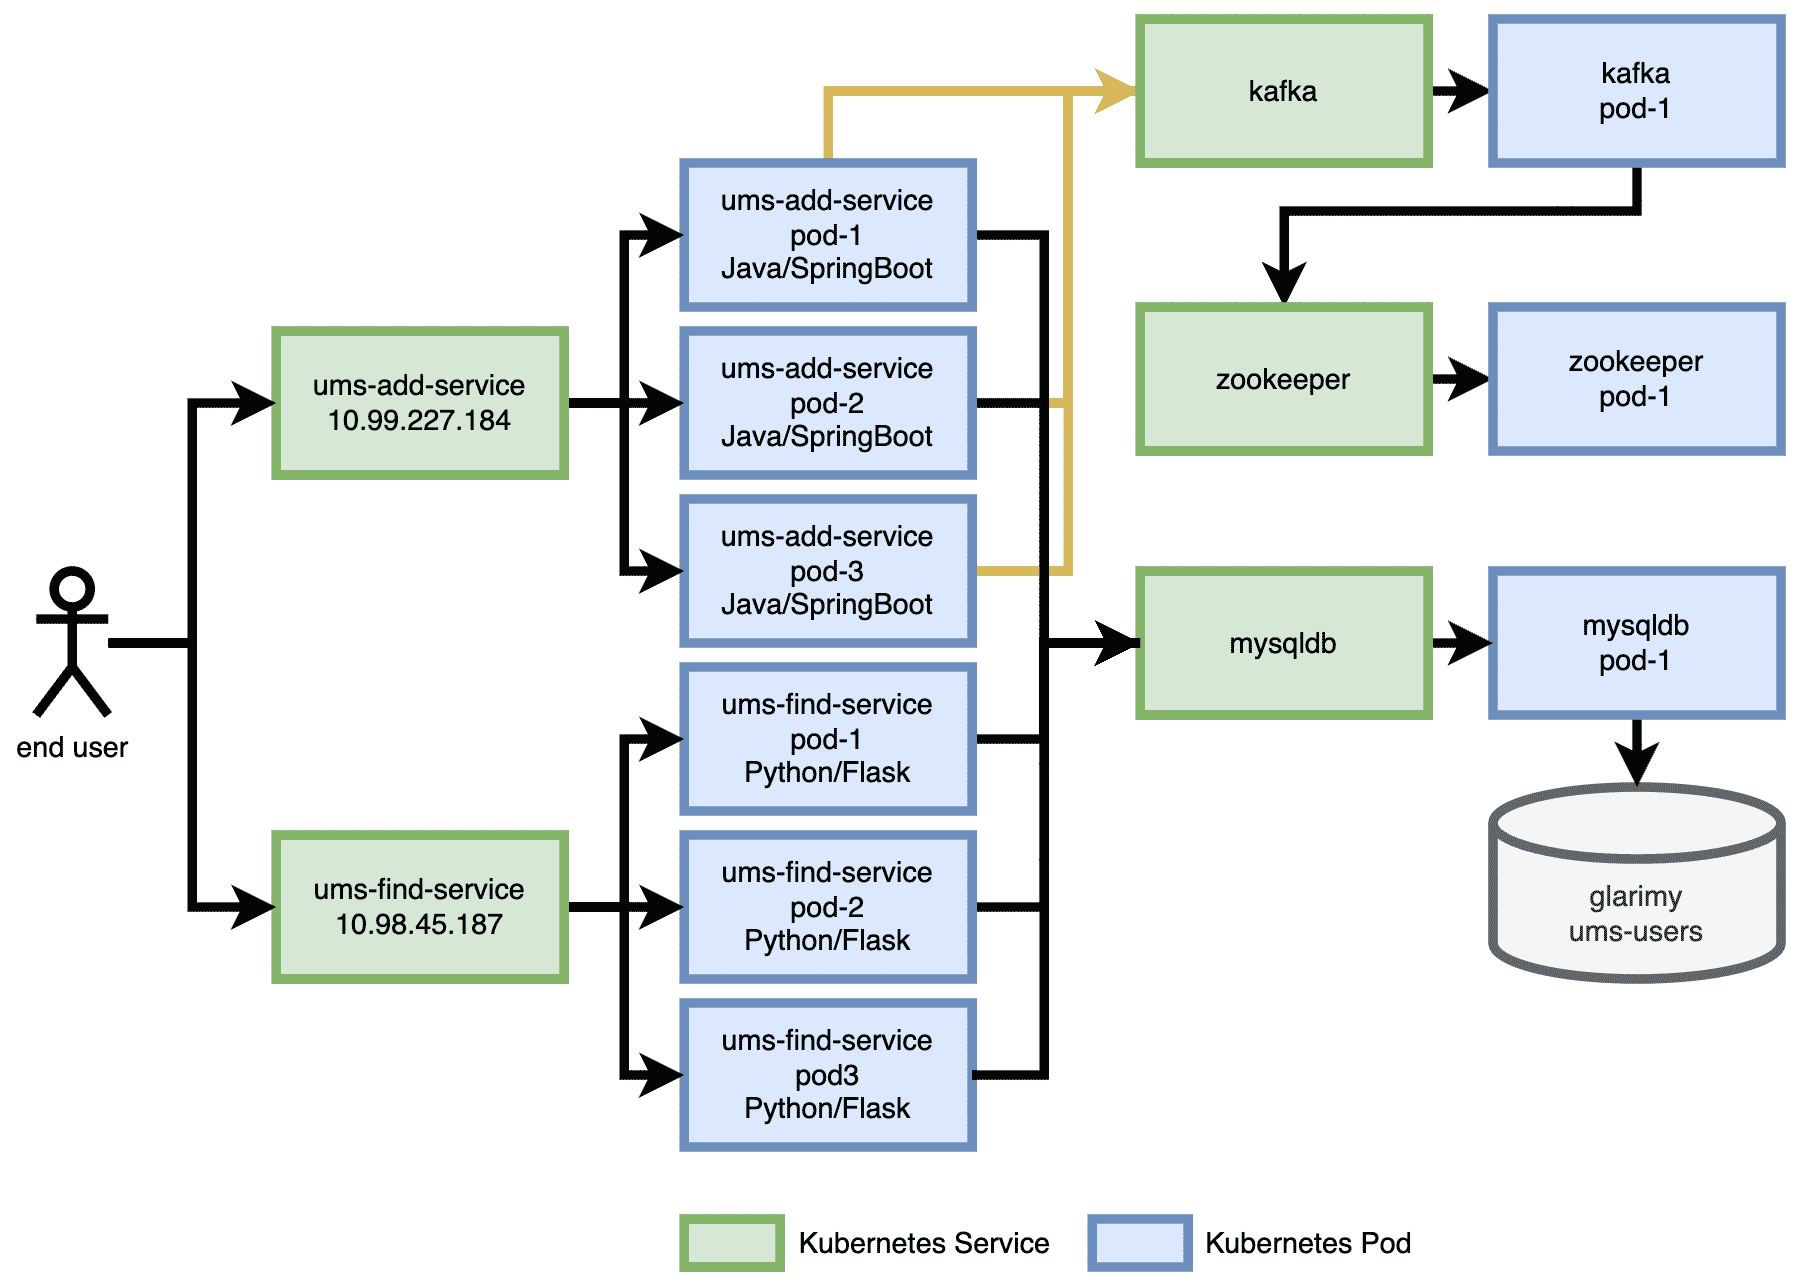
With the AddService and FindService, along with the required back-end services for storage and messaging, the architecture of the user management system (UMS) stands as shown in Figure 5, at this point. You can observe that the end-user uses the IP address of the ums-add-service for adding a new user, whereas it uses the IP address of the ums-find-service for finding existing users. Each of these Kubernetes services are backed by three pods with the corresponding containers. Also note that the same mysqldb service is used for storing and retrieving the user data.
What about the other services?
The UMS consists of two more services, namely, SearchService and JournalService. We will design these services in the next part of this series on the Node platform, and deploy them on the same Kubernetes cluster to demonstrate the real power of polyglot microservices architecture. We will conclude by observing some design patterns pertaining to microservices.


