


This article will tell you how to install minikube and use it for deploying a sample application. It will also tell you how to build a Docker image and run it.
Kubernetes or k8s is an open source, extensible and portable container orchestration platform developed by Google that offers declarative configuration and automation for deployment. It has become one of the most popular tools for DevOps practices because of its capabilities and features for deployment, management, and scaling applications in Kubernetes clusters. We can create a Kubernetes cluster in an on-premise environment as well as on private and public clouds. The public cloud provides managed services for Kubernetes. Google Cloud Platform has Google Kubernetes Engine, AWS has Amazon Elastic Kubernetes Services (EKS) and Azure has Azure Kubernetes Service (AKS) for managing Kubernetes clusters in a cloud environment.
In this article, we will use minikube for sample application deployment. minikube is a tool that is used to run Kubernetes locally. It runs a single-node Kubernetes cluster so that hands-on work can be done on Kubernetes for daily software development.
Some of the important commands that we are going to use in this article are listed below.
| Description | Command |
| Get Kubectl version | kubectl version |
| Get details on Kubernetes cluster | kubectl cluster-info |
| Get details about a node | kubectl describe nodeName |
| Get details about a pod | kubectl describe podName |
| List of all pods | kubectl get pods |
| List of all services | kubectl get services |
| List of all deployments | kubectl get deployments |
You will need the following to install minikube on the Ubuntu operating system.
| Container or virtual machine manager | Architectures |
|
|
Go to Settings and click on the About tab to verify the Ubuntu version.
Next we will install minikube on the Ubuntu operating system.
Minikube installation on Ubuntu 22.04.1 LTS
To install the latest minikube stable release on Ubuntu 22.04.1 LTS execute the following commands:
osfy@ubuntu-22-04-1-lts:~/Desktop$ curl -LO https://storage.googleapis.com/minikube/releases/latest/minikube_latest_amd64.deb

% Total % Received % Xferd Average Speed Time Time Time Current
Dload Upload Total Spent Left Speed
100 26.1M 100 26.1M 0 0 1430k 0 0:00:18 0:00:18 --:--:-- 1231k

osfy@ubuntu-22-04-1-lts:~/Desktop$ sudo dpkg -i minikube_latest_amd64.deb

Selecting previously unselected package minikube.
(Reading database ... 204624 files and directories currently installed.)

Preparing to unpack minikube_latest_amd64.deb ...
Unpacking minikube (1.28.0-0) ...
Setting up minikube (1.28.0-0) …
Start your minikube cluster. If you face any issues, stop the cluster, delete it and execute the minikube start command again.
Now verify the existing status of minikube by using the minikube status command:
osfy@ubuntu-22-04-1-lts:~/Desktop$ minikube status
We have installed minikube and verified it. The next step is to verify the Java and Maven installation, create a Docker image, and deploy it using Kubernetes YAML in the minikube cluster.
Java and Maven installation
We need Java and Maven to build a package file for the sample application that we are going to run in a Docker container. Install Java and Maven in the Ubuntu OS. Once installation is completed successfully, verify the Java version using the java –version command.
osfy@ubuntu-22-04-1-lts:~/Desktop$ java -version
openjdk version “11.0.17” 2022-10-18
OpenJDK Runtime Environment (build 11.0.17+8-post-Ubuntu-1ubuntu222.04)
OpenJDK 64-Bit Server VM (build 11.0.17+8-post-Ubuntu-1ubuntu222.04, mixed mode, sharing)
Verify the Maven version using the mvn -version command:
osfy@ubuntu-22-04-1-lts:~/Desktop$ mvn –version
Apache Maven 3.6.3
Maven home: /usr/share/maven
Java version: 11.0.17, vendor: Ubuntu, runtime: /usr/lib/jvm/java-11-openjdk-amd64
Default locale: en_IN, platform encoding: UTF-8
OS name: “linux”, version: “5.15.0-53-generic”, arch: “amd64”, family: “unix”
We will use PetClinic as a sample application. PetClinic is a Spring Boot application built using Maven or Gradle. In this article we will build a JAR file and deploy it in a minikube cluster. Visit https://github.com/spring-projects/spring-petclinic to know more. Copy the GitHub repository URL from the above URL and use the git clone command to clone it locally:
osfy@ubuntu-22-04-1-lts:~/Desktop$ git clone https://github.com/spring-projects/spring-petclinic.git
Once the source code is available, go to the root of the project using the change directory command as given below, and execute the ./mvnw package command to create a JAR file. At first execution it will try to download multiple dependencies and hence will take some time to complete execution.
osfy@ubuntu-22-04-1-lts:~/Desktop$ cd spring-petclinic
osfy@ubuntu-22-04-1-lts:~/Desktop/spring-petclinic$ ./mvnw package
Warning: JAVA_HOME environment variable is not set.
[INFO] Scanning for projects...
Downloading from spring-snapshots: https://repo.spring.io/snapshot/org/springframework/boot/spring-boot-starter-parent/2.7.3/spring-boot-starter-parent-2.7.3.pom
.
.
Downloaded from central: https://repo.maven.apache.org/maven2/org/springframework/session/spring-session-bom/2021.2.0/spring-session-bom-2021.2.0.pom (3.1 kB at 6.0 kB/s)
[INFO]
[INFO] ------------< org.springframework.samples:spring-petclinic >------------
[INFO] Building petclinic 2.7.3
[INFO] --------------------------------[ jar ]---------------
.
.
[INFO] Building jar: /home/osfy/Desktop/spring-petclinic/target/spring-petclinic-2.7.3.jar
[INFO]
[INFO] --- spring-boot-maven-plugin:2.7.3:repackage (repackage) @ spring-petclinic ---
[INFO] Replacing main artifact with repackaged archive
[INFO] ------------------------------------------------------
[INFO] BUILD SUCCESS
[INFO] ------------------------------------------------------
[INFO] Total time: 15:36 min
[INFO] Finished at: 2022-12-01T00:56:56+05:30
[INFO] ------------------------------------------------------
Observe the output of Maven command execution where it says Building jar: /home/osfy/Desktop/spring-petclinic/target/spring-petclinic-2.7.3.jar.
Now it is confirmed that we have a JAR file ready. The next step is to create a Docker image that contains the JAR file and runtime environment.
So, what is a Dockerfile? Well, it’s nothing but the text document that provides build instructions to build the image with your application package.
FROM openjdk:11
MAINTAINER osfy
COPY target/spring-petclinic-2.7.3.jar app.jar
ENTRYPOINT [“java”,”-jar”,”/app.jar”]
Place the Dockerfile in the project root directory. Now, it is time to build a Docker image.
For testing locally with minikube, we should point the local Docker daemon to the minikube internal Docker registry, and build the image to install it in the minikube cluster: eval $(minikube docker-env).
Building a Docker image and running a container
Execute the sudo docker image build -t petclinic:latest command from the project root directory.
osfy@ubuntu-22-04-1-lts:~/Desktop$ cd spring-petclinic/
osfy@ubuntu-22-04-1-lts:~/Desktop/spring-petclinic$ ls
build.gradle docker-compose.yml Dockerfile gradle gradlew gradlew.bat LICENSE.txt mvnw mvnw.cmd pom.xml readme.md settings.gradle src target
osfy@ubuntu-22-04-1-lts:~/Desktop/spring-petclinic$ docker image build -t petclinic:latest .
The output screen will show you the successful execution of the command.
Successfully built 6f78e1ae176e
Successfully tagged petclinic:latest
Now verify that the PetClinic image is available while you execute the docker images command.
osfy@ubuntu-22-04-1-lts:~/Desktop/spring-petclinic$ docker images

REPOSITORY TAG IMAGE ID CREATED SIZE
petclinic latest 6f78e1ae176e 6 minutes ago 707MB
registry.k8s.io/kube-apiserver v1.25.3 0346dbd74bcb 7 weeks ago 128MB
registry.k8s.io/kube-scheduler v1.25.3 6d23ec0e8b87 7 weeks ago 50.6MB
registry.k8s.io/kube-controller-manager v1.25.3 603999231275 7 weeks ago 117MB
registry.k8s.io/kube-proxy v1.25.3 beaaf00edd38 7 weeks ago 61.7MB
openjdk 11 47a932d998b7 4 months ago 654MB
registry.k8s.io/pause 3.8 4873874c08ef 5 months ago 711kB
registry.k8s.io/etcd 3.5.4-0 a8a176a5d5d6 6 months ago 300MB
registry.k8s.io/coredns/coredns v1.9.3 5185b96f0bec 6 months ago 48.8MB
k8s.gcr.io/pause 3.6 6270bb605e12 15 months ago 683kB
gcr.io/k8s-minikube/storage-provisioner v5 6e38f40d628d 20 months ago 31.5MB
We will use the Docker images available in the local environment and not from the public or private Docker registry. So set imagePullPolicy value to Never in the YAML file. Here is the YAML file (for deployment and service) to deploy a sample application in the minikube cluster:
apiVersion: apps/v1
kind: Deployment
metadata:
creationTimestamp: null
labels:
app: petclinic
name: petclinic
spec:
replicas: 1
selector:
matchLabels:
app: petclinic
strategy: {}
template:
metadata:
creationTimestamp: null
labels:
app: petclinic
spec:
containers:
- image: petclinic:latest
name: petclinic
resources: {}
imagePullPolicy: Never
status: {}
---
apiVersion: v1
kind: Service
metadata:
name: petclinic
spec:
type: LoadBalancer
selector:
app: petclinic
ports:
- protocol: TCP
port: 8080
targetPort: 8080
Use the kubectl apply command to create service and deployment available in the YAML file.
osfy@ubuntu-22-04-1-lts:~/Desktop$ kubectl apply -f petclinic-deployment.yaml
deployment.apps/petclinic created
service/petclinic created
The minikube tunnel runs as a process. It helps to expose the Load Balancer Service type. We need to run the minikube tunnel command in a separate terminal so the load balancer continues to run until we press CTRL + C. It helps to create a network route on the host. Open a new terminal window or a tab and execute the minikube tunnel command:
osfy@ubuntu-22-04-1-lts:~/Desktop$ minikube tunnel
[sudo] password for osfy:
Status:
machine: minikube
pid: 21648
route: 10.96.0.0/12 -> 192.168.49.2
minikube: Running
services: [petclinic]
errors:
minikube: no errors
router: no errors
loadbalancer emulator: no errors
Status:
machine: minikube
pid: 21648
route: 10.96.0.0/12 -> 192.168.49.2
minikube: Running
services: []
errors:
minikube: no errors
router: no errors
loadbalancer emulator: no errors
Let’s verify services first:
osfy@ubuntu-22-04-1-lts:~/Desktop$ kubectl get services

NAME TYPE CLUSTER-IP EXTERNAL-IP PORT(S) AGE
kubernetes ClusterIP 10.96.0.1 <none> 443/TCP 13h
petclinic LoadBalancer 10.104.9.29 10.104.9.29 8080:30768/TCP 118s
Now let’s verify deployments:
osfy@ubuntu-22-04-1-lts:~/Desktop$ kubectl get deployments

NAME READY UP-TO-DATE AVAILABLE AGE
petclinic 1/1 1 1 5m3s
Next, let’s verify pods:
osfy@ubuntu-22-04-1-lts:~/Desktop$ kubectl get pods

NAME READY STATUS RESTARTS AGE
petclinic-686f5d46c8-9qsxb 1/1 Running 0 4m56s
Visit the localhost:8080 in the browser and our sample application is ready (Figure 2).
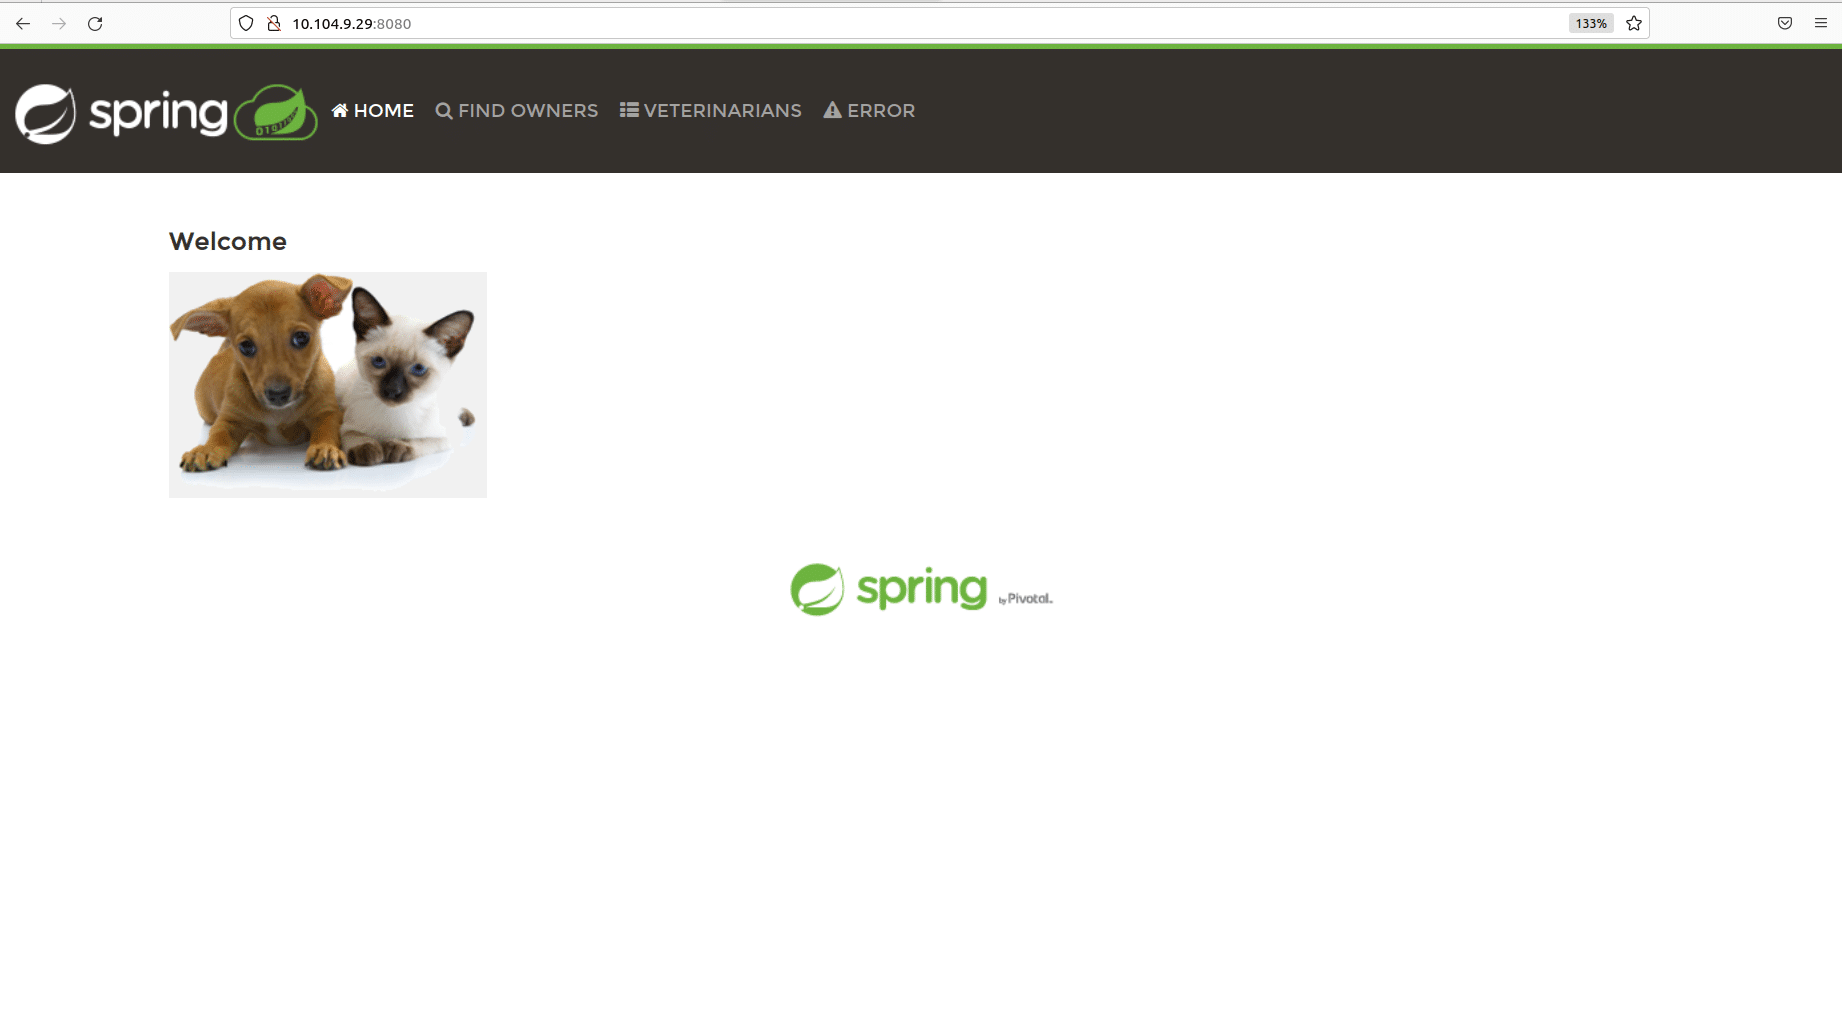
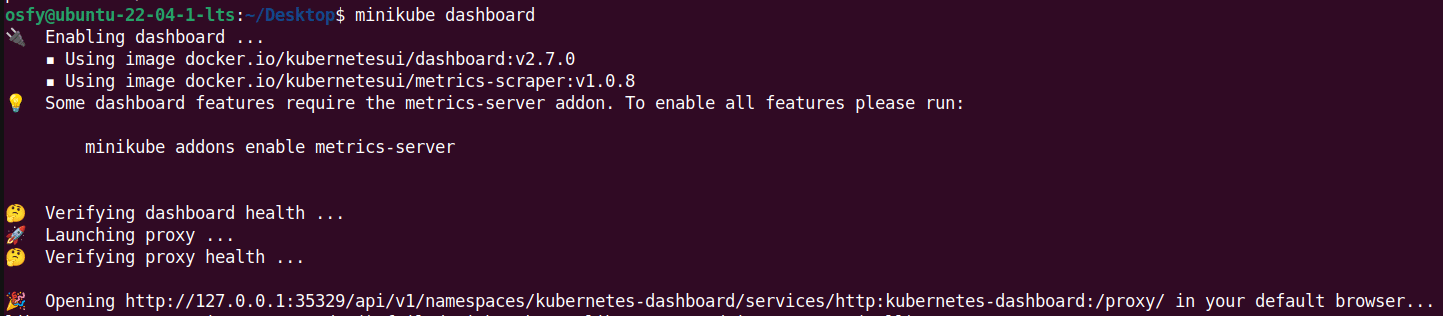
Figure 3 shows the verification of the minikube dashboard.
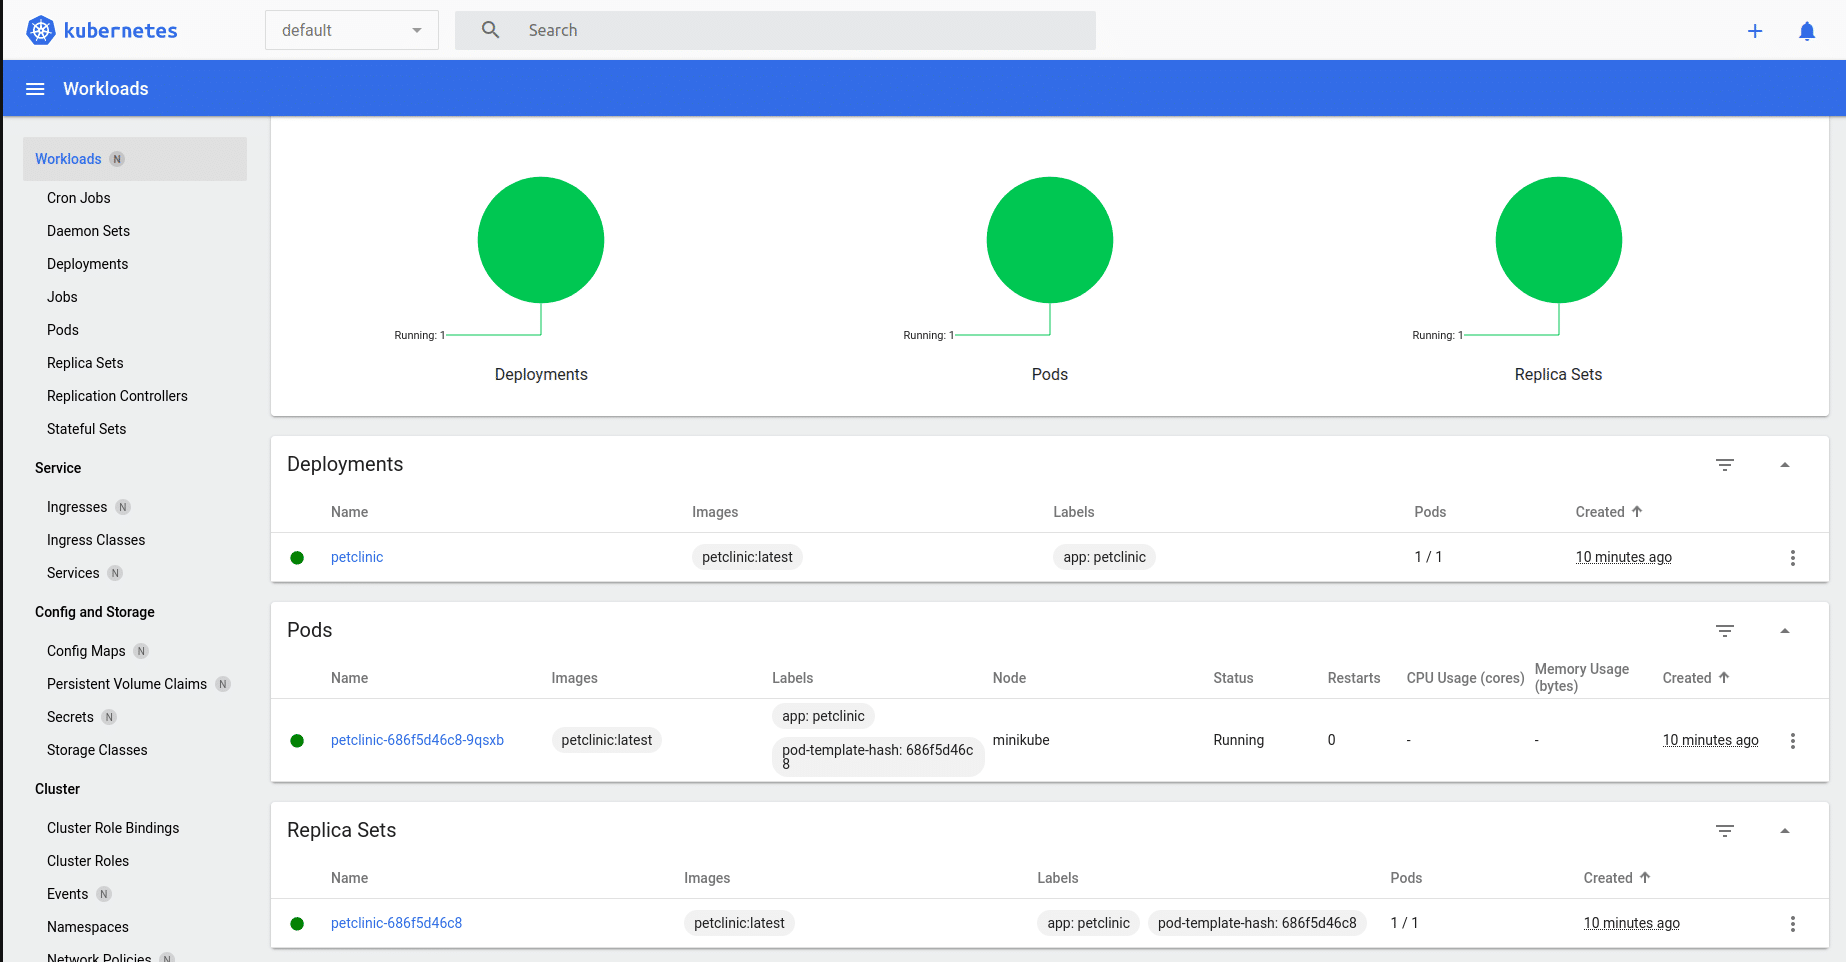
Refer to Figure 4 for verification of workloads with respect to deployments, pods, and replica sets.
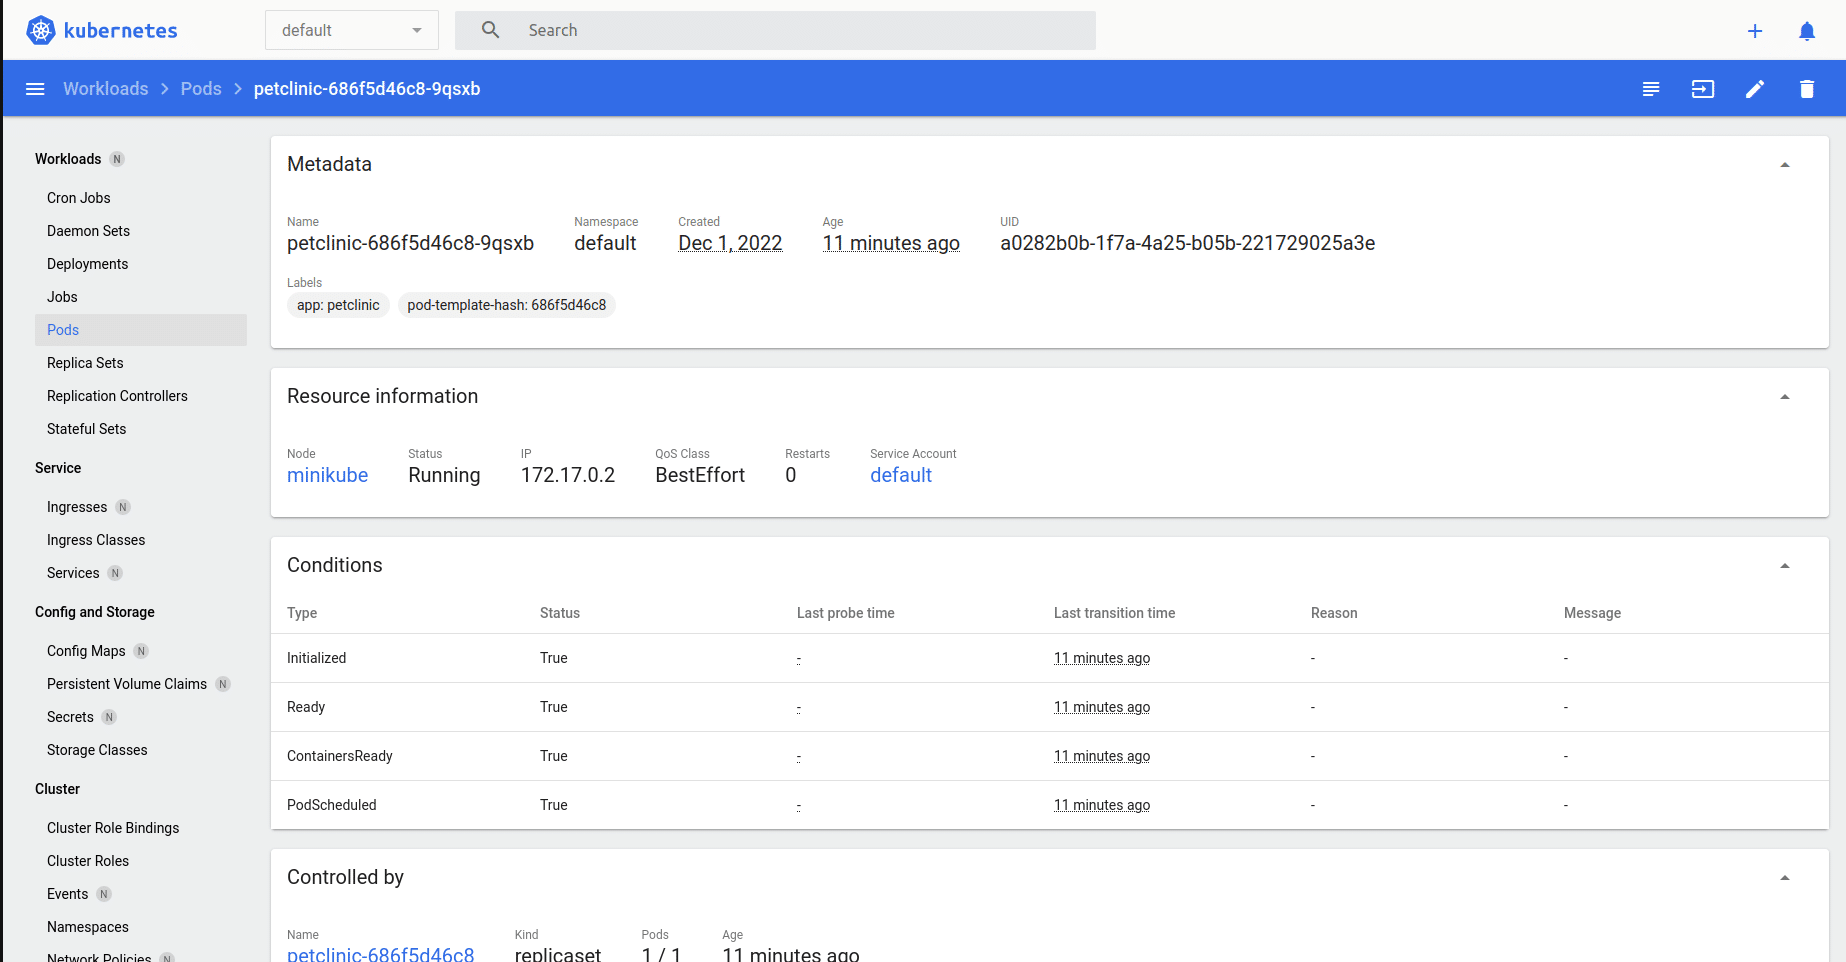
Click on Pods and go to the PetClinic Pod to verify details about it (Figure 5).
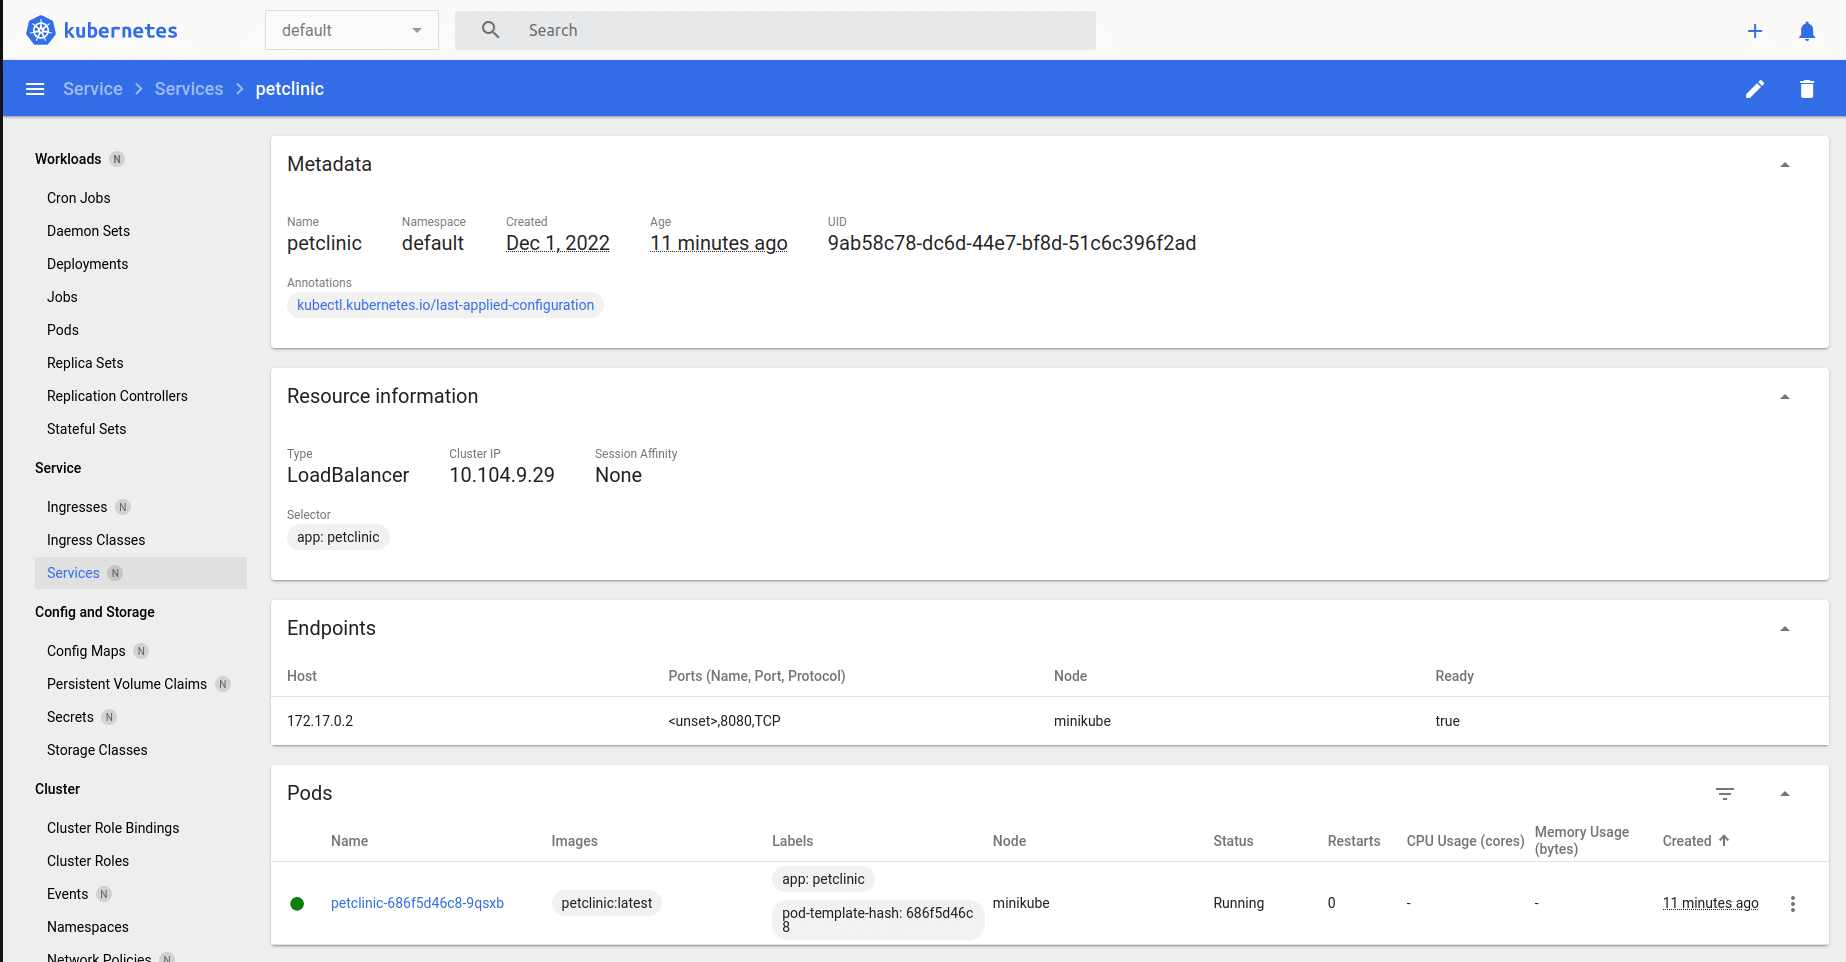
Verify the PetClinic Service in the Services section (refer Figure 6).
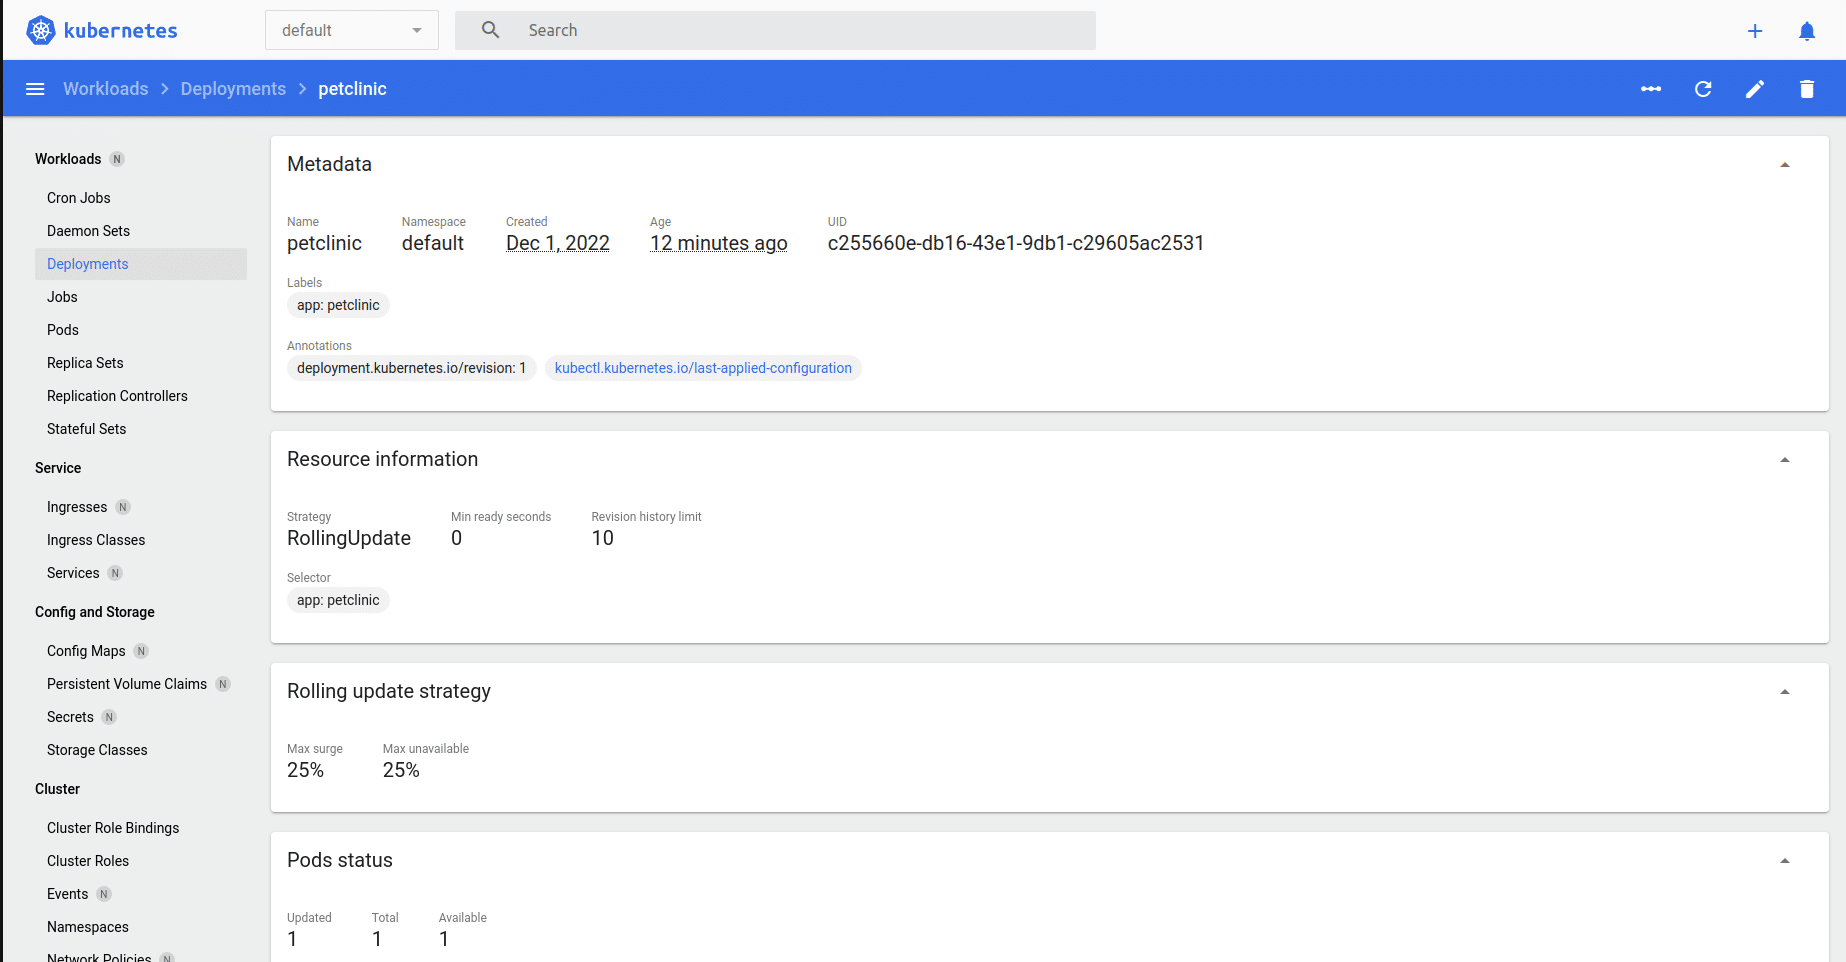
Verify the PetClinic Deployment in the Deployments section. Check the pod status in the same section as seen in Figure 7.
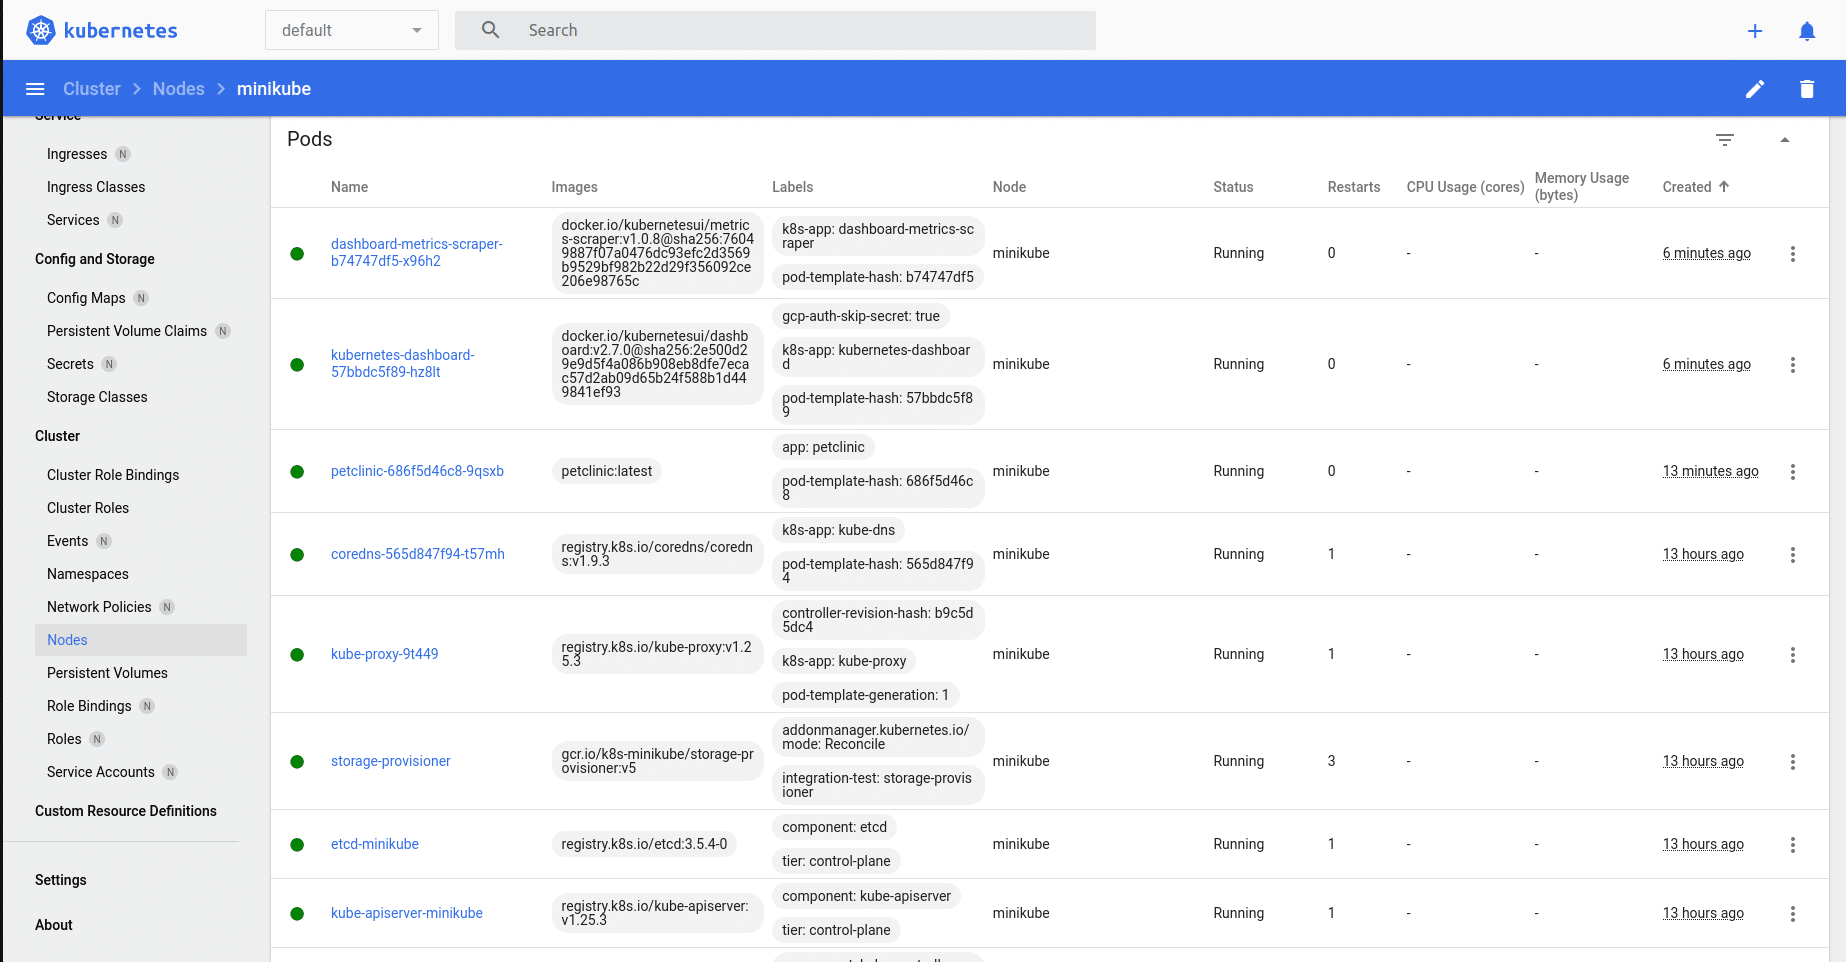
The Nodes section gives you details on CPU and memory consumption. It also gives you details on all the pods deployed. Check the PetClinic Pod in the same list.
With this, we have completed a sample application deployment in minikube successfully. Hope you enjoyed the learning in this simple ‘how to’ article.


