This DIY project demonstrates the use of Spring Boot to develop a simple quiz service. The service exposes a REST API and a set of random questions, and generates a quiz with a set of ten questions.
Spring Boot is a Java framework for developing enterprise applications. With several sub-frameworks like Spring Data, Spring Rest, etc, Spring Boot helps in the quick development of full-stack applications. This DIY project demonstrates developing the server side of a Quiz application using Spring Boot.
The objective of the project is to develop the server side of a simple quiz application and expose it through REST API.
The API requirements are:
- An API to upload quiz questions. Each question consists of four options with one of them being the correct option. Each question belongs to a specific topic under a specific subject.
- An API to generate a quiz with a set of ten random questions on a specific subject and topic.
- An API to submit answers and get the score.
The architectural requirements are as follows.
Database: Any RDBMS like MySQL
Environment: Spring Boot framework on Java 8+ platform with an embedded Tomcat server
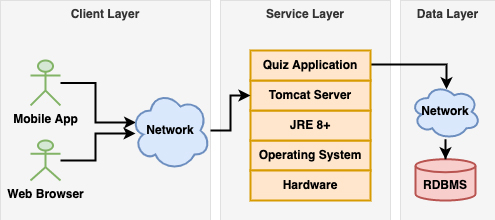
The Quiz application represents a typical three-layer Java web application. The scope of this project is limited only to the service and data layers.

REST API
The Quiz service exposes the following three REST endpoints.
- POST /question adds a new question to the system. Successful addition of the question returns the HTTP 201 status. The request payload will be a JSON with the following model:
{
description: string,
optionOne: string,
optionTwo: string,
optionThree: string,
optionFour: string,
answer: int,
subject: string,
topic: string
}
The response payload will be a JSON with the following model:
	qid: int,
	description: string,
	optionOne: string,
	optionTwo: string,
	optionThree: string,
	optionFour: string
}
2. GET /questions?subject=SUBJECT&topic=TOPIC gets a set of ten random questions from the specified SUBJECT and TOPIC. The response payload will be a JSON array of the following:
{
qid: int,
description: string,
optionOne: string,
optionTwo: string,
optionThree: string,
optionFour: string
}
3. POST /answers submits the answers and gets the score. The request payload will be a JSON array of the following:
{
qid: int,
option: int
}
And the response payload will be a JSON with the following structure:
{
total: int,
rights: int
}
Domain model and design
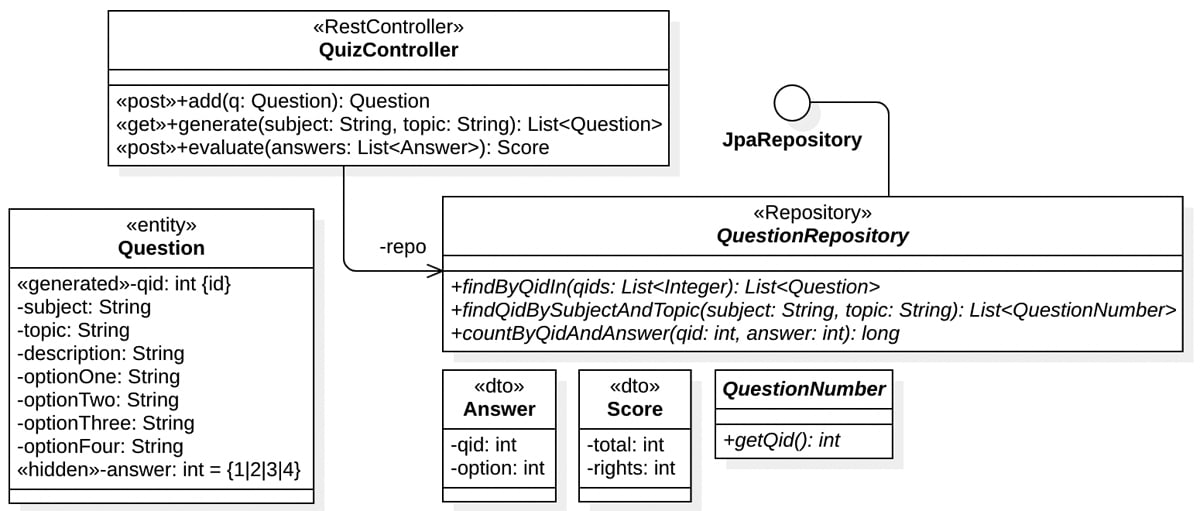
The domain model consists of the Question entity. The field qid represents the identity and it is system generated. The field’s subject, topic and answer will not have any getters and setters as they are hidden from the users of the system.
The repository will be an interface extending the JpaRespository interface, as the Question objects are stored in an RDBMS system and accessed using Java Persistence API. The repository is extended with three custom methods in line with JPQL.
The controller is a REST controller with appropriate HTTP mappings.

Implementation
Step 1: Create a Spring project with Maven support
Choose Spring version 2.7.3, which is the latest version that supports Java 8+. Add spring-boot-starter-web for REST support, and spring-boot-starter-data-jpa for JPA-based database connectivity, apart from other dependencies for JSON bindings, database drivers, etc.
Given below is the extract of the critical dependencies in the pom.xml. Observe that we are using an H2 database in this project, which can be replaced with any other RDBMS.
<dependency>
<groupId>org.springframework.boot</groupId>
<artifactId>spring-boot-starter-web</artifactId>
</dependency>
<dependency>
<groupId>com.fasterxml.jackson.core</groupId>
<artifactId>jackson-core</artifactId>
</dependency>
<dependency>
<groupId>com.fasterxml.jackson.core</groupId>
<artifactId>jackson-databind</artifactId>
</dependency>
<dependency>
<groupId>org.springframework.boot</groupId>
<artifactId>spring-boot-starter-data-jpa</artifactId>
</dependency>
<dependency>
<groupId>com.h2database</groupId>
<artifactId>h2</artifactId>
<scope>runtime</scope>
</dependency>
<dependency>
<groupId>org.springframework.boot</groupId>
<artifactId>spring-boot-starter-actuator</artifactId>
</dependency>
<dependency>
<groupId>org.springframework.boot</groupId>
<artifactId>spring-boot-devtools</artifactId>
<scope>runtime</scope>
<optional>true</optional>
</dependency>
Step 2: Develop the domain classes
This project has only one domain class, namely, Question, which is mapped as a JPA entity.
@Entity
public class Question {
@Id
@GeneratedValue
private int qid;
private String description;
private String optionOne;
private String optionTwo;
private String optionThree;
private String optionFour;
private int answer;
private String subject;
private String topic;

// add the constructors

public int getQid() {
return qid;
}

public String getDescription() {
return description;
}

public String getOptionOne() {
return optionOne;
}

public String getOptionTwo() {
return optionTwo;
}

public String getOptionThree() {
return optionThree;
}

public String getOptionFour() {
return optionFour;
}
}
It does not offer any setters, as the questions are not expected to be updated once added. Also, since the Question objects will be returned to the REST clients, hide the subject, topic and answer fields by not exposing the corresponding getters.
Step 3: Develop the data layer
The repository follows the JPQL and Spring Data conventions.
@Repository
public interface QuestionRepository extends JpaRepository<Question, Integer> {
List<Question> findByQidIn(List<Integer> qids);

List<QuestionNumber> findQidBySubjectAndTopic(String subject, String topic);

long countByQidAndAnswer(int qid, int option);
}
The findByQidIn() method fetches the questions with the supplied list of Question IDs.
The findQidBySubjectAndTopic() method fetches the list of IDs of all the questions belonging to the specified subject and topic. The QuestionNumber interface is used by this method, as the operation involves projection.
public interface QuestionNumber {
public int getQid();
}
The countByQidAndAnswer0 method returns 1 if the supplied option matches the expected answer; otherwise, it returns 0.
Step 4: Develop the REST layer
This layer consists of controllers and DTOs. The QuizController with the @RestController annotation maps the REST endpoints to the methods and processes the HTTP requests with the help of injected QuestionRepository.
@RestController
public class QuizController {
@Autowired
private QuestionRepository repo;

// mapping methods

}
The add() method maps POST /question API, accepts Question as RequestBody of the HTTP Post request, and saves it in the repository and thereby in the database.
@PostMapping(“/question”)
public ResponseEntity<Question> add(@RequestBody Question question) {
question = repo.save(question);
return ResponseEntity.status(HttpStatus.CREATED).body(question);
}
The generate() method maps GET /questions API, extracts subject and topic parameters from the request URI, and fetches the matching question IDs from the repository. It randomly picks ten question IDs and returns the corresponding questions. Randomisation can also be done in the database itself, but not all databases support such an operation. To make the implementation work for any RDBMS, we chose to randomise the question IDs in the service layer.
@GetMapping(“/questions”)
public ResponseEntity<List<Question>> generate(@RequestParam(“subject”) String subject,
@RequestParam(“topic”) String topic) {
List<Integer> ids = repo.findQidBySubjectAndTopic(subject, topic).stream().map(qn -> qn.getQid())
.collect(Collectors.toList());
Collections.shuffle(ids);
List<Question> questions = repo.findByQidIn(ids.subList(0, 10));
return ResponseEntity.status(HttpStatus.OK).body(questions);
}
The evaluate() method maps POST /answers API and gets the list of answers from the request body. For each of the answers, the method checks with the repository if it is right or wrong, and returns the final computed score.
@PostMapping(“/answers”)
public ResponseEntity<Score> evaluate(@RequestBody List<Answer> answers) {
int rights = 0;
for (Answer answer : answers)
rights += (int) repo.countByQidAndAnswer(answer.getQid(), answer.getOption());
Score score = new Score(answers.size(), rights);
return ResponseEntity.status(HttpStatus.CREATED).body(score);
}

}
The Answer and Score objects are simple POJOs.
public class Answer {
private int qid;
private int option;

...
}

public class Score {
private int total;
private int right;

...
}
Step 5: Configuration
The application.properties provides the configuration for the data source. Since we are using H2 in this project, the following configuration works for it:
spring.datasource.url=jdbc:h2:mem:quiz-db
spring.datasource.driverClassName=org.h2.Driver
spring.datasource.username=sa
spring.jpa.properties.hibernate.dialect=org.hibernate.dialect.H2Dialect
spring.jpa.hibernate.ddl-auto= update
spring.h2.console.enabled=true
The Tomcat server runs on the default 8080 port. We added configuration to add /quiz as the URL prefix.
server.port=8080
server.servlet.contextPath=/quiz
The complete code of the application is available at https://bitbucket.org/glarimy/glarimy-university/src/master/glarimy-boot/.
Step 6: Build, run, test, and deploy
Build the application and access the database at http://localhost:8080/quiz/h2-console/ with jdbc:h2:mem:quiz-db as the URL string. You can find that the tables are created automatically.
Use tools like Postman or cURL to add questions. For instance, the following curl command adds a new question.
curl -X ‘POST’ ‘http://localhost:8080/quiz/question’ -H ‘Content-Type: application/json’ -d ‘{“description”: “What is the capital of India?”, “optionOne”: “Bengaluru”, “optionTwo”: “New Delhi”, “optionThree”: “Mumbai”, “optionFour”: “Kolkota”, “subject”:”Politics”, “topic”:”India”, “answer”: 2}’
Add as many questions as possible. The following curl command generates a new quiz with ten questions.
curl ‘http://localhost:8080/quiz/questions?subject=Politics&topic=India
Repeat the above call several times. You will find different questions being generated, provided that there are a good number of questions in the database.
Submit the answers using the curl command, which looks like the following:
curl -X ‘POST’ ‘http://localhost:8080/quiz/answers’ -H ‘Content-Type: application/json’ -d ‘[{“qid”: 1, “option”: 1},{“qid”: 10, “option”: 2},{“qid”: 4, “option”: 2},{“qid”: 6, “option”: 2},{“qid”: 14, “option”: 1},{“qid”: 25, “option”: 4},{“qid”: 7, “option”: 1},{“qid”: 18, “option”: 3},{“qid”: 3, “option”: 4},{“qid”: 19, “option”: 1}]’
The response will report the score.
Extension
This simple application can be extended with several enhancements. You can:
- Generate a quiz with a specified number of questions, instead of fixing the size just to ten.
- Add authentication and authorisation in such a way that only the admin is able to call the POST /question API and only students are able to call the other two APIs.
- Store the quiz and scores so that they can be retrieved later by the students and admin.
- Add APIs to list the available subjects and topics.
- Add a feature to generate and store the quiz so that it can be accessed by students at a specified time and for a specified duration.


