


As a Linux user, you must know how to handle processes. By understanding how to start, list, and kill processes, you can effectively manage resources and ensure smooth operations. This tutorial discusses a few commands that will help you gain valuable insights into the processes running on your Linux system.
A process is an instance of a program executing on a system, and Linux provides different ways for managing processes. In this tutorial, we will explore the basics of handling processes in Linux, including starting processes, listing running processes, and killing processes. We will also discuss the concept of parent and child processes. Understanding how to handle processes is an essential skill for any Linux user.
Starting processes
A process is a running instance (active) of a program (passive). There are several ways to start a process in Linux. You can initiate a process in Linux by using the command line, shell scripts, or a GUI. By default, a process runs with the permissions of the user running it.
When a process is started, Linux assigns it a unique identifier known as a process ID (PID). This is a numerical value, which is used by the system to track and manage the processes running on it. PIDs are integers, and their range may vary depending on the kernel version. PID 0 is reserved for the swapper or scheduler process, while PID 1 is reserved for the init process, which is the first process to start when the system boots up.
Listing running processes
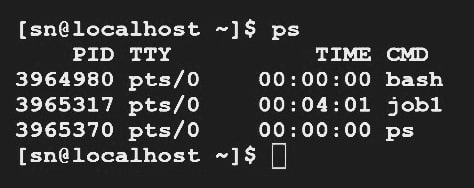
To list all running processes on your system, you can use the ‘ps’ command (‘process status’). It displays information about the processes running on your current terminal session.
$ps
You can use various options with the ‘ps’ command to display information about all the processes running on your system and their PIDs. The ‘-ef’ option displays information about all the processes running on your system in a detailed format, including the process ID (PID), the parent process ID (PPID), the user who started the process, the amount of CPU and memory the process is using, and the command that started the process.
$ps -ef
Another useful option is the ‘aux’ option, which displays information about all the processes running on your system, including those that are not associated with a terminal session. This option enables monitoring of all the processes running on a system.
$ps aux
The ‘-ef’ option provides more detailed information compared to the ‘aux’ option, which gives a more user-friendly output. You can customise the output of the ‘ps’ command by using various options. Table 1 lists some of the most useful options for the ‘ps’ command.
| Command options | Effect |
| ps -e | Lists all running processes in the system. |
| ps -f | Displays a detailed list of all running processes started by the user, including the parent process ID, session ID, and the process group ID. |
| ps -ef | Displays a full list of all running processes with additional details such as the user name, start time, and the command that launched the process. |
| ps aux | Displays a detailed list of all processes running on the system, including those owned by other users. The output includes the process ID (PID), CPU usage, memory usage, and other relevant details. |
| ps -C <command> | Displays all processes that are running a particular command. |
| ps -u <username> | Displays all processes owned by a particular user. |
| ps -o <columns> | Allows you to specify the columns you want to display in the output. |
| ps -p <pid> | Displays detailed information about a specific process identified by its process ID. |
Killing processes
You can terminate a process that is running on your system by using the ‘kill’ command along with the PID of the process in Linux.
$kill 102353
The ‘kill’ command sends a signal called SIGTERM to the process, asking it to terminate gracefully. If the process does not respond to the SIGTERM signal, the ‘-9’ option can be used with the ‘kill’ command to send a signal called ‘SIGKILL’, which forcefully ends the process.
$kill -9 102353
Killing a process using the ‘kill’ command could have unintended consequences, such as data loss or other issues if the process is performing a critical task. Therefore, it is important to use the `kill` command with caution and only when necessary to gracefully terminate a process or force it to end immediately. The `kill` command is a powerful tool for stopping processes in Linux, and by using the options, you can manage the system effectively.
‘killall’ command
The ‘killall’ command allows you to kill all processes that match a name. For example, if you want to kill all Chrome processes, you can run the following command at the prompt:
$killall chrome.
The ‘-u’ option is available to kill all processes owned by a particular user. For example, you can end all processes owned by a user named ‘ravi’ with the following command:
$killall -u ravi
Parent and child processes
In Linux, each process has a parent process. Upon starting, Linux assigns a process a unique process ID (PID) and a parent process ID (PPID). The PPID is the PID of the process that started the current process. The new process becomes a child process of the process that created it, and inherits many of its properties from the parent process, such as its environment variables and file descriptors.
The benefit of parent and child processes is that they can communicate with each other using inter-process communication (IPC) mechanisms such as pipes, sockets, and shared memory that allow them to work together to perform complex tasks and also facilitate process management. For example, a parent process can signal the child process to terminate if it has stopped responding to it. This prevents the child from consuming too many system resources and causing other issues.
Parent and child processes are a fundamental concept in Linux process management. By understanding how parent and child processes work, you can perform complex tasks and manage system resources effectively.
Keeping background processes around
When you start a process from the command line, it becomes associated with the terminal session that launched it. Linux will terminate once the process you log out of the terminal session. However, if you need to keep a process running even after logging out of the terminal session, you can use the ‘nohup’ command (‘no hangup’). This command will not be associated with the terminal session and will continue running even after you log out. To use the ‘nohup’ command, type ‘nohup’ followed by the command you want to execute. For example:
$nohup ./longprocess &
Because of the ‘nohup’ command, any output from the process, including error messages, will be redirected to a file called ‘nohup.out’ in the current directory. You can run commands that take a long time to complete or need to continue running in the background, and ensure these are not terminated when you log out by using the ‘nohup’ command.
[sn@localhost ~]$ nohup ./jobl &
[1] 3965317
[sn@localhost ~]$ nohup: ignoring input and appending output to ‘nohup.out’
[sn@localhost ~]$
Job ID versus process ID
In Linux, a process is a program that is currently executing, whereas a job refers to a process or a group of processes managed by a shell. A job is a way of managing processes that run for a long time within a process. Jobs allow you to use job control commands to perform various operations on them. When a job is initiated in a terminal session, it receives a unique job ID (JID).The JID is used to identify the job and manage its processes. The process ID (PID) is not the same as the JID. The JID is used to manage the job while the PID is used to manage individual processes within the job. A job can comprise multiple processes running in sequence, or in parallel, so using the job ID is easier than tracking the individual processes.
You can control the job as a unit, and suspend, resume, or terminate it as a group using job control commands. In contrast, process commands are used to manage the processes individually.
Moving a process from the foreground to the background and vice-versa
By default, a process launched from the command line runs in the foreground. It remains attached to the terminal session, displaying its output in the terminal window. However, if you want to move a process to the background, allowing you to continue using the terminal session, you can use the ‘&’ symbol at the end of the command. For example, to initiate a process called ‘longprocess’ in the background, enter the following command:
$./longprocess &
This command starts the process in the background and returns control of the terminal session to you, as shown below:
[sn@localhost ~]$ ./longprocess &
[3] 20721
[sn@localhost ~]$
If you have already started a process in the foreground and wish to move it to the background, you can use the ‘Ctrl+Z’ key combination to suspend the process.
You can then use the ‘bg’ command (‘background’) to move it to the background. This command resumes a suspended process in the background. The shell assigns a new job to the process and adds it to the list of background jobs.
$bg

[sn@localhost ~]$ ./longprocess2
^Z
[1]+ Stopped ./longprocess2
[sn@localhost ~]$ bg
[1]+ ./longprocess2 &
[sn@localhost ~]$
The shell displays the last character ‘&’ (an ampersand) to show that the job is running in the background. By default, the background command moves the most recently suspended process to the foreground. You can have multiple processes suspended at any point in time. To differentiate the multiple processes, append the job number prefixed with a per cent sign (%) on the command line.
To move the first suspended process to the background, use the following command:
$bg %1
To bring a process back to the foreground, the `fg` command is employed. This ‘fg’ command stands for ‘foreground’ and is used to bring a background process to the foreground. By default, the process that was most recently suspended or moved to the background moves to the foreground. You can also specify which job you want to make as a foreground process by specifying its job number.
$fg %1
The output will be:
[sn@localhost ~]$ fg %1
./longprocess1
Moving processes to the background or foreground is a valuable technique for effectively managing your terminal sessions in Linux. By using the ‘&’, ‘Ctrl+Z’, ‘bg’, and ‘fg’ commands, you can start, stop, and resume processes as needed, and keep your terminal session organised.
‘jobs’ command
We manipulate background and suspended processes usually via job numbers (JIDs), which, as mentioned earlier, differ from the process ID and are used because they are shorter. The jobs command shows you the processes you have suspended and the ones running in the background. For example, if we have three jobs—job1, job2, and job3 and we give the following command at the prompt:
$jobs
The output will be:
[sn@localhost ~]$ jobs
[1] Running ./job1 &
[2]- Running ./job2 &
[3]+ Running ./job3 &
[sn@localhost ~]$
The job with the plus sign (+) is the most recent, while the one before that is indicated by a minus sign (-). Linux reassigns job numbers when one completes and another starts.
One of the key benefits of using ‘jobs’ in Linux is that we can manage them as a single entity. For example, you can use the ‘fg’ command to bring a job to the foreground, or the ‘bg’ command to move a job to the background. Understanding the difference between job IDs and process IDs is important for managing terminal sessions in Linux.
Changing process priority in Linux
Each process in Linux is assigned a priority level between -20 and 19, which determines its allotted CPU time. A priority level of -20 represents the highest priority, while 19 represents the lowest priority. By default, Linux assigns most processes a priority level of 0. The ‘nice’ command can start a process at a particular priority level. For example, to start a process named ‘longprocess’ with a priority level of 10, use the following command:
$nice -n 10 ./longprocess
The ‘renice’ command allows you to change the priority level of a running process. For example, to reduce the priority level of a process with PID of 12034 to 15, use the following command:
$renice -n 15 12034
The output of the ‘renice’ command is:
[sn@localhost ~]$ renice -n 15 20721
20721 (process ID)_old priority 0, new priority 15
However, note that though you can use the ‘renice’ command to reduce the priority of the processes, you cannot increase the priority as a non-root user. To increase the priority, run the command with ‘sudo’. For example, to increase the priority of a process with PID 12034 to -10, use the following command:
$sudo renice -p -10 12034
The output of the ‘renice’ command with ‘sudo’ is:
[sn@localhost ~]$ renice -n 5 20721
renice: failed to set priority for 20721 (process ID): Permission denied
[sn@localhost ~]$ sudo renice -n 5 20721
[sudo] password for sn:
20721 (process ID) old priority 15, new priority 5
[sn@localhost ~]$
The ‘-u’ option of the ‘renice’ command allows you to change the priority level of all the processes owned by a specific user simultaneously. For example, to change the priority level of all processes owned by the user ‘ravi’ to 5, type the following at the command prompt:
$renice -n 5 -u ravi
Assigning higher priority levels to critical processes ensures they receive the necessary CPU time for their tasks. Assigning lower priority levels to non-critical processes prevents them from consuming excessive CPU time and causing other issues. The ‘nice’ and ‘renice’ commands help ensure that critical processes are given the CPU time they require.
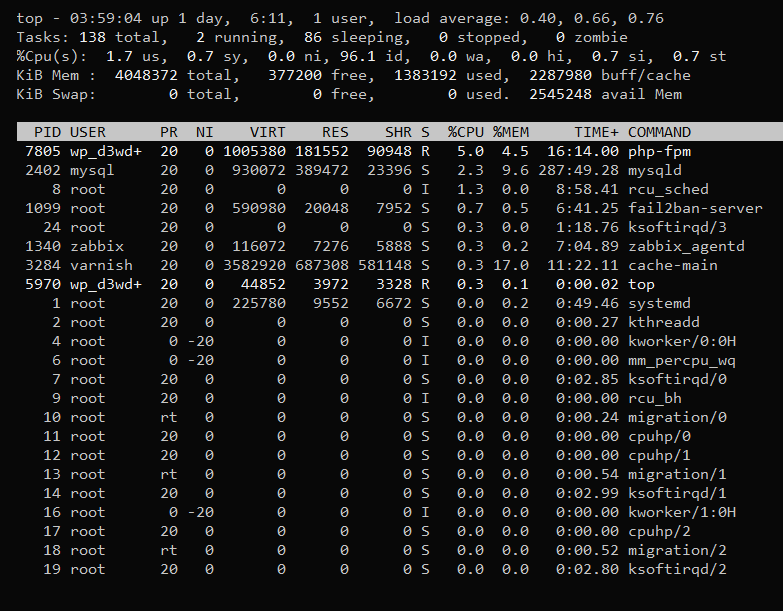
The ‘top’ command
The ‘top’ command is a powerful tool for real-time monitoring of processes and their resource usage on a Linux system. When you run this command, it provides an interactive view of the running processes, sorted by the amount of CPU time they are using. The output of the ‘top’ command includes information about each process, such as its process ID, the user who initiated the process, CPU time and memory usage, and the command that started the process. The output is updated in real-time, allowing for dynamic monitoring of the processes running on your system.
Interactively managing processes on your system becomes possible using the ‘top’ command. For instance, you can use the ‘k’ command to signal a process for termination, the ‘r’ command to change a process’s priority, or the ‘n’ command to adjust the number of displayed processes.
The ‘top’ command is a powerful tool for system administrators who need to monitor the processes running on a Linux system in real-time. By using this command, you can quickly identify processes that consume excessive CPU or memory resources, take appropriate actions to manage them effectively, and ensure the smooth and efficient operation of your system.
Important options of the ‘top’ command
Several options can be used with the ‘top’ command to customise the output and display additional information. One particularly useful option is ‘-d’, which allows you to specify the interval between updates. By default, the ‘top’ command updates the output every 3 seconds. However, you can use the ‘-d’ option to specify a different update interval. For example, to update the output every 5 seconds, you would type the following at the prompt:
$top -d 5
Another useful option is ‘-p’, which enables you to specify the process IDs of the processes you want to monitor. This is useful if you want to monitor specific processes rather than all the processes running on your system. For example, if you want to monitor processes with PIDs 1234 and 5678, you would type the following at the command prompt:
$top -p 1234,5678
You can also use the ‘z’ command to toggle between displaying all the processes running on your system and only those currently using CPU time. This is useful when you want to focus on the processes that consume the most CPU time and ignore the idle ones.
How to use the ‘top’ command in batch mode
By default, the ‘top’ command displays a dynamic view of the processes running on your system, sorted by the amount of CPU they are using. However, you can also use the ‘top’ command in batch mode to generate a static report of the processes running on your system. To do so, you need to use the ‘-b’ option. This option tells the ‘top’ command to generate a static report of the processes running on your system, rather than displaying a dynamic view. For example, if you want to generate a report of the processes running on your system and save it to a file called ‘processes.txt’, use the following command:
$top -b -n 1 > processes.txt
The ‘-n’ option is used to specify the number of iterations the ‘top’ command should run before generating the report. In this example, we are using the ‘-n 1’ option to tell the ‘top’ command to run for one iteration before generating the report. When you run the ‘top’ command in batch mode, the output is saved to a file in plain text format. You can then open the file in a text editor or import it into a spreadsheet program for further analysis. Finally, type ‘q’ to exit the ‘top’ command at any point in time.
In conclusion, the ‘top’ command can be used in batch mode to generate a static report of the processes running on a Linux system in plain text format, which can be easily analysed and shared with others.
Other commands equivalent to ‘top’
There are other commands similar to ‘top’ that can be used to achieve similar results. Here are some of the most commonly used alternatives.
‘htop’: ‘htop’ is a more advanced version of the ‘top’ command that provides a more user-friendly interface and allows you to sort processes by various criteria, search for specific processes, and view detailed information about each process.
‘atop’: ‘atop’ provides a more detailed view of the processes running on your system compared to the ‘top’ command. It allows you to view historical data about the processes running on your system, as well as real-time data that can help in identifying trends and patterns in the behaviour of your system.
‘glances’: This is a multi-platform, user-friendly tool that provides a comprehensive view of system performance, including CPU usage, memory usage, disk usage, and network activity.
Each of these tools has its own strengths and weaknesses. ‘top’ is a good choice for a simple and lightweight tool that provides real-time information about the processes running on your system and is included in most Linux distributions. ‘htop’ is a more advanced tool with a more user-friendly interface. Its additional features allow you to sort processes by various criteria, search for specific processes, and view detailed information about each process.
If you need a tool that provides historical data about the processes running on your system, as well as real-time data, ‘atop’ is more suitable. If you need a multi-platform, user-friendly tool that provides a comprehensive view of the performance of your system, ‘glances’ may be better as it gives all the information in one place. The best tool for monitoring the processes running on your Linux system depends on your specific needs and preferences.
| Command | Description |
| kill | Terminates a process |
| kill -l | Prints a list of signal names that can be used with the ‘kill’ command |
| kill -9 | Forcibly ends a process |
| killall | Kills processes by name |
| killall -u ravi | Kills all processes owned by a specific user ‘ravi’ |
| bg | Resumes a suspended process in the background |
| fg | Brings a job running in the background to the foreground |
| jobs | Displays the status of jobs currently running or suspended in the background |
| nice | Runs a program with changed scheduling priority |
| renice | Alters priority of running processes |
| top | Displays currently executing Linux processes interactively in real-time |
| htop | An interactive and user-friendly process monitoring tool for Linux |
| atop | A real-time system monitor that displays an anatomised view of the system performance |
| glances | A cross-platform tool that gives a comprehensive view of the performance of your system, in a user-friendly way |
| pstree | Displays a tree of processes |
| pidof | Finds the process ID of a running program |
| pgrep | Looks up or signals processes based on name and other attributes |
There are a few other commands that may be helpful in certain situations.
‘pstree’: This command displays a tree-like representation of all the processes currently running on the system, and is useful for visualising the relationships between parent and child processes.
‘pidof’: This command helps you find the process ID (PID) of a running program by name. For example, if you want to find the PID of the chrome process, you can run the following command:
$pidof chrome
‘pgrep’: This command enables you to search for processes based on their attributes, such as name or owner. For example, if you want to find all processes owned by the user ravi, you can run the following command:
$pgrep -u ravi
This can help automate the task of finding and manipulating a process or a group of processes.
These commands may be helpful in certain situations and learning them can make you more effective at managing processes in Linux.
In this tutorial, we have explored various commands that can monitor the processes running on a Linux system. We have discussed the ‘ps’, ‘kill’, ‘nice’, ‘renice’, ‘bg’, ‘fg’, and ‘top’ commands and their most frequently used options, the commands ‘nice’ and ‘renice’ for adjusting the priorities of processes. We have introduced other commands like `htop`, `atop`, and `glances` that can achieve similar results. We have briefly mentioned a few less frequently used commands that are useful.
By mastering these commands and their options, you can gain valuable insights into the processes running on your Linux system and manage system resources more effectively.


