We, the distro hunters, face a drought season twice a year—during autumn and spring—when the development teams of the four major distros that most of us care about are busy fixing the last-minute bugs to meet their release deadlines. As you’re reading this, Ubuntu and Mandriva are already up for grabs, but the final versions came in too late for us to include them on the optical discs. So, we decided to make a compilation like we did back in October 2008 with mini, non-so-well-known distros to fill in the media.
The plan was similar, but there’s a slight twist this time. There’s a PC-BSD ISO image in the DVD, and there’s also a PCLinuxOS live-cum-installer OS for a CD. Thankfully, PC-BSD doesn’t take up the whole of the DVD, which left us with some space to fill, and we finalised on including ISOs of three mini distros—SimplyMepis, Dreamlinux and Pardus. After assigning others the responsibility of reviewing four of the distros, we were still left with Pardus. Oh well, I got stuck with it as you can see. So, I said to myself, I said… damn!
I’m a Mandriva fan at heart, and have been flamed for trashing every other distro to the point that I’m always the last person the team would give the responsibility of reviewing a distro. Good that most of my comments about a distro are rendered not suitable for print. Sorry folks! Everyone has a bias.
Enough already! Would you mind doing your job? Yeah, yeah…!
What on earth is a YALI?
Yet Another Linux Installer, as they like to call it, is the default installer for Pardus. They say it’s written in Python and Qt—like it makes any difference was my first response. Turns out it does—or maybe it’s just the UI team that matters here—because YALI is seriously quite good, someone opined.
It’s the usual chore of triggering your BIOS to boot from the CD/DVD ROM, placing the CD (yeah, don’t forget to burn the Pardus ISO image available in the DVD to an empty disk; I just noticed that the other distro reviewers this month totally missed this point of providing the complete picture about stuff that matters ;-)) in the drive, and hit the reset button of the computer tower. (Dude, it’s called a cabinet. Oh, shut it!)
And thus, the journey began! First looks are impressive—the colour scheme of a yellow-orange shade, I’ve got to say, is very good. Wait a sec now…. Good gawd! What’s with this foreign language on the boot screen? Turns out it’s Turkish, by default. Thankfully, there’s an F2 button on my keyboard and I could switch to English. Yes, that’s much better now!
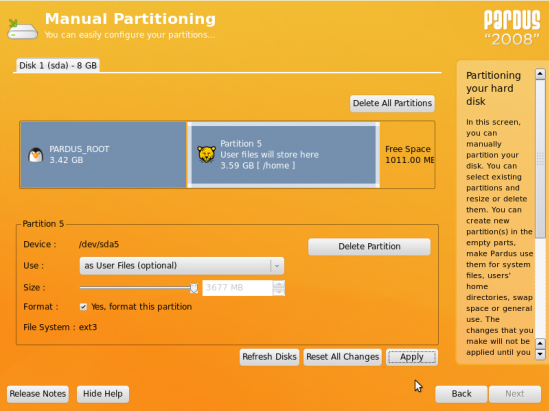
Then press the F3 button to select the video mode as well. Since my CRT monitor supports up to 1280 x 1024px, I decided to give that a try. The default option to boot Pardus seemed good enough to me, so I hit Enter. The nice and plain splash screen with a progress bar that basically hides the verbose kernel boot messages was soon replaced by the installer’s welcome screen with the licence message. It’s GPL, phew! Obviously, they needn’t ask me if I’m okay with it or not, but good that they have put a button there if anyone wants to read the GPL—it’s good information for some folks. The addition of a Release Notes button is a bonus, and I’d say has been implemented at the right place. Not to forget the Show Help button as well—upon clicking it, a nice help box on the right shows up with information on what to expect (Figure 1). Nice add-on for the ones in need of help, as they can leave this on throughout :-) Anyway, overall, it’s a very well-thought layout for a welcome screen.
Next up is the CD integrity check screen. Useless! Then the keyboard layout—English is good. Then comes the time zone—no world map here, so scroll down in search of ‘Asia/Kolkata’. Then the screen to create the system (I mean ordinary) users—you can create multiple users, give them admin privileges, and set it to auto login, if you like. Set the root password and host name in the next one, following which the partitioner pops up.
OK, it lists both my hard drives, and there’s no way I want to go with an automatic partitioning scheme, so I chose the time-tested manual option. The following screen lists both the hard drives as tabs, and presents a horizontal bar as the partition (Figure 1). This is where you’ll select the chunk which says ‘free space’ (or a pre-partitioned space that you can format), move the slider to set the size, click the drop-down menu to set the ‘use’ criteria—root, home, swap, etc—and hit Apply. The labels for ‘use’ cases are interestingly titled ‘Pardus System Files’ for the root FS, ‘User Files’ for the home partition, ‘Swap Space’, and ‘Storage Area’ for God knows what (if you happen to figure it out, do let me know because I’m too lazy to test it). I figure these labels would make more sense to new GNU/Linux users, although they might confuse a veteran. Nonetheless, the partitioner seems very intuitive, and looks much more useful compared to the partitioners available even with some of the major distros.
Next up are the bootloader options, followed by a final summary screen listing the details of all the selections you’ve made in the installer. Interestingly, YALI is yet to make any changes to your system; so this is your final chance to go back and make amends if you suddenly notice you’ve done something stupid during the previous steps. If you’re satisfied, you can hit—well, Next is now greyed out, so—Begin Install.
Following this, YALI will partition/format the disk, and proceed with the installation of packages. Yes, you’re right—there’s no package selection option; everything will be installed by default. The installer is not the fastest I’ve seen—took around 20 minutes on my Athlon X2 5800+ system with 2gigs of RAM, and around 30 on my Celeron laptop with 512 megs of RAM. But the information on the installer presents a case for lots of software, so if you’re new to GNU/Linux, this is your chance to learn. Finally, it’s “Goodbye from YALI” and you’ve to hit the Next button to reboot the machine to “Enjoy your fresh Pardus!”
Bottom line: Although you only install an OS once, YALI still leaves a good impression. And I hate the fact that I won’t be using it as often as I would use, say Firefox or Amarok. However, I would love to use it over and over again on other people’s systems—anyone game for it?
Kaptan helps you get started
The GRUB boot screen after install will list all the other distros installed on your system. The system boots to the KDM screen (if you haven’t set the user on auto log-in) seriously fast, thanks to MUDUR, the Pardus home-grown init system. The KDM screen looks customised with the only options being: enter user name, password, login or quit to shut down/reboot/suspend the system. This is where I realised that hitting F3 and setting the screen resolution earlier had set 1280x1024px as the default resolution post installation—quite impressive, considering it’s using Vesa, and not the proprietary drivers from Nvidia.
Upon your first login, the Kaptan greets you. Kaptan is nothing but a click-next wizard to set up your desktop. It starts off with mouse settings (Figure 2), then the desktop layout style (placement of panel, and the ability to replace the default KDE3 menu with Kickoff), followed by setting the number of workspaces. Then comes the wallpaper (by default there is no wallpaper—I chose Canis aureus 02, the one for this release, which has a nice artwork of a running wolf, fox, jackal, or something similar.). Then came network set-up.
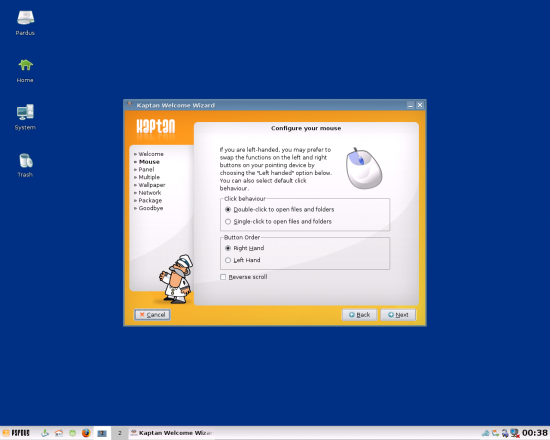
This is interesting, as on my laptop, it listed the wlan0 interface, and allowed me to configure it out of the box, with no requirement to load the Broadcom drivers first. The final option before a ‘Goodbye’ from the Kaptan is the ability to configure package manager settings. This is where you can set the parameters for updates, like show an icon on the system tray, the interval to check for updates, and add the ‘contrib’ repository. Every time it requires a system-level change like while configuring the network or setting ‘contrib’ repository in the package manager, it prompts for authentication.
In fact, the final ‘Goodbye’ screen is handy too. It has the option to reconfigure your graphics. While testing it on VirtualBox, it even reported that the resolution was too low (being at 800 x 600). I noticed a second spelling mistake here—the first one was somewhere in the installer. It said, “You can change your resolution bye using Display Manager.” On my AMD system, launching the display manager prompted me that I might be better off using the Nvidia v177.x driver in my system, instead of the default Vesa. Later on I found that v180.x is also available in the software repository, and although I had installed it later using the package manager, the display manager continued to report that I might be better off with v177.x. Strange.
Anyway, the ‘Goodbye’ screen also introduces you to Tasma, the Pardus configuration centre, and the User Group and Help pages. Upon clicking the Start button of the latter it launches Firefox to take you to the ‘Contact’ page of the Pardus website, which lists information on mailing lists, IRC, Bugzilla, etc.
Tasma helps you configure
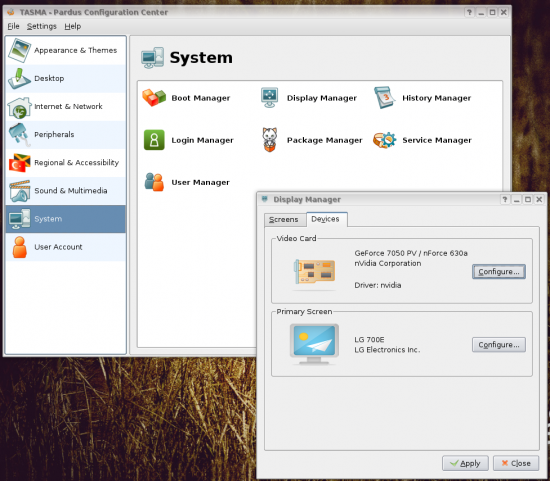
At first glance, it looks like the Pardus team has re-branded KControl to Tasma. However, unlike KControl, the home screen explains the purpose of this tool. The broad categories on the left panel are the same like KControl, and so are the modules for these individual sections. Oh, wait a second, a lot of third-party modules have also been integrated into it, and there’re more modules to be accessed using Settings→Show Extra Modules. These essentially make it similar to the Mandriva Control Centre or SuSE’s YAST.
One very cool module I chanced upon here is the History Manager. It lets you take snapshots of the system and roll back to a previous system state if something goes wrong. Although I didn’t get a chance to break the system and then try this out, my understanding of this tool is that, besides giving you the ability to take snapshots of the system state manually, it also keeps a log of package installs and removals as per their date and time, and thus essentially gives you the privileges of rolling back to a previous state.
Other modules include: user configuration, firewall set-up, network manager, desktop sharing, display manager, TV card configuration, service manager, package manager, etc. Refer to Figure 3.
Apps helps you get the work done
Back to the desktop, I like the fact that the developers haven’t overloaded the desktop with too many shortcut icons. In fact, by default, it’s just the System icon (which is configured to load the sysinfo KIO slave), Home and Trash. Of course, it’ll also display the icons for removable devices when plugged in.
While we are on the subject of icons, Pardus uses something called the ‘Tulliana’ icon set by default, instead of the hideous-looking Crystal that comes with KDE3. I find Tulliana quite gorgeous.
The Pardus menu is a customised KDE menu, which only lists five options under the ‘All Applications’ category—Tasma, Package Manager, Home, Find, and the Programs menu. This Programs menu, in turn, lists the software section inside it, like Games, Graphics, Internet, etc, which otherwise show under ‘All Applications’ in KDE3, by default. I don’t know how usable this customisation is, but it probably makes the lives of those used to the Winduhs ways of doing things, a bit easier.
When it comes to applications, Pardus has everything covered for a typical desktop user—from multimedia and graphics apps to Internet and office tools. OpenOffice.org is still at v2.4.1—hope the next Pardus version carries v3.0 along with KDE4.
Anyway, this distro even includes all the multimedia apps like MP3, Flash, DivX, encrypted DVD decoder (libdvdcss), etc, by default. Makes the life of a new user easier, wouldn’t you agree?
Something strange… in OpenOffice.org the English dictionaries are missing—so there’s no spell check. I tried to look it up on the package manager, and had to install the openoffice-dicts package to get it working. This should have been installed by default.
It’s also odd that the MPlayer UI is not translated to English. My cure is SMPlayer, because I anyway don’t use the MPlayer UI.
Obviously, you can install more apps using the Pardus package manager—what’s it called again?
PISI helps you get more stuff
PISI—Packages Installed Successfully, as Intended—is what they like to call the package manager. The command-line syntax is very similar to apt. So in order to install a package (e.g., kdesdk), you need to do the following:
pisi install kdesdk
To search for a package—e.g., Firefox:
pisi search firefox
To remove a package—e.g., Firefox:
pisi remove firefox
To update the repository database:
pisi update-repo
There are many more options, so take a look at:
pisi help
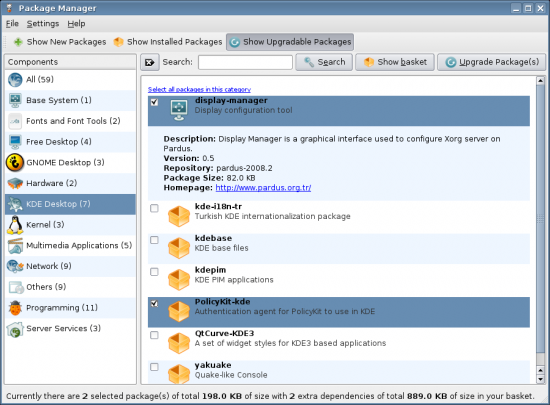
Of course, there’s also a GUI front-end. You can access it either from the Pardus menu, or the icon sitting next to the clock. The package manager has an innovative UI. There’re three tabs on top: Show New Packages, Show Installed Packages, and Show Upgradable Packages. Take a look at Figure 4; its UI is much better and easier to understand compared to the Adept manager that Kubuntu likes to bundle by default.
Let me spare you the torture
As for the final words, Pardus made me use KDE3 almost after a year—and I hate the fact of downgrading to something. That said, Pardus is a pretty solid distro, which will address the requirements of most desktop users, out of the box. If you want more, the package repository probably has the answer—although, don’t expect the number of packages to be as high as any of the major distros.
I also found its hardware detection skills to be pretty good. Strange that Pardus is ranked quite low in DistroWatch.com’s hits-based rankings. On the downside, English support is missing in parts, and of course, there’re some of these spelling mistakes in their custom applications. The greatest disadvantage is the absence of KDE4, by default. Okay, okay! Time for me to buzz off.



The default language in international iso is English.