The look and feel factor leaves a mark on everyone—as the Mac OSX has proved over the years. We have had a distro from GNU/Linux userland that is reminiscent of the OSX desktop. So, when Dreamlinux 3.5 came out this March, I decided to take it for a ride. Here I present the results of the test drive.
To begin with, here are the specs of my test system:
- AMD Phenom X3 8650 over-clocked to 3.013 GHz
- AMD 790GX motherboard with ATI HD3300 graphics
- 4GB DDR2 800 MHz RAM
- Western Digital 640GB Aaks hard disk
- HP all-in-one 1410
The onset of a beautiful dream
Dreamlinux comes in two flavours, featuring the minimal XFCE and the feature-rich GNOME. I chose the XFCE edition. This is packed into a 695 MB ISO image (which is bundled in this month’s LFY DVD), while the ISO image for the GNOME edition comes packed in an awkward 913 MB size, which will push you to burn a DVD, leaving you with a lot of wasted storage space. I really wished for a bigger ISO image if they wanted to force users to burn a DVD. Anyway, I downloaded and burned both.
Restarting the PC with the XFCE CD inside, I was confronted with a bluish boot splash screen. Now if you have used an older version of Dreamlinux, you won’t be pleased, as there is no change in the boot loader screen. There are only two entries here—one to boot the XFCE desktop and the other for memory diagnostics.
I booted the disc and to my surprise it was all verbose mode. Thankfully, it didn’t take too long to load the desktop—back to a GUI, thankfully!
Tips: The live CD should load the desktop without any human intervention. However, if you do run into trouble, and the system asks for a user name and password ‘which is quite irrelevant for a live CD’, don’t panic—’dreamer’ is the user name and ‘dream’ is the password. If you run into X server problems (for example, if the GUI fails to load), try reconfiguring your X by using the following command: sudo dpkg-reconfigure xserver-xorg. Then log in by typing: startx.
The default desktop looks a bit cluttered with too many icons, but also includes a cool dock allusive of Mac OSX (Figure 1). The ‘Engage’ dock doesn’t require Compiz to work; it uses fake transparency, just like screenlets and gDesklets. Likewise, it won’t allow maximised applications to cover it up, which is sort of irritating. Shifting to Compiz will trigger the Avant Window Navigator, a much more feature-rich dock.
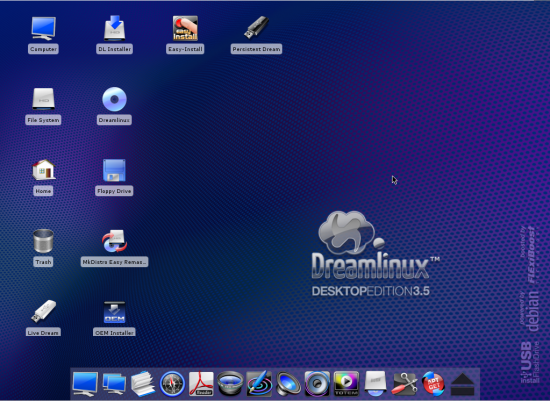
The wallpaper is simple and stylish, listing the distro’s peers. I really liked the way it listed ‘Powered by Debian’ and ‘Boosted by Flexiboot’. Flexiboot aims to provide a clean boot experience, but I still don’t find it as snappy as some of the other new distros that boot in 20 secs or less.
On my system, the distro came up with a decent resolution of 1280 X 1024 pixels. This is impressive considering that the distro doesn’t come with the proprietary ATI fglrx drivers.
Coming to the installation steps, the desktop lists many install icons that will surely baffle a new user. Dreamlinux is perhaps the only one of its kind that provides so many options:
- OEM Installer is aimed at an OEM installer, or someone who wants to dedicate the whole PC to Dreamlinux.
- Live Dream: This install option will dump the ISO in a USB drive, making it accessible for booting as a live medium. Please note the changes you made in the live session will not be sustained after you restart the PC.
- Persistent Dream: This option is the same as Live Dream. However, it lets you store your settings and changes, so that they’re available even after a reboot.
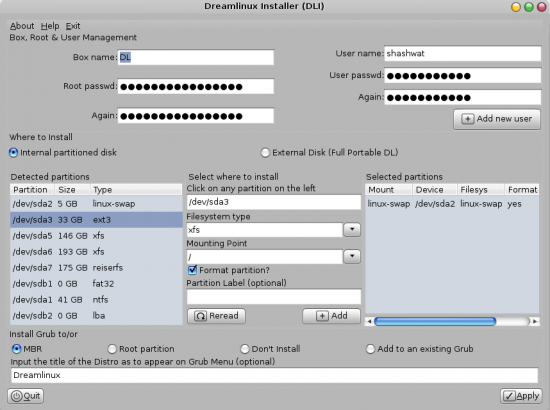
- DL Installer: Now this is the option that lets you install the distro on the hard disk. No frills here. Dreamlinux offers the easiest install wizard I have ever seen — just one window, with no next tab to click. All options merge perfectly into one window. See Figure 2.
- ‘Portable Dream’: This option installs the whole Dreamlinux into the USB, making it a portable operating system. You can thus change things and save files in it, and you won’t lose settings after rebooting the desktop. Quite a handy tool for people on the move, and with the plummeting prices of USB drives, it makes sense to have a USB desktop in your pocket. There isn’t a separate installer for this; it is integrated with DL install. Just plug in the external drive, and select the ‘External Disk’ option under the ‘Where to Install’ section of the DL Installer.
- MkDistro Easy Remaster: This is a good option that allows you to create your own modified ISO with no hassle. Simply install what you want in Live mode and make a different ISO using the Easy Remaster.
There is another icon on the desktop named Easy Install, which is not for OS installation. Easy Install enables a one-click install for pre-selected applications.
Finally, after fiddling around a bit, I thought of installing the distro and was stunned to see that the installation finished in a mere five minutes.
Riding the dream
Post installation, I rebooted the system and noticed that the bootsplash is visible, though it goes into verbose mode now and then. Still, the transition to verbose and bootsplash is very smooth. The splash becomes faint before fading into verbose mode or switching to the log-in screen.
After logging in, I was pleasantly startled by the welcome sound, which seemed refreshingly different from the other gloomy sounds that we generally hear as the log in greeting. The desktop remains the same—the Engage Dock and the install icons were still there. I cleaned my desktop removing the install icons and installed ATI proprietary drivers… Dreamlinux Control Panel lists an install option for NVIDIA drivers, but when you click on it, you’re only guided on how to install it. To install drivers, simply press CTRL+ALT+F1 and type nvidia-install or ati-install to install the respective proprietary drivers.
I noted that the wizard was about to install older drivers. I closed the install set-up and installed fglrx from the latest ATI Catalyst 9.3. After rebooting, I was able to get the full resolution for my monitor. But I wasn’t able to get hold of Compiz’ composite effects. With some searching and help from developers, I was able to use Compiz. To enable it in the ATI/NVIDIA card, in case it doesn’t work, open the terminal and take the following steps.
sudo gedit /etc/X11/xorg.conf
Insert the line in the ‘Extensions’ section, if it is not present there:
Section “Extensions”
Option  “Composite”     “Enable”
EndSection
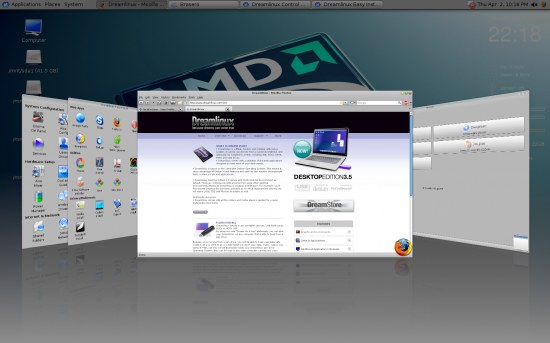
Dreamlinux comes only with a handful of Compiz plug-ins, but you can install restricted and additional plug-ins—it’s Debian, so you have the apt-get magic. You can then enable it from CCSM. Though in my case, whenever I select additionally installed plug-ins, it gets deselected automatically! Pretty weird, right?
The next thing was to set up my printer. I plugged it in and opened the DL Control Panel. Since there was a Printer Wizard, I thought of setting it up, but was unable to. Then I installed hp-lip, sane, sane-utils packages, and headed to configure it again. It was detected and set up correctly. I was able to print documents, but somehow Xsane didn’t recognise my printer!
Lots of home-made goodies!
On the applications front, you might be a little upset at first, but once you use all that’s available you will be pleased—it still has all the necessary tools for daily work. Some of the major numbers that we all like to see are:
Linux Kernel 2.6.28.5
- Xorg 1.3 (it’s too old I know; 1.6 is out now!)
- Alsa 1.0.16 (another old release)
- Xfce 4.4.2
- GIMP 2.6.0, Inkscape 0.46
- OpenOffice.org 2.4.1 (old again!)
- Firefox 3.0.6
XFCE 4.6 was not included, because it was released only a day before Dreamlinux 3.5 came out!
DL ships a lot of multimedia utilities—Avidemux for video editing, EasyTAG for ID3 tag editing, Totem for video and Rhythmbox for audio. I didn’t have a problem playing any media files. I was even able to play my Blu-ray movies in their full glory, without any hiccups. The only problem was with playing midi and dat files. For your optical disc burning need, Brasero is installed.
In addition to basic applications, DL spices up the distro by adding its own home-made Ruby scripts for pumping up the experience. There are many scripts with easy-to-use GUIs to help you set up your system. Conky lovers get a pre-configured script to set up Conky, which is pretty handy. There is a Colour Folder script that changes colours with simple clicks.
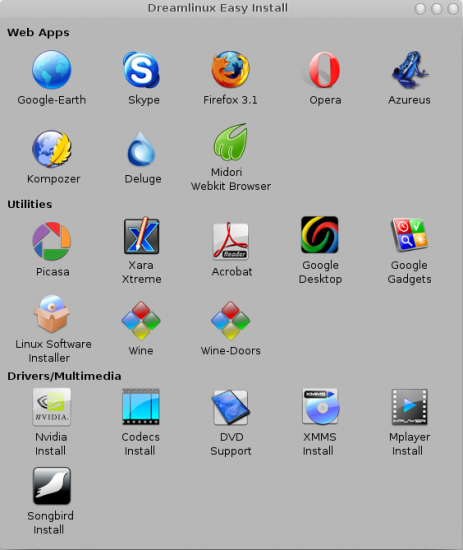
For audio buffs there’s an SPDIF redirecting switch. If you have a Dolby set-up you can easily use it with this SPDIF script. The icing on the cake is the Dreamlinux Easy Install and Control Panel. Easy Install acts as a wget wrapper, with few selected applications on board; all you need is to click on the application to install it (Figure 4). The only let down is that it installs older versions of software. Developers should have updated the easy install repositories with newer software. But you can expect some updates in the near future.
The Control Panel serves as a centralised hub to control major parts of the system (Figure 5). It consists of basic features like setting up a network, sharing folders, enabling composite windows, etc. A few exquisite features are AMD Cool ‘n’ Quite, Multiscreen set-up, etc. AMD CnC works only with the AMD K8/K10 series (or above) processors. This is an energy efficient technology that reduces the multiplying of processors, thus lowering the speed and voltage required to operate when they are not needed, and saving quite a bit of electricity. You can always turn on this feature from the motherboard BIOS if this script fails to work.
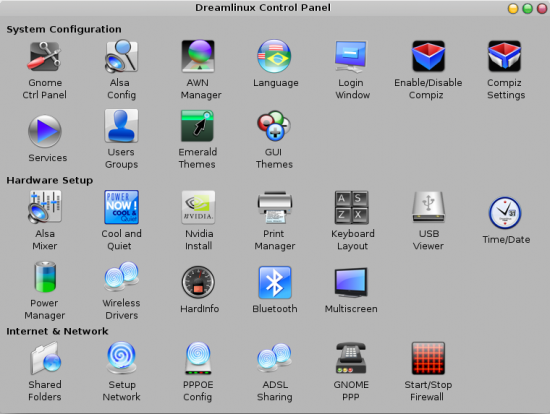
A tool called HardInfo in the Control Panel lists your hardware, like lshw. HardInfo comes with an easy-to-use GUI as a bonus. It covers almost all system devices with decent information, and even lists temperatures from the system diode. Apart from this, it comes with a few benchmarking tools to test your system’s power. Though there isn’t much data to compare with, it’s still good enough.
Since it is a Debian-based distro, you need not worry about package managers or searching for additional software. You can either install it from the vast Debian repositories, or you can grab software from TuxSoftware.com, a portal very similar to Linspire’s Click-N-Run utility. One thing to note is that the default server is pretty slow. Even with my 512 KBps plan I don’t get sufficiently good speed while installing applications.
You might be a bit disappointed if you plan to install deb files by double clicking on them—it opens the package using the archive manager. For some reason, gdebi is not associated with deb files. To associate deb files with gdebi, simply right click on the file and select the ‘Open With Other Application’ option. In the ‘Use a custom command’ box, paste the following: gdebi-gtk %f. Make sure you check the ‘Use as default for this kind of files’ option.
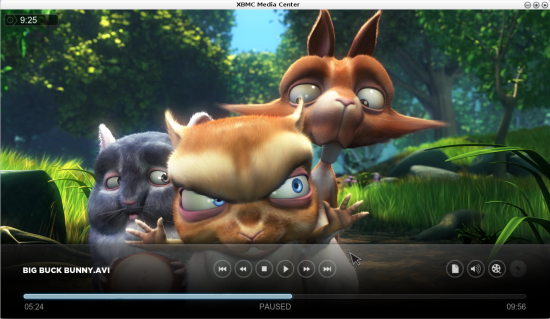
A few applications like the XBMC media centre application, Softmaker Office, OpenOffice.org 3.0, and GNOME, can be directly installed from the binary packages provided at the download page of Dreamlinux. XBMC is a very interesting player—take a look at Figure 6.
Time to get up!
Well, every distro has its ups and downs and so does Dreamlinux. The only problem I am facing is with my non-functioning scanner. Another problem that you are going to face is that the Synaptic package manager is not present in the applications menu. So, the only way to access it is by clicking the big Apt-Get icon on the Engage dock.
Anyway, the bottom line is: Dreamlinux is a distro with great potential! I really don’t see a reason for not trying it.


[…] demuestra un artículo en LinuxForU en el que analizan las características de esta distro, que en su versión XFCE ocupa una ISO de […]