Emulation refers to the running of unchanged code on virtual hardware on the top of the physical host, interactively. It is handy, practical and low cost. It comes with certain restrictions, though, like slower speeds compared to running the same code on a hardware test-bed which is fast and accurate, but expensive. While a simulator requires code modifications and is slow as well.
Network virtualisation
Computer networks are constantly evolving. The next generation networks have to be scalable, programmable and flexible enough to adapt to innovative ideas. Researchers continue to work on providing innovative solutions or modifications to the current physical network infrastructure. The existing networks are not capable of performing as experimental test beds. So, there is a need for new customised test-beds for experimentation. What is required are new protocols which do not affect existing network infrastructure and operations and this need is addressed by the virtual network infrastructure.
Virtualisation refers to the process of framing a virtual environment to execute experimental work. It could be virtualisation of hardware, platforms, servers or a network. We can create such an experimental test-bed using the Mininet emulator.

Introducing Mininet
Mininet is a network emulator that enables the creation of a network of virtual hosts, switches, controllers, and links. Mininet hosts standard Linux network software, and its switches support OpenFlow, a software defined network (SDN) for highly flexible custom routing.
It constructs a virtual network that appears to be a real physical network. You can create a network topology, simulate it and implement the various network performance parameters such as bandwidth, latency, packet loss, etc, with Mininet, using simple code. You can create the virtual network on a single machine ( a VM, the cloud or a native machine).
Mininet permits the creation of multiple nodes (hosts, switches or controllers), enabling a big network to be simulated on a single PC. This is very useful in experimenting with various topologies and different controllers, for different network scenarios.
The programs that you run can send packets through virtual switches that seem like real Ethernet interfaces, with a given link speed and delay. Packets get processed by what looks like a real Ethernet switch, router, or middle-box, with a given amount of queuing.
The Mininet CLI and API facilitate easy interaction with our network. Virtual hosts, switches, links and controllers created through Mininet are the real thing. They are just created using the Mininet emulator rather than hardware and for the most part, their behaviour is similar to discrete hardware elements.

How it works
Mininet uses Linux processes in network namespaces on a simple desktop to create scalable, virtual, software defined networks. The installation of the Mininet emulator and its supported package-like controllers (POX, NOX, BEACON and OPENDAYLIGHT) and virtual switch (OpenvSwitch) enables us to work with the virtual network environment. Mininet could be run on different platforms and hardware devices with varied capabilities like laptops, servers, virtual machines, Linux systems, or even in the cloud. The default version of Mininet supports some simple predefined network topologies (a network topology is the arrangement of nodes, e.g., hosts, switches and links in a computer network).
If a network programmer needs to create custom topology, Mininet provides the programming support. You can create the custom topology using Python, Java or other supported programming languages. You have to modify existing code or write your own new code to create custom topologies.
Virtualisation of computing resources in every operating system is done through a process of abstraction. The provision of running many hosts and switches on a single OS kernel is done based on process based virtualisation in Mininet, which can build user or kernel-space OpenFlow switches, controllers to control the switches. and hosts to communicate over the simulated network.

Why is it better?
Mininet has various features like emulators, simulators and hardware test-beds that make it superior to other network virtualisation tools.
- Compared to full system virtualisation based approaches, Mininet boots faster.
- It can connect hundreds of hosts and switches through the software network controller.
- It provides higher bandwidth support for network virtualisation on virtual hardware.
- It is inexpensive, easy to install and quickly reconfigurable.
- It supports a variety of virtualisation software.
- It supports Mac, Windows and Linux operating systems with an inbuilt virtual switch and the OpenFlow protocol.
- Easily connects to real networks.
The Mininet installation guide
There are three ways in which Mininet can be installed, and these have been detailed in this section.
Option 1
Mininet VM installation is easy and its what I would recommend since its the most foolproof method.
The following steps lead to a VM install:
1. Download the Mininet VM image
2. Download and install a virtualisation system
3. Run through the VM Setup Notes to log in to the VM and customise it as desired
4. Follow the Walkthrough to get familiar with Mininets commands and typical usage
Option 2
This is native installation from source, which works well for a local VM, remote EC2, and native installation. It assumes the starting point of a fresh Ubuntu (or, experimentally, Fedora) installation.
For this, I would strongly recommend more recent Ubuntu releases, because they support newer versions of Open vSwitch.
To install natively from source, you first need to get the source code, as follows:
git clone git://github.com/mininet/mininet
cd mininet
Once you have the source tree, the command to install Mininet is given below:
Mininet/util/install.sh [options]
Install.sh option includes
- -a installs everything that is included in the Mininet VM, including dependencies like Open vSwitch as well as the additions like the OpenFlow Wireshark dissector and POX.
- -nfv install Mininet installs the OpenFlow reference switch and OpenvSwitch
Option 3
Installation from packages:
if youre running a recent Ubuntu release, you can install the Mininet packages.
Install the base Mininet package by entering only one of the following commands, corresponding to the distribution you are running.
For Mininet 2.1.0 on Ubuntu 14.10:
sudo apt-get install mininet
For Mininet 2.0.0 on Ubuntu 12.04:
sudo apt-get install mininet/precise-backports
Then test Mininet, as follows:
Sudo mn test pingall
The Mininet command cheat sheet
1. The following command runs the default minimal topology which includes the OpenFlow kernel switch connected to two hosts with the reference controller:
Mininet> sudo mn
2. The following command is used to get the help of any command in Mininet:
Mininet>help
3. The following command displays the nodes of the network:
Mininet>nodes
4. The following displays the links of a network:
Mininet> net
5. To dump information about all nodes, use the command below:
Mininet> dump
6. To test connectivity between hosts, you can ping from Host 0 to Host 1, as follows:
Mininet> h1 ping c1 h2
7. The following command will start the two separate terminals for node h1 and h2:
Mininet> xterm h1 h2
8. The command below is used to open the Wireshark network packet analyser tool to monitor and analyse the behaviour of incoming and outgoing packets:
Mininet> wireshark &
9. A few performance modeling commands in Mininet:
The following command establishes the transmission control link with CPU limited hosts:
net = Mininet(link=TCLink, host=CPULimitedHost)
# Limit link bandwidth and add delay
The following command is used to set the links bandwidth and delay timing:
net.addLink(h2, s1, bw=10, delay=50ms)
10. To exit from the command line interface (CLI), use the following command:
Mininet> exit
11. To clean up the Mininet network configuration, issue the following command:
Mininet> sudo mn -c
Creating a network
Mininet supports parametrised topologies. You can create a flexible custom topology (in Python, with just a few lines of code) which can be configured based on the parameters you pass onto it, and this can be reused for many experiments. You can also set the networks performance and quality of service parameters.
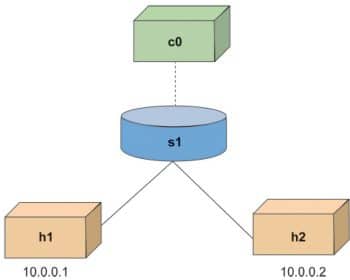
You can create a network topology as shown in Figure 1 using Mininet Python code.
Mininet code net = Mininet() # net is a Mininet() object h1 = net.addHost( h1 ) # h1 is a Host() object h2 = net.addHost( h2 ) # h2 is a Host() s1 = net.addSwitch( s1 ) # s1 is a Switch() object c0 = net.addController( c0 ) # c0 is a Controller() net.addLink( h1, s1 ) # creates a Link() object net.addLink( h2, s1 ) net.start() CLI( net ) net.stop()
The above code creates a topology with two hosts, one switch and remote controller. In the example shown above, h1 and h2 are the two hosts connected to controller c0 through the virtual switch s1. I will give more details on this in the section on simulation.

Build your custom network topology in Mininet
Shown below is the code for custom topology creation. The first section imports an API for various functions.
#/usr/bin/python
from mininet.net import Mininet
from mininet.node import Controller
from mininet.node import RemoteController
from mininet.cli import CLI
from mininet.link import TCLink
from mininet.log import setLogLevel, info
Note: In the follwing code, we define a function myNet() which creates all the nodes and links. The Mininet class returns an empty network object to which we add hosts, switches and a controller. The RemoteController class returns a controller object which runs outside Mininet. Then we assign the controller into our Net object.
def myNet(): Create an empty network net = Mininet( link=TCLink ) Create a RemoteController and add to network info( *** Adding RemoteController\n ) c = RemoteController(c, ip=127.0.0.1, port=6666) net.controllers = [ c ] Note: net.addHost() creates host nodes and adds to the network. net.addSwitch adds the openflow switch to the network Create hosts and add to network info( *** Adding hosts\n ) h1 = net.addHost( h1, ip=10.0.0.1 ) h2 = net.addHost( h2, ip=10.0.0.2 ) h3 = net.addHost( h3, ip=10.0.0.3 ) Create switch and to network info( *** Adding switch\n ) s3 = net.addSwitch( s3 ) s4 = net.addSwitch( s4 )
Note: In the following code, we connect the nodes by adding links between them as shown. Then the net.build() call will build the topology and net.start() will start all the nodes. CLI(net) will run the cli mode awaiting user inputs.
# Add link: h1.linkTo( s3 ) h2.linkTo( s3 ) s3.linkTo( s4 ) h3.linkTo( s4 ) # Network build and start: net.build() net.start() #CLI mode running: CLI( net ) net.stop() if __name__ == __main__: setLogLevel( info ) myNet()
Simulating a basic Mininet network topology using the Mininet command
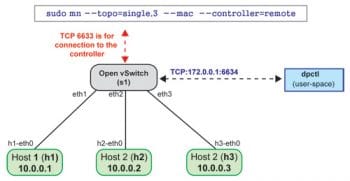
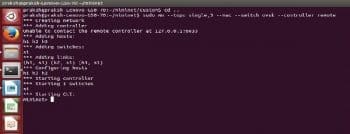
The following example creates a network topology with a single OpenFlow switch and three hosts connected to a remote controller. When we run this topology, it shows that its unable to connect to the remote controller. After running it, the topology just starts the POX controller so it should be connected to the controller. The default remote controller runs on the IP address 127.0.0.1 with the 6633 port. Dpctl is a management utility that enables some control over the OpenFlow switch. It shows the current state of the data path, including its features, configuration, and flow tables entries.
In Figures 2 and 3 h1, h2 and h3 are the network nodes which are connected with S1 OpenvSwitch (a virtual switch).
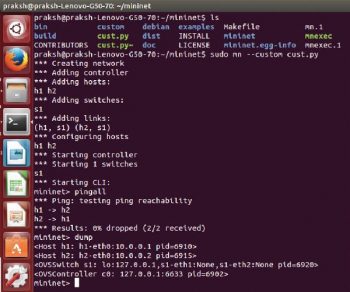
The simulation of a Mininet custom network topology is shown in the following example:
from mininet.topo import Topo
class MyTopo( Topo ):
Simple topology example.
def __init__( self ):
Create custom topo.
# Initialize topology
Topo.__init__( self )
# Add hosts and switches
leftHost = self.addHost( h1 )
rightHost = self.addHost( h2 )
leftSwitch = self.addSwitch( s3 )
rightSwitch = self.addSwitch( s4 )
# Add links
self.addLink( leftHost, leftSwitch )
self.addLink( leftSwitch, rightSwitch )
self.addLink( rightSwitch, rightHost )
topos = { mytopo: ( lambda: MyTopo() ) }
Important classes, methods, functions and variables in the preceding code include:
Topo: The base class for Mininet topologies
addSwitch(): This adds a switch to a topology and returns the switch name
addHost(): This adds a host to a topology and returns the host name
addLink(): Adds a bi-directional link to a topology (and returns a link key, but this is not important). Links in Mininet are bi-directional unless mentioned otherwise.
Mininet: This is the main class to create and manage a network
References
[1] http://mininet.org/sample-workflow/
[2] http://ofworkshop.blogspot.in/2013/10/build-your-network-topology-in-mininet.html
[3] http://mininet.org/download
[4] http://mininet.org/walkthrough/#part-1-everyday-mininet-usage
[5] https://github.com/mininet/mininet/blob/master/custom/topo-2sw-2host.py


