In this article lets create some popular content – a quiz with a set of questions and answers, along with an app that allows you to answer questions from a selected question set. We will also enable speech based inputs to answer questions, a novelty that could lead to other inventive applications too. Readers will require prior working knowledge of the MIT AI 2 environment to benefit from this column.
The infrastructure
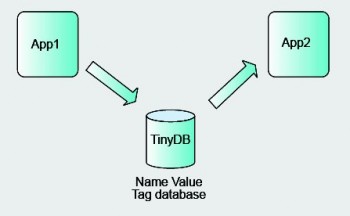
Let us examine what is needed as basic infrastructure to accomplish what we want to do. We are trying to create two apps: App1 to create data and App2 to use that data and enable some functionality. This means that data written by App1 needs to be communicated to or be available to App2. In the example featured in this article, we will use screens to simulate App1 and App2, and use TinyDB for communicating data between the apps. Refer to Figure 1. We could easily extend this using TinyWebDB and break the screens into totally independent apps. For this article, lets restrict ourselves to using TinyDB and a single app with multiple screens, which makes it easier to illustrate concepts.
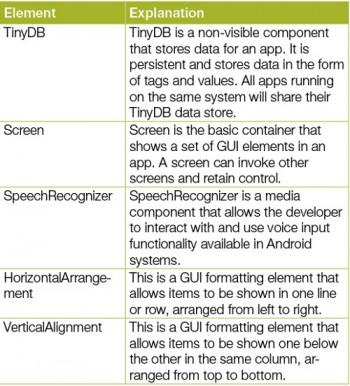
Expanding on this concept further, the elements that we see in this article are explained in more detail in Table 1.
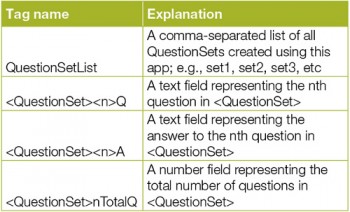
Next, lets look at how the design for the TinyDB tags is arrived at. TinyDB is a simple tag <-> value store, which has a simple interface to write a tag and its value into the database. It then allows you to fetch a value based on a tag name. Now, coming to the design of tags for our Question and Answer system, the idea here is to identify a set of questions with a unique text based identifier called a QuestionSet. This comprises multiple questions and their answers. Hence, we need to know how many questions are present in a question set. We also need a way to identify all the QuestionSets already created in the system. So, we use the tags as explained in Table 2 for storing and retrieving the values needed on our app screens.
The main screen
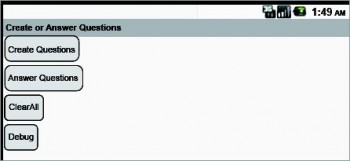
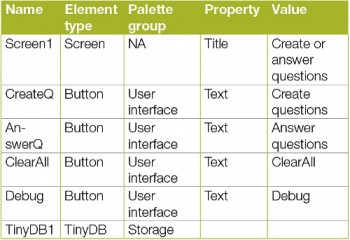
Now we come to the main screen. In each of these screens we first take a look at the elements we use from the palette in the design view and what their names and values are to be. We will then present the code in the blocks view and explain to an extent the role played by each code piece. In the main screen, which could not be renamed from Screen1 as far as I could make out, we see the elements described in Table 3 with their properties. Also note that TinyDB is a non-visible component. The screen itself should look like what is shown in Figure 2.
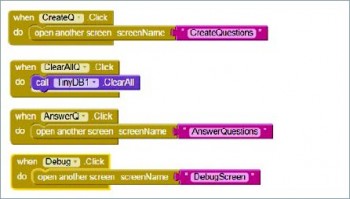
Ideally Create Questions and Answer Questions can be separate apps, as you may want to offer a different service to creators of questions and provide a different app for answering. But for this article, it would be fine to use the common app with different screens to be able to illustrate how they work using TinyDB for storage and retrieval of data. The blocks for Screen1 look like whats shown in Figure 3.
The main functionality of Screen1 is only to provide an interface to control invocation of the other screens, namely CreateQuestions, AnswerQuestions and also a DebugScreen. There is one more entry to ClearAll, which basically cleans up TinyDB of all the entries. Both the ClearAll and the DebugScreen aid in debugging during development. They are not expected to play this role in a production level app. The new procedure call, which opens another screen screenname, is available from the Built-in? Control group of blocks. It basically takes a screen name as an argument and instantiates that particular screen. As of now, it looks like using the Back button is necessary to come back to the main screen and to do a clean-up in the child screen. We will come to that later in the next section.
Note: It is interesting to note that the screens cannot share any variables or any other common component. Also, even a copy-paste does not work across screens, either in design mode or in blocks mode.
The CreateQuestions screen
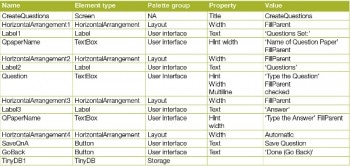
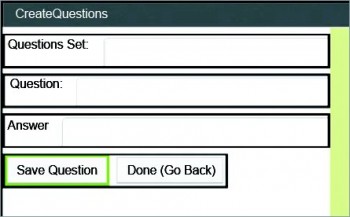
Now we come to the CreateQuestions screen. The elements of the screen are described in Table 4. The screen itself is shown in Figure 4.
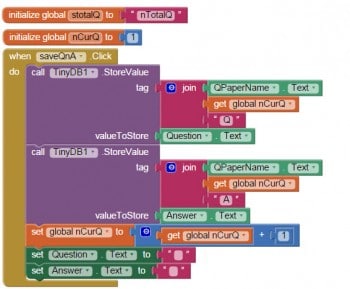
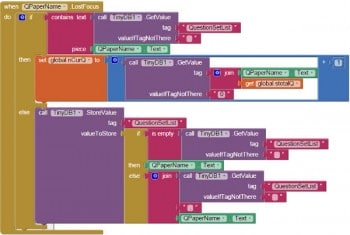
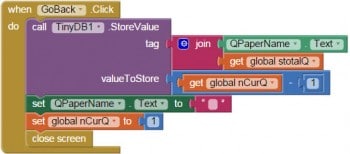
TinyDB has some very simple interfaces for CRUD (create, read, update and delete) operations. In fact, create and update are one and the same operation as the presence of a tag before them does not make any difference. In addition, a GetTags interface allows one to read all the tags present in the database. The StoreValue interface allows one to store a value against a particular tag. The GetValue interface allows the reading of the value stored against a particular tag. There is also a ClearTag interface, which deletes a tag and its value from the database. Putting these together we have the blocks for the CreateQuestions screen, as shown in Figure 5.
AnswerQuestions screen
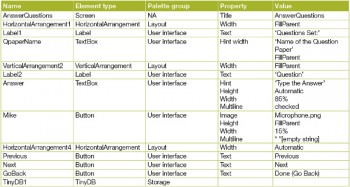
Now we come to the AnswerQuestions screen. The elements here are similar to CreateQuestions, except that we add an element for voice input, called SpeechRecognizer. Also, we create an image button to indicate voice input is enabled. To do this, we can upload the image of a microphone into the projects media section. In the current case, I have uploaded a file microphone.png into the project. Then we can set the image for the button. Next, lets add a couple of buttons to navigate forward and back, amongst the questions. We describe elements of the screen in Table 5. The screen itself is shown in Figure 6.
Note: There are three values for width, height, etc. These could be automatic, which means that they will get adjusted based on their properties, like a text box getting adjusted based on text input. It could also be Fill Parent, which means that it will fill as much as the parent element allows it to; e.g., for our Mike button, we want its height to fill as much as the parent will allow. Automatic will make it too big, based on the image size. We can also make it a percentage of the available space and, in this case, you can adjust the percentage out of 100 per cent to different elements available.
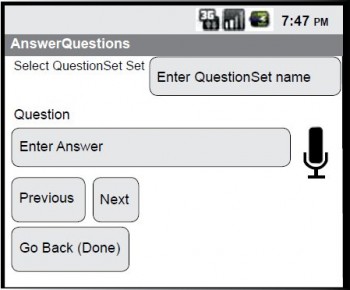
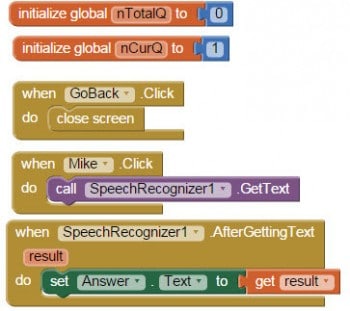
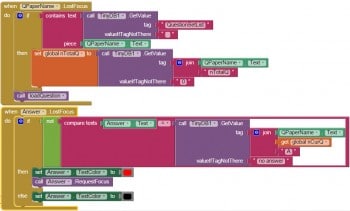
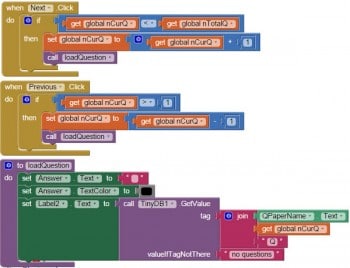
The blocks for AnswerQuestions in Figure 7 are similar to those of CreateQuestions except for additional checks and controls over the following items.
Validating the answer: Once the answer is entered, we need to validate it against the answer stored for the question when it was created. While doing this, I decided to show an incorrect answer by changing the colour of the answer to red. When the correct answer is entered, it changes back to black.
SpeechRecognizer input: When the Mike button element is clicked, we invoke the speech input component. We set the value returned from this to the Answer text box.
Controlling the current question with the previous and the next one: We use a question tracker as a number starting at 1, in order to navigate between questions. This needs to be changed and the corresponding question loaded into the screen elements. Also, to do this neatly, we create a procedure loadQuestion, which reads the current question number and loads the question accordingly.

Debugging
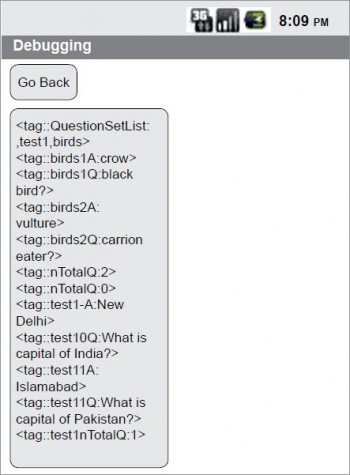
During development, I wanted to understand how the tags were created and retrieved. Thus I felt the need to have a debugging interface with which I could walk through the tags and values already created. The DebugScreen is meant for this and is created with simple elements as shown in Table 6. The DebugScreen is shown in Figure 7.
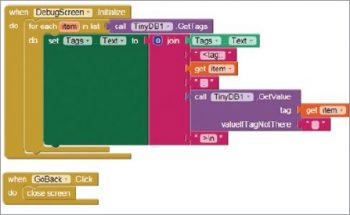
The blocks code for DebugScreen looks like what is shown in Figure 8. For operations that you want to perform during screen load, you need to implement the Screen.Initialise method and implement your functionality.
Important points for debugging and more
The connect to the AI Companion option does not work when a VPN network is connected. The error is not usable, and it occurred to me later that VPN is interfering with the connectivity between the AI2 in the cloud and the mobile phone.
The speech recogniser does not work in the Emulator mode and gives an error when invoked. It looks like there is some error in the settings, even though my laptop is capable of microphone input.
Every environment in which you run sets up its own TinyDB database and, hence, when you test freshly in Emulator or in AI Companion you will find that the QuestionsList needs to be set afresh.
TinyDB on your phone or emulator is common across all apps and, hence, may have tags and values that are not intended for your app and may even interfere with your data.
What next?
This app is only a starter. You could consider doing the following to improve it:
1. Use TinyWebDB to store and retrieve data across apps.
2. Use microphone input to also create questions.
3. Make the app completely media-friendly by including a SpeakQuestion option too, to read out loud.
4. Include the ability to give multiple options as answers. Hint: You can store an xml in the answer for a tag.


