
Developing mobile apps is fun, but developing apps for different mobile operating systems, individually, is a chore! An easy way out is to use PhoneGap, which is a software development platform that can create mobile apps for all mobile platforms in one go. The best thing about PhoneGap is that developers can work with it using existing Web developer skills.
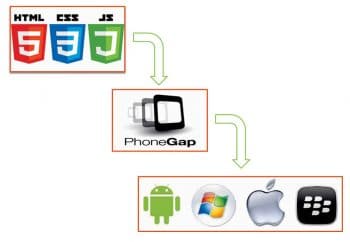
PhoneGap is a free and open source framework that can be used to create mobile apps using Web technologies like HTML, CSS and JavaScript. We can also use standardised Web APIs and target the platforms on which we want to develop the app. The biggest advantage of PhoneGap is that we can use our existing Web developer skills, which result in a shorter learning period and faster development. This framework is entirely based on Web standards.
The structure of a mobile is similar to that of a computer. It has a custom-built operating system, hardware and firmware. Every mobile OS provides its own environment set-up and tools to develop apps, which will run only on that OS. Apps running on one OS can’t run on another. So to increase the reach among users, there’s a need to make the apps compatible with all major mobile OSs. To make an app that can not only run on all major OS platforms but also have the look and feel that’s compatible with them is a tedious task.
PhoneGap is the solution for all the problems mentioned above. It is a framework that allows us to develop apps using HTML, CSS, JavaScript and standard Web APIs for all major mobile OSs. PhoneGap takes care of the look and feel of the app and its compatibility with various mobile OSs.
It also allows us to use different features of the mobile device like the camera, contacts and location. It supports iOS, Android, BlackBerry, Symbian, webOS, WP7 and Bada.
Developing an app in PhoneGap doesn’t require any expertise in any of the above platforms nor any hard core coding practices. Once you upload the data content to the website, PhoneGap will convert it to various app files.
Installation
1) Install Node.JS from its official site. This is a prerequisite for PhoneGap.
2) Download PhoneGap (desktop or mobile, according to the requirement) from its official site http://phonegap.com/getstarted/.
3) To install PhoneGap, go through the following steps.
Mac: Type the following command in the terminal:
sudo npm install -g phonegap
Windows: Type the following in the command prompt:
npm install -g phonegap
4) Install Java, Ant and Android Studio according to the platform on which you want to develop the app.
5) Update the path variables in Mac/Windows.
6) Test PhoneGap by entering the following commands in a terminal:
cd /Users/YOURUSERNAME/Desktop
phonegap create MyApp com.test.myapp TestApp
cd TestApp
phonegap local build android
7) If it is installed successfully, you will get the following results:
[phonegap] adding the Android platform...
[phonegap] compiling Android...
[phonegap] successfully compiled Android app

Environment set-up
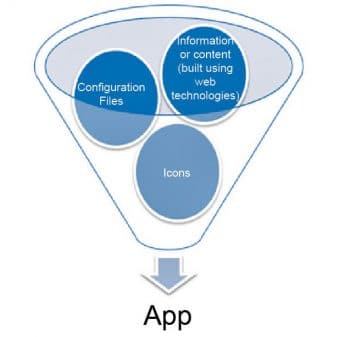
An app contains the following items in its package:
- Configuration files
- Icons for the app
- Information or content (built using Web technologies)
Apps created using the PhoneGap build can be set up either through the Web or by setting the configuration in config.xml. The config.xml file allows us to specify the metadata about our applications.
An example is:
<?xml version=”1.0” encoding=”UTF-8” ?>
    <widget xmlns   = “http://www.w3.org/ns/widgets”
        xmlns:gap   = “http://phonegap.com/ns/1.0”
        id          = “com.phonegap.helloworld”
        versionCode = “20”
        version     = “0.0.1” >
   <name>PhoneGap Hello Wold</name>
    <description>
       Hello World Example
    </description>
</widget>
Platforms and preferences
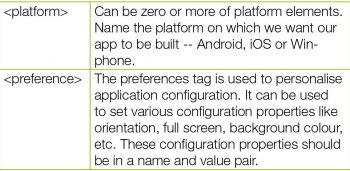
An example is:
<platform name=”ios” />
<platform name=”android” />
<patform name=”winphone” />
Preferences are for all platforms if you haven’t specified them for a single platform. To specify a preference for a single platform, you can place the preference tag inside a platform tag.
<platform name=”ios” >
  <preference name=”orientation” value=”landscape” />
</platform>
<platform name=”android” >
  <preference name=”orientation” value=”portrait” />
</platform>
Icons and splashes
Icons and splashes are platform dependent. Shown below are two ways to specify an icon or splash for a particular platform.
1) By specifying a platform attribute:
<icon src=”icon1.png” platform=”ios” width=”100” height=”100”/>
2) By putting the icon or splash inside a platform element:
<platform name=”ios”>
    <icon src=”icon1.png” width=”100” height=”100” />
</platform>
Both these statements will give the same result—that the icon is being used for iOS.
Developing a Hello World application for Android
To build an app for Android, you need the following prerequisites on your machine:
1) Java SDK
2) Android SDK
3) Eclipse
4) Eclipse ADT plugin
5) Android platforms and components
6) Apache Ant
7) Ruby
8) PhoneGap framework
Now, make an environment variables check.
Set the following values to your account’s PATH variable:
system_path/jdk/bin
system_path/android-sdk/tools
system_path/ruby/bin
system_path/apache-ant/bin
Also set the following variables:
JAVA_HOME – path of JDK directory
ANT_HOME – path of apache-ant directory
ANDROID_HOME – path to android SDK directory
To create a workspace for your app, go to the‘phonegap-android’folder on the command prompt:
ruby ./droidgap "[android_sdk_path]" [name] [package_name] "[www]" "[path]"
android_sdk_path: Where you have installed the Andorid SDK
name: Name of the application.
package_name: The name you want to have for your application.
www: The path of the folder where you want to have your PhoneGap app files.
path: The application workspace for your project which you will add afterwards.
Once you run the command, you will see the screen shown in Figure 3.
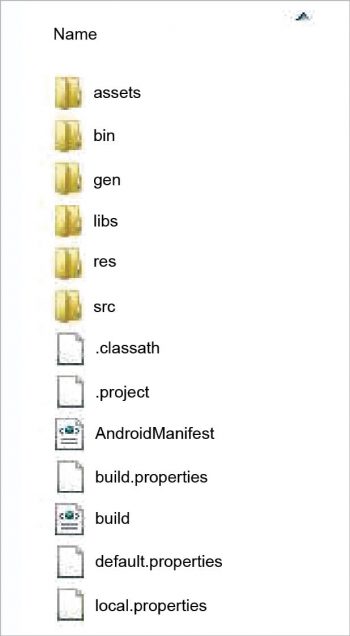
This will create a complete workspace for your PhoneGap Android app, as shown in Figure 4.
Setting up your project in Eclipse
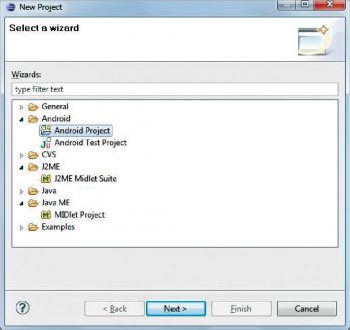
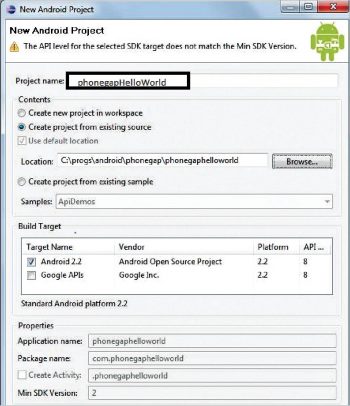
Once you have created the above workspace, you can open it in Eclipse. Now create a new Android project, as shown in Figure 5,
Next, select ‘Create project from existing source’ and give the project a name, as shown in Figure 6.
Add the external library (phonegap.jar) in the libs folder of your workspace.
To add the external library, right-click on the project Build Path →Add external archive →phonegap.jar in the libs folder.
There will already be a file called phonegap.js in the assets/www folder of the workspace. In the same folder, create a file called index.html for your content and add the following code:
<!DOCTYPE HTML>
 <html>
   <head>
     <meta name="viewport" content="width=320; user-scalable=no" />
     <meta http-equiv="Content-type" content="text/html; charset=utf-8">
     <title>PhoneGap</title>
               <script type="text/javascript" charset="utf-8" src="phonegap.js"></script>
               <script type="text/javascript" charset="utf-8">
               var sayHello = function() {
                         var name =      document.getElementById("Name").value;
                         navigator.notification.alert("Hello :" + name);
             }
    </script>
   </head>
   <body onload="init();" id="ibody" >
             <div id="txt">
             <input   type="text" name="Name" id="Name" />
             </div>
             <div id ="btnhello">
    <a href="#" class="btn" onclick="sayHello();">Go</a>
            </div>
         </div>
   </body>
</html>
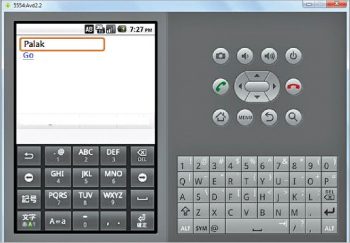
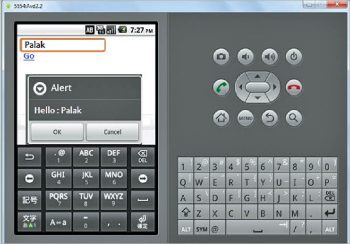
There is a textbox in which you can enter the name and there is a button called ‘Go’. Once you click the button, it will show the output of ‘Hello’ and the name you have entered in the textbox in an alert box.
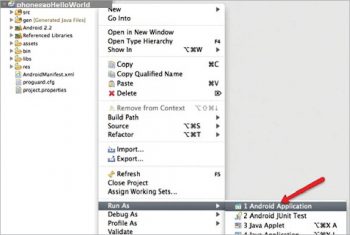
To launch your PhoneGap application in the Android emulator, right-click the project root, and select Run As > Android Application (see Figure 7).
Once you run the project, you can see the screen shown in Figure 8 on your emulator.
When you click on the Go button, it will show the alert box, as shown in Figure 9.
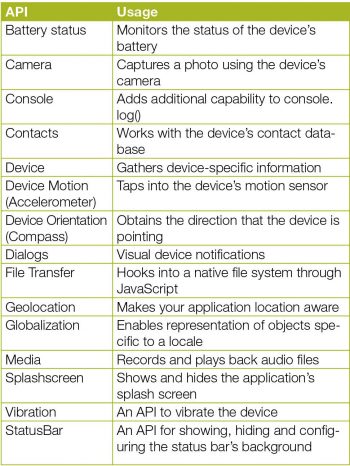
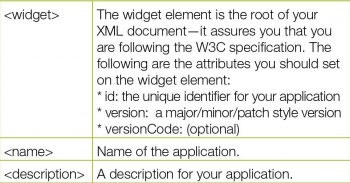
PhoneGap’s native APIs are listed in Table 1.




It was awesome post there is many points are very helpful for developing so I like it post and some of the points
PhoneGap is a free and open source framework that can be used to create
mobile apps using Web technologies like HTML, CSS and JavaScript. We
can also use standardized Web APIs and target the platforms on which we want to develop the app. thanks.