A chatbot simulates conversations with human users, especially over the Internet. This can be in the form of voice or text messages. Chatbots are being increasingly used in commercial environments. Dialogflow can be used to create a great chatbot. In this tutorial, the author uses the JavaScript SDK to build a chatbot directly in Angular.
Dialogflow, formerly known as API.AI, is an engine for building conversational experiences. It harnesses Google’s machine learning and natural language processing technologies to give Web developers a user friendly interface to build chatbots and deploy them on any platform, including the Web, on Slack or Facebook Messenger.
Prerequisites
Let’s start by building a new Angular app from the command line using ng new chatbot, and then ‘cd’ into that folder to install the JavaScript SDK via NPM in the development environment.
npm install -g @angular/cli

ng new chatbot

cd chatbot

npm install api-ai-javascript --save-dev
Note: At this point, the SDK is still called API.AI, but it may change to Dialogflow in the future.
I am using Visual Studio code for this project. You are free to choose your own code editor.
Feature module (chat.module.ts)
Technically, this step is optional, but it is good practice and will make your life a lot easier as your app grows more complex. The first step is to generate a module called chat, as follows:
ng g module chat
Then you can add resources to this module, like a service, and you can use the –m flag to make sure that it’s included in this module.
ng g service chat -m chat
In addition, you need to create a component called chat-dialog and place that in the module as well, as shown below:
ng g component chat/chat-dialog -m chat
You can see in the file structure that all your resources are nested under the chat folder, and the components and services are registered inside the chat module. The only extra bit that you need to add is the Angular FormsModule and set your ChatDialogComponent to Exports so that it can be used directly in the app component. The chat.module.ts file should look like what’s shown below:
import { NgModule } from '@angular/core';

import { CommonModule } from '@angular/common';

import { FormsModule } from '@angular/forms';

import { ChatService } from '../chat.service';

import { ChatDialogComponent } from './chat-dialog/chat-dialog.component';

@NgModule({

imports: [

CommonModule,

FormsModule

],

declarations: [

ChatDialogComponent

],

exports: [ ChatDialogComponent ], // <-- export here

providers: [ChatService]

})

export class ChatModule { }
You need to jump over to the app.module.ts file and import the ChatModule there. All you have to do is add it to the import section. After the import, the app.module.ts file should look like what’s shown below:
import { BrowserModule } from '@angular/platform-browser';

import { NgModule } from '@angular/core';

import { AppComponent } from './app.component';

import { ChatModule } from './chat/chat.module';

@NgModule({

declarations: [

AppComponent

],

imports: [

BrowserModule,

ChatModule

],

providers: [],

bootstrap: [AppComponent]

})

export class AppModule { }
Now we can go into app.component.html to delete the default code, and we’ll declare our chat dialogue component there:
<chat-dialog></chat-dialog
If you pull up the app, you should see that the chat dialogue component works.
Introducing Dialogflow
To start building chatbots in Dialogflow, go ahead and sign up. Dialogflow is a completely free service. You don’t have to enter any kind of billing information to create your first agent on it.
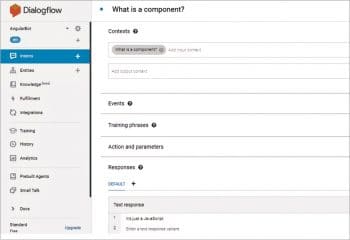
The fundamental purpose of the Dialogflow agent is to detect the intent of the user. When a user asks a question and if the chatbot has been trained to recognise this phrase, it will detect the intent. You can program the bot to run backend code at this point, or just send a response down to the user.
When the bot doesn’t recognise the intent, then you can have it respond with any kind of customised message. Dialogflow allows you to customise this in many different ways. In this tutorial, I’m going to focus on the back and forth dialogue between the user and the bot.
You need to add a phrase that the user might say. In addition, you need to add multiple phrases to make your bot more robust to different ways of expressing this intent. The bot sends a response once it recognises this intent.
That is how we build a basic chatbot with Dialogflow.
Getting to understand Small Talk
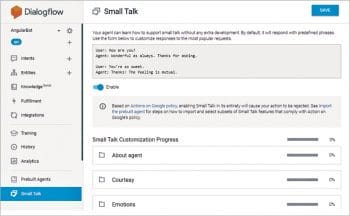
Small Talk allows you to quickly customise the personality of your bot without having to create your own custom intents. Small Talk has a huge list of possible scenarios and you can add your own custom language to it.
Small Talk is a great way to impress your users by adding funny or intelligent responses to certain common questions.
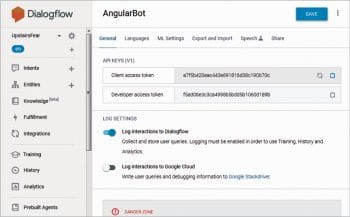
Grabbing a client access token
Before you leave Dialogflow, you need to grab a client access token. To grab the token, click on the agent, and then from the main agent page, just copy the client access token.
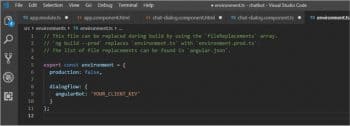
Now, go back into Angular and add that client token inside your environment.ts file (Figure 4).
In some cases, it’s not secure to add an API key here, but since Dialogflow is free and doesn’t have write access, this isn’t an issue.
Communicating with your bot (chat.service.ts)
To communicate with your bot, go into the Angular code and open chat.service.ts. You need to import the environment that you just added the API token to, as well as the API.AI client which was installed at the beginning. You need to set a read-only variable for the token and use that to initialise the API.AI client. You can set that as another variable called client and pass it to the API token.
To send a basic text request to the bot, you can set up a method called talk(), and call client.textRequest() with the text that you want to send within the parenthesis. The method sends a HTTP request to Dialogflow, which then responds with a JSON of the actual response from the agent.
chat.service.ts should like what’s shown below:
import { Injectable } from '@angular/core';

import { environment } from '../../environments/environment';

import { ApiAiClient } from 'api-ai-javascript';

@Injectable()

export class ChatService {

readonly token = environment.dialogflow.angularBot;

readonly client = new ApiAiClient({ accessToken: this.token });

constructor() {}

talk()

this.client.textRequest(msg)

.then( );
You can set this chatbot up by going into your chat-dialog.component.ts file, injecting the chat service in the constructor and calling that talk() method which you just defined by adding the following command to the file:
this.chat.talk();
Making the bot user friendly (chat.service.ts)
To refactor things in order to make the bot a little more user friendly, you need to use RxJs to create an observable array of messages, and import Observable and BehaviorSubject from the library to the chat.service.ts file.
import { Observable } from ‘rxjs/Observable’;

import { BehaviorSubject } from ‘rxjs/BehaviorSubject’;
You also need to create a message class to define the way a message should look. The message class will have content, which includes a string and a sentBy property to distinguish between bots and humans.
constructor(public content: string, public sentBy: string) {}
Inside the chat service, you need to define a variable called conversation, which is a behaviour subject typed to an array of messages with a default value as an empty array.
conversation = new BehaviorSubject<Message[]>([]);
To make updates to this array, you need to create a function called update, which calls next on the behaviour subject. The function will clean up the code a little bit. Anytime you want to add a new message to the message feed, just call this method with the corresponding message object.
update(msg: Message) {

this.conversation.next([msg]);
The conversation is going to start with a message from the user. That message is going to be in the form of a string. You need to convert the string into a message object. Thus, set the content equal to the message and sentBy property to the user.
converse(msg: string) {

const userMessage = new Message(msg, ‘user’);

this.update(userMessage);
To add this to the UI, you should call this update with the user message, and send the request to Dialogflow with that text, as follows:
return this.client.textRequest(msg)
As before, you can call the client text request to return a promise; take the response from that promise and format it as a message from the bottom. You can get the bot’s actual text response from res.result.fulfilment.speech. As you did with the user message, make this an instance of the message class and then call the update() method on it.
return this.client.textRequest(msg)

.then(res => {

const speech = res.result.fulfillment.speech;

const botMessage = new Message(speech, ‘bot’);

this.update(botMessage);

});
Putting the service to use (chat-dialog.component.ts)
Now switch back to the chat-dialog.component.ts file. You need to import the ChatService, Message class from chat.service.ts file, and Observable class and Scan operator from RxJs.
import { Observable } from ‘rxjs/Observable’;

import ‘rxjs/add/operator/scan’;
To arrange your messages in an observable array, you can tap into the behaviour subject that we created in the service. You need to set a variable for messages and formValue, which we’ll see once we get to the HTML.
messages: Observable<Message[]>;

formValue: string;
You need to add ChatService in the constructor and convert that behaviour subject into an observable array, which you can do with the Scan operator by calling the behaviour subject asObservable.
constructor(public chat: ChatService) { }

ngOnInit() {

// appends to array after each new message is added to feedSource

this.messages = this.chat.conversation.asObservable()
Scanning gives you the current value as well as the accumulated total in that behaviour subject. You can concatenate two values into a new array together. The end result is an observable array that you can loop over in HTML with the async pipe.
.scan((acc, val) => acc.concat(val) )
By taking the form value that will set up with ng-model in HTML, we can call the converse method from the service. This is just an event handler that will bind to some events in HTML.
sendMessage() {

this.chat.converse(this.formValue);

this.formValue = ‘’;

}
Letting a user send messages (chat-dialog.component.html)
Head over to the chat-dialog.component.html file. You need to loop over that Observable list of messages. You can do that with ngFor and the async pipe, which will give you access to the message object. You can use ngClass to distinguish the bot messages from the actual human messages. The ‘from’ messages will be sentBy the bot and ‘to’ messages will be sentBy the user.
<ng-container *ngFor=”let message of messages | async”>

<div class=”message” [ngClass]=”{ ‘from’: message.sentBy === ‘bot’,

‘to’: message.sentBy === ‘user’ }”>

{{ message.content }}

</div>

</ng-container>
The other step is to set up a form so the users can actually type their messages. The quickest way to take care of that is with ngModel. You can set up a form input with ngModel set to the formValue. When the user clicks the Enter button, your code will fire the event handler that will send the message to Dialogflow. You can set up a button that fires the event handler on a click as well, in case the user doesn’t have an Enter button.
<label for=”nameField”>Your Message</label>

<input [(ngModel)]=”formValue” (keyup.enter)=”sendMessage()” type=”text”>

<button (click)=”sendMessage()”>Send</button>
Congratulations on building your first chatbot! Dialogflow gives your customers new points of interaction to connect with your brands by building appealing conversational interfaces powered by AI. You can connect with your customers on your Web page, application, Google Assistant, Microsoft Cortana, Amazon Alexa, Facebook Messenger, and other popular platforms and devices.


