The first part of this article introduced Git, its workflow, installation and basic commands. This second part elaborates the collaboration aspects of Git, including branching and merging, which help with parallel, non-linear development in projects and avoid disruption in the main line of development. Working with remote repositories is also covered.
Branching in Git is analogous to branches on a tree. A Git branch is an independent line of development emerging from the main development line, just like branches coming out of the trunk of a tree. This feature at its core enables the collaboration of a team on a single project by letting developers work on feature developments, bug fixes or hot fixes without disturbing the main development line on their own branches, and merging them whenever necessary.
In most version control systems (VCS), branching is an expensive operation with respect to both time and space. Git branches are extremely lightweight, making operations like creating branches and switching back and forth from one to the other very quick. This feature sets Git apart from the other VCS.
Creating and using branches
git branch <branch-name> is used to create a new branch. It creates a new pointer from the current branch. When the branch is put to use, it does affect the current branch whenever any changes or commits are made in the repository. $git checkout <branch-name> is used to make the HEAD point to the <branch-name>. In other words, this updates the files in the repository to match the version stored in the branch, and tells Git to record any changes from now on to the branch.
Both these commands can be combined in a single command like git checkout -b <branch-name>. Let’s create a feature branch and record some changes in it, as explained in Figure 1. We will continue working on the same repository that was created in the first part of this article carried in the August 2020 issue of OSFY.

We can easily switch back to another branch (in this case master branch), work separately on it and commit the changes, which is as shown in Figure 2.

Integrating the branches
There are two ways to put the work done in branches onto the main line of development — merge and rebase. Both ways take the series of commits from the target and current branch, and combine them into one unified history, but both do it in different ways.
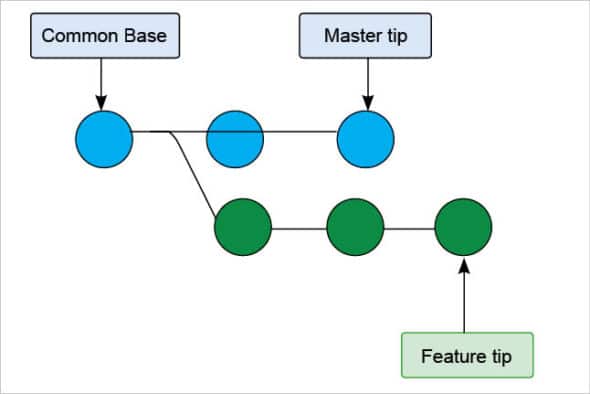
Based on which branch needs to be updated from which one, the branches can be designated as source branch and target branch. In this scenario (refer Figure 3) we consider master as source branch and feature as target, assuming that work being done on the feature needs to be updated with work on the master.
Merge: Merging is done after checking out the target branch and then using git merge <source-branch-name>, which is shown in Figure 4.

git merge introduces a merge commit in the history of the feature branch, that binds the histories of both master and feature, and updates the feature with changes made to the master branch. Figure 3 shows the branching structure before merge commit. The branching structure after merge commit is shown in Figure 5.
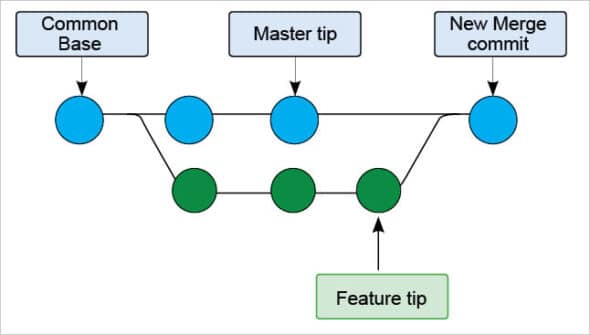
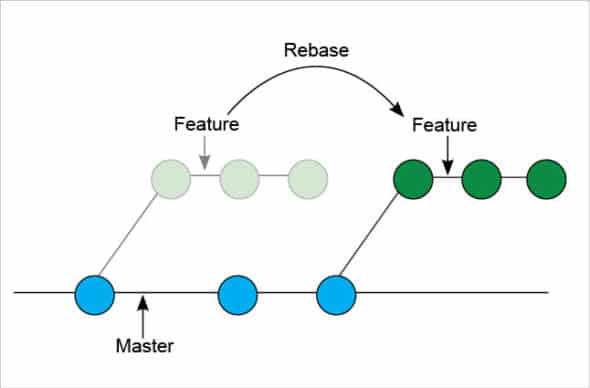
Rebase: This has many more capabilities like rewriting the history interactively, re-sequencing the history, editing commit messages, adding missing files in the commits, etc, but here we look at it in terms of integrating the work from two branches. This is called ‘rebasing source onto target branch’, which means taking the commit history from the source branch and reapplying target branch commits on top of it. It does not introduce merge commit unless there are conflicts with two branches. This leaves the target branch with a linear and clean history. This is done just like merging by checking out the target branch and rebasing the source onto the target. Some changes can be made in the feature and master branches to demonstrate rebasing, as shown in Figures 6 and 7.


Rebasing is done using git rebase <source-branch-name> as shown in Figure 8.
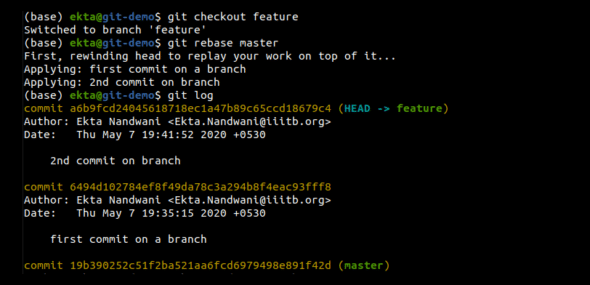
As seen in the log, the feature branch contains a full history of the master branch as well as its own commits applied on top of master branch commits. The new branching structure is shown in Figure 9.
Working with a remote repository
A remote repository is a local repository hosted somewhere on the Internet. It is generally used to collaborate with other people, be it the team members or anyone who has access to the repository. git remote -v is used to see the remote server URLs along with the configured shorthand for the same. There should be none by default in a newly initialised Git repository, but for a cloned repository, the default would be the URL from which it was cloned with the shorthand as ‘origin’.
To add a new remote repository, the following command is used:
$ git remote add <shorthand> <url-to-remote-repo>
We have created a repository on GitHub to demonstrate working with remote repositories in Git, as shown in Figure 10.

Pushing the changes to the remote repository: The git push command is used to update the remote repository with the changes made in the local repository. It acts as a syncing function that uploads the local changes made in the codebase to the remote repository.
The basic command used is: git push <remote> <branch>. Here <remote> is the destination and <branch> is the source of the push command. An example of this could be: git push origin master. Here the master branch from the local repository is pushed to the origin (which is shorthand for the remote repository).
One thing to note is that git push only works when there is a fast-forwarding merge in the destination repository. A merge or any reference change in Git is called fast-forward if it is possible to traverse back to the old reference from the new reference. So, if the old reference is an ancestor of the new reference then it’s a fast-forward, which is explained in Figure 11.

Fetching the changes from the remote repository: The git fetch command downloads files, commits, refs, etc, from a remote repository to a local repository. The fetch command only downloads and doesn’t merge into the local repository. It has absolutely no effect on the local development. The head and the refs are not changed and no new merge commit is created. One can check out the fetch content and see the changes in order to decide whether to merge it or not. The basic structure of the command is: git fetch <remote> where <remote> is the source remote repository.

Pulling the changes from the remote repository: The git pull command is used to pull in all the changes made in the remote repository to the local repository. The basic structure of the command is git pull <remote> <branch-name> which is shown in Figure 12.

The git pull command undergoes two internal operations: git fetch and git merge. git fetch, as described earlier, is used to download the contents of a branch from the specified remote repository. Then the git merge command is run, which merges the remote refs and heads into a new local merge commit. Instead of merge, rebase can also be done after fetch. For this, the git pull –rebase <remote> <branch-name> command is used.
Collaborating with open source projects
Every project/organisation has its own process with respect to collaboration. Forking a repository is one of the ways to collaborate with someone on a project or an open source project. For a demo, the OVS project at https://github.com/openvswitch/openvswitch.github.io, which is forked from GitHub, is shown in Figure 13.
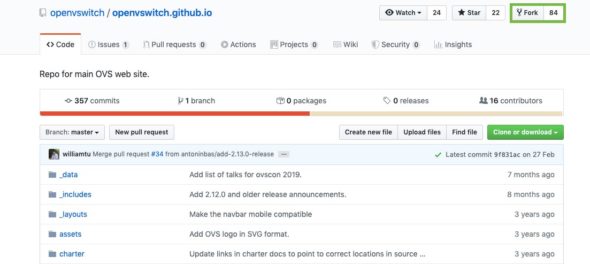
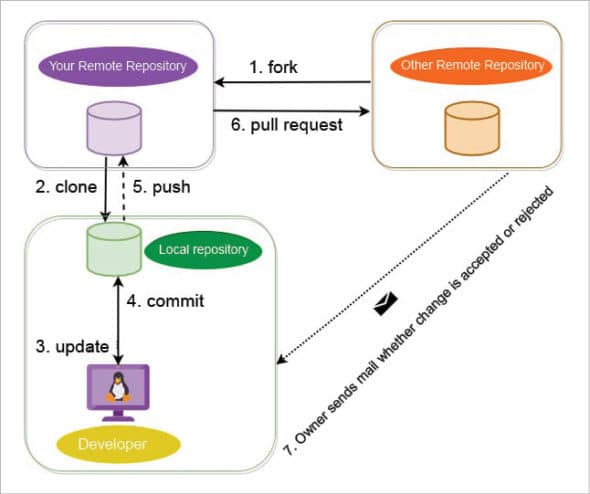
Once the project is forked, it will be present in our GitHub account. The next steps are cloning it in a local machine, working on it like any other project and pushing the changes to the cloned repository. If we wish to contribute those changes back to the original repository, a pull request can be created with the proposed changes. The maintainer of the project will decide whether to accept or reject the proposed changes, and will send a notification regarding the same, as shown in Figure 14.
To summarise, Git provides developers a robust version control system which helps them in doing non-linear and parallel development. Because of its lightweight branches and consistent tracking, it provides scalability as well as immunity from data loss. These facts make Git an absolute favourite among developers.

