


Imagine you have a server that hosts several applications. Each of these applications has different requirements, and you would like to allocate resources fairly to all of them for optimal performance. While containerisation and orchestration tools are a great boon to help simplify these tasks, having fine-grained control over individual processes and threads is preferable for high-performance computing or real-time applications. Let’s see how cgroups can effectively manage and allocate resources in a Linux system!
cgroups, also known as control groups, allow you to manage, allocate and monitor system resources, such as CPU, memory, network and disk I/O, in a group of processes. cgroups are useful for a variety of tasks, such as limiting the resources that a process can use, prioritising certain processes over others, and isolating processes from each other.
Some key terms
Understanding the key concepts of cgroups is essential for effectively managing and allocating resources in a Linux system; so let’s familiarise ourselves with these!
- Tasks: Processes are alternatively called tasks in cgroups’ context.
- Subsystems: Simply put, these are the resources on which we are going to use cgroups. They can be disk, memory, bandwidth, etc. There are many subsystems in the latest Linux version, but some of the major ones are stated below.
- cpu: This is used to guarantee the minimum number of CPU shares. In the later editions it has been extended to provide CPU bandwidth control, so that we can control the amount of time we can allocate to a task in the cgroup.
- cpuset: This is used to allow individual CPUs to the processes/tasks in the cgroup.
- memory: This is used to limit the memory being used by a task in the cgroup.
- devices: This is used to limit the usage of a device for a given task in the cgroup.
- net_prio: This is used to set the priority of network traffic per interface.
There are many other subsystems available, but we shall limit our conversation mostly to these.
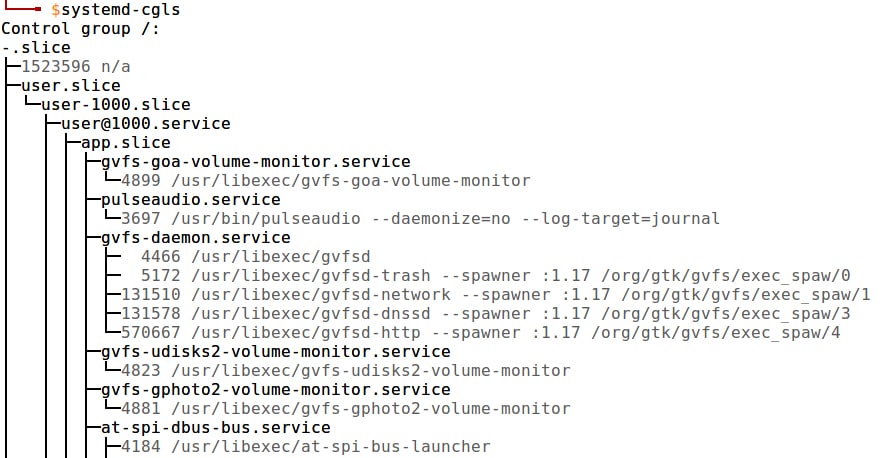
Hierarchies: Anyone familiar with Linux processes knows that these follow a hierarchy-based structure. cgroups follow a hierarchy too. We can see the similarities by comparing the outputs of systemd-cgls and pstree in Figures 1 and 2.
Hierarchies are a bunch of cgroups in a tree-based structure. This hierarchy is required to set up configs for our tasks in cgroups. The hierarchy is determined and maintained according to a set of rules:
A hierarchy of cgroups can have single or multiple subsystems attached to it. A configuration of cgroups can be mapped onto multiple subsystems.

If a hierarchy is assigned a subsystem previously, the same subsystem cannot be assigned another hierarchy. In a given hierarchy, a task can be part of a single cgroup. However, the same task can be part of multiple hierarchies.
A child task inherits the same cgroup as its parent task.
Figure 3 gives a brief of some of the terms we have visited in this section.
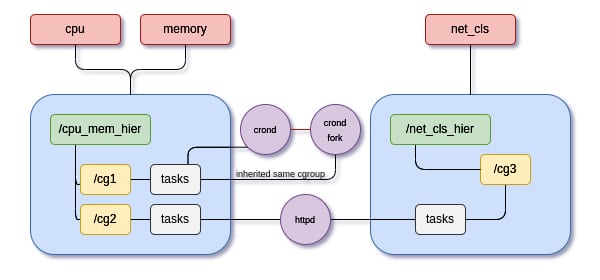
cpu, memory and net_cls are the subsystems in the configuration specified. We notice that both cpu and memory subsystems share the same hierarchy. There are two hierarchies — cpu_mem_hier and net_cls_hier. These hierarchies consist of multiple cgroups — cg1, cg2 and cg3 . There are three tasks: crond, its fork and httpd. As discussed, crond’s fork inherits cgroups from its parent process/task.
Resource limiting and sharing through slices
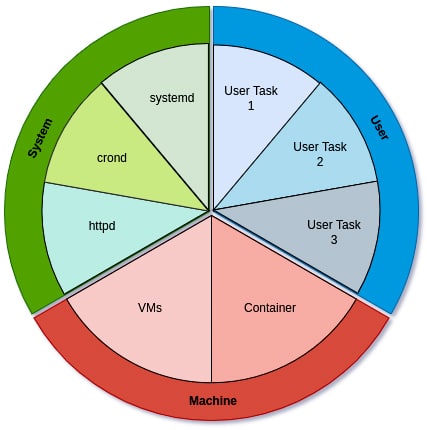
Resources can be divided into three major slices.
- System: This slice is concerned with all the daemons and services like httpd, crond, etc.
- User: This slice is concerned with all user tasks.
- Machine: This slice takes care of all the requirements for VMs, containers, etc.
Sharing is a concept that helps manage the usage of resources. Each slice has a relative share of 1024 units. The absolute value of shares from all the three slices discussed above amounts to 100 per cent. A small visual example is shown in Figure 4.
Using the concept of shares, we can manipulate how many shares each slice of resource will get. Imagine we have three services — A, B and C — and we allocate 1024 shares to service A, 256 shares to service B, and 512 shares to service C. This essentially means that 57 per cent of the resources will be allocated to service A, 14 per cent to service B, and 29 per cent to service C. This is one way we can calculate how the resources can be limited.
Now that we are familiar with the fundamentals and theoretical aspects of cgroups, we can delve into how we can practically use them to manage and allocate resources to limit CPU, memory, network, etc.
Tweaking the limits
In this section we shall look at how to create cgroups and manage our subsystems using the concepts learnt in previous sections. Let’s begin by looking at the directory structure of cgroups. cgroups can be mounted anywhere on the file system but, by default, they are present in sys/fs/cgroup. Let’s play around with CPU limits by creating cgroups.
CPU
Imagine there are two types of users in your organisation: managers and interns. The administration would want to allocate more resources to the managers than the interns. Let’s assume the division is 75-25. Let’s begin with the experiment on Ubuntu 20.04 using an Azure B1S VM.
We shall start by creating the two new users — manager and intern — and setting their respective passwords. Remember to perform all these steps as a root user.
# Create users manager, intern with `useradd` and set password using `passwd`
useradd manager && passwd manager
useradd intern && passwd intern

# Create a repository and allocate the right privileges
mkdir /home/manager && chown manager:manager /home/manager
mkdir /home/intern && chown intern:intern /home/intern
We use the chown command to assign our respective home folders with their respective ownership. Doing this will allow us to run scripts in their user space. Now that we have all our users ready, we can start creating our cgroups. Remember, cgroups can be mounted anywhere on the file system.
# Create a new folder ‘demo_cgroup’, where we will mount our cgroups
mkdir demo_cgroup

# Now we shall mount cgroups here with the required subsystems ie(cpu and memory)
mkdir demo_cgroup/cpu
mount -t cgroup -o cpu,cpuacct h1 demo_cgroup/cpu
mkdir -p demo_cgroup/cpu/{manager,intern}
The mount command is used to attach a file system to a mount point, which here is demo_cgroup/cpu. The -t cgroup flag specifies that the file system being mounted is a cgroup file system. The -o cpu,cpuacct flag specifies that the cgroup file system being mounted should include support for cpu and cpuacct subsystems. h1 is the name of the hierarchy within which the cgroup file system should be mounted. So, the command mounts a cgroup file system that supports control and accounting of CPU usage at the demo_cgroup/cpu mount point within the h1 hierarchy. The third command creates two directories, manager and intern, inside the cpu directory, which is inside the demo_cgroup directory. The -p option tells the mkdir command to create any missing parent directories as needed, so the entire directory structure demo_cgroup/cpu/{manager,intern} will be created if it doesn’t already exist.
On inspecting the manager/intern directory inside the cpu folder, we see that it is already filled with configuration parameters. Now we can begin with our experiment.
Let’s write a simple Python code which generates load, and run it on both manager and intern users.
a=1
while True:
    a+=1
On the main user (alpha), let’s open top and italicize top to see the CPU usage.
PID |
USER |
PR |
NI |
VIRT |
RES |
SHR |
S |
%CPU |
%MEM |
TIME+ |
COMMAND |
2198 |
manager |
20 |
0 |
15836 |
8960 |
5672 |
R |
49.8 |
1.0 |
2:28:52 |
python3 |
2199 |
intern |
20 |
0 |
15836 |
8868 |
5664 |
R |
49.8 |
1.0 |
2:28:52 |
python3 |
We see that, initially, the CPU resources are divided equally with approximately 50 per cent of the resources allotted to each user. We can verify that.
cat demo_cgroup/cpu/manager/cpu.shares
# 1024

cat demo_cgroup/cpu/intern/cpu.shares
# 1024
But we would prefer to allocate more CPU time to a manager compared to an intern. Using the concept of shares, let’s assume we allot 1024 shares to the manager and 340 shares to the intern to maintain an approximate 75-25 ratio among both.
# Updating the shares for the specific user
echo 1024 > demo_cgroup/cpu/manager/cpu.shares
echo 340 > demo_cgroup/cpu/intern/cpu.shares

# Linking the task to the cgroup
echo <manager PID> > demo_cgroup/cpu/manager/tasks
echo <intern PID>  > demo_cgroup/cpu/intern/tasks
Now looking at the CPU usage, we find that we have succeeded with our aim.
PID |
USER |
PR |
NI |
VIRT |
RES |
SHR |
S |
%CPU |
%MEM |
TIME+ |
COMMAND |
2198 |
manager |
20 |
0 |
15836 |
8960 |
5672 |
R |
74.8 |
1.0 |
14:32.69 |
python3 |
2199 |
intern |
20 |
0 |
15836 |
8868 |
5664 |
R |
24.9 |
1.0 |
11:21.72 |
python3 |
We see that 75 per cent of the CPU bandwidth is allocated to the managers and 25 per cent to interns. We can also verify that by looking at the time being spent on the process. We had initially spent some time running with 50-50 resources, so the time didn’t show an exact 75-25 division. But we can clearly see that the manager gets more CPU time now, i.e., 14 minutes over the intern’s 11 minutes. In a similar fashion, we can also limit memory usage by mounting the memory subsystem and updating the memory.limit_in_bytes file.
Once we are done with the limiting, in order to unmount the hierarchy we can simply use the umount command to do the same
umount demo_cgroup/cpu
Devices
In Linux, device files are special files that represent devices, such as hard drives and terminals. They allow the operating system to communicate with the devices, and perform actions such as reading and writing data.
Device files are typically located in the /dev directory and are named according to the type of device they represent. For example, /dev/sda1 represents the first hard drive, and /dev/tty represents the terminal. Device files can be either character devices or block devices. Character devices transfer data sequentially, one character at a time, such as a terminal. Block devices transfer data in blocks, such as a hard drive.
Device files are used by the operating system to access the devices, and they can also be accessed by users through the command line or by programs that need to interact with the devices. By using device subsystems in cgroups, we can restrict the access that certain processes have to certain device files.
Continuing the previous example, there could be certain scenarios where you would want to limit the access to certain devices. Let’s start by mounting the subsystem to our hierarchy:
mount -t cgroup -o devices h1 demo_cgroup/devices
This command mounts the devices subsystem in the demo_cgroup/devices directory and allows you to control access to device files.
Let’s start with a simple example to restrict a device sdb1. To identify your partitions, type fdisk -l:
echo “b 8:17 rw” > demo_cgroup/devices/devices.deny
We are restricting access to sdb1, and since it’s a block device specified by b, we enter the major and the minor number to identify the driver associated with our device. We then add rw to make sure that the user does not have access to read and write privileges to that device. All these details can be extracted by using the command ls. And voila! We have restricted access to the device sdb1.
In another example, we will restrict the tty device to our intern user. /dev/tty is a device file in Linux that represents the terminal that the user is currently using. When you open a terminal window and enter commands, you are interacting with the system through /dev/tty. In other words, tty acts like a bridge between the user and the system, allowing the user to send commands to the system and receive output in return. By restricting tty write access, admins can prevent users from accidentally or intentionally making changes that could potentially cause the system to crash or malfunction. This can help to maintain system stability and prevent downtime. Let’s write a simple bash script that writes to tty.
#!/bin/bash
while:
do
    echo “hello world” > /dev/tty; sleep 2
done
This prints the line hello world to tty every 2 seconds. Let’s update the tunable and bind the process to our tasks file:
echo “c 5:0 w” > demo_cgroup/devices/devices.deny
echo <PID of script> > demo_cgroup/devices/tasks
We see that now we cannot access /dev/tty, as shown in Figure 5. This is the way we can limit/deny access to devices.

cgroups can be used for many more applications. There can be situations when there is a shared host, which could be used for team-intensive network queries and personal network queries. It’s pretty clear that in a workspace setup, it is more favourable if the team network server has more bandwidth than the personal server. This can be a good use case to limit the network bandwidth between two types of services. net_prio can be used to perform these tasks. QoS can be maintained and SLAs can be controlled in an efficient manner using cgroups.
Tooling and latest advancements
So far, we have manually been able to limit CPU resources. But in a production-based set up, this can be tedious. One reason is that these steps need to be done over and over again, and are transient in nature, i.e., they aren’t saved after a reboot. As admins, we must be able to automate our tasks and replicate the steps quickly and, preferably, keep them persistent in nature.
Let’s now use a few tools to improve the same workflow and limit our resources in a much better manner. We shall try to design a configuration file to allocate how CPU and memory must be shared among the group’s manager and intern using the same example discussed in the previous section. RHEL users can install libcgroups and libcgroups-tools to install the toolkit, which can simplify these tasks. Once we are done with the step, we start the cgconfig service and perform the following steps:
mount {
    cpu     = demo_cgroup/cpu_mem;
    cpuacct = demo_cgroup/cpu_mem;
    memory  = demo_cgroup/cpu_mem;
}

group manager {
        cpu {
                cpu.shares=”1024”;
        }
        cpuacct {
                cpuacct.usage=”0”;
        }
        memory {
                memory.limit_in_bytes=”1.5G”;
        }
}

group intern {
        cpu {
                cpu.shares=”340”;
        }
        cpuacct {
                cpuacct.usage=”0”;
        }
        memory {
                memory.limit_in_bytes=”0.5G”;
        }
}
This is a simple configuration file to achieve what we have described above. There are many persistent alternatives like systemd for limiting the default subsystem resources, which is preferable to using cgconfig.
To start the relevant services, type:
service cgconfig start
service cgred start
To make these configs persistent across reboot, type:
chkconfig cgconfig on
chkconfig cgred on
A small glimpse of how systemd can help solve these problems is shown below:
systemctl set-property <service name> CPUShares=1024
systemctl set-property <service name> MemoryLimit=50%
We can tweak multiple tunables in properties to their respective values in this way, using systemd.
In this article, we have understood the concepts of cgroups, subsystems, hierarchies and ways to access, limit, deny and monitor the resources of users or groups in organisations. We have briefly discussed ways to set up configuration files and to persist these files. cgroups have been widely used in various containerisation technologies to limit resources. With so many use cases, cgroups can be combined with tools like name spaces and many more to give sysadmins greater control.


