


With innovative technologies like generative AI and AR, we can transform the airport experience, simplifying it tremendously for passengers. The app discussed in detail in this article will help them breeze through airport exits.
Shweta, a young businesswoman, went on a business trip to a new destination. As she stepped off the plane, she was greeted by the bustling energy of the airport. The airport stood before her like a miniature city, its vastness and diversity posing a unique challenge as she navigated her way through the arrival and exit processes. The foreignness of it all felt overwhelming, and she realised that each airport had its own distinct features.
Shweta scanned the terminal for directions to immigration, baggage claim, and eventually the exit. The airport, like a complex puzzle, presented an array of information to absorb. As she attempted to make sense of the signs and symbols guiding her, Shweta couldn’t help but yearn for a more seamless way to connect this influx of information to the real world.
She also faced the issue of identifying restrooms. The signage for restrooms varied across different airports, and the lack of clear and standardised indicators made it difficult for her to locate them.
As Shweta proceeded towards the immigration area, she encountered a significant delay due to the long queues. After clearing immigration, Shweta faced difficulties in finding her baggage carousel, which had been reallocated for the next landed flight. She wandered between the carousels and, finally, found her baggage in a corner.
As Shweta finally made her way out of the airport, she almost felt a sense of accomplishment at having overcome all the frustrations.
The above is one air passenger’s exit experience. Even though a few hi-profile passengers use airport navigation apps, they still face difficulties such as loading different apps for each airport. So, what is the solution?
Before developing our solution let us look into some technical components considered for it. We will apply design thinking, and build a mobile app and a web app leveraging generative AI and augmented reality.
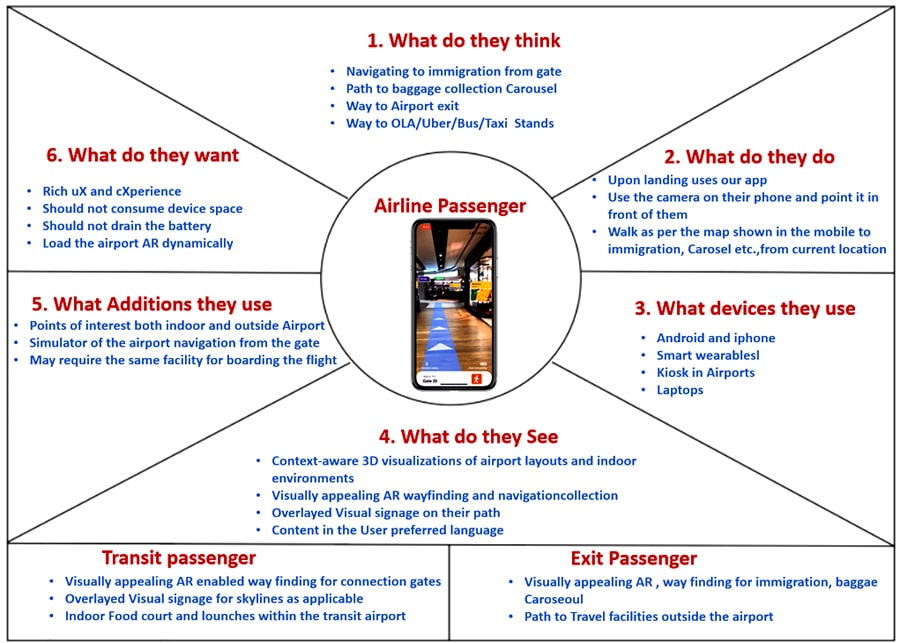
Empathy map of our solution
Our solution will provide the features shown in the figure of the empathy map (Figure 1). Our main focus will be on building the mobile app, which will use generative AI to dynamically load the airport AR module. This module will disappear 24 hours after the flight arrives at the destination. Our mobile app will consume very little memory. We will use generative AI to provide a dynamic personalised airport navigation experience to passengers, as some passengers may need to catch different connection flights.
Mobile development approaches
We will adopt open source solutions for developing our app. Four major development approaches can be used when building mobile applications.
- Native mobile applications
- Cross-platform native mobile applications
- Hybrid mobile applications
- Progressive web applications
Each of these has its own set of advantages and disadvantages. When choosing the right development approach, we need to consider the desired user experience, the computing resources and native features required for our app, the development budget, time targets, and resources available to maintain the app.
We will opt for the cross-platform approach to create a mobile app and the web application. The latter will be used in airport kiosks and laptops to provide the airport navigation experience for passengers who don’t have smartphones. We will also use augmented reality and generative AI in combination, and host the application on cloud. Our mobile solution will provide similar experiences for both Apple and Android users, and will be accessible from smart wearables also.
We will use AWS cloud for our development and hosting. AWS provides the necessary platform support for our solution. We will also plug in open source VIRO React for creating augmented reality for airport navigation. We will design our architecture front-end using Module Federation (aka Microfrontends).
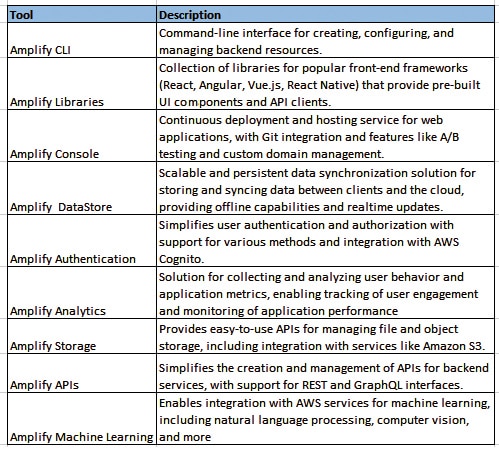
AWS Amplify
AWS Amplify is an open source development platform that empowers developers to rapidly build innovative web and mobile applications on top of the Amazon Web Services (AWS) infrastructure. It includes a wide range of open source libraries and supports drag-and-drop user interface components that developers can use as the building blocks for the desired application. AWS Amplify also has a built-in CLI (command-line interface) which can be used for app backend purposes.
It enables developers to quickly build applications with features like user authentication, offline data synchronisation, real-time updates, push notifications, etc.
AWS Amplify combines the best of AWS services, seamless integration, and an intuitive development workflow to enable developers to focus on building exceptional user experiences rather than dealing with the complexities of infrastructure management.
Key features and benefits: Here are some of its key features and benefits.
- Seamless integration: AWS Amplify seamlessly integrates with other AWS services, enabling developers to leverage the full potential of the AWS ecosystem. It provides easy access to services such as AWS Lambda, Amazon S3, Amazon DynamoDB, and AWS AppSync, simplifying tasks like data storage, authentication, API management, and real-time updates.
- Rapid prototyping: Developers can rapidly prototype and iterate on their ideas, thanks to its robust CLI and intuitive development workflow. Using unified CLI development tasks such as creating backend resources, managing deployments and configuring continuous integration and delivery (CI/CD) pipelines can be automated.
- Scalability and security: Leveraging the power of AWS infrastructure, Amplify ensures scalability and security are built-in from the ground up. Applications can effortlessly scale up to handle millions of users without worrying about infrastructure provisioning. Additionally, Amplify incorporates security best practices, including encryption, user authentication, and authorisation, to protect sensitive data and ensure compliance.
- Front-end framework support: Amplify supports popular front-end frameworks such as React, Angular, and Vue.js, enabling developers to use their preferred tools and frameworks while benefiting from Amplify’s powerful back-end capabilities. It provides libraries and pre-built UI components that simplify common tasks like user authentication, data fetching, and real-time updates.
- Mobile and web applications: Amplify simplifies the development of mobile and web applications by providing pre-built UI components, backend services, and native SDKs. It enables developers to quickly build applications with features like user authentication, offline data synchronisation, real-time updates, and push notifications.
- Serverless applications: Amplify embraces the serverless paradigm, allowing developers to focus solely on writing application code without worrying about server management. It seamlessly integrates with AWS Lambda and other serverless services, enabling developers to create highly scalable and cost-effective applications.
- Continuous deployment and hosting: Amplify provides seamless integration with AWS services like AWS CodeCommit, AWS CodeBuild, and AWS CodePipeline for automating the deployment process. Developers can easily configure continuous deployment pipelines and host their applications on AWS services like Amazon S3, Amazon CloudFront, or AWS Amplify Console.
AWS generative AI – Bedrock
Amazon Bedrock is an innovative service designed to facilitate the development and scalability of generative AI applications. These applications have the remarkable ability to generate text, images, audio, and synthetic data in response to prompts. With Amazon Bedrock, customers gain convenient access to foundation models (FMs) — the powerful, ultra-large machine learning models that are at the core of generative AI. These foundation models are sourced from top AI start-up providers such as AI21, Anthropic, and Stability AI, along with exclusive access to AWS’s own Titan family of foundation models.
We will gather a comprehensive data set of airport-related images, including runways, gate side indoor launches, signages, immigration counters, carousels and other relevant visual elements, ensuring the data set covers a wide range of perspectives, lighting conditions, and variations to train a robust generative AI model.
We will utilise generative AI models such as a generative adversarial network (GAN) or variational autoencoder (VAE) to train on our airport data set. The model learns the visual patterns, structures, and characteristics of airports from the collected images. We train the model to generate realistic and diverse airport scenes and objects dynamically based on the boarding pass after the passenger has checked in. Once the passenger clicks the navigate button on our app, the AR experience module gets loaded into the app dynamically. The personalised AR scenario may differ for each passenger. The produced model will be realistic with visually coherent objects placed within the AR environment.
Since most of the airlines and airports already use AWS and store data, by using the Bedrock generative AI we will be able to get more training data. Also, AWS Bedrock can run in a small set of training data and is serverless. Accessing the AWS Bedrock can happen via an API call.
Viro React: An open source AR
Viro React is a platform that enables developers to create immersive augmented reality (AR) and virtual reality (VR) experiences using React Native. It provides a set of tools, components, and APIs that simplify the development process and allow developers to build cross-platform AR/VR applications for iOS, Android, and virtual reality headsets.
Key features of Viro React: Viro React’s powerful components simplify AR/VR development across platforms. Here are some of its key features and benefits.
- Cross-platform compatibility: Viro React supports building AR/VR applications for both iOS and Android platforms, allowing developers to create consistent experiences across devices. It also offers compatibility with popular virtual reality headsets like Google Cardboard, Daydream, etc.
- React Native integration: Viro React leverages the React Native framework for building mobile applications, which enables developers to leverage their existing React Native skills and codebase. This allows for faster development and easier code sharing between mobile and AR/VR projects.
- Powerful AR and VR components: It provides a wide range of ready-to-use AR and VR components that simplify the creation of interactive and immersive experiences. These components include 3D objects, 360-degree media, particle systems, physics simulations, audio playback, and more.
- Scene and object management: It can easily manage scenes, objects, and their interactions within the AR/VR environment. The platform offers a scene graph-based architecture, allowing for hierarchical organisation of objects and intuitive manipulation of their properties.
- Physics and animation: Viro React incorporates physics-based simulations and animation capabilities, enabling realistic interactions and dynamic movements within the AR/VR environment. Developers can apply physics forces, collisions, and constraints to objects, as well as define complex animations and transitions.
- AR Core and ARKit support: It seamlessly integrates with AR Core (for Android) and ARKit (for iOS), providing access to advanced AR features such as plane detection, motion tracking, light estimation, and face tracking. Developers can leverage these capabilities to create engaging AR experiences.
- Performance optimisation: The platform offers performance optimisations to ensure smooth and responsive AR/VR experiences. It leverages native rendering capabilities, hardware acceleration, and dynamic occlusion culling techniques to deliver high-performance graphics and interactions.
- Interaction and input: It supports various input methods, including touch gestures, device sensors (such as gyroscope and accelerometer), voice commands, and controller input (for VR headsets). Developers can implement interactive features and enable user-driven interactions within their AR/VR applications.
Mobile and web app development using Amplify
To develop and deploy the React Native and React web applications using AWS Amplify, you can follow these general steps.
1. Set up an AWS Amplify project.
- Install the Amplify CLI globally by running npm install -g @aws-amplify/cli.
- In each project’s root directory (React Native and React web), initialise Amplify by running amplify init.
- Follow the prompts to configure your Amplify project, including selecting an AWS profile, providing a name for the project, and specifying the environment.
2. Add authentication to your projects.
- For each project, run amplify add auth to add authentication to your projects. Follow the prompts to configure your authentication settings, such as selecting the authentication type, specifying the user pool name, and setting up the required configuration.
3. Develop your React Native app.
4. Develop your React web app.
5. Set up your AWS Amplify backend.
- For each project, navigate to its respective directory (React Native and React web).
- Run amplify push to deploy the backend resources for each project, including the authentication user pool and any other resources defined in the Amplify configuration.
- Follow the prompts and confirm the changes to proceed with the deployment.
6. Publish your apps using AWS Amplify.
- In the AWS Amplify Console, navigate to the ‘Apps’ section and click ‘Connect app’.
- For each project (React Native and React web), select the appropriate option (React Native or React) and choose your preferred repository service.
- Connect each app’s repository and configure the build settings for React Native and React web separately.
- After configuring the build settings for each app, click ‘Next’ and follow the instructions to deploy your React Native and React web apps using the AWS Amplify console.
Make sure to refer to the AWS Amplify documentation for more detailed instructions and specific configuration options based on your project’s requirements.
Sample mobile and web application code
Our solution is a React Native application that combines several libraries and technologies to create an augmented reality (AR) experience with generative AI content, while integrating user authentication using Amplify UI and AWS Cognito. It also incorporates the mobile device’s camera for displaying signage within the AR scene. The sample code can be downloaded from https://www.opensourceforu.com/article_codes/aug23/aws.zip.
In the code, do remember to replace with your own values for YOUR_AWS_REGION, YOUR_USER_POOL_ID, YOUR_USER_POOL_CLIENT_ID, GENERATIVE_AI_API_ENDPOINT, and ensure that all required libraries and dependencies are properly installed and configured.
Test your React Native app locally to ensure it functions correctly, including authentication and any other desired features.
1. Import required libraries:
- The ‘react’ package allows you to define React components.
- The ‘useEffect’ and ‘useState’ hooks are used for managing side effects and state in functional components.
- The ‘View’ and ‘Text’ components are UI components provided by React Native for creating the layout and displaying text.
- ‘PermissionsAndroid’ is a React Native API for handling Android permissions.
- ‘Amplify’ and ‘Auth’ are part of the AWS Amplify library, which is used for configuring authentication and authorisation.
- ‘withAuthenticator’ is a HOC (higher-order component) provided by aws-amplify-react-native to wrap the main component with authentication functionality.
- ‘ViroARSceneNavigator’, ‘ViroARScene’, and ‘ViroText’ are components from the ViroReact library that enable AR capabilities and rendering AR scenes.
- ‘RNCamera’ is a component from the react-native-camera package, used to access the mobile device’s camera.
2. Configure Amplify:
- Amplify is configured with the AWS Cognito user pool details, including region, user pool ID, and client ID.
3. Define the AR Scene component:
- The ‘ARScene’ functional component represents the augmented reality scene where the generative AI content will be displayed.
- The ‘generatedContent’ state variable is used to store the content fetched from the generative AI API.
- The ‘useEffect’ hook is used to make an HTTP request to the generative AI API when the component mounts.
- The generative AI API is called using the ‘fetch’ function, and the access token from AWS Cognito is included in the request headers for authorisation.
- The received content is stored in the ‘generatedContent’ state variable.
- The AR scene is rendered using the ‘ViroARSceneNavigator’ component, which wraps the AR scene content.
- Within the ‘ViroARScene’, a ‘ViroText’ component is used to display the generative AI content as signage in the AR scene.
4. Main App component:
- The ‘App’ functional component represents the main component of the application.
The ‘hasCameraPermission’ state variable is used to manage the camera permission status. - The ‘useEffect’ hook is used to request camera permission when the component mounts.
- The ‘requestCameraPermission’ function uses ‘PermissionsAndroid’ to request camera permissions from the user.
- If camera permission is granted, ‘hasCameraPermission’ is set to ‘true’; otherwise, an error message is logged and a simple message is displayed to inform the user.
- The AR Scene component (‘ARScene’) is rendered within a ‘View’ component.
5. Wrap the App component with Amplify Authenticator:
- The ‘App’ component is wrapped with the ‘withAuthenticator’ HOC from ‘aws-amplify-react-native’. This ensures that the application requires user authentication, leveraging Amplify UI and AWS Cognito.
6. Export the component:
- The ‘AppWithAuth’ component (the wrapped ‘App’ component) is exported as the default export of the module.
Web application code
The web application codes can also be found from the same download link, where you found the mobile app codes. The codes are self-explanatory.
Our solution uses other AWS services like AWS AppSync, s3, RDS, CloudFront (for delivering static contents for mobile and web applications), and AI services like Transcribe, Lex, etc. These were not discussed here as our key focus is on providing a smooth passenger exit experience and bringing personalised augmented airport navigation for passengers.
The app can provide information on various transportation options available outside the airport, such as taxi stands, rideshare pick-up areas, public transportation stops, car rental services, ATMs and money exchange counters. Passengers have the luxury of loading any airport navigation system without the need to load each app independently.


