


Tauri can create lightweight, fast, and secure applications, while offering cross-platform compatibility and a host of language choices. Let’s learn how to build an application with Tauri, and compile it to an executable format.
For ages in software development, GUI development was a mind-numbing task mainly because the GUI frameworks provided very non-intuitive design APIs and lacked flexibility. One reason for the lack of flexibility, in my opinion, was the need for desktop applications to have a uniform look so that users did not get confused or had to learn their way around different applications. While this is true to some extent, those days are now gone.
Nowadays, users prefer modern looking GUIs, especially since the advent of web pages. GUI frameworks like QT have evolved to incorporate somewhat different/modern designs. However, they still haven’t resolved the issues of non-intuitive design APIs, creating responsive designs, and creating/reusing custom GUI elements.
On the other hand, web pages designed with HTML/CSS have a highly comprehensible style with a minimal learning curve, especially for designers without programming backgrounds. This gave rise to the idea of using web technologies to create GUI applications.
One major success resulting from this idea was Electron, a framework for developing cross-platform desktop applications using JavaScript, HTML and CSS. Electron was indeed a fresh breath of air for desktop applications, but it had a major disadvantage — it was essentially a web application running as a desktop application. It used Chromium’s rendering library and Node.js as runtime components; so, effectively all Electron applications were web browsers running web applications. This made Electron applications bulky and less performant compared to lightweight and high performance binaries provided by frameworks like QT.
So, one might ask, “Why not keep the intuitive design or frontend of the application with web technologies and use the OS itself to run the actual working task/backend task?” That’s exactly what Tauri provides.
Why Tauri?
It has several advantages.
Lightweight and efficient: It is designed to be lightweight and efficient, making it easier to build and deploy applications that use fewer system resources and have smaller file sizes.
Flexible and customisable: It provides a minimal and flexible architecture, allowing developers to create apps that are tailored to their specific needs and requirements.
Streamlined development experience: It provides a range of tools and plugins that simplify the development, packaging, and deployment of desktop applications across multiple platforms.
Native look and feel: It’s use of a web view component enables developers to create desktop applications that have a native look and feel, while still using web technologies for the user interface.
Active development: It is a relatively new framework, but it has an active development community that is constantly working to improve and expand its features and capabilities.
Developing a Tauri app
It supports almost every web frontend framework. If you are already proficient in any of the web frontend frameworks, you can easily create a GUI application with minimal effort. Let’s see how you can transform your simple web development skills into software development skills.
As I mentioned before, Tauri consists of two parts:
- A Rust layer, which takes care of OS-level functionality (let’s call it the backend)
- A frontend built using web technologies like HTML/CSS/JS
- You can set up your Tauri project easily using Tauri CLI. To install Tauri CLI you can use Rust’s package manager, Cargo or Node.js’ package manager, npm.
To use Cargo, type:
cargo install tauri-cli
cargo create-tauri-app
To use npm, give the following command:
npm install --save-dev @tauri-apps/cli
After installing Tauri CLI, you can create a directory/folder in which you develop your application. Let’s call it ‘osfy-tauri’, for example. Inside the folder, you can create another folder called ‘frontend’ to keep your UI related files.
Create a simple html file inside the ‘frontend’ folder; let’s name it index.html.
The content of index.html could be something like this:
<html>
<head>
<title>My First Tauri Application</title>
</head>
<body>
<h1>Hello OSFY readers!</h1>
</body>
</html>
Now go back to your parent folder, and in the terminal, write:
cargo tauri init
This command will guide you through setting up your directory as a Tauri project.
The third and fourth questions in Figure 1 are related to where the frontend assets of your application will be located. Since we have created a simple html file, we can use its directory location, which is ‘../frontend’. You can also leave the frontend dev and build command as empty, since we are not using any node project or framework but a simple HTML file for the frontend. If you are using a frontend framework, you can simply use the build and dev command in the package.json file.

After the command is executed, your directory structure will look like what’s shown in Figure 2.
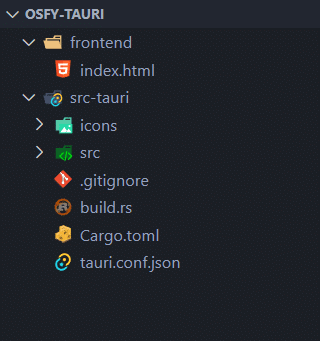
The ‘src-tauri’ generated by Tauri CLI consists of your backend related source code, which is a Rust program. Now let’s try running the application using the command:
cargo tauri dev
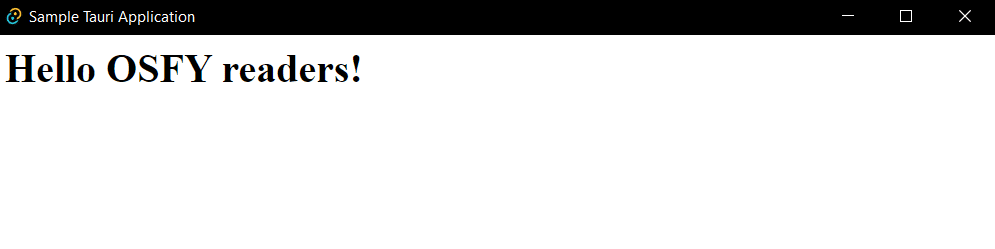
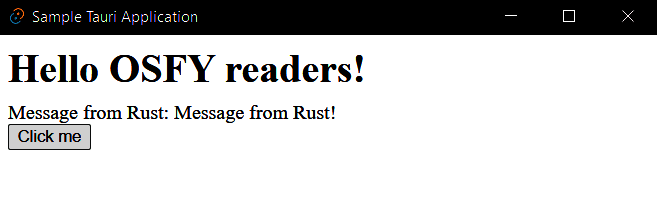
You will be greeted with an application screen, as shown in Figure 3.
Calling Rust functions from frontend
Tauri provides a straightforward way to call Rust functions from the frontend. These are called commands. It commands enable the frontend to use the OS for any resource-heavy task instead of relying on a browser, as done in Electron.
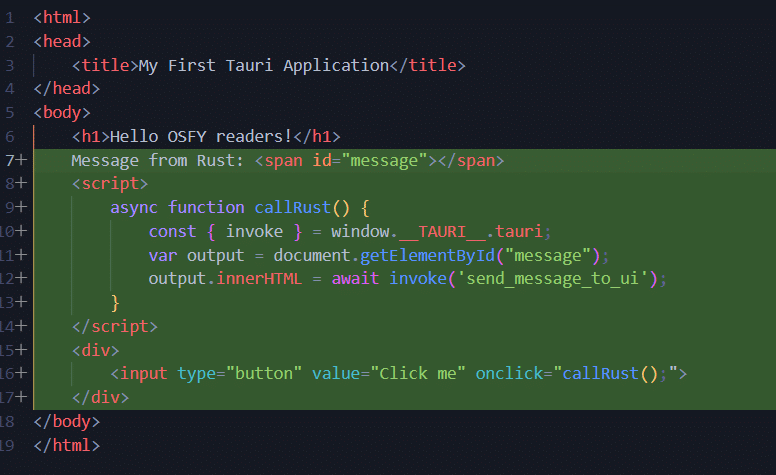
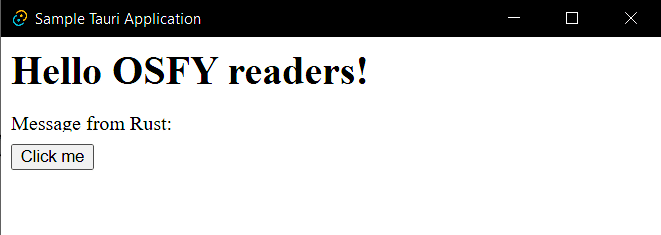
Let’s see how commands work. Make changes to index.html so that you use a button to call a function that invokes Rust functions, using the ‘invoke’ function provided by Tauri to the JS front.
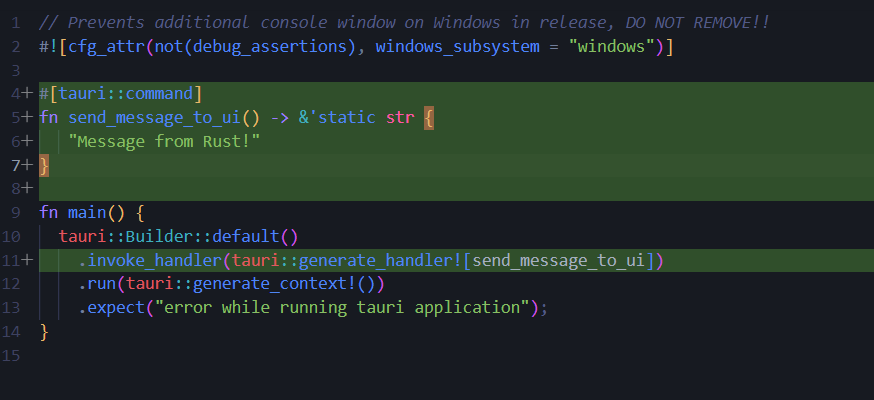
Now, go to the src-tauri/src/main.rs file and write a corresponding Rust function that you would like to call. This function will return a string from Rust to JS. Additionally, you need to register this function by adding it to your app using the invoke_handler function.
Next, go to src-tauri\tauri.conf.json, Tauri’s configuration file. Add what is given in Figure 6 under the build section.
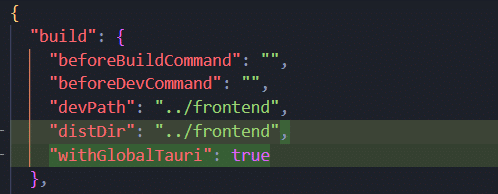
When ‘withGlobalTauri’ is set to ‘true’, Tauri’s API methods are available globally in the application. This means they can be accessed from any part of the application code without requiring an import statement for each method. This can be avoided if you are using frameworks like React, but we are simply using HTML and pure JS. Tauri CLI will make note of these changes once we save, and recompile and reload the application with our new changes.
Bundling our application to an executable
Bundling or compiling our application to an executable format like ‘.exe’ is rather simple. Just use the command:
cargo tauri build
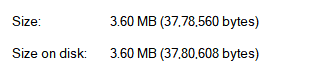
This will create an installer for your application if you are on Windows. Here is the amazing part of Tauri — the size of this application is just under 3MB!
The same application with Electron would have been at least 30MB or more because of Chromium’s renderer and entire Node.js bundled within it. It needs none of that and also uses the OS to handle the backend work, which makes it more performant as well.
So, we have seen that Tauri has the potential to become the future of UI development. Its ability to create lightweight, fast, and secure applications, while providing cross-platform compatibility and a variety of language choices, makes it a promising option for developers looking to streamline their workflow and improve user experience. I have only scratched the surface of Tauri’s capabilities here. Readers who wish to read more about Tauri’s ongoing development and its features can visit https://tauri.app/.


