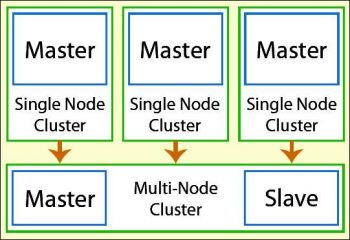
This tutorial describes how to build a distributed Apache Hadoop multi-node cluster on four nodes running Ubuntu Server 14.04.1 LTS
It is assumed that readers are aware of or have a good knowledge of Hadoop. This walkthrough is a guide to the configurations required to build a multi-node Hadoop cluster in which one node will serve as the NameNode and the others as DataNode.
The architecture of a Hadoop multi-node cluster is given in Figure 1.
Prerequisites to building the Hadoop cluster
Supported platforms: GNU and UNIX are supported as development and production platforms while Windows is only for development. For this tutorial, we will be using Ubuntu 14.04.1 (http://www.ubuntu.com/download/server).
Required software:
a. Java is mandatory for running Hadoop. Do refer to the following guide prior to choosing the Java version: http://wiki.apache.org/hadoop/HadoopJavaVersions For this tutorial, we will be using Java 7.
$apt-get install default-jre
$sudo apt-get install default-jdk
$sudo apt-get update
b. Download the latest Hadoop version from http://www.apache.org/dyn/closer.cgi/hadoop/common/
c. ssh must be installed and sshd must be running to use Hadoop scripts:
$apt-get install ssh

User accounts and passwords for Hadoop installation
Adding a Hadoop user: Let us create a dedicated user account to run Hadoop. Though this is not mandatory, I would recommend it as it helps in isolating the Hadoop installation from other software applications and other user accounts running on the same node.
$sudo addgroup hadoop #this will add Hadoop group, make sure that it is done in all the nodes $sudo adduser ingroup hadoop hduser #this will add hduser
Networking: Before we continue to build our Hadoop cluster, we need to make sure that all nodes can communicate with each other. According to the block diagram (shown in Figure 1) we will have one master node (hdnamenode) and three slave nodes (hddatanode1, hddatanode2 and hddatanode3) as shown below:
$sudo vi /etc/hosts
172.15.10.2 hdnamenode
172.15.10.3 hddatanode1
172.15.10.4 hddatanode2
172.15.10.5 hddatanode3
Enabling SSH: Hadoop requires SSH access to manage all its nodes. hduser on hdnamenode needs to connect to itself and to the datanodes (in our case, hddatanode1, hddatanode2 and hddatanode3) via passwordless SSH login. Installing Hadoop in a passwordless manner is not recommended, but in this case it is needed to unlock the system without user interaction to avoid entering the passphrase every time Hadoop interacts with its nodes.
hduser@hdnamenode:~$ su i hduser hduser@hdnamenode:~$ ssh-keygen t rsa P hduser@hdnamenode:~$cat ~/.ssh/id_rsa.pub >> ~/.ssh/authorized_keys hduser@hdnamenode:~$ ssh-copy-id i ~/.ssh/id_rsa.pub hduser@hdnamenode:~$ ssh-copy-id i ~/.ssh/id_rsa.pub hduser@hddatanode1 hduser@hdnamenode:~$ ssh-copy-id i ~/.ssh/id_rsa.pub hduser@hddatanode2 hduser@hdnamenode:~$ ssh-copy-id i ~/.ssh/id_rsa.pub hduser@hddatanode3
Installation
Download the latest stable Hadoop version, which is 2.6.0, from http://hadoop.apache.org/releases.html and extract the contents from the Hadoop package to the location of your choice.
$cd /usr/local $sudo tar xzf Hadoop-2.6.0.tar.gz $sudo mv Hadoop.2.6.0 Hadoop $sudo chown R hduser:hadoop hadoop Add the lines below at the end of ~/.bashrc #HADOOP VARIABLES START export JAVA_HOME=/usr/lib/jvm/jdk1.7.0_67/ export PATH=$PATH:$JAVA_HOME/bin export HADOOP_INSTALL=/usr/local/hadoop/etc/hadoop export PATH=$PATH:$HADOOP_INSTALL/bin export PATH=$PATH:$HADOOP_INSTALL/sbin export HADOOP_MAPRED_HOME=$HADOOP_INSTALL export HADOOP_COMMON_HOME=$HADOOP_INSTALL export HADOOP_HDFS_HOME=$HADOOP_INSTALL export YARN_HOME=$HADOOP_INSTALL export HADOOP_COMMON_LIB_NATIVE_DIR=$HADOOP_INSTALL/lib/native export HADOOP_OPTS=-Djava.library.path=$HADOOP_INSTALL/lib $source ~/.bashrc # refresh the bashrc file
Edit /usr/local/hadoop/etc/hadoop/hadoop-env.sh
# set to the root of your Java installation
export JAVA_HOME=/usr/lib/jvm/java-7-openjdk-i386
# assuming installation directory is /usr/local/hadoop
export HADOOP_PREFIX=/usr/local/hadoop
Configuration details
Lets configure the following files in order to build a Hadoop multi-mode cluster — masters, slaves, core-site.xml, mapred-site.xml and hdfs-site.xml.
Masters: In Hadoopmaster node, navigate to /usr/local/hadoop/etc/hadoop folder and edit the masters file as shown below:
hduser@hdnamenode:~$vi /usr/local/hadoop/etc/hadoop/masters
hdnamenode
Slaves: Add all the slave nodes, one per line, as shown below:
hduser@hdnamenode:~$vi /usr/local/hadoop/etc/hadoop/slaves
hdnamenode
hddatanode1
hddatanode2
hddatanode3
Core-site.xml: Change the host name from localhost to hdnamenode in core-site.xml as shown below:
hduser@hdnamenode:~$vi /usr/local/hadoop/etc/hadoop/core-site.xml
<configuration>
<property>
<name>fs.default.name</name>
<value>hdfs://hdnamenode:9000</value>
</property>
<property>
<name>hadoop.tmp.dir</name>
<value>/usr/local/hadoop/etc/hadoop/tmp</value>
</property>
</configuration>
Hdfs-site.xml: Change the replication value to 4, as there are four nodes including Hadoopmaster, as shown below.
Create two directories for Hadoop storage:
hduser@hdnamenode:~$mkdir p /usr/local/hadoop_store/hdfs/namenode hduser@hdnamenode:~$mkdir p /usr/local/hadoop_store/hdfs/datanode hduser@hdnamenode:~$sudo chown hadoop:hadoop R /usr/local/hadoop_store hduser@hdnamenode:~$vi /usr/local/hadoop/etc/hadoop/hdfs-site.xml <configuration> <property> <name>dfs.datanode.data.dir</name> <value>file:///home/hduser/hdfs/datanode</value> <description>DataNode directory</description> </property> <property> <name>dfs.namenode.name.dir</name> <value>file:///home/hduser/hdfs/namenode</value> <description>NameNode directory for namespace and transaction logs storage.</description> </property> <property> <name>dfs.replication</name> <value>2</value> </property> </configuration>
Mapred-site.xml: Change the hostname from localhost to Hadoopmaster with port 54311:
<configuration>
<property>

<name>mapreduce.framework.name</name>

<value>yarn</value>

</property>
</configuration>
Once the core files of Hadoop are configured, its time for formatting and starting/stopping the HDFS file system via namenode:
$hadoop namenode format
You can start a multi-node cluster in two steps:
i. Start HDFS daemons, i.e., the NameNode daemon on Hadoopmaster and DataNode daemon on all the slave nodes.
ii. Start MapReduce daemons, i.e., JobTracker on hdnamenode and TaskTracker on the hddatanode1, hddatanode2 and hddatanode3 nodes.
hduser@hdnamonode:~$start-dfs.sh # this is to check NameNode and DataNode running or not
hduser@hdnamenode1:~$jps #will list all the java processes running on master & slave nodes
hduser@hdnameno1:~$ start-mapred.sh
hduser@hdnamenode1:~$ jps # to check Job tracker and task tracker running or not
hduser@hdnamenode1:~$stop-dfs.sh # to stop the service
Web services
You can check the Web interface of the NameNode, DataNode, MapReduce and TaskTracker processes at the following URLs:
http://hdnamenode:50070/ web UI of the NameNode daemon http://hdnamenode1:50030/ web UI of the JobTracker daemon http://hdnamenode:50060/ web UI of the TaskTracker daemon


