The performance of Windows systems is greatly enhanced by defragmenting or defragging the disk. A file may have many small fragments spread across the hard disk of the computer. Rearranging the fragments together in one place speeds up computer performance. The Windows OS does provide an inbuilt defrag tool, but the efficiency of the operation is improved with the use of third party tools like UltraDefrag.
UltraDefrag is an open source disk defragmenter for Windows. It improves defragmentation and speeds up computer performance to read continuous data from the disk. It uses many defragmentation algorithms to do so.
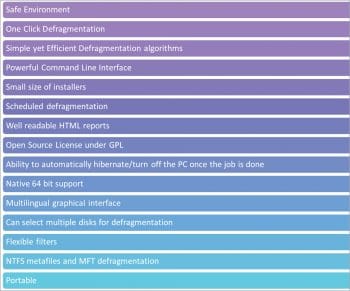
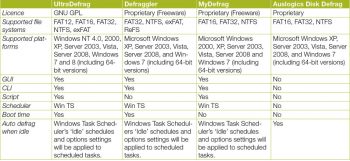
UltraDefrag has many useful features, which are shown in Figure 1.
Processing algorithms
UltraDefrag gathers the complete information about files and gaps of free space by analysing the disk. Optimising or defragging the disk depends on the selected action or algorithm.
There are three processing algorithms available for defragmentation.
The first is the defragmentation algorithm. It has the following phases.
- Analysis phase: This gathers all information about files and disk spaces.
- Defragmentation phase: This joins all the fragments of files into one unit. Locked or unmovable files are skipped.
- Partial defragmentation phase: This tries to join the rest of the fragments of files into as few units as possible.
The second is the quick optimisation algorithm.
- The analysis phase is the same as in the defragmentation algorithm.
- In the next phase, UltraDefrag moves all the fragments to the beginning of the free space at the end of the disk.
- The defragmentation phase is also the same as in the defragmentation algorithm.
- In the last phase, it moves all the not-so-fragmented files to the beginning of the disk to create a large free space at the end.
The third is the full optimisation algorithm.
The analysis and defragmentation phase are the same as in the defragmentation algorithm.
In the second phase, all fragmented or unfragmented files will be moved to the beginning of the free space at the end of the disk.
And the last phase will work the same as in the quick optimisation algorithm.
Supported file systems
UltraDefrag can defragment the following file systems:
- FAT12/16/32
- exFAT
- NTFS
There are some restrictions in UltraDefrag.
- Directories lying on FAT disks cannot be moved. This well-known FAT driver restriction cannot be fixed.
- To defragment the $MFT file, we need at least Windows XP, as NTFS system drivers are not allowed to access it.
- For Windows versions later than Windows 2000 only, the $Bitmap and other internal NTFS files can be defragmented.
- For Windows NT 4.0 and Windows 2000, NTFS disks with a cluster size greater than 4 kilobytes cannot be defragmented.
- UltraDefrag is not able to process NTFS disks as effectively as it does on Windows XP and later versions of Windows for Windows NT 4.0 and Windows 2000 NTFS, due to the complexity of disk rules.
Installation
We can obtain the latest version of UltraDefrag from SourceForge. Two types of packages are available for the UltraDefrag download.
- Full-featured installer: This will install all the program features but cannot be used directly from USB drives as it requires standalone installation.
- Portable package: This package can be downloaded, unpacked and used without any installation. We can use this package anywhere by carrying it in a USB stick.
The prerequisites for installing UltraDefrag on Windows are an Intel Itanium processor and an appropriate 64-bit edition of Windows. To install and run UltraDefrag on your system, you must be an administrator of the system.
Silent installation
UltraDefrag installation can be done silently by adding the /S switch to the command line. No dialogues will appear, and the entire program will be installed automatically with all the features enabled on the hard disk in silent mode.
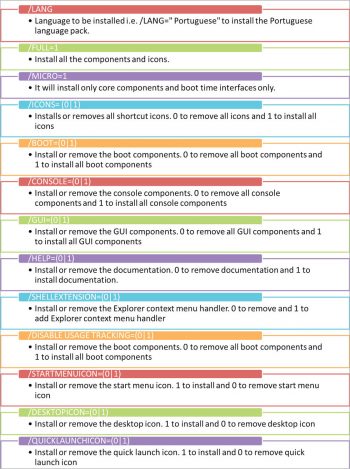
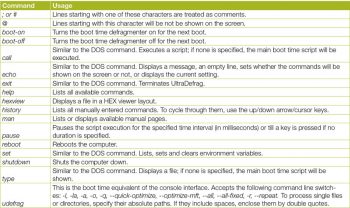
The command line switches supported in UltraDefrag are shown in Figure 2.
To install the full edition of UltraDefrag in Portuguese with only the Start menu in silent mode, execute the command given below:
ultradefrag-6.0.0.bin.i386.exe /S /STARTMENUICON=1 /LANG=” Portuguese” /FULL=1 /ICONS=0
To uninstall the UltraDefrag in silent mode, execute the following code in the command line interface:
%UD_INSTALL_DIR%\uninstall.exe /S
Graphical and console interfaces
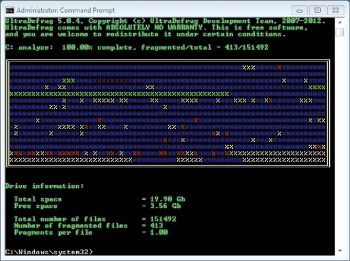
Console interface: To automate defragmentation via batch scripts and scheduling tasks, UltraDefrag provides a console interface. This is nothing but the command line environment, which is used to handle the context menu entries in Windows Explorer. To rejoin any object’s clusters, we can right click on the object and defragment it with UltraDefrag. Figure 3 shows the console interface of UltraDefrag.
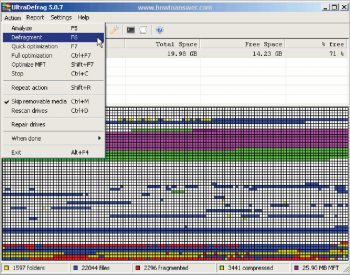
Graphical interface: UltraDefrag GUI is very simple to use. Select the disk and then either analyse, optimise or defragment it. If you select multiple disks, these will be processed one after the other.
Figure 4 shows the graphical interface (GUI) of UltraDefrag.
Scheduled defragmentation
The Windows Task Scheduler can help us automate the defragmentation of frequently used files.
To defragment the Firefox cache, use the following command:
udefrag "%APPDATA%\Mozilla*"
To defragment the Google Earth cache, use the command given below:
udefrag "%APPDATA%\Google\GoogleEarth*"
To defragment small files from all the non-removable disks, use the command given below:
cmd.exe /C "set UD_SIZELIMIT=100M && udefrag --wait --all-fixed
Boot time defragmentation
To defragment any system file or file that is locked by the system or application, boot time defragmentation is used. Native UltraDefrag can process files before locking them as ordinary files. When the boot time defragmenter is enabled, it will run at every boot. To exit immediately, you can press any key when the program prompt is displayed. The boot time script will continue its execution if no key is pressed.
There are some restrictions to what’s possible with boot time scans:
- Encrypted disks are not available for scanning, as the exe (Isass.exe) that scans encrypted files won’t be available during boot time scans.
- While in Windows Safe Mode, UltraDefrag won’t be able to show the test on the boot screen.
To enable and disable boot time defragmenter, we can use the GUI window or command prompt by typing the commands boot-on/boot-off.
Boot time modes
There are two modes in which a boot defragmenter can run.
Boot time script: Boot time script is nothing but the collection of all the disk defragmentation commands and comments. It can be found at %windir%\system32\ud-boot-time.cmd. To edit the boot time script, you can execute the boot-config file using the command prompt, or you can simply click on the boot time script button on the graphical interface. To terminate the boot time script and enter into interactive mode, press ESC any time while the boot time script executes.
Interactive mode: As there is no exit in boot time script, execution will enter into interactive mode once all the boot script commands are executed. UltraDefrag will wait for the end user input by showing the following command on UltraDefrag command prompt:
Interactive mode: Type ‘help’ for list of supported commands
To drop from the interactive mode, hit escape. This same interactive console will appear after the boot time execution if no exit command is given.


