


In this article, we compare the time taken and success rates while running different Rally tasks on load balancers using the providers Amphora and OVN for OpenStack, and outline the reasons for failures (if any). This can help administrators choose the right provider driver, depending on the service and resource requirements. Results have shown that OVN load balancers can be created and used in environments with low resources, while creating Amphora load balancers resulted in errors due to lack of resources.
OpenStack is a cloud computing infrastructure that manages the compute, storage and networking resources of a data centre. It also provides a dashboard to help users provision resources with the help of a Web interface. The dashboard also gives administrators control over the management of resources. Besides Infrastructure-as-a-Service (IaaS), OpenStack provides other functionalities like fault management, orchestration, load balancing and service management.
A load balancer is used to allocate resources to various tasks to make the overall processing efficient. Load Balancer as a Service (LBaaS) is implemented as a networking service in OpenStack. So it uses a port in Neutron (Networking-as-a-Service) and is assigned an IP from a subnet. Each port that the load balancer uses is specified by a listener, through which it can listen for requests. A listener is used to monitor the communications between the virtual machines and OpenStack services.
Load balancers use health monitors to divert traffic away from members (servers with specific IPs and ports) that do not respond properly. Each health monitor is associated with a pool — a list of members serving content through the load balancer.
If there are no load balancers, newly created virtual servers won’t receive incoming traffic properly or not receive it at all. The resource allocation also becomes unbalanced when some virtual servers do not receive any traffic while some are overloaded.
The algorithms used for load balancing are ROUND_ROBIN, LEAST_CONNECTIONS, and SOURCE_IP.
- ROUND_ROBIN: Nodes are selected on a round-robin basis (each node is used for a fixed time period) for workload handling; so all nodes are under equal pressure to handle workloads.
- LEAST_CONNECTIONS: Nodes are selected in increasing order of the number of established connections from the client.
- SOURCE_IP: Hash values are computed based on the IP addresses of the clients and the server that is used for routing, to ensure that the requests from a client always go to the server with which the connection was established even when there are broken connections.
Provider drivers are implementations that allow Octavia operators to choose the load balancing systems they want to use in their Octavia deployment. The following is a list of available provider drivers.
- A10 Networks OpenStack Octavia driver
- Amphora
- AmphoraV2
- F5 Networks provider driver for OpenStack Octavia by SAP SE
- OVN Octavia provider driver
- Radware provider driver for OpenStack Octavia
- VMware NSX
Amphora is used by Octavia (load balancing solution) as a default provider driver. OVN is chosen because, unlike Amphora, it does not require a VM to deploy which saves a lot of time and resources. But OVN has the following disadvantages:
- Layer-7 based load balancing is not possible because it supports TCP and UDP.
- It only supports the SOURCE_IP load balancing algorithm.
- Octavia flavours are not supported.
- Mixed IPv4 and IPv6 members are not supported.
- There are no health monitors in OVN’s provider driver [https://docs.openstack.org/ovn-octavia-provider/latest/admin/driver.html].
The setup
The following system configuration was used in this experiment.
- Operating system: Ubuntu 20.04 LTS (Server)
- Number of cores: 2
- RAM: 5GB
- Kernel version: 5.4.0
The following OpenStack services were used in this setup.
Nova: This is the compute service used for providing virtual machines and bare metal servers.
Neutron: This is used for providing Network-as-a-Service (NaaS) functionality between different interfaces.
Octavia: This is a load balancing solution used in OpenStack.
Keystone: Keystone is used for authentication and authorisation of users and service discovery.
Placement: Placement provides HTTP API to allow access to resource usages which can help services manage their resources effectively.
Glance: Glance is used to discover, register and retrieve virtual images.
Installation and configuration
OpenStack with Octavia: OpenStack is installed in the server version of Ubuntu 20.04 LTS. To install it with Octavia, DevStack is used. Here, Octavia is installed as a DevStack plugin. We create a new user stack before installing OpenStack.
This account should be able to run the sudo commands without a root password.
Since two provider drivers for load balancers are being compared, two setups are used to install OpenStack — OVN is installed in one setup and the default configuration is used in the other one. Horizon (OpenStack dashboard) and Cinder (block storage) services are disabled in both the setups to improve performance and increase the amount of free resources, since the current objective is not dependent on either of the services.
Creating the stack user: Run the following command to create the stack user. Here, stack is the user name of the user:
sudo adduser stack
Hit Enter for all other fields after retyping the password.
Now, log in to the root user:
sudo -i
Give permissions to run sudo commands without a root password. Care should be taken while executing the line below, because mistakes made while executing the command can result in syntax errors or loss of configuration for other users. This can result in not letting other users use sudo commands. So, take a backup of the sudoers file before making any changes to it.
sudo cp /etc/sudoers /etc/sudoers.original
Now execute the command given below:
echo “stack ALL=(ALL) NOPASSWD: ALL” >> /etc/sudoers
The exit command is used to exit from the root and current user.
DevStack installation: First, enable the universe repository as DevStack installs packages and configure OpenStack:
sudo apt-add-repository universe
Upgrade the operating system by installing the latest updates and install git (to clone repositories), bridge-utils (to configure Octavia) and python-is-python3 (for setting default Python version).
sudo apt update && sudo apt upgrade
sudo apt install git bridge-utils python-is-python3
Clone the DevStack repository from OpenDev:
git clone https://opendev.org/openstack/devstack
Enter the devstack directory (cd devstack).
DevStack uses the local.conf file to install OpenStack and any other required plugins. The local.conf file varies depending on the provider used to create Octavia load balancers. The local.conf file used for default installation of Octavia with DevStack can be found at https://docs.openstack.org/devstack/latest/guides/devstack-with-lbaas-v2.html, and the contents of the local.conf file for installing Octavia with OVN can be found at https://docs.openstack.org/ovn-octavia-provider/latest/admin/driver.html. The local.conf file should be created in the devstack directory.
Each service mentioned in the local.conf file is preceded with devstack@ when used as a systemd daemon. For example, the o-api service is identified by systemd (default system, PID1) as devstack@o-api.service.
Now install OpenStack with Octavia by running the following command:
./stack.sh
In case the installation is not successful, run the following command before solving the errors and reinstalling:
./unstack.sh && ./clean.sh
Rally installation: The method that we used was our own method, which was simpler, new and error-free. It took the least amount of time and number of steps. Also, we prefer precompiled packages from the operating system’s repositories over source code, since we can remove or purge the tool without any issues or standalone installer. We can also update the tools without manually checking for a revision and avoid conflicts with the packages in the repositories. The following commands should be run to install Rally. Select ‘No’ when Rally asks to create a database.
sudo apt install rally
pip3 install rally-openstack
Configuration: To configure, first create a Rally database, as follows:
rally db recreate
Now, create a Rally deployment:
. ~/devstack/openrc admin admin rally deployment create --fromenv --name=existing
The first command exports the required environment variables like OS_USERNAME, OS_PASSWORD, OS_AUTH_URL, etc, which are used by Rally and OpenStack services in general to communicate with change to ‘the latter.’
Testing procedure
The command to run a Rally task, the configuration of which is defined in a JSON file, say task.json, is:
rally task start task.json
Rally also supports YAML files to run jobs. The usage is as follows (consider task.yaml):
rally task start task.yaml
Rally scenarios in general can be found at:
https://rally.readthedocs.io/en/latest/plugins/plugin_reference.html
Rally jobs for Octavia can be found at https://opendev.org/openstack/rally-openstack/src/branch/master/samples/tasks/scenarios/octavia.
In case a load balancer is to be created using OVN instead of Amphora, an additional key-value pair is added in the args section to specify the provider:
“args”: {
“provider”: “ovn”
}
Tests are conducted using the scenarios given below.
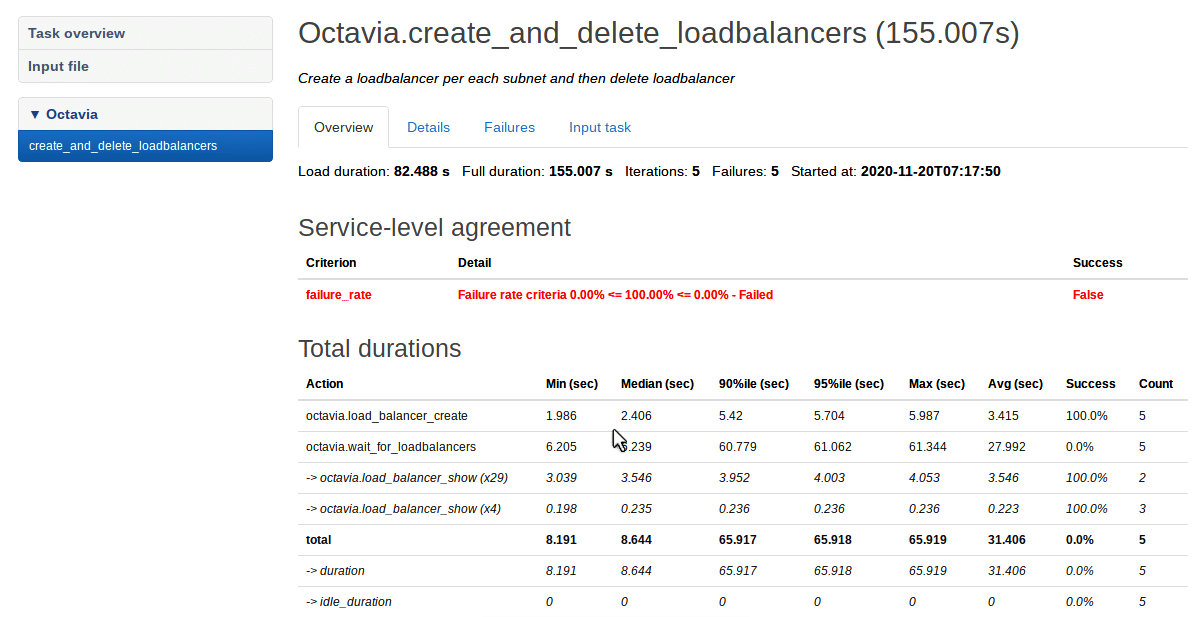
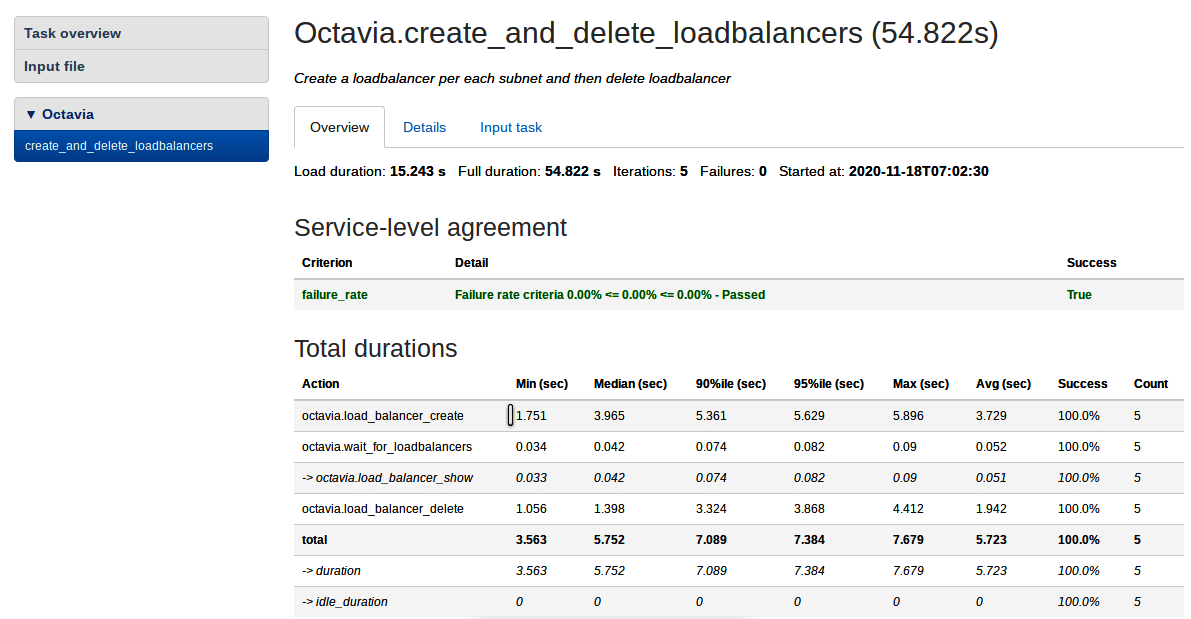
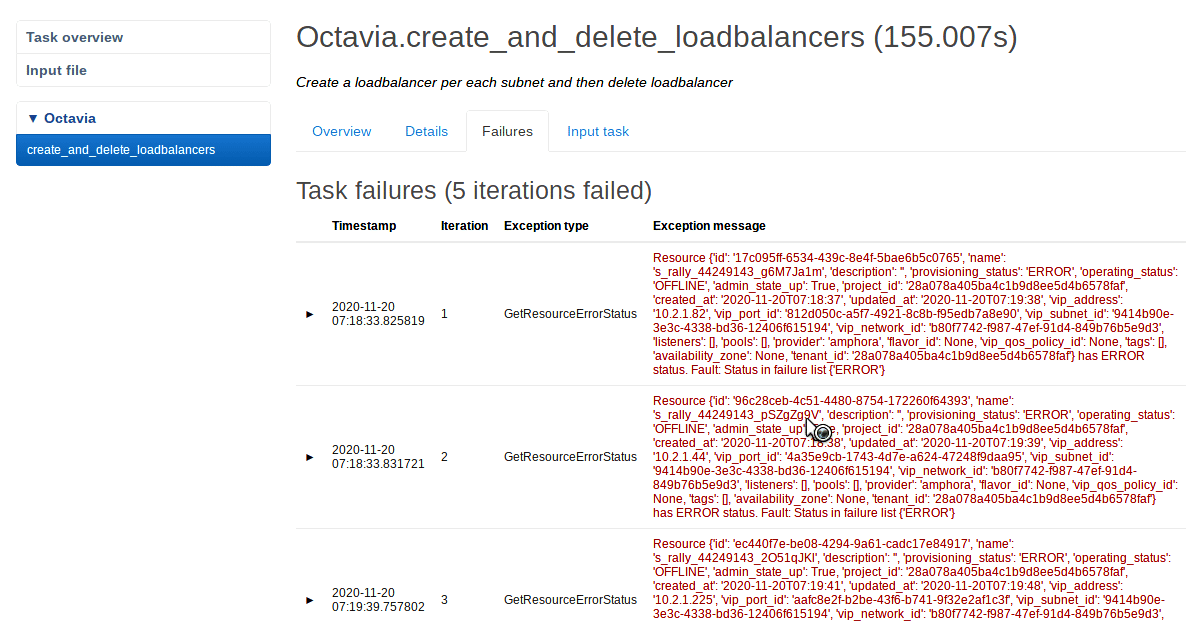
Octavia.create_and_delete_loadbalancers: Creates a load balancer for each subnet and then Figures 1 and 2 show the results of this scenario.
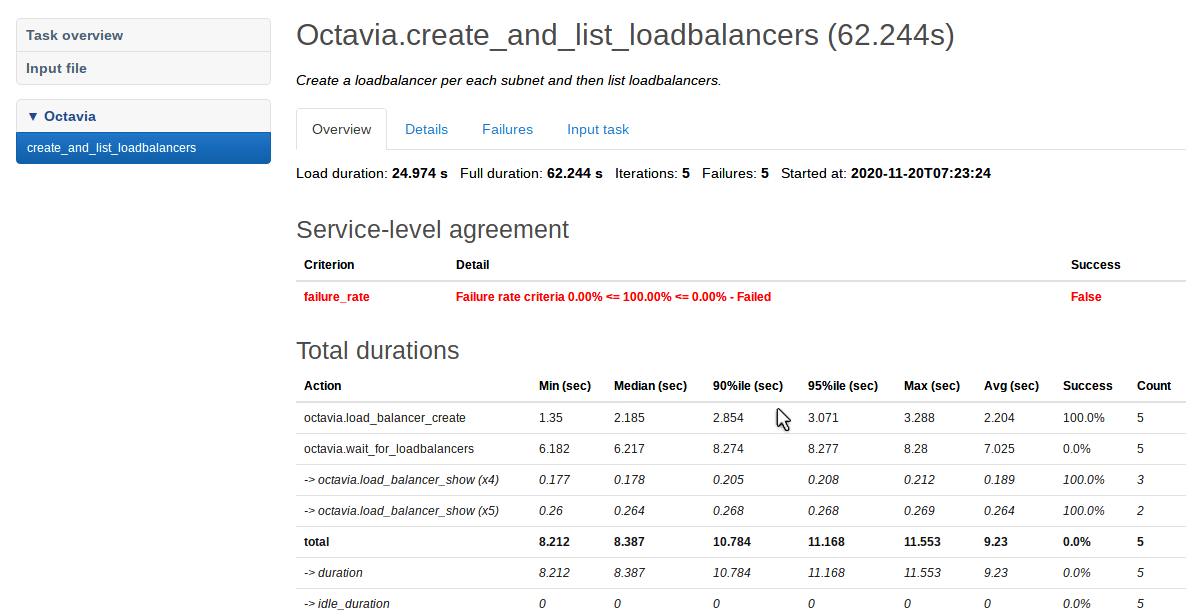
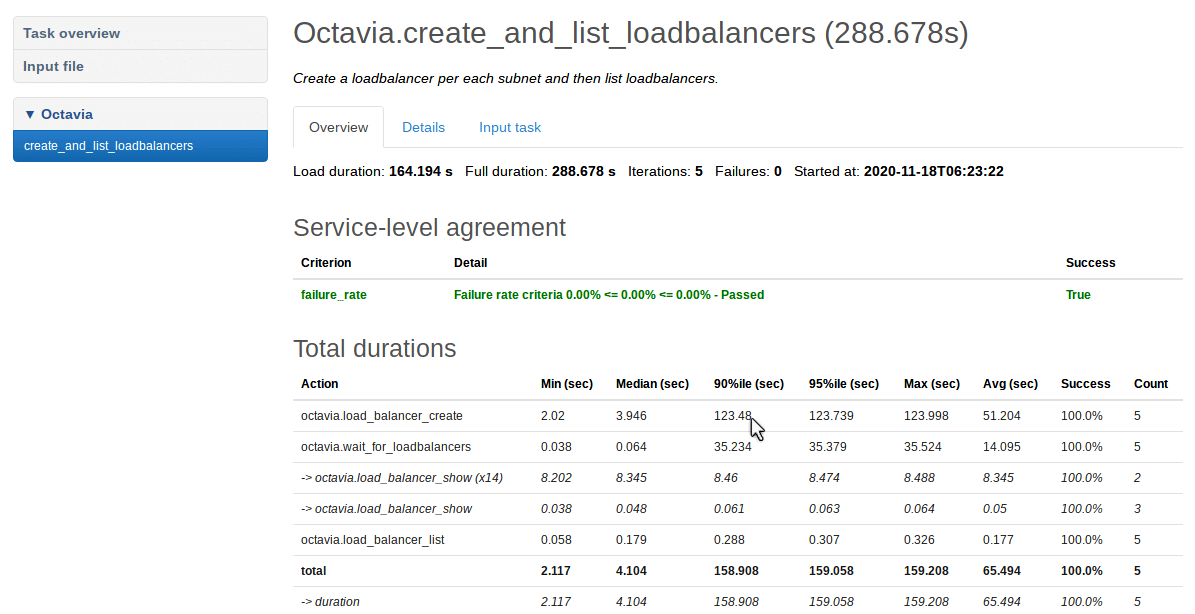
Octavia.create_and_list_loadbalancers: Creates a loadbalancer per each subnet and then lists loadbalancers. Figures 3 and 4 show the results of this scenario.
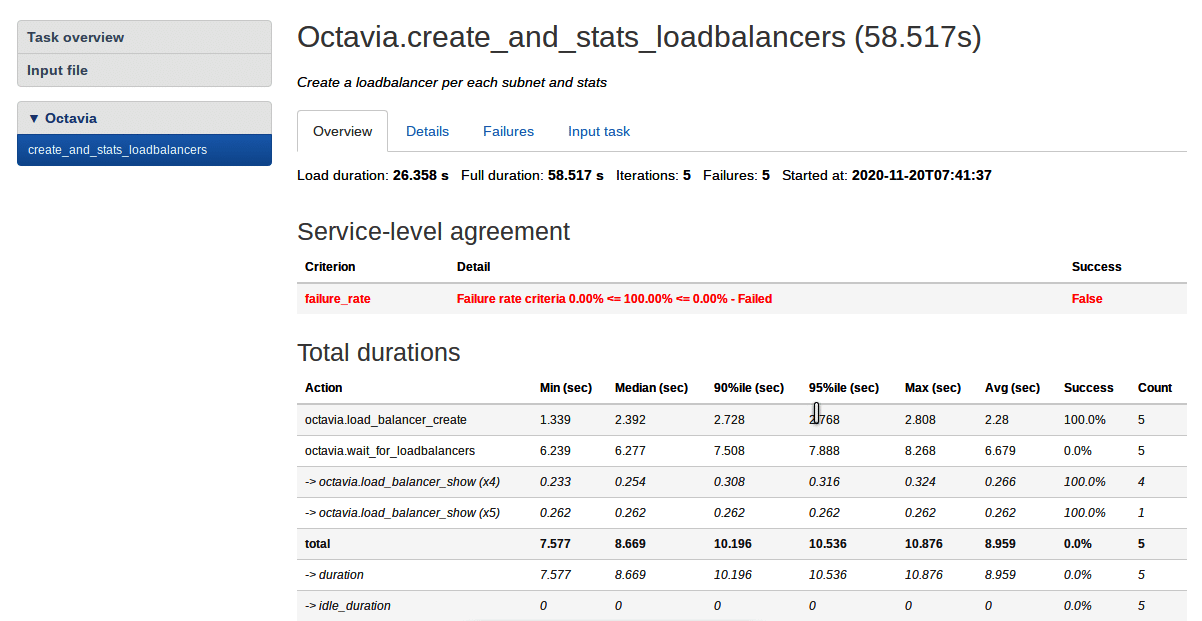
Octavia.create_and_stats_loadbalancers: Creates a loadbalancer for each subnet and then compares these. Figures 5 and 6 show the results of this scenario.
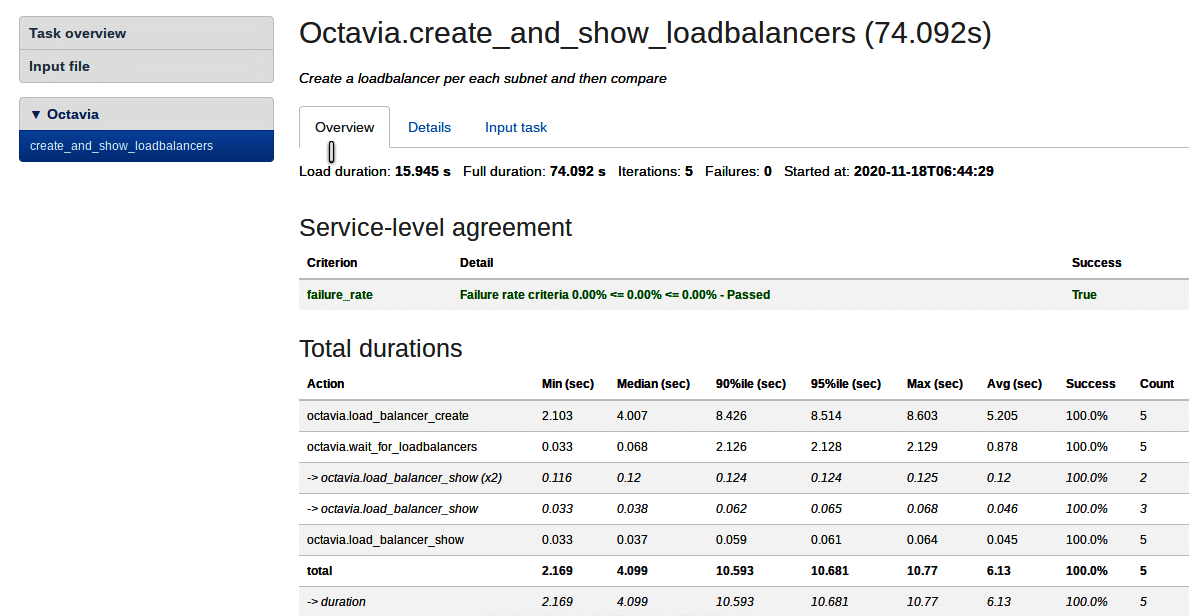
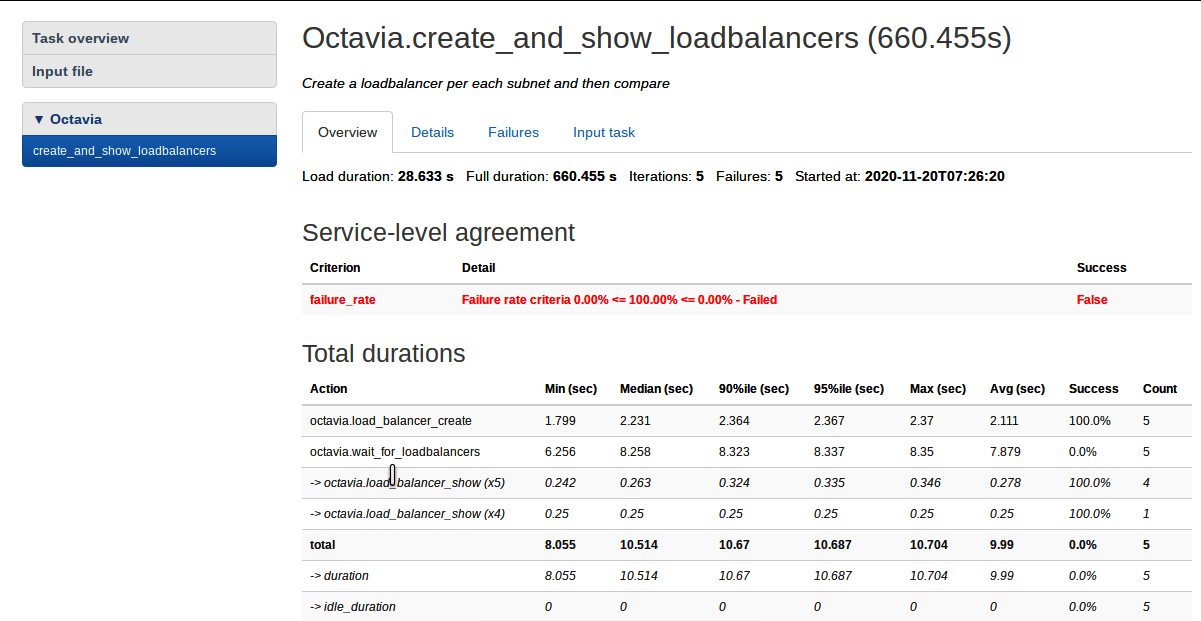
Octavia.create_and_show_loadbalancers: Creates a loadbalancer per each subnet and stats. Figures 7 and 8 show the results of this scenario.
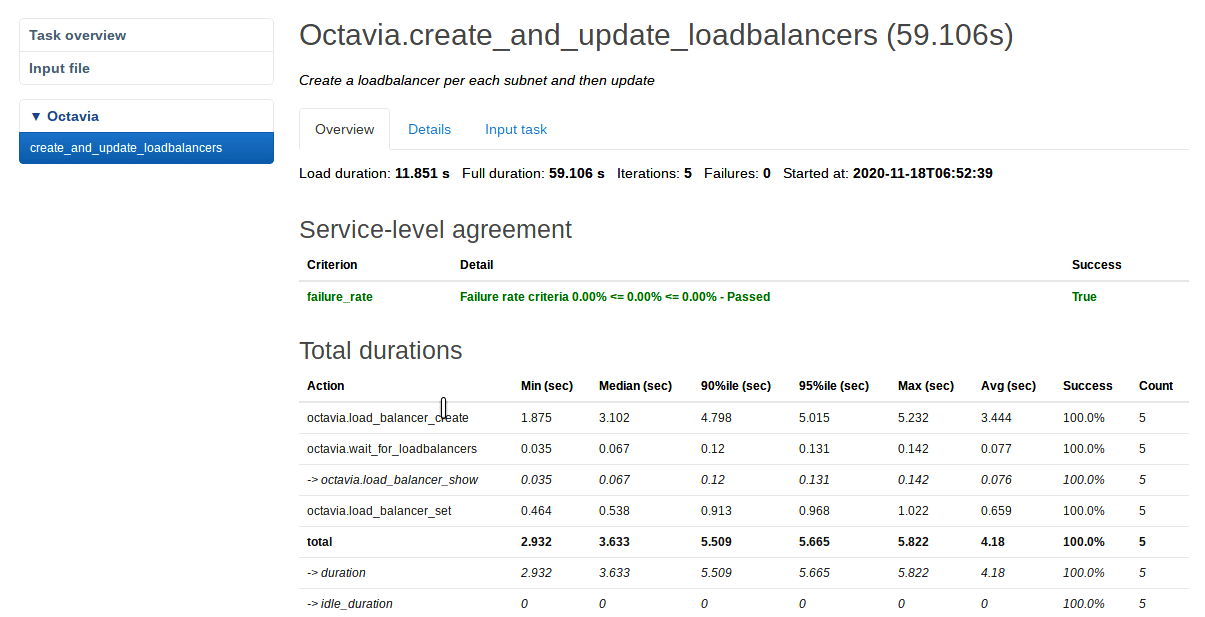
Octavia.create_and_update_loadbalancers: Creates a loadbalancer for each subnet and then updates them. Figures 9 and 10 show the results of this scenario.
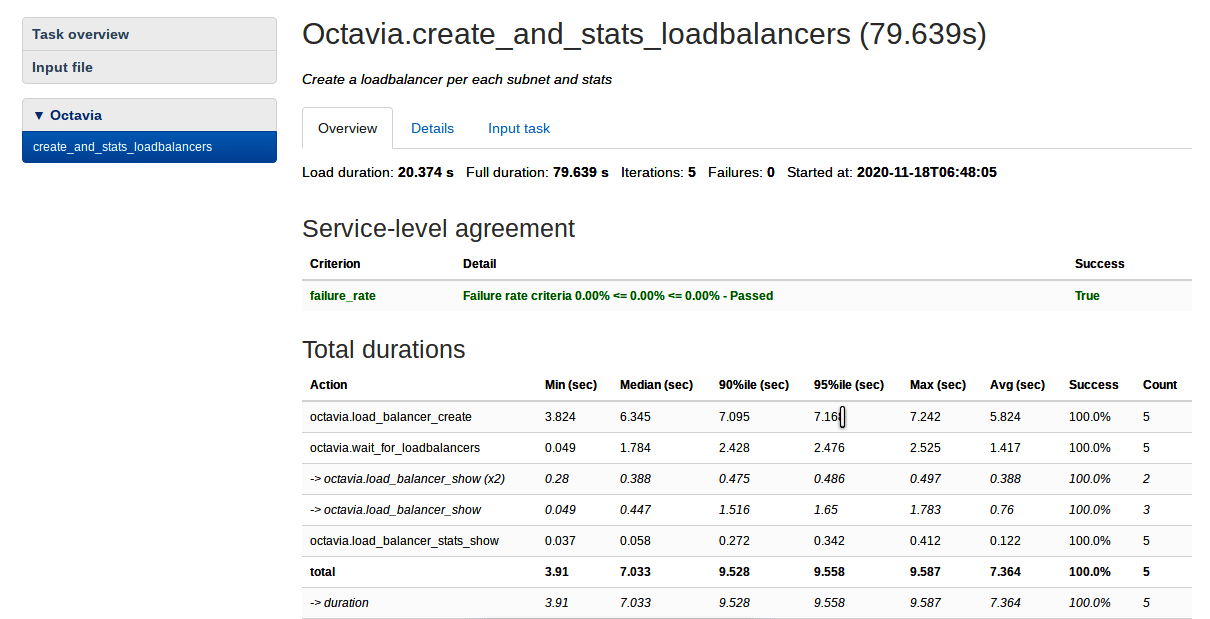
In Figure 1, the ‘Service-level agreement’ table shows the failure rate of the Octavia.create_and_delete_loadbalancers scenario and the ‘Total durations’ table shows the total time taken for the job and for each of the sub-tasks, i.e., the sum of times taken for creating the load balancer in each iteration (the number of iterations is five for each of the jobs run), the sum of times taken waiting for the load balancer to create in each iteration, and the sum of times taken for deleting the load balancer in each iteration. The failure rate is 100 per cent, which means that none of the iterations of the job are completed successfully. Similarly, Figures 3, 5, 7 and 9 show the results of the jobs mentioned in each of them respectively when Amphora is used and Figures 2, 4, 6, 8, 10 show the results of the same when OVN is used. Figure 11 shows the errors which occurred when running the Octavia.create_ and_delete_loadbalancers Rally job when Amphora is used. The same errors occurred when other jobs are run using Amphora. No errors occurred when OVN was used, and all the jobs were completed successfully.

Architecture and workflow
The workflow for OpenStack can be found at https://docs.openstack.org/ocata/admin-guide/common/get-started-logical-architecture.html.
The workflow for Octavia can be found as described below at https://docs.openstack.org/octavia/queens/contributor/design/version0.5/component-design.html.
Summing up
The results showed that the Rally tasks were successful when a load balancer was created using OVN but the opposite was true when using Amphora. The Rally tasks failed while using Amphora because of the GetResourceErrorStatus exception, which is caused due to less RAM and CPU cores in this case. This shows that OVN is a better option than Amphora, since resource consumption is the main consideration when creating a load balancer.


