


Organisations use low code/no code (LC/NC) apps to construct new information systems swiftly in today’s fast-paced digital world. This article introduces PyCaret a low code machine learning library written in Python.
PyCaret is a Python version of the Caret (short for Classification And REgression Training) package in the R programming language, and has many benefits.
Increased productivity: PyCaret, being a low code library, makes you more productive. With less time spent coding, you and your team can now focus on business problems.
Easy to use: This simple and easy to use machine learning library will help you to perform end-to-end ML experiments with fewer lines of code.
Business ready: PyCaret is a business-ready solution. It allows you to do prototyping quickly and efficiently from your choice of notebook environment.
You can create a virtual environment in Python and execute the following command to install the PyCaret complete version:
pip install pycaret [full]
A machine learning practitioner can do classification, regression, clustering, anomaly detection, natural language processing, association rules mining and time series analysis with PyCaret.
Classification model building with PyCaret
This article explains classification model building with PyCaret by taking the Iris data set from PyCaret’s data repository.
We will use the Google Colab environment to make things simple and follow the steps mentioned below.
Step 1: First, install PyCaret by giving the following command:
pip install pycaret
Step 2: Next, load the data set, as shown in Figure 1:
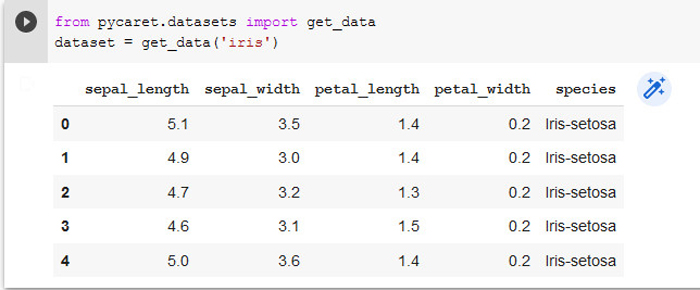
from pycaret.datasets import get_data
dataset = get_data(‘iris’)
(or)
import pandas as pd
dataset = pd.read_csv(/path_to_data/file.csv’)
Step 3: Now set up the PyCaret environment, as shown in Figure 2:
from pycaret.classification import *
clf1 = setup (data=dataset, target = ‘species’)
For any type of model building with PyCaret, the environment setup is the most important step. By default, setup () function takes the data: Pandas DataFrame and target, which points to the class label variable in the data set. The result of the setup function is shown in Figure 3. The setup function, by default, splits 70 per cent of the data as train set and 30 per cent as test set, and does data preprocessing as shown in Figure 3.
Step 4: Next, find the best model, as shown in Figure 4:
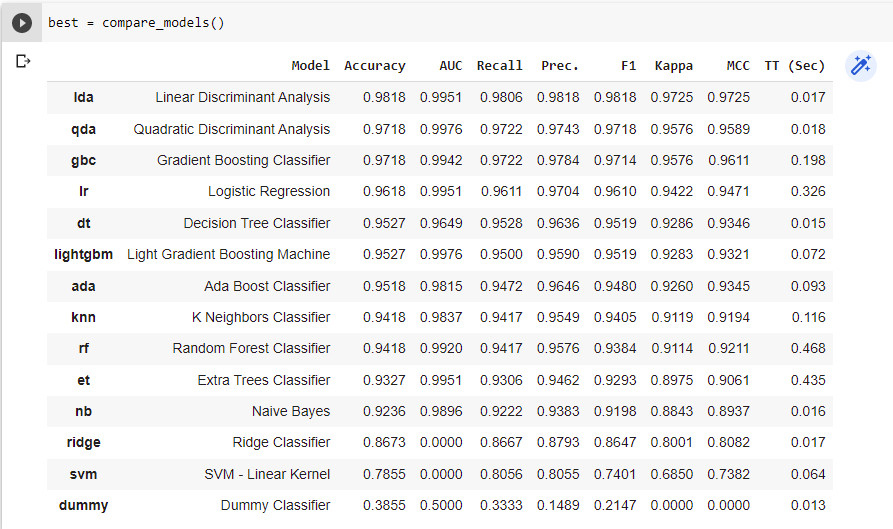
best = compare_models()
The compare_models(), by default, applies ten-fold cross validation and calculates different performance metrics like accuracy, AUC, recall, precision, F1 score, Kappa and MCC for different classifiers with lesser training times, as shown in Figure 4. By passing the tubro=True to compare_models() function we can try all the classifiers.
Step 5: Now create the model, as shown in Figure 5:

lda_model=create_model (‘lda’)
The Linear Discriminant Analysis classifier is performing well, as shown in Figure 4. So by passing ‘lda’ to the create_model() function, we can fit the model.
Step 6: The next step is to fine tune the model, as shown in Figure 6.
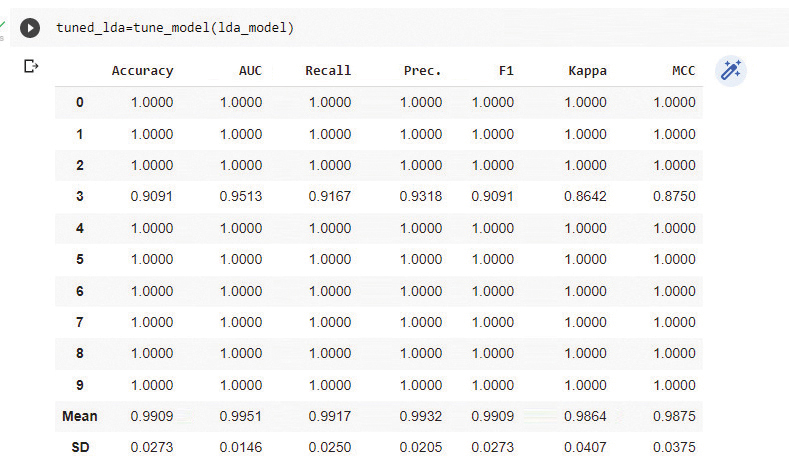
tuned_lda=tune_model(lda_model)
Tuning of hyper parameters can improve the model accuracy. The tune_model() function improved the Linear Discriminant Analysis model accuracy from 0.9818 to 0.9909, as shown in Figure 7.

Step 7: The next step is to make predictions, as shown in Figure 8:

predictions=predict_model(tuned_lda)
The predict_model() function is used for making the predictions of the samples present in the test data.
Step 8: Now plot the model performance, as shown in Figure 9:
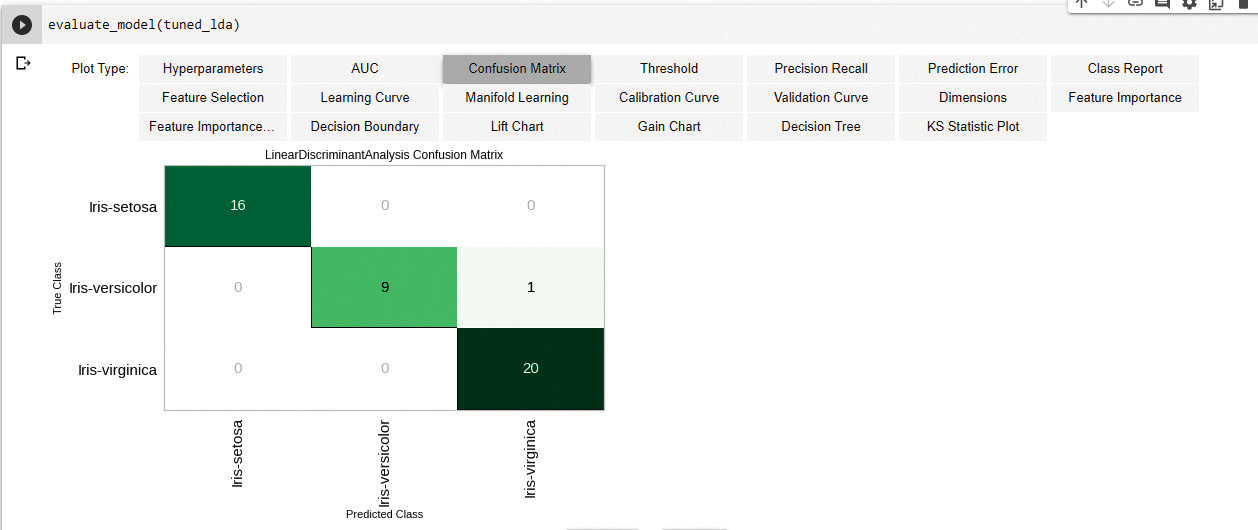
evaluate_model(tuned_lda)
The evaluate_model () function is used to develop different performance metrics with minimum effort. You can try them out to see the output.


