


Lens Desktop is an exciting platform for working with Kubernetes. It is a distribution of the OpenLens repository with specific customisations. In this article we will see what Lens Desktop can do and how it works.
Lens Desktop is free of charge. For more details, you can visit https://k8slens.dev/pricing.html. A few benefits of using Lens Desktop are:
- Simplicity and increased productivity – no need to learn kubectl commands
- Visibility in existing Kubernetes resources
- Built on open source
- Observability — live statistics, events, and log streams in real-time
- Errors and warnings are directly available on the Lens dashboard
- Supports EKS, AKS, GKE, Minikube, Rancher, k0s, k3s, OpenShift
- Huge community support — 450,000 users and 17,000 stars on GitHub
Minikube installation
Minikube is a tool that is used to run Kubernetes locally. It runs a single-node Kubernetes cluster so that hands-on work can be done on Kubernetes for daily software development.
We will use minikube and verify the usage of Lens. Let’s install minikube on a Windows based system first. You can also install it on other operating systems, virtual machines or laptops.
- Two or more CPUs
- 2GB of RAM
- 20GB of free disk space
- Internet connectivity
- Container or virtual machine manager such as Docker or VirtualBox
From a terminal or command prompt, execute the minikube start command.
minikube start --driver=virtualbox
* minikube v1.12.3 on Microsoft Windows 10 Home Single Language 10.0.19044 Build 19044
* Using the virtualbox driver based on existing profile
* minikube 1.26.0 is available! Download it: https://github.com/kubernetes/minikube/releases/tag/v1.26.0
* To disable this notice, run: ‘minikube config set WantUpdateNotification false’
* Starting control plane node minikube in cluster minikube
* virtualbox “minikube” VM is missing, will recreate.
* Creating virtualbox VM (CPUs=2, Memory=3000MB, Disk=20000MB) ...
! This VM is having trouble accessing https://k8s.gcr.io
* To pull new external images, you may need to configure a proxy: https://minikube.sigs.k8s.io/docs/reference/networking/proxy/
* Preparing Kubernetes v1.18.3 on Docker 19.03.12 ...
* Verifying Kubernetes components...
* Enabled addons: default-storageclass, storage-provisioner
* Done! kubectl is now configured to use “minikube”
Go to your virtual box and verify the newly created minikube virtual machine (Figure 1).

Now verify the existing status of minikube using the minikube status command.
C:\>minikube status
minikube
type: Control Plane
host: Running
kubelet: Running
apiserver: Running
kubeconfig: Configured
Next, use the kubectl cluster-info command to get details about kubeDNS.
kubectl cluster-info
Kubernetes master is running at https://192.168.99.103:8443
KubeDNS is running at https://192.168.99.103:8443/api/v1/namespaces/kube-system/services/kube-dns:dns/proxy
To get more details on debugging and to diagnose cluster problems, use the kubectl cluster-info dump command.
Once minikube is ready, install kubectl (https://kubernetes.io/docs/tasks/tools/). It is a command line cluster that is used to run commands against Kubernetes clusters and minikube as well.
Execute the kubectl get nodes command to get details on all nodes and, in this case, minikube.
C:\>kubectl get nodes
NAME       STATUS   ROLES    AGE     VERSION
minikube   Ready    master   7m57s   v1.18.3
Use the kubectl get all command to get all details for the default name space.
C:\>kubectl get all
NAME                 TYPE        CLUSTER-IP   EXTERNAL-IP   PORT(S)   AGE
service/kubernetes   ClusterIP   10.96.0.1    <none>        443/TCP   7m58s
We now have a minikube cluster ready with kubectl. The next step is to install and configure Lens and verify the sample applications.
Lens installation and configuration
Go to https://k8slens.dev/ and download an installable package based on the operating system you have.
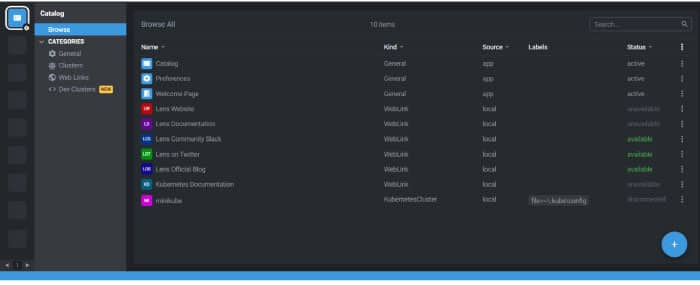
Next, install Lens as per the instruction displayed on the screen. Open Lens after successful installation. You will find a minikube in the catalogue (Figure 3).
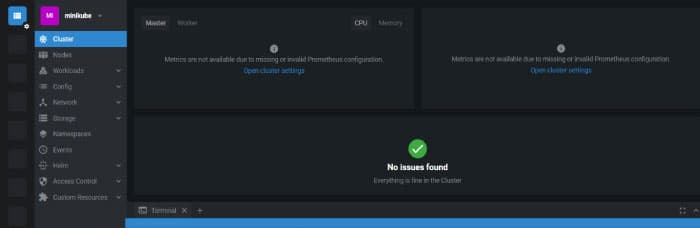
Click on minikube and you will enter the world of minikube clusters, which you will love forever.
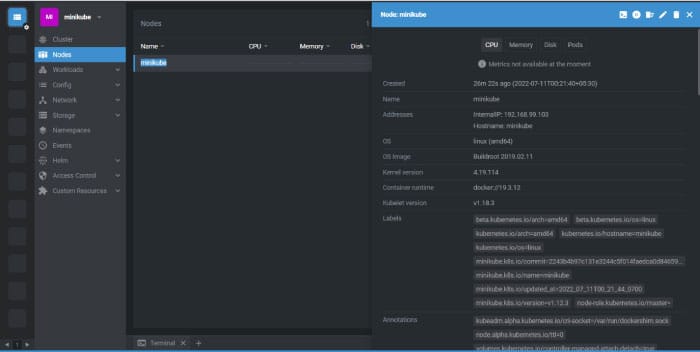
Click on Nodes and get the node details that you got after executing the kubectl get nodes commands.
Now, Lens is ready to use.
Let’s deploy https://github.com/GoogleCloudPlatform/microservices-demo, which is a cloud-native microservices demo application. It has 11-tier microservices applications, and is a Web based e-commerce app.
Download the application and extract it locally in the system where you have downloaded and configured minikube.
Go to the release directory and execute the following command.
kubectl apply -f kubernetes-manifests.yaml

deployment.apps/emailservice created
service/emailservice created
deployment.apps/checkoutservice created
service/checkoutservice created
deployment.apps/recommendationservice created
service/recommendationservice created
deployment.apps/frontend created
service/frontend created
service/frontend-external created
deployment.apps/paymentservice created
service/paymentservice created
deployment.apps/productcatalogservice created
service/productcatalogservice created
deployment.apps/cartservice created
service/cartservice created
deployment.apps/loadgenerator created
deployment.apps/currencyservice created
service/currencyservice created
deployment.apps/shippingservice created
service/shippingservice created
deployment.apps/redis-cart created
service/redis-cart created
deployment.apps/adservice created
service/adservice created
The installation of the app will start now, but it will take some time to reflect that we have used kubectl commands.
kubectl get pods
NAME                 READY   STATUS    RESTARTS   AGE
adservice-775d8b9bf5-cp7jr   0/1     Pending   0          8h
cartservice-79749895f5-jrq4d  1/1     Running   0         8h
checkoutservice-5645bf9c65-882m4  1/1   Running  0        8h
currencyservice-545c79d477-8rhg7  1/1  Running   0         8h
emailservice-7cc5c74b4f-hk74s     1/1  Running   0        8h
frontend-9cdf787f5-klfkh    1/1     Running   1          8h
loadgenerator-7b6874cb4c-645v9   1/1  Running   0        8h
paymentservice-5f74bc7b87-l4248  1/1  Running   0        8h
productcatalogservice-6846f59899-v4q4w  1/1  Running  0  8h
recommendationservice-d9c6c8b55-m2x9k  1/1  Running   0  8h
redis-cart-57bd646894-v7kfr    0/1   Pending   0         8h
shippingservice-8685dd9855-pmgjm  1/1  Running  0        8h
Table 1 lists a few commands that you can use to get information from kubectl.
| Description | Command |
| List one or more nodes | kubectl get node |
| List all resources in the cluster | kubectl get all –all-namespaces |
| List one or more deployments | kubectl get deployment |
| Display the complete state of one or more deployments | kubectl describe deployment <deployment_name> |
| Edit and update one or more deployments on the cluster | kubectl edit deployment <deployment_name> |
| Delete deployments | kubectl delete deployment <deployment_name> |
| List one or more pods | kubectl get pod |
| Delete a pod | kubectl delete pod <pod_name> |
| Display the complete state of a pod | kubectl describe pod <pod_name> |
| Get a shell to a running single-container pod | kubectl exec -it <pod_name> /bin/bash |
| List secrets | kubectl get secrets |
| List one or more services | kubectl get services |
| Display the complete state of a service | kubectl describe services |
| Edit and update one or more services on the cluster | kubectl edit services / kubectl edit deployment <deployment_name> |
| List one or more namespaces | kubectl get namespace <namespace_name> |
| Print the logs for a pod | kubectl logs <pod_name> |
| Print the logs for a specific container in a pod | kubectl logs -c <container_name> <pod_name> |
Lens can help you get all the information listed in Table 1 and more for a specific cluster. We can also perform edit and delete actions on Kubernetes resources using Lens.
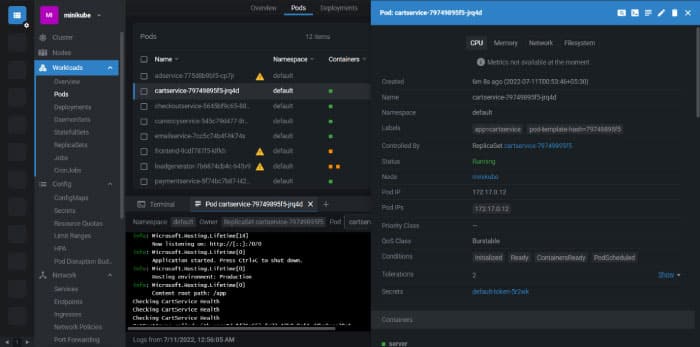
Let’s see how this works. Select Pods in the Workloads section (Figure 6). We can edit, delete, access logs, access terminals of pod from Lens itself. Cool, right?
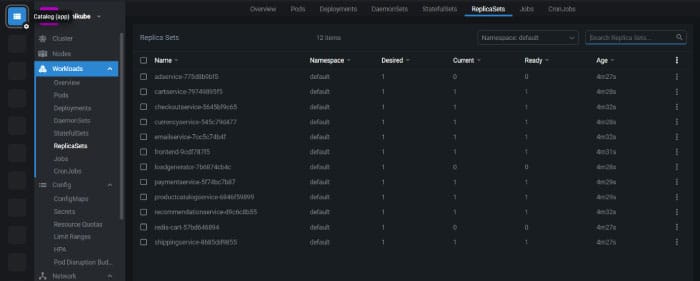
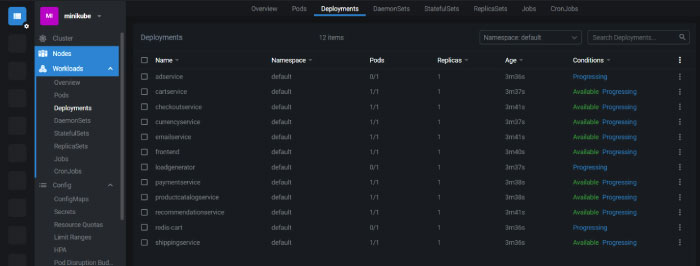
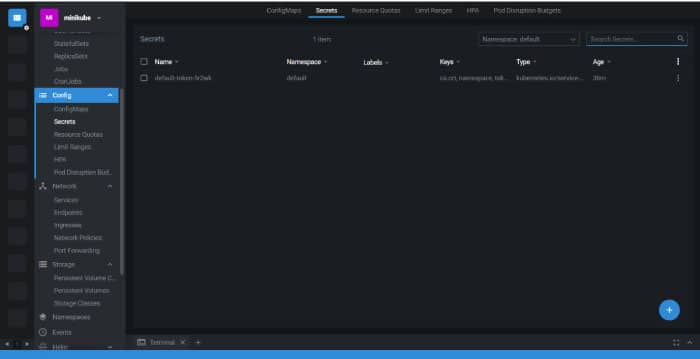
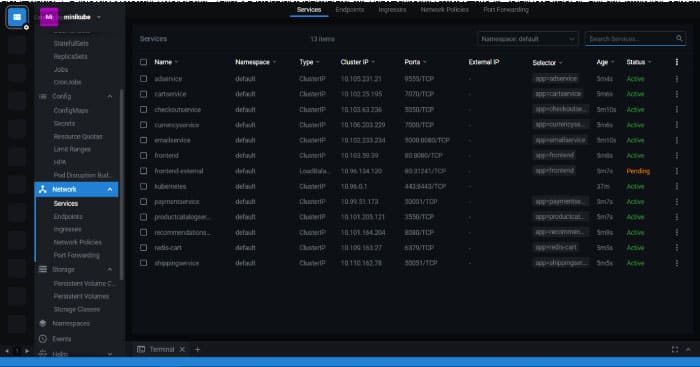
You can verify all deployments in the Workloads section (Figure 7), verify all Replicasets in the Workloads section (Figure 8), all Secrets in the Config section (Figure 9) and all Services in the Network section (Figure 10).
You can see how easy it is to navigate to all resources, and effectively find all Kubernetes resources from a single place quickly. We can edit YAML files in Lens and apply it at runtime to see the change.
We can also configure multiple clusters deployed by multiple cloud service providers and use Lens for visibility and troubleshooting.


