


Explore the entire life cycle of deploying Java applications via Docker — from understanding the basics and writing the initial Dockerfile to building container images and managing complex multi-container deployments using Docker Compose. You can use this guide to streamline the deployment pipeline of a Spring Boot microservice, a traditional Java SE program, and even an enterprise web application.
Consistency, scalability, and portability have become must-haves in software development. Because of Java’s robustness, platform independence, and vast ecosystem, it has been the cornerstone of enterprise and backend applications. But rolling out Java applications on multiple environments — develop, test, and production –can cause dependency hell among other issues.
Docker offers a new method of containerisation on the packaging and delivery end. It wraps a Java application with its dependencies in a thin container that is portable and can be run anywhere — on a local machine, in some test environment, or on a cloud-hosted production server.
The problem that Docker solves
An all-too common and annoying problem for the software developer is: “It works on my machine.” The Java application may be working flawlessly on the developer’s system, say with JDK 17 on macOS, but in QA or production it may be misbehaving according to different platform OSs and Java versions. Such variations break builds, or improperly configure sources or runtime situations.
These could be environment-related bugs — the worst kind to locate and fix. Teams spend hours establishing how an issue can be replicated; in fact, it’s not really because of faulty code but an inconsistent setup. This slows development cycles, delaying releases, and increasing deployment risks.
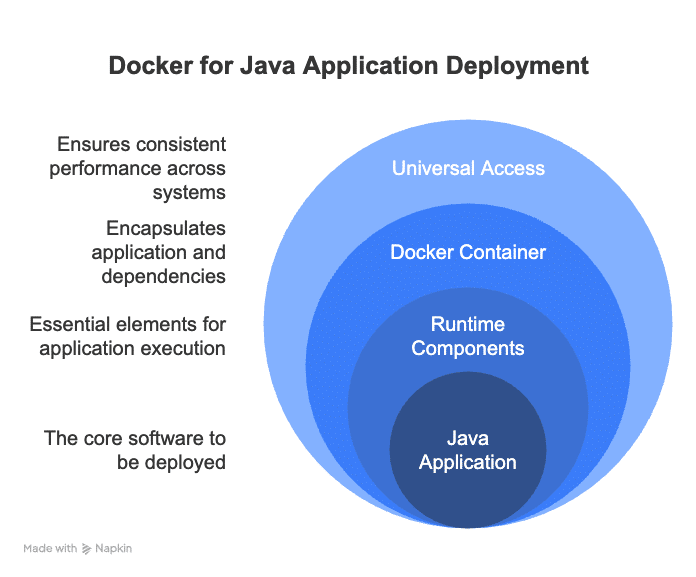
Docker resolves all that by allowing developers to pack the Java application with the specific runtime, libraries, environment variables and configurations into the container image that simply runs the same way in any environment where Docker is installed –however inefficiently configured it may be in development, test, and production instruments.
With Docker there is no need for installing Java inside the working environment or even resolving dependencies. The container already goes with whatever the app needs for execution. This prevents environmental bugs, allowing faster onboarding of developers and testing. Simply put, Docker makes it certain that a Java application runs smoothly everywhere, thus taking care of reliability and deployment ease.
Why use Docker for Java applications?
Imagine developing a Java game on your computer which functions perfectly when you play it but fails on your friend’s system. The reason for this failure lies in the differences between your computer and your friend’s system, which can exhibit Java version discrepancies and missing files.
Software development faces this issue frequently. Perfect code may operate without issues on your computer yet could encounter problems on different machines because the system configurations vary.
Docker functions as a container system for Java applications. A perfect analogy is delivering a complete meal inside a lunchbox instead of merely sharing a recipe for a sandwich. Docker creates a container that houses your app together with all the essential runtime components including Java code, configuration settings and the required files.
Any person who wants to launch your Java application needs to access your lunchbox. The application functions in an identical way for all users across all locations since it eliminates file loss and version discrepancies.
Here’s an example. Imagine you’ve created a school project—a Java program that calculates grades. It runs perfectly on your laptop since you have Java 17 installed. However, when your teacher tries to run it on her computer with Java 11, it throws an error. Now, if you had used Docker, you could package your program along with Java 17 in a single container. This way, it wouldn’t matter what version of Java your teacher has—your app would run smoothly because it carries its own Java environment.
Table 1: Types of Java applications
|
Application type |
Description |
Example use case |
|
Standalone app |
Runs independently on a desktop or server |
Grade calculator, PDF reader |
|
Web application |
Runs on a server and serves web pages over HTTP |
Online banking system, e-commerce site |
|
Microservice |
Small, self-contained service in a larger system |
Product catalogue in e-commerce |
Table 2: Common Java packaging formats
|
File type |
Full form |
Used for |
Runs on |
|
.jar |
Java ARchive |
Standalone apps, libraries, Spring Boot |
Java runtime (JRE/JDK) |
|
.war |
Web ARchive |
Traditional web apps (servlets, JSPs) |
Java EE servers (Tomcat, JBoss) |
|
.ear |
Enterprise Archive |
Enterprise apps with multiple modules |
Full Java EE servers |
Table 3: Popular frameworks and their packaging
|
Framework / Style |
Package type |
How it runs |
|
Plain Java (No framework) |
.jar |
Run via java -jar filename.jar |
|
Spring Boot |
.jar |
Self-contained; has embedded server (Tomcat/Jetty) |
|
Jakarta EE / Java EE |
.war / .ear |
Deployed on app servers like WildFly or GlassFish |
Setting up your Java project
Before you dive into putting your Java application into a Docker container, it’s essential to ensure that your project is well-prepared and neatly organised. Here’s a step-by-step guide to help you get your Java project ready for Docker deployment.
Choose your Java application type: If you’re working on a simple Java program, you may want to create a standalone JAR file. For web applications, particularly those using frameworks like Spring Boot, you’ll usually build a runnable JAR that comes with an embedded web server. If you’re dealing with older Java EE applications, you may have WAR files that require a separate application server. Understanding your project type is key to figuring out how to package it for Docker.
Build your application: Utilise build tools like Maven or Gradle to compile your code and handle dependencies.
For Maven, run:
mvn clean package
This command cleans previous builds and packages your app into a JAR or WAR file in the target/ directory.
For Gradle, use:
./gradlew build
Test locally: Before moving to Docker, run your Java app locally to confirm it works as expected. For example, run a Spring Boot app with:
java -jar target/your-app.jar
Prepare configuration files: Get your configuration files ready. Make sure to externalise your configurations—think database URLs, ports, and API keys—into separate files or environment variables. This approach allows you to tweak settings without having to rebuild your Docker image.
Set up a .dockerignore file: Just like .gitignore, create a .dockerignore file to exclude unnecessary files (e.g., target folders, logs, local IDE configs) from your Docker build context.
A well-prepared Java project with a clean, runnable build artifact and externalised configurations is the foundation for smooth Docker deployment. Once your app builds and runs locally without issues, you’re ready to move on to creating your Docker image.
Table 4: Best practices for Dockerizing Java apps
|
Best practice |
Description |
Why it matters |
|
Use official and lightweight base images |
Start with trusted images like openjdk:17-jdk-alpine. |
Keeps image size small and secure. |
|
Use multi-stage builds |
Build your app in one stage; copy only the final JAR to the runtime image. |
Reduces image size and removes unnecessary tools. |
|
Externalise configuration |
Use environment variables or config files instead of hardcoding settings. |
Makes containers flexible across environments. |
|
Use .dockerignore |
Exclude unnecessary files (e.g., IDE configs, logs) from the build context. |
Speeds up builds and keeps images clean. |
|
Minimise number of layers |
Combine commands to reduce layers in your Dockerfile. |
Smaller, more efficient images. |
|
Run as non-root user |
Create and switch to a non-root user before running the app. |
Improves container security. |
|
Expose only necessary ports |
Open only the ports your app needs. |
Limits potential security vulnerabilities. |
|
Add health checks |
Define health checks to monitor app status inside the container. |
Enables auto-restart on failure in orchestration. |
|
Log to standard output |
Configure app to write logs to console (stdout) instead of files. |
Simplifies log management and collection. |
|
Keep images updated |
Regularly update base images and dependencies to patch vulnerabilities. |
Ensures latest security and performance fixes. |
Creating a Dockerfile for Java
Let’s create a Dockerfile for a Java application packaged as a runnable JAR using a lightweight Java 17 runtime image:
FROM openjdk:17-jdk-alpine
Set the working directory inside the container to /app:
WORKDIR /app
Copy the built JAR file from the host machine into the container at /app/myapp.jar:
COPY target/myapp.jar /app/myapp.jar
Run the Java application when the container starts:
CMD [“java”, “-jar”, “myapp.jar”]
Here’s how you can use this file.
Build your Java app using Maven (creates target/myapp.jar):
mvn clean package
Build the Docker image from your project directory (where this Dockerfile is):
docker build -t my-java-app .
Run the Docker container and map port 8080 (adjust if your app uses a different port):
docker run -p 8080:8080 my-java-app
Now your Java app runs inside a container and is accessible at http://localhost:8080.
Table 5: Common pitfalls and how to avoid them
|
Common pitfall |
Description |
How to avoid it |
|
Using large base images |
Large images make your container bulky and slow to download. |
Use lightweight images like openjdk:17-jdk-alpine and multi-stage builds. |
|
Ignoring .dockerignore |
Including unnecessary files bloats your build context and image size. |
Create a .dockerignore file to exclude |
|
Hardcoding configuration inside image |
Embedding environment-specific settings reduces flexibility and forces rebuilds. |
Use environment variables or external config files. |
|
Running containers as root |
Running as root poses security risks if the container is compromised. |
Create and run as a non-root user in the Dockerfile. |
|
Over-exposing ports |
Exposing unnecessary ports increases the attack surface. |
Expose only the ports your app needs. |
|
Forgetting health checks |
Without health checks, unhealthy containers may not be detected or restarted. |
Add Docker health checks for automatic monitoring. |
|
Logging to files inside container |
Writing logs to container files complicates log management and can cause storage issues. |
Log to standard output (console) instead. |
|
Neglecting image updates |
Using outdated base images and dependencies can cause security vulnerabilities. |
Regularly update base images and rebuild containers. |
Building and running the Docker image
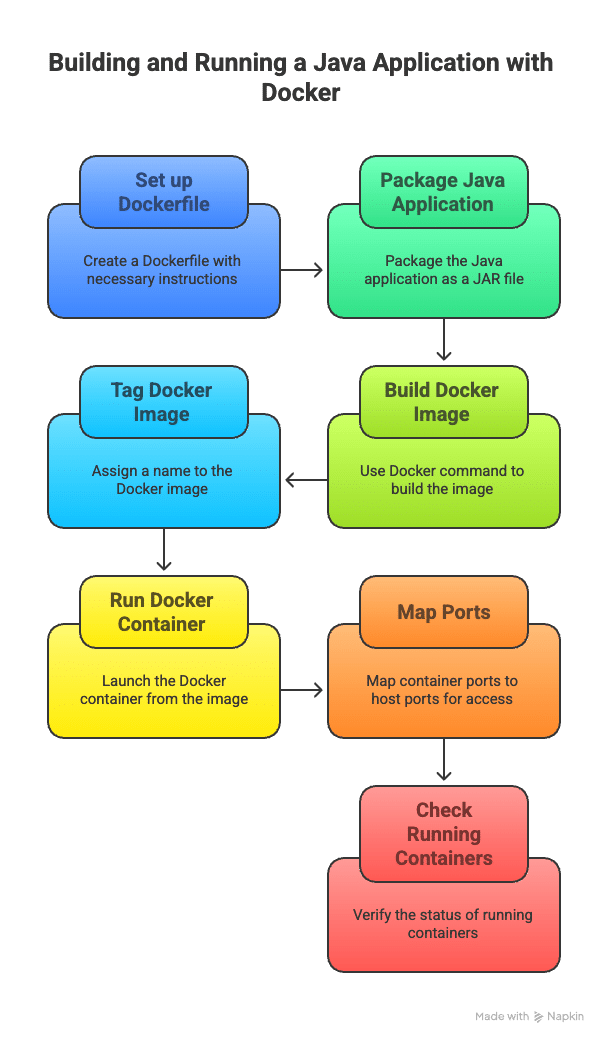
Once you’ve set up your Dockerfile and your Java application is neatly packaged as a JAR, the next step is to build a Docker image and run it as a container. Building the image means that Docker takes all the instructions from your Dockerfile and creates a snapshot that includes your Java app along with the necessary Java runtime environment. Think of this image as a portable package that you can run on any machine with Docker installed, without having to stress about differences in the environment. To build the image, you’ll need to run a Docker command in your project directory. This command reads your Dockerfile, copies your Java app into the image, and sets everything up just the way you specified. Once the build is complete, you’ll have an image named whatever you decided to tag it — for instance, my-java-app.
When it comes to running the Docker container, you’re essentially launching an instance of that image. As the container starts up, it runs your Java app in a controlled and isolated environment. You can also map the container’s internal ports to your computer’s ports, allowing you to access your app from a browser or API client as if it were running directly on your machine. Lastly, you can easily check which containers are currently running with a simple Docker command. This is a great way to keep an eye on your apps and manage them effectively.
Using Docker to build and run your Java application guarantees that it behaves the same way everywhere, making development, testing, and deployment a whole lot easier and more reliable.
To build the Docker image from the current directory, tag it as my-java-app:
docker build -t my-java-app
Run a container from the image, mapping container port 8080 to host port 8080:
docker run -p 8080:8080 my-java-app
List all running containers to verify your app is running (optional):
docker ps
Multi-stage Docker builds (optional, for optimised images)
When you’re putting together a Docker image for your Java application, it typically includes all the necessary files and tools for both building and running the app. However, this can lead to a hefty final image size since build tools like Maven or Gradle, along with the source code, don’t really need to be part of the image that’s deployed in production. That’s where multi-stage builds come in handy. They allow you to use one stage to compile and build your Java app, and then you can just copy the final runnable files (like the JAR) into a much smaller image that only has what’s essential for running the app. The end result? A leaner, cleaner Docker image that takes up less disk space, downloads quicker, and is more secure. Think of it like baking a cake in one kitchen and then only packing the finished cake (leaving behind the baking tools and ingredients) into a box for delivery.
Here’s an example of a multi-stage Dockerfile for a Spring Boot Java app.
Stage 1: Build the app using Maven:
FROM maven:3.8.6-openjdk-17 AS build
Set working directory inside the builder container:
WORKDIR /build
Copy source code and pom.xml files into the container:
COPY pom.xml . COPY src ./src
Build the project and package it as a jar:
RUN mvn clean package –DskipTests
Stage 2: Create a lightweight image for running the app:
FROM openjdk:17-jdk-alpine
Set working directory inside the runtime container:
WORKDIR /app
Copy the JAR built in the first stage into this stage:
COPY --from=build /build/target/myapp.jar ./myapp.jar
Run the Java app when the container starts:
CMD [“java”, “-jar”, “myapp.jar”]
This is how it works:
The first stage (build) uses a Maven image with JDK to compile your app and create the JAR.
The second stage starts from a small Java runtime image (openjdk:17-jdk-alpine) and copies only the built JAR from the first stage.
This way, the final image doesn’t include Maven, source code, or build files — only the essential runtime and your app.
Docker has truly transformed the way we build, ship, and deploy Java applications by offering a consistent and portable environment. When you containerise your Java apps, you can be confident they’ll run smoothly across various machines and cloud platforms. By sticking to best practices like using lightweight images, multi-stage builds, and effective configuration management, you can create Docker containers that are not only efficient but also secure and easy to maintain. As you progress on your Docker journey, diving into advanced topics like Docker Compose for managing multi-container applications, Kubernetes for orchestration, and integrating Docker with CI/CD pipelines will take your development workflow to the next level.


