


Snort is a popular, open source intrusion detection system that monitors traffic in real time to detect malware. Here’s a detailed explanation of how to set it up on Ubuntu and test it by generating traffic from another system.
In today’s digital world, networks often face constant risks from intrusions that may lead to data theft, service outages, or even complete system compromise if not detected in time. To address these risks, many organisations use intrusion detection systems (IDS). A widely used open source IDS tool is Snort, which monitors network traffic in real time and identifies suspicious activity based on rules and patterns.
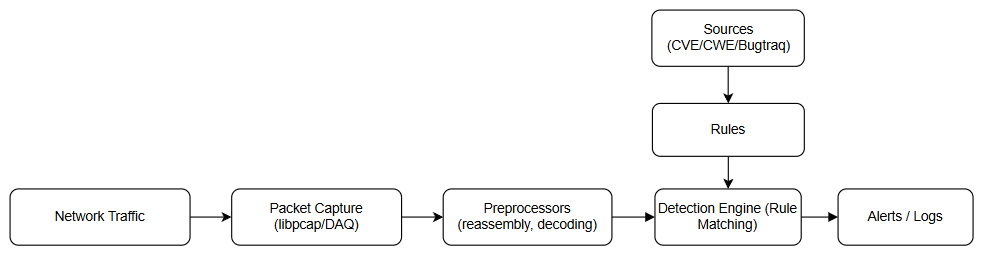
Snort works by capturing raw network packets with its packet capture module, preprocessing them to normalise and decode protocols, and then passing this data to its detection engine. Here, the preprocessed packets are compared against a separate set of rules, which are created based on threat intelligence from sources like CVE and Bugtraq, to identify suspicious activity. If a rule matches, Snort generates alerts/logs through its output modules.
System setup
Before installing Snort, it is important to prepare the system properly. Snort works best on a clean and updated Linux environment. We will use Ubuntu as the base operating system. Ensure that the system is up to date so that all required packages remain current.
Since we will be testing FTP detection rules later, it is also necessary to have an FTP server installed and running on the Ubuntu system. This will allow you to generate FTP traffic (USER, PASS, STOR commands, etc) for testing Snort’s dynamic behaviour. The popular option is vsftpd, which can be installed via apt.
A stable internet connection is also necessary since several dependencies need to be downloaded during the installation. It is recommended to have root or sudo access to the system because most installation and configuration steps require administrative privileges. With these preparations done, the system will be ready for the smooth installation of Snort.
Installation of Snort on Ubuntu
Before the installation of Snort, find the IP address and network interfaces of the system using $ ip addr; it is necessary to take note of both, since these will be used in the configuration of Snort.
To install Snort and its dependencies use the following command:
$ sudo apt-get install snort
After successful installation of Snort, check its version using:
$ snort --version
During installation, Snort automatically creates several directories to store its files, which include configuration files, rules, and logs. The important directories created include:
- /etc/snort: This is the main directory for Snort users. It contains configuration files and rule files. The important .conf file is also located here, which will be used later for settings.
- /usr/sbin/snort: This contains the Snort executable binary, which runs the IDS program.
- /usr/lib/snort: This directory holds shared libraries and files used by the Snort executable and other components. These files are necessary for Snort to work with modules and plugins.
- /usr/include/snort: This directory has header files and related resources. These files are used when building custom plugins, preprocessors, or extensions for Snort.
- /etc/snort/rules: This directory contains the rule files that Snort uses to detect suspicious activity.
- /var/log/snort: This directory keeps the alerts and log files that Snort creates when it finds something.
These directories form the core structure of Snort and will be used in the later steps of configuration. Let’s begin with the Snort configuration.
Setting HOME_NET
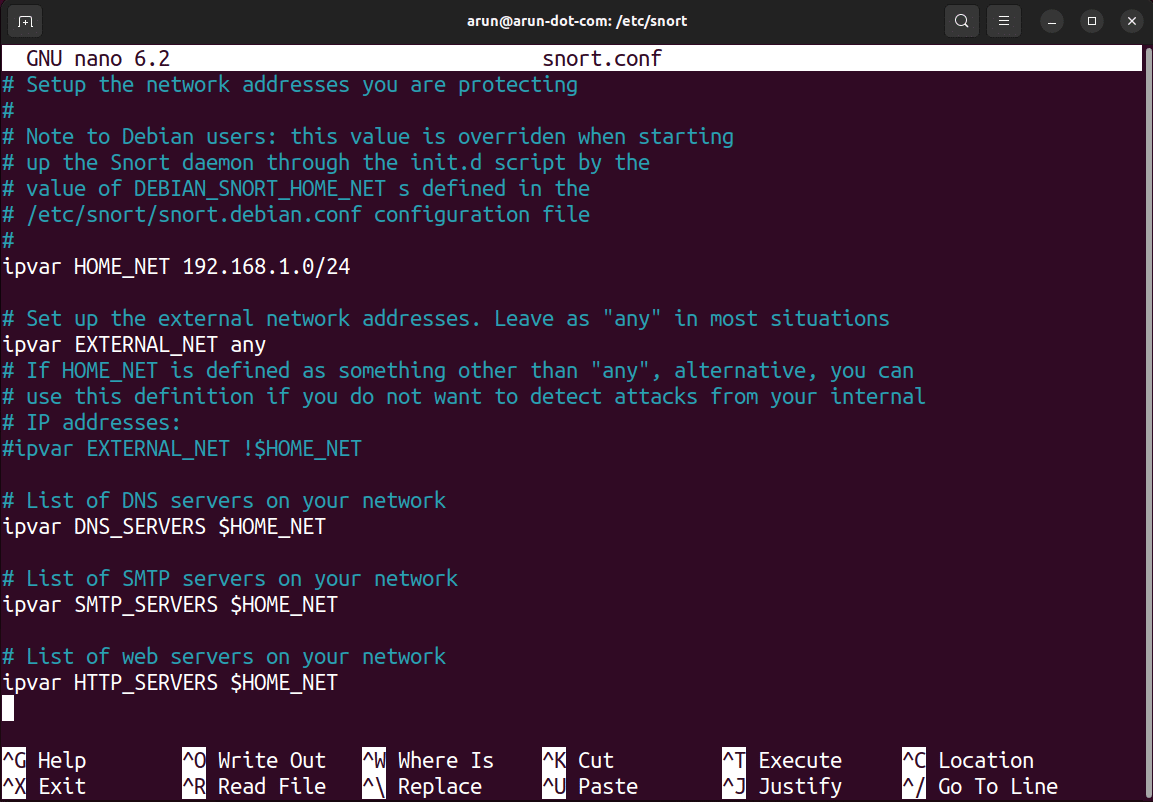
First, navigate to the Snort directory using $ cd /etc/snort. Take a backup of the snort.conf file using $ sudo cp snort.conf snort.conf.backup. Open snort.conf file using $ sudo nano snort.conf.
The configuration of Snort requires setting the HOME_NET variable. The network’s IP address and CIDR block (e.g., 192.168.1.0/24) are first determined using the $ ip addr command. Subsequently, the snort.conf file is edited, and the default value of the HOME_NET variable is replaced with the specific network’s IP range as shown in Figure 2. This action allows for the correct identification of internal traffic.
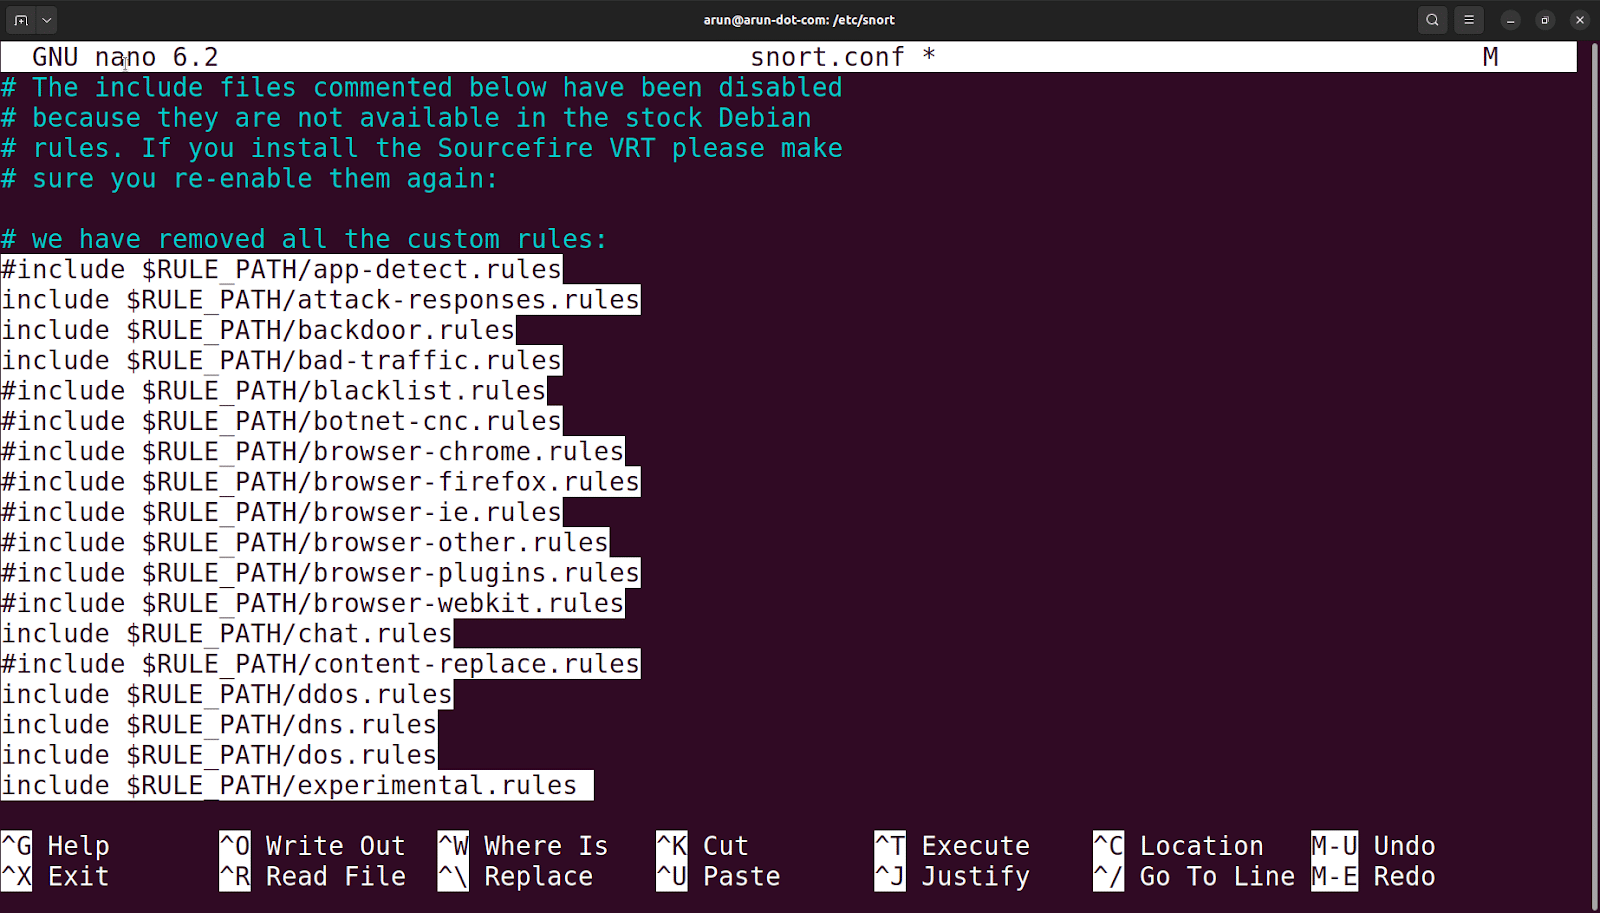
In the same file, remove the pre-existing custom rule set by selecting it and pressing Ctrl+K.
To understand pre-existing rules, open the rule file exploit.rules under
/etc/snort/rules. For example, consider the following rule:
alert tcp $EXTERNAL_NET any -> $HOME_NET 22 (msg:”EXPLOIT ssh CRC32 overflow /bin/sh”; flow:to_server,established; content:”/bin/sh”; reference:bugtraq,2347; reference:cve,2001-0144; reference:cve,2001-0572; classtype:shellcode-detect; sid:1324; rev:6;)
This Snort rule detects an SSH exploit by matching the string ‘/bin/sh’ in TCP traffic targeting port 22. It identifies the attack as a CRC32 overflow and references Bugtraq ID 2347 and CVEs 2001-0144, 2001-0572, classifying it as a possible shellcode attack. Bugtraq is a mailing list/database for reporting and discussing security vulnerabilities, while a CVE (Common Vulnerabilities and Exposures) is a standardised identifier for publicly disclosed security flaws. These CVEs from 2001 describe a buffer overflow in the SSH daemon’s CRC32 compensation attack detector, where crafted packets could trigger memory corruption, allowing remote attackers to execute arbitrary code and spawn a shell on the target system.
Now, validate the snort.conf file with the following command (replace enp0s3 in the following command with the correct interface found using the command from your system $ ip link show).
$ sudo snort -T -i enp0s3 -c /etc/snort/snort.conf
Editing snort.conf
The snort.conf file is the main configuration file of Snort. Any change in settings, network variables, or rule paths is managed here. It is important to open this file only from its original directory (/etc/snort). This ensures that the correct file is being edited. After every change made in this file, the configuration should be validated. Validation helps confirm that there are no syntax errors or missing values before Snort is started.
The validation command is:
$ sudo snort -T -i enp0s3 -c /etc/snort/snort.conf
Writing custom rules in local.rules
Snort rules follow a fixed format. A simple rule looks like this:
action protocol source_ip source_port -> destination_ip destination_port (options)
- action: What Snort should do when the rule matches (example: alert).
- protocol: The protocol to check, such as TCP, UDP, or ICMP.
- source_ip and source_port: The address and port of the traffic origin (any can be used for all).
- destination_ip and destination_port: The address and port of the target system.
- options: Extra instructions in brackets, such as the message (msg), rule ID (sid), and version (rev).
After removing the custom rules that are available in snort.conf, move to the rules directory and open the local.rules file using:
$ cd rules

$ sudo nano local.rules
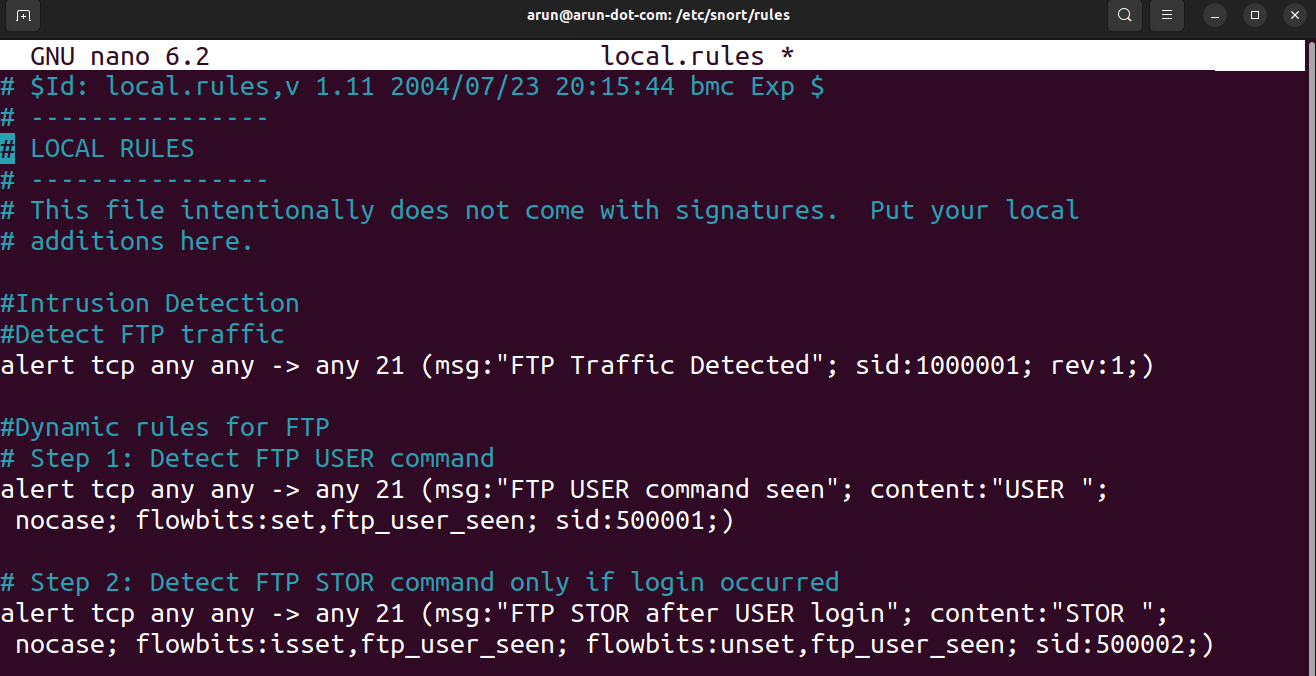
The rules demonstrate detection of FTP traffic using both static and dynamic approaches.
Static rule
alert tcp any any -> any 21 (msg:”FTP Traffic Detected”; sid:1000001; rev:1;)
This rule is always active and triggers whenever TCP traffic is observed on port 21, which is the default FTP control port. Since it is static, it will continuously monitor and alert FTP connections from the start of the FTP session until the session exits.
Dynamic rules with flowbits
Detecting the FTP USER command
alert tcp any any -> any 21 (msg:”FTP USER command seen”; content:”USER “; nocase; flowbits:set,ftp_user_seen; sid:500001;)
This rule looks for the USER command in FTP traffic, indicating a login attempt. When detected, it sets a flowbit (ftp_user_seen) to track the occurrence of this action.
Detecting a file upload after login
alert tcp any any -> any 21 (msg:”FTP STOR after USER login”; content:”STOR “; nocase; flowbits:isset,ftp_user_seen; flowbits:unset,ftp_user_seen; sid:500002;)
This rule triggers only if the flowbit ftp_user_seen is already set, meaning a USER command has been observed (a login attempt). It then looks for the STOR command, which indicates a file upload. Once fired, the flowbit is unset to reset the state for the next sequence.
The static rule for FTP traffic detection is always active and triggers whenever communication occurs on port 21, continuously monitoring from session start to exit. In contrast, the dynamic rules are context-aware and depend on specific actions in sequence: one detects a login attempt with the USER command and sets a flowbit, while the next triggers only if a file upload (STOR command) follows that login. This demonstrates multi-step detection, where alerts fire based on the logical flow of FTP activity rather than every packet.
Next, save the file using Ctrl+O and exit with Ctrl+X. Now, validate the snort.conf file using $ sudo snort -T -i enp0s3 -c /etc/snort/snort.conf.
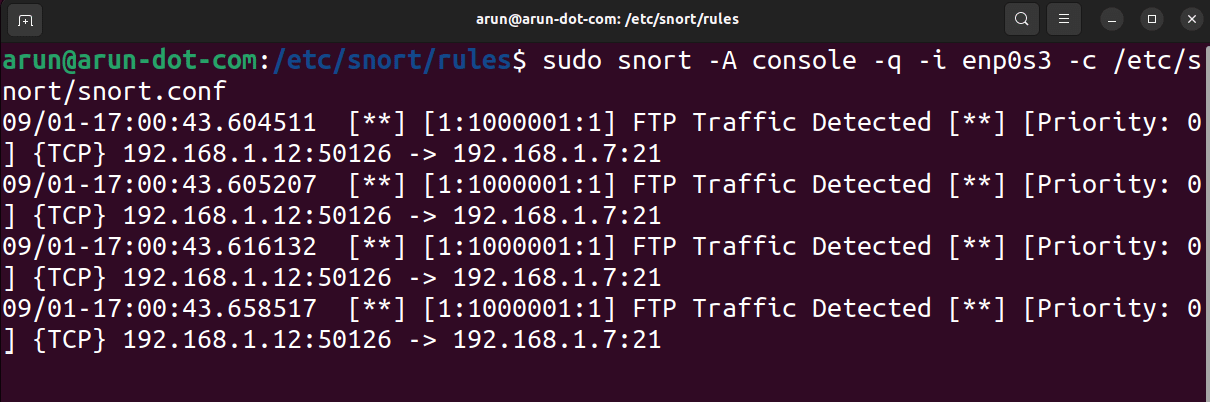
Testing traffic
The traffic is tested using the console mode of the Snort. Listen to the ftp command in quiet mode by using this command:
$ sudo snort -A console -q -i enp0s3 -c /etc/snort/snort.conf
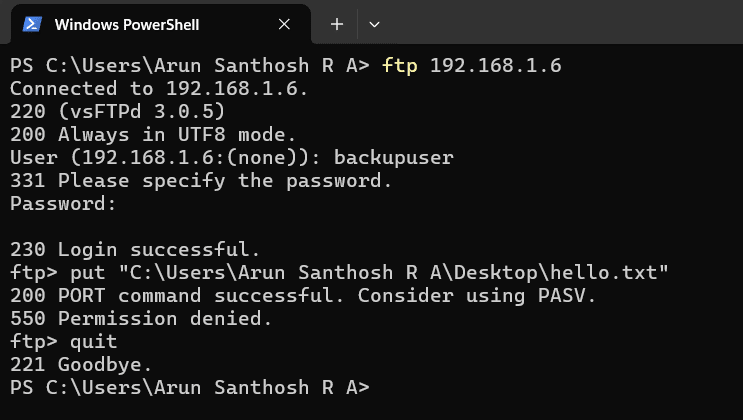
To test the FTP traffic, an FTP connection request must be sent from another system on the same network (for example, a Windows machine) to the Ubuntu system using the IP address of another machine as follows:
$ ftp192.168.1.7
When prompted, the user should enter a valid username and password to gain access to the FTP server. After logging in, the user can upload a file using the put command. Even if the user does not have permission to access the file contents, the command will succeed, and the FTP activity can be observed in the Snort console.
The expected outcomes are:
- The ftp command should work successfully, and the user should be prompted for user details.
- The Snort console should display alerts for FTP traffic.
Once the user details are prompted, the FTP traffic configured with dynamic rules in Snort will start working.
The expected outcomes are:
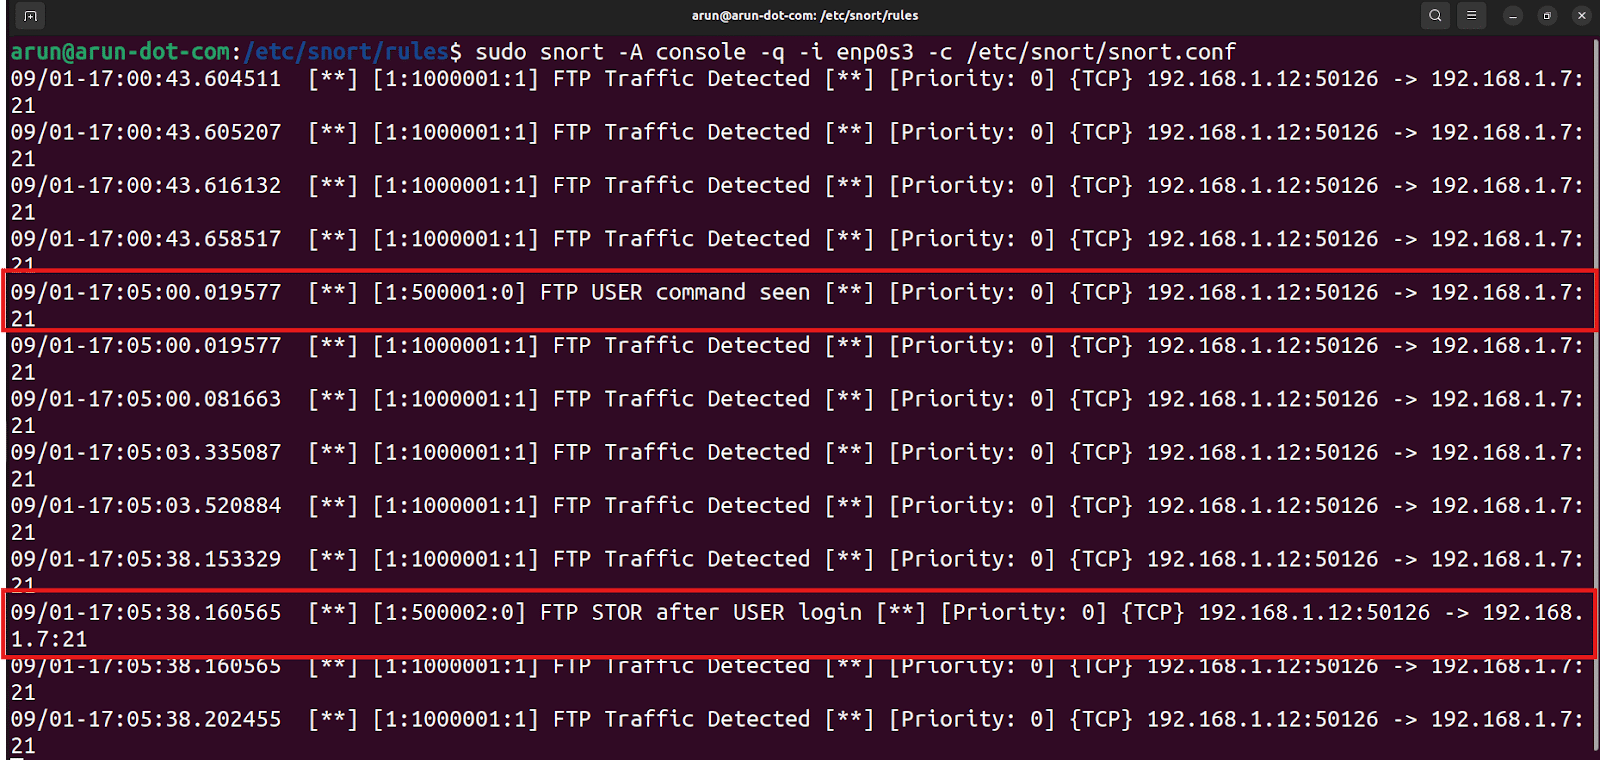
- When the user enters the USER command, Snort should detect the login attempt and trigger the first dynamic rule.
- When the put command is used to upload a file, Snort should detect the STOR command and trigger the second dynamic rule.
- Both alerts should appear in the Snort console, showing that the multi-step dynamic detection is working as intended.

The alerts generated by the Snort console are also stored in the Snort log file. This log file is stored in /var/log/snort/snort.alert.fast. Each alert entry includes details such as the timestamp, source and destination IP addresses, the rule that was triggered, and a brief description of the detected activity. Reviewing this log allows verification that Snort correctly detected and logged the actions.
By the successful listing of commands in the Snort installed terminal, it can be confirmed that the IDS installation and setup have been completed successfully.
Snort plays an important role in securing networks by acting as a powerful intrusion detection system. It constantly watches the flow of traffic and quickly identifies unusual or suspicious activity that could harm the system. With its open source nature and signature-based detection, Snort has become a widely trusted tool for both learning and real-world use.
This is how you can set up an intrusion detection system (IDS) on Ubuntu using Snort. The steps include preparing the system, installing Snort, changing the main settings, and adding custom rules to detect FTP traffic. The setup can then be tested by sending traffic from another system, and Snort can monitor it and show alerts. With this IDS running, the network becomes safer, suspicious activity can be noticed quickly, and the system is ready for more security improvements in the future.


