


In the previous article in this series (published in the November 2025 issue of OSFY), we had a detailed discussion on secure key exchange and how the Diffie–Hellman key exchange scheme can be implemented using SageMath. As promised, in this article we will discuss digital signatures, hashing, and message authentication.
Let’s begin by trying to have a theoretical understanding of the concepts of digital signatures, hashing and message authentication.
In the previous article, we looked at a practical situation where a digital signature becomes essential—when your friend emails you agreeing to lend `1 million and later denies ever sending the message. A digital signature is a mathematical technique used to verify the authenticity and integrity of digital messages or documents. When a message carries a valid digital signature, the recipient can be confident that it was indeed sent by the claimed sender and has not been tampered with. An added advantage is that a properly generated digital signature is far more trustworthy than a handwritten signature, since it is backed by strong cryptographic guarantees. Digital signatures can be created using various cryptographic algorithms such as RSA, DSA, and ECDSA, each offering different security properties and performance characteristics.
Hashing is a fundamental technique in cryptography that transforms an input message of any length into a fixed-size string of characters, called a hash value (informally called hash) or message digest (informally called digest). A good hash function is designed to be fast to compute while being practically impossible to reverse, meaning the original message cannot be reconstructed from its hash value. It also ensures that even a small change in the input—such as altering a single character—produces a completely different hash, a property known as the avalanche effect. Examples for hash functions include SHA-256, SHA-384, SHA-512, BLAKE2, BLAKE3, MD5, etc. Hash functions are widely used to ensure data integrity, verify passwords, generate digital signatures, and support many other security protocols.
Let us look at a simple example of a hash function. Suppose we want to hash numbers between 1 and 1000 using the following toy hashing algorithm. First, we compute the sum of the digits of the number. If the result has more than one digit, we repeat the process—adding the digits again—until we obtain a single-digit number. This final single-digit value will be the hash value. Consider the number 123. The sum of its digits is: 1 + 2 + 3 = 6. Since 6 is already a single-digit number, the hash value of 123 is 6. Now take the number 987. The first step gives: 9 + 8 + 7 = 24. Because 24 has more than one digit, we apply the step again: 2 + 4 = 6. So the hash value of 987 is 6.
Although this toy hash algorithm is very simple, it highlights three important characteristics of a good hash function. First, the hash value (also called a message digest or digest) has a fixed size, which in this example is a single digit. Second, it is not possible to recover the original message from the hash value. For instance, a hash value of 6 does not reveal whether the input was 123 or 987. Third, different inputs can produce the same hash value. Our earlier examples demonstrate this: both 123 and 987 yield a hash value of 6. Such a situation is known as a hash collision.
A hash collision occurs when two different inputs produce the same hash value under a given hash function. Because hash functions map data of arbitrary size to a fixed-size output, collisions are theoretically unavoidable. However, good cryptographic hash functions are designed so that collisions are extremely rare and computationally infeasible to find. It is also evident that increasing the size of the hash value reduces the likelihood of collisions. For instance, in our toy example, if we allowed the hash value to be two digits instead of one, the results would differ. The hash of 123 would be 06, while the hash of 987—after a single round of digit-sum computation—would be 24. With more possible output values available, the chance of two inputs landing on the same hash value becomes smaller.
Now, let us try to understand how hashing can be used for message authentication. Message authentication is primarily used to prove the integrity of a message, ensuring that the receiver can detect whether the message has been tampered with during transmission. Although digital signatures can also ensure message integrity, they are computationally more expensive compared to message authentication techniques based on hashing. Before comparing the two, let us look at a simple example of how hashing can be used for message authentication.
Consider the toy hashing algorithm we discussed earlier. Suppose the message is 987, and we know that its hash value is 6. While sending this message, the sender transmits both the original message (987) and its hash value (6). When the receiver gets this combined message, they recompute the hash value of 987 using the same hash algorithm. Since the algorithm is deterministic, the receiver will also obtain a hash value of 6. Because the received hash value and the freshly computed one match, the receiver can be confident that the message has not been altered. However, suppose a malicious user modifies the message so that the receiver gets 986 instead of 987. In that case, the computed hash value will be 5 instead of 6. Since this does not match the hash value sent along with the message, the receiver immediately knows that the message has been tampered with and should not be trusted.
Now, let us have a comparison between digital signatures and message authentication using hashing. Digital signatures and message authentication codes (MACs) both ensure the integrity of a message, but they operate in fundamentally different ways. A digital signature is based on public-key cryptography, where a private-public key pair is used. The sender signs the message using his private key, and anyone with the corresponding public key can verify it. This provides strong sender authentication and non-repudiation, since only the legitimate sender possesses the private key needed to generate the signature. Non-repudiation refers to the security property that ensures a sender cannot deny having created or sent a message later. In other words, once a message is digitally signed, the sender cannot repudiate (or reject) his authorship of that message because the signature uniquely binds the message to his private key. In contrast, message authentication relies on symmetric-key cryptography, where both sender and receiver share a secret key. While MACs also ensure message integrity, they offer only limited sender authentication and do not provide non-repudiation, because either party with the shared key could have generated the authentication code. However, MACs are significantly faster than digital signatures, making them well suited for high-speed or resource-constrained applications.
Before we move on to the actual implementation of these algorithms in SageMath, let us return to another theme we have been exploring throughout this series: what makes SageMath so powerful — often faster than Python and even languages like Julia that are purpose-built for scientific computing? The key lies in the rich ecosystem of highly optimised mathematical libraries integrated into SageMath. In the previous articles, we examined several of these tools, including FLINT (Fast Library for Number Theory), GMP (GNU Multiple Precision Arithmetic Library), PARI/GP for advanced number-theoretic computations, and the ECM library used for elliptic curve factorisation.
In this article we will explore a very powerful library: the Number Theory Library (NTL). NTL is a C++ library designed for solving number-theoretic problems. Along with a range of high-level mathematical capabilities, NTL supports arbitrary-length integer arithmetic and arbitrary-precision floating-point arithmetic — features that are essential for many cybersecurity-related algorithms. You may recall that FLINT and PARI/GP are also used for number-theoretic applications. So, what distinguishes NTL from these other tools?
First, let us look at the differences between NTL and FLINT. The key distinction lies in their design philosophy and the types of problems each library is optimised to solve. NTL, written in C++, focuses on high-level algebraic and number-theoretic structures. It provides efficient implementations for polynomial arithmetic, lattices, finite fields, modular arithmetic, elliptic curve operations, and related areas that are highly relevant to cybersecurity, making it especially suitable for cryptographic algorithms. FLINT, on the other hand, is a C library designed for extremely fast arithmetic on integers, polynomials, power series, modular forms, and similar objects. Its strength comes from aggressive low-level optimisations and advanced algorithms aimed at achieving raw computational speed, particularly for large-scale arithmetic tasks.
Now, let us examine the differences between NTL and PARI/GP. PARI/GP is a computer algebra system (CAS) designed specifically for number-theoretic computations. It includes both a C library (PARI) and an interactive command line interface (gp) that make it easy to experiment with mathematical ideas. PARI/GP is exceptionally fast for classical number-theoretic tasks, such as integer arithmetic, prime testing, and algebraic number field calculations. In contrast, NTL often outperforms PARI/GP in modular arithmetic, polynomial operations, and lattice-based computations—areas that are especially important in modern cryptography.
Now that we know NTL plays a significant role in cybersecurity applications, let us look at a few examples that demonstrate its computational power. The SageMath program ‘ntl40.sage’, shown below, contains several NTL one-liners that highlight these capabilities.
1. print(factor(1111111111111111111111111111
111111111111111111111111111111111))
2. print(7061709990156159479.is_prime( ))
3. print(7061709990156159478.is_prime( ))
4. print(gcd(987654321987654321, 123456789123456789123456789))
5. print(factor(x^4 - 1))
6. print(GF(7)[‘x’].random_element( ))
7. print(gcd(x^3 - 1, x^2 - 1))
8. print(power_mod(5, 3, 5))

9. print(power_mod(5, 3, 50))
Now, let us try to understand the one-liners. Line 1 calls the function factor( ) on a very large integer and prints its prime factorisation (Sage uses fast number-theory libraries to accomplish this). Line 2 uses the function is_prime( ) to test whether the integer 7061709990156159479 is prime and prints True or False accordingly. Line 3 performs the same primality test for the number 7061709990156159478. Line 4 computes and prints the greatest common divisor of the two large integers 987654321987654321 and 123456789123456789123456789. Line 5 factors the polynomial x4−1 over the integers and prints the resulting factorisation. Line 6 constructs a polynomial ring over the finite field GF(7) and prints a randomly generated polynomial from GF(7)[‘x’]. I am not going to cover this concept in detail here, but it is important to remember that finite fields play a crucial role in cryptography, which is a major component of cybersecurity. Line 7 computes and prints the greatest common divisor of the two polynomials x3−1 and x2−1. Line 8 computes 53 mod 5 using the function power_mod( ) and prints the result. Finally, Line 9 computes 53 mod 50. All these operations are handled by SageMath’s high-performance arithmetic and algebra backend libraries like NTL, FLINT, etc, enabling efficient computation even with very large integers and polynomials.
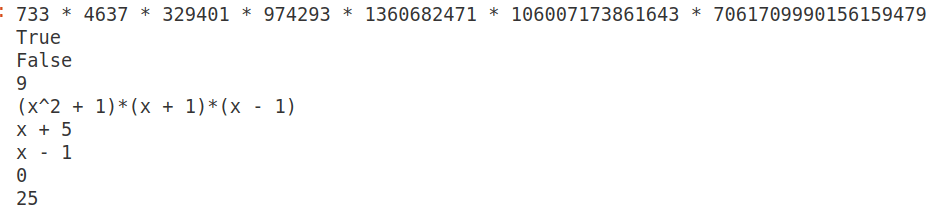
Since the calculations involved in the above program are computationally intense, in this article also we are using CoCalc to execute the SageMath programs. Upon executing the program ‘ntl40.sage’, the output shown in Figure 1 is obtained. The first line printed in this figure shows that the factors of the number 1111111111111111111111111111111111111111111111111111111111111 are 733, 4637, 329401, 974293, 1360682471, 106007173861643, and 7061709990156159479. The second line confirms that the number 7061709990156159479 is prime. This is obvious, as this number is one of the prime factors obtained while executing Line 1 of the program ‘ntl40.sage’. Line 3 tells us that the number 7061709990156159478 is not a prime and is hence composite. Line 4 tells us that the GCD of the numbers 987654321987654321 and 123456789123456789123456789 is 9. I urge you to take a minute to verify this fact. Line 5 in Figure 1 tells us that the factors of the polynomial (x⁴ – 1) are (x² + 1), (x + 1), and (x – 1). Line 6 shows the randomly generated polynomial from GF(7)[‘x’], which in this case is (x + 5). Line 7 shows that the GCD of the two polynomials (x³ – 1) and (x² – 1) is (x – 1). Line 8 shows that 5³ mod 5 = 125 mod 5 = 0. Finally, Line 9 shows that 5³ mod 50 = 125 mod 50 = 25.
Implementing a digital signature
Now, it is time to implement a digital signature. As mentioned earlier, a digital signature is created using public-key cryptography. In public-key cryptography, there are two keys: a private key, known only to its owner, and a public key, which is shared publicly. Unlike encryption—where the sender uses the receiver’s public key—in a digital signature the sender uses his own private key to provide authentication, integrity, non-repudiation, and other security properties.
Consider a situation where Alice wants to send a message to Bob (recall the stock characters used in cryptography discussed earlier in this series). Alice generates the digital signature by applying her private key to the message (or more precisely, to the hash of the message). She then sends both the message and the signature to Bob. When Bob receives them, he uses Alice’s public key, which is available online, to verify the signature. If the verification is successful, Bob can be certain that the message was indeed sent by Alice, because only Alice has access to her private key.
Note that if Alice wants to encrypt the message as well, she must use Bob’s public key, as discussed in a previous article in this series. Additionally, to guarantee message integrity, a cryptographic hash function such as SHA-256, SHA-384, or SHA-512 must be used, since the signature is applied to the hash of the message rather than the message itself.
Now, let us implement a simplified version of a digital signature scheme using RSA and SHA-256. The SageMath program titled ‘digsign41.sage’ (line numbers included for clarity), shown below, provides a concise yet practically feasible implementation of a digital signature. Note that in this program, the RSA public and private key values are hard-coded, since the detailed process of RSA key generation has already been discussed in earlier articles in this series.
1. import hashlib

2. n = 9516311845790656153499716760847001433441357

3. e = 65537

4. d = 5617843187844953170308463622230283376298685

5. def hash_message(msg):

6. if isinstance(msg, str):

7. msg = msg.encode(“utf-8”)

8. h = hashlib.sha256(msg).hexdigest()

9. return Integer(int(h, 16) % n)

10. def sign_message(msg):

11. h = hash_message(msg)

12. sig = pow(h, d, n)

13. return sig

14. def verify_signature(msg, sig):

15. h = hash_message(msg)

16. recovered = pow(sig, e, n)

17. return recovered == h

18. message = “Hello Bob”

19. print(“Message:”, message)

20. signature = sign_message(message)

21. print(“\nSignature:”, signature)

22. ok = verify_signature(message, signature)

23. print(“Verification:”, ok)

24. tampered = message + “!”

25. print(“Tampered message:”, tampered)

26. ok2 = verify_signature(tampered, signature)

27. print(“Verification on tampered message:”, ok2)
Now, let us try to understand the working of the program. Line 1 imports Python’s hashlib module so that we can compute SHA-256 hashes of messages. Lines 2 to 4 set the RSA modulus n (a public parameter), which is the product of two large prime numbers, the RSA public exponent e (commonly 65537), and the RSA private exponent d (which is kept secret). The value in variable d satisfies e.d ≡ 1 (mod φ(n)).
In Line 5, the function hash_message( ) that returns an integer hash for a message begins. Line 6 checks whether the value in the variable msg is a Python string so that it can be encoded to bytes. If msg is text, Line 7 encodes it to UTF-8 bytes (required by hashlib). Line 8 computes the SHA-256 digest of the byte string msg and returns it as a hexadecimal string. Line 9 converts the hex digest h to an integer (base 16), reduces its modulo n to ensure the hash fits the RSA modulus, and returns it as a SageMath Integer.
In Line 10, the function sign_message( )—which creates an RSA signature for msg—begins. Line 11 computes the integer hash h of the message using the function hash_message( ). Line 12 computes the RSA signature sig = h^d mod n using fast modular exponentiation. Line 13 returns the signature integer. In Line 14, the function verify_signature( )—which checks whether sig is a valid signature for msg—begins. Line 15 recomputes the integer hash h of the (received) message. Line 16 recovers the signed hash by computing sig^e mod n (the inverse operation of signing). Line 17 returns True if the recovered value equals the computed hash h, otherwise False — this is the signature verification test.
Line 18 defines the message to be signed, which in this case is “Hello Bob”. Line 19 prints the message to the console. Line 20 calls the function sign_message( ) to produce the signature for the message and stores it in the variable signature. Line 21 prints the signature (the integer) to the console. Line 22 verifies the signature against the original message, and the result is stored in the Boolean variable ok. Line 23 prints the verification result (True if valid). Line 24 creates a tampered version of the message by appending an exclamation mark. Line 25 prints the tampered message. Line 26 attempts to verify the original signature against the tampered message and stores the result in the Boolean variable ok2. Finally, Line 27 prints the verification result for the tampered message.
Upon executing the program ‘digsign41.sage’, the output shown in Figure 2 is obtained. The first line displays the digital signature of the message, which in this case is 4466491779663873112179864100592158183363638. The second line indicates that the original message is authentic, and therefore the verification result is True. The figure also shows the modified message “Hello Bob!” (with an exclamation mark appended) fails verification, correctly producing the result False, since the message has been tampered with.

Message authentication with hashing
Now, it is time to implement message authentication using hashing in SageMath. As mentioned earlier, message authentication efficiently ensures message integrity. It relies on symmetric-key cryptography, in which both the sender and receiver share a common secret key. Because symmetric-key operations are used instead of public-key cryptography, message authentication is generally much faster than digital signatures. However, message authentication cannot provide non-repudiation, and regarding sender authentication, it only ensures that the message was sent by someone who possesses the shared secret key.
Now, let us implement a simplified version of a message authentication scheme using symmetric-key encryption and SHA-256. The SageMath program titled ‘mac42.sage’ (line numbers included for clarity), shown below, provides a simplified implementation of a message authentication scheme.
1. import hashlib

2. def hash_message(msg):

3. if isinstance(msg, str):

4. msg = msg.encode(“utf-8”)

5. h = hashlib.sha256(msg).hexdigest()

6. return h

7. def create_mac(secret_key, message):

8. combined = secret_key + message

9. return hash_message(combined)

10. def verify_mac(secret_key, message, received_mac):

11. expected_mac = create_mac(secret_key, message)

12. return expected_mac == received_mac

13. secret_key = “my_shared_secret”

14. message = “Hello Bob”

15. print(“Message:”, message)

16. mac = create_mac(secret_key, message)

17. print(“MAC:”, mac)

18. ok = verify_mac(secret_key, message, mac)

19. print(“Verification:”, ok)

20. tampered = message + “!”

21. print(“Tampered message:”, tampered)

22. ok2 = verify_mac(secret_key, tampered, mac)

23. print(“Verification on tampered message:”, ok2)
Now, let us try to understand the working of the program. Line 1 imports Python’s hashlib module so that SHA-256 hashing can be performed. Lines 2 to 6 define a function hash_message( ) that computes the SHA-256 hash of a message, similar to the program ‘digsign41.sage’. Line 3 checks if the message is a Python string. Line 4 converts the string to bytes (required by SHA-256). Line 5 computes the SHA-256 hash of the message stored in the variable msg and returns it as a hexadecimal string. Line 6 returns the SHA-256 hash of the message. Lines 7 to 9 define a function to create a Message Authentication Code (MAC). Line 8 concatenates the shared secret key with the message. Line 9 computes the SHA-256 hash of the concatenation, producing the MAC. Lines 10 to 12 define a function to verify the MAC of a message. Line 11 recomputes the MAC for the message using the shared secret key. Line 12 returns True if the recomputed MAC matches the received MAC, and returns False otherwise.
Line 13 defines the shared secret key that both the sender and receiver know, which in this case is “my_shared_secret”. Line 14 defines the message to be authenticated, which in this case is “Hello Bob”. Line 15 prints the message to the console. Line 16 creates the MAC for the message using the shared secret key. Line 17 prints the MAC to the console. Line 18 verifies the MAC for the original message, and the result is stored in the variable ok. Line 19 prints True if the message is authentic. Line 20 creates a tampered version of the message by appending an exclamation mark. Line 21 prints the tampered message. Line 22 attempts to verify the MAC for the tampered message, and the result is stored in the variable ok2. Line 23 will print False, as the tampered message fails verification.
Upon executing the program ‘mac42.sage’, the output shown in Figure 3 is obtained. The first line of the figure displays the message “Hello Bob” which is to be authenticated. The second line displays the MAC of the message, which in this case is 88d52c24023d66398f418c7ffc894f4d5d 3f6a88e524138c9944503f4c792724. The third line indicates that the original message is authentic, and therefore the verification result is True. The figure also shows the modified message “Hello Bob!” (with an exclamation mark appended) fails verification, correctly producing the result False, since the message has been tampered with.

With this article, we are concluding our discussion of how SageMath can be used to implement various cybersecurity algorithms and schemes. In the next article in this series, we will start exploring SageMath libraries and packages that can be applied in the field of mathematics called number theory. The applications of number theory in computer science include fields like cybersecurity (examples of which we have already seen), algorithms, random number generation, error-correcting codes, computer graphics, machine learning, AI, blockchain, etc. Thus, implementing number-theoretic applications using SageMath is essential.


