Docker is a tool for packaging an application and its dependencies into a standardised unit, so that the app can be moved between different environments and run without any changes. This article details how a Node.js application can be Dockerised.
Containers allow developers to package an application with all of its dependencies, and ship it as a single entity. Docker is a tool designed to ease the process of containerisation and is a part of many DevOps toolchains.
A Docker image is a read-only template of the changes in a root file system and other parameters for use within the container runtime. Basically, images are frozen snapshots of the container that can be made to run or stopped, whereas containers are the running instances of the images. A container is the isolated process in user space, which shares the kernel with other containers. When a container is started, Docker adds a read-write layer on top.
Node.js is an asynchronous event driven runtime that enables the development of scalable network applications. It uses an event driven, non-blocking I/O model that makes it lightweight and efficient for developing data intensive applications.


The need for Dockerising
We might have heard the following statement: ‘It works on my machine’ – it is from here that the need for Dockerising the application has come into the picture, for developers. Any Dockerised image build will run the same way it runs anywhere else. Using orchestration services, Dockerised applications can be used to respond to dynamic traffic demands as they are easily reproducible.
Setting up the environment
To set up the development environment, we will first need to install Node.js and Docker.
On Windows: The Node.js installer can be downloaded from https://nodejs.org and Docker for Windows can be downloaded from https://hub.docker.com/editions/community/docker-ce-desktop-windows.
On Linux: To install Node.js on Linux, use the following command:
sudo apt install nodejs
Once installed, the download can be verified by using the following command:
node -v
You will also need to install the Node package manager (npm) for development, which can be done using the following command:
sudo apt install npm
Once the installation is complete, verify it using the following command:
npm -v
The latest Docker version may be missing in the Linux repository; so you can download it from Docker’s official repository. First update the existing list of packages using the code below:
sudo apt update
In order to install a few other packages to allow the use of apt over HTTPS, use the following command:
sudo apt install apt-transport-https ca-certificates curl software-properties-common
Then you will need to add the GPG key for the official Docker Repository on your system, as follows:
curl -fsSL https://download.docker.com/linux/ubuntu/gpg | sudo apt-key add –
Now add the Docker Repository to APT sources:
sudo add-apt-repository “deb [arch=amd64] https://download.docker.com/linux/ubuntu bionic stable
Next, update the package database with Docker packages from the newly added repo, as follows:
sudo apt update
Finally, install Docker using the command given below:
sudo apt install docker-ce
After Docker is installed, its daemon will be started, and the process will be enabled to start on boot. This can be checked using the following command:
sudo systemclt status docker
By default, Docker can only be run by the root user or by a user in the Docker group, which is automatically created during Docker’s installation.
Creating a Node.js application
Now that you have already set up your development environment, you will need an application for containerisation. Let us develop a basic application using Node.js which we will Dockerise later in this article.

As you already have npm installed, let us start with installing Express and Express-generator globally, using the following commands:
npm i -g express express-generator
In this step, we will create a skeleton of an Express application named node-docker. Use the command given below to create a skeleton:
express node-docker
The app will be created in a folder named node-docker. Then install dependencies by changing the directory to node-docker and use the following command:
npm install or npm I
The application can be started using the npm start command. Let us use this same sample application for Dockerisation.
Writing a Dockerfile
Dockerfile is a text file that contains all the commands that are called in order to assemble an image. We will need this file to be added to the directory of our application that is in the node-docker folder. For our application, Dockerfile will instruct Docker to download Node.js, create a directory for the application, and also install all the packages required by the application.
FROM node:10

#Create app directory

WORKDIR/usr/src/app

#Instal app dependencies

COPY package*.json./

RUN npm install

# Bundle app source

COPY  .  .

EXPOSE 8080

CMD [ “npm”, “start”]
A valid Dockerfile must start with a FROM instruction, which initialises a new build stage and sets the base image for subsequent instructions. It can appear many times within a single Dockerfile in order to create multiple images or use every build stage as a dependency for another.
The WORKDIR instruction sets the working directory for all the other following instructions.
The COPY instruction copies the files from the application directory to a container’s file system.
The EXPOSE instruction informs Docker that the container will listen on a specified port at runtime. This instruction does not actually publish the port but is used as documentation for building the image and for running the container. To actually publish, the port -p is used at the time of running the container with the docker run command.
The CMD instruction provides default commands for an executing container. When used in the shell or exec format, it sets the command to be executed when running the image. If a Dockerfile has more than one CMD instruction, only then will the last instruction be executed.


Building a Docker image
As we now have an application and Dockerfile, we are ready to build a Docker image for the sample application. Make sure you are in the root directory of your application before building an image using the following command:
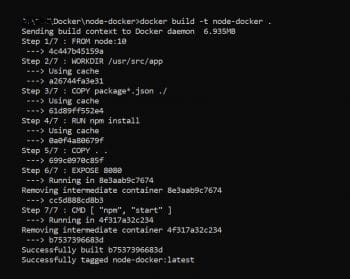
docker build -t node-docker
You will now be able to see the execution of each step mentioned in the Dockerfile after successfully building the image that you will see below the message on your command line, as shown in Figure 1.
Running containers
After we have successfully built the container, we need to run it. Execute the following command to run the container. We will also need to map the port for the container.
docker run -p 33221:3000 -d node-docker
With the -d option, we are instructing the container to run in the background and print the container ID; and -p is used to publish a container’s port to the host.
After we are satisfied with how the container works, we can stop the container using the string given below:
docker stop <CONTAINER_ID>
The container ID can be found by the command that lists containers:
docker ps
Sharing containers
Now that our container is ready for sharing, we can do so by using any of the available Docker registries like Docker Hub or GitHub. These are the few popular ones on which we can host public or private Docker images. We will use Docker Hub here, but before pushing an image to it, make sure you have already signed up for an account, since Docker Hub credentials are required to build the image. Now execute the following command to build the image using Docker Hub.
docker build -t[Username]/node-docker
Log in to Docker Hub using the command shown below:
docker login
You will be asked for your credentials if you are logging in for the first time, else your existing credentials will be used. Now we will push the image to Docker Hub using the command below:
docker push [username]/node-docker
After the image has been successfully pushed, visit the Docker Hub website at https://hub.docker.com, where you can see the pushed images in the repositories. Now this image can be used on any server with Docker installed, just by using the run command.
To pull our Docker image username/node-docker, execute the following command:
docker pull [username]/node-docker
Now we will just need to run our container from the image.
docker run -p 31221:3000 -d [username]/node-docker
You will be able to browse this application at http://127.0.0.1:31221/ .
That’s all. You have now successfully Dockerised a Node.js application.


