


This short tutorial on kernel programming will set you on a journey to doing bigger things.
The core and central component of an operating system is known as the kernel. All the basic hardware level functions like task management and disk management are taken care of by the kernel of an operating system. When a user-level process requires direct access to a hardware component, it makes a request to the kernel, which is referred to as a system call.
The kernel resides in a protected area, accessible only to authorised users. It can directly access the hardware and therefore kernel functions are generally faster than normal user functions. The main functions of the kernel are to access all computer resources, manage all resources, as well as manage the memory and the entire device.
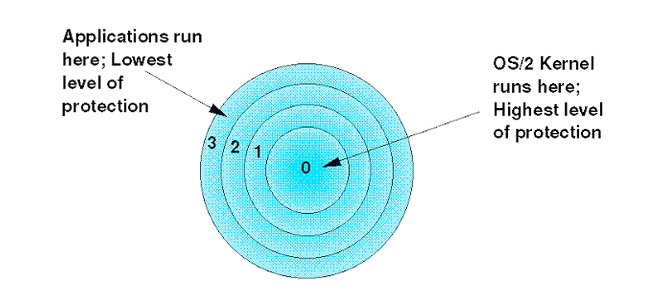
The kernel determines who can access it. It has something called ‘rings’ (as shown in Figure 1), which help it determine who has access to it and how. Basically, there is a specific region for kernel-level programs to run, known as a kernel space. Similarly, there is a space where user programs run, called the user space.
But why should we learn kernel-level programming?
The main benefit is that by programming at the kernel level, we gain access to and control all the basic subsystems including system management, networking, memory, and file handling. We can develop modules for the kernel separately and incorporate them into it while the machine is still running. This means we can use the kernel ourselves, bypassing user layers to access it.
From Figure 1, it is clear that the kernel level is the innermost and the most protected layer, while the application layer is the outermost and the least protected layer within the hardware.
We have now covered the basics of kernel-level programming.
Our main goal is to understand how to interact with the kernel and include our own small program within it! Sounds interesting, right? So let’s get started!
Creating a makefile
The initial step is to create a makefile. The ‘make’ command facilitates us to run a set of commands specified in a makefile.
Open a text editor and add the following code. Name it ‘Makefile’ and save it in a location as shown below.
obj-m += jishnuos.o
all:
 make -C /lib/modules/$(shell uname -r)/build M=$(PWD) modules
clean:
 make -C /lib/modules/$(shell uname -r)/build M=$(PWD) clean6
With the makefile ready, we can now write the code to make our kernel run. In this case, we will include a module into our kernel to add two numbers.
Create a file with the name that you have given in the object file, as shown in the code here. Now save this file in the same location you have saved your makefile.
#include<linux/module.h>
#include<linux/kernel.h>
#include<linux/kthread.h>
#include<linux/sched.h>
#include<linux/time.h>
int init_module(void)
{
int pi
int q = 5;
int r = 3;
p= q + r;

printk (KERN_INFO “The sun of the numbers is %d\n”,p)
return 0;
}

void cleanup_module(void){
printk(KERN_INFO”BYE\n”);
}
Once the kernel program is ready, we can insert this module into the kernel.
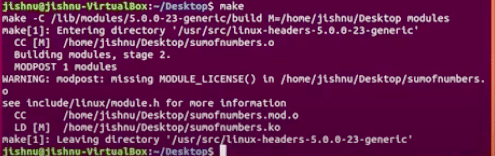
To do this, first run the ‘make’ command. Open a terminal and enter the ‘make’ command as shown in Figure 2.
Next, open a terminal, go to the location where you have stored the files and use the command as shown in Figure 3.

sudo insmod sumofnumber.ko
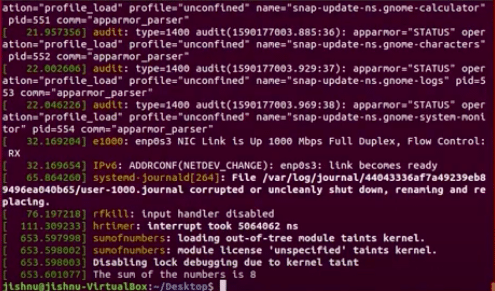
Now that our module is inserted, we can use the ‘dmesg’ command to check our output, as shown in Figure 4. It displays the sum of the two numbers we provided, indicating that our code has worked!
We have successfully inserted our own module into the kernel, which is pretty amazing. You can explore further with this as the base; the deeper you go, the more fun it gets! You can create and develop your own projects and implement new functionalities into Linux. Who knows, your work may even be accepted by Ubuntu itself!


