


The open source based data backup system outlined here can be really useful for a small office home office setup. Learn how to set up Duplicati on Windows, back up data to a Linux server, schedule daily backups, secure them with encryption, restore files when needed, and receive email notifications.
Small office and home office (SOHO) environments often rely on a few computers and basic storage devices to manage essential data like client records, invoices, and project files. While the setup is simple, the data is valuable and losing it can cause serious disruptions. Data loss can occur due to hardware failures, accidental deletion, or malware attacks. Yet, many SOHO users lack a proper backup system or depend on manual copies that are easy to overlook.
So let’s learn how to build a secure and automated backup system using Duplicati, an open source tool that supports encryption, scheduling, and both local and network storage.
System overview
To demonstrate the backup system, we use a typical SOHO arrangement involving two devices on the same local network:
- A Windows laptop, used for regular office tasks such as document editing, billing, and project handling.
- An Ubuntu virtual machine hosted locally using VirtualBox, which serves as the backup destination.
- Duplicati, installed on the Windows machine to manage the backup process.
The Ubuntu virtual machine is prepared to receive secure file transfers using the SFTP protocol. The following steps were followed to configure the Linux server as a backup target.
Install SSH server: To allow secure access, the SSH service is installed using the following steps:
$ sudo apt update && sudo apt install openssh-server
Create a backup user: A dedicated user named ‘backupuser’ is created to handle incoming backup data:
$ sudo adduser backupuser
A password is set during the process to authenticate incoming connections.
Create backup directory: A directory is created for storing backup files, and ownership is assigned to the new user:
$ sudo mkdir -p /home/backupuser/duplicati-backups

$ sudo chown backupuser:backupuser /home/backupuser/duplicati-backups
Confirm SSH is running: The status of the SSH server is checked to ensure it is active and listening on port 22:
$ sudo systemctl status ssh
Find the server’s IP address: The IP address of the Ubuntu machine is required to configure the Duplicati destination. It can be found using: $ ip a
For commands that begin with sudo, you will be prompted to enter your system password to authorise the action.
In our setup, the IP address is 192.168.1.6, which will be used by Duplicati to connect to the backup server using SFTP. This completes the server-side setup. The system is now ready to accept backups securely from the Windows machine. Now let’s install and configure Duplicati to connect to this server and begin the backup process.
Installing Duplicati
With the backup server ready, the next step is to install Duplicati on the Windows machine. Duplicati is an open source backup client that provides an easy-to-use interface, supports strong encryption, and can send backups to various storage types including local folders, remote servers, and cloud providers. In this setup, Duplicati will be used to back up selected folders from the Windows system to the Ubuntu server using the SFTP protocol.
Visit the official website at https://www.duplicati.com/download, choose the Windows installer and download the .msi file. Run the installer and follow the default instructions to complete the installation.
After installation, Duplicati opens automatically in your default browser. If not, you can open it manually by visiting http://localhost:8200. This web interface is where all backup jobs are created, configured, and monitored. With Duplicati now installed and running, we can proceed to create the first backup job and link it to the Ubuntu backup server.
Creating the first backup job (with automation)
With Duplicati installed and the web interface open, the next step is to create a backup job that connects your Windows system to the Ubuntu backup server.
Initial setup
When Duplicati opens for the first time, it prompts you to secure the interface with a passphrase. While this step is optional if you plan to use Duplicati only from the same system, it is recommended for added protection. Click on ‘Yes’ to set a passphrase, then enter and confirm the password as instructed on screen. This ensures that only authorised users can access the Duplicati interface. Once the password setup is complete, the main dashboard appears with options on the left-hand side such as ‘Home’, ‘Add backup’, ‘Restore’, and ‘Settings’.
Start a new backup job and fill general settings
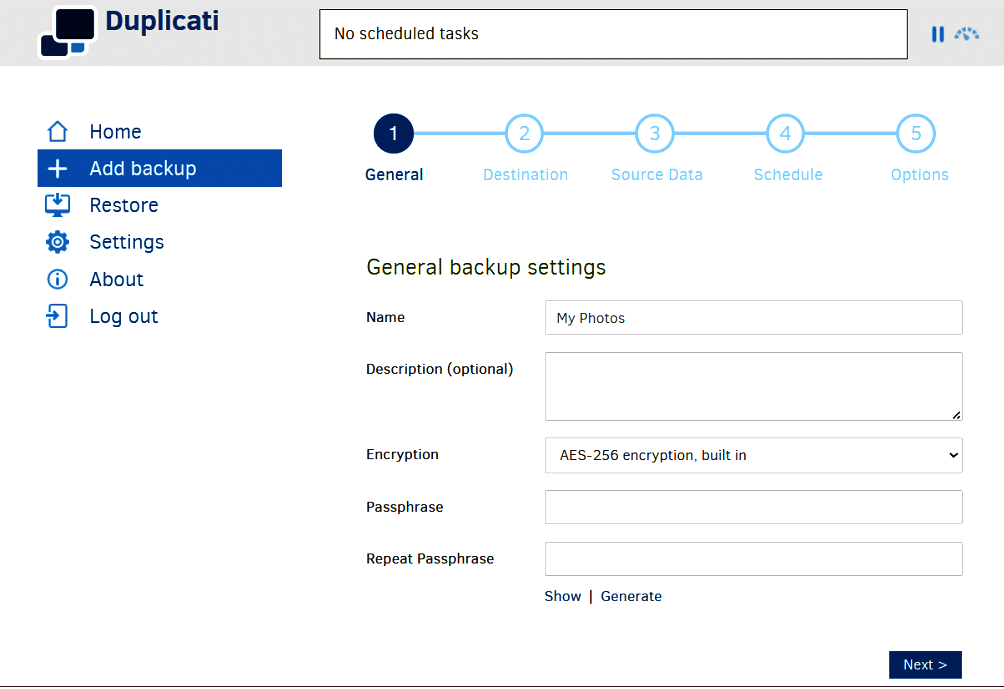
To begin creating your backup job, click on Add backup from the left menu, choose Configure a new backup and click on Next. In this step, you define the basic details of your backup job. Start by giving it a friendly name, such as ‘SOHO Backup’, and optionally add a description with any notes you find useful. For security, choose the built-in AES-256 encryption and set a strong passphrase to protect your backup data. This passphrase is required if you ever need to restore your files, so be sure to keep it safe and secure. Once all fields are filled, click Next to proceed.
Configure backup destination
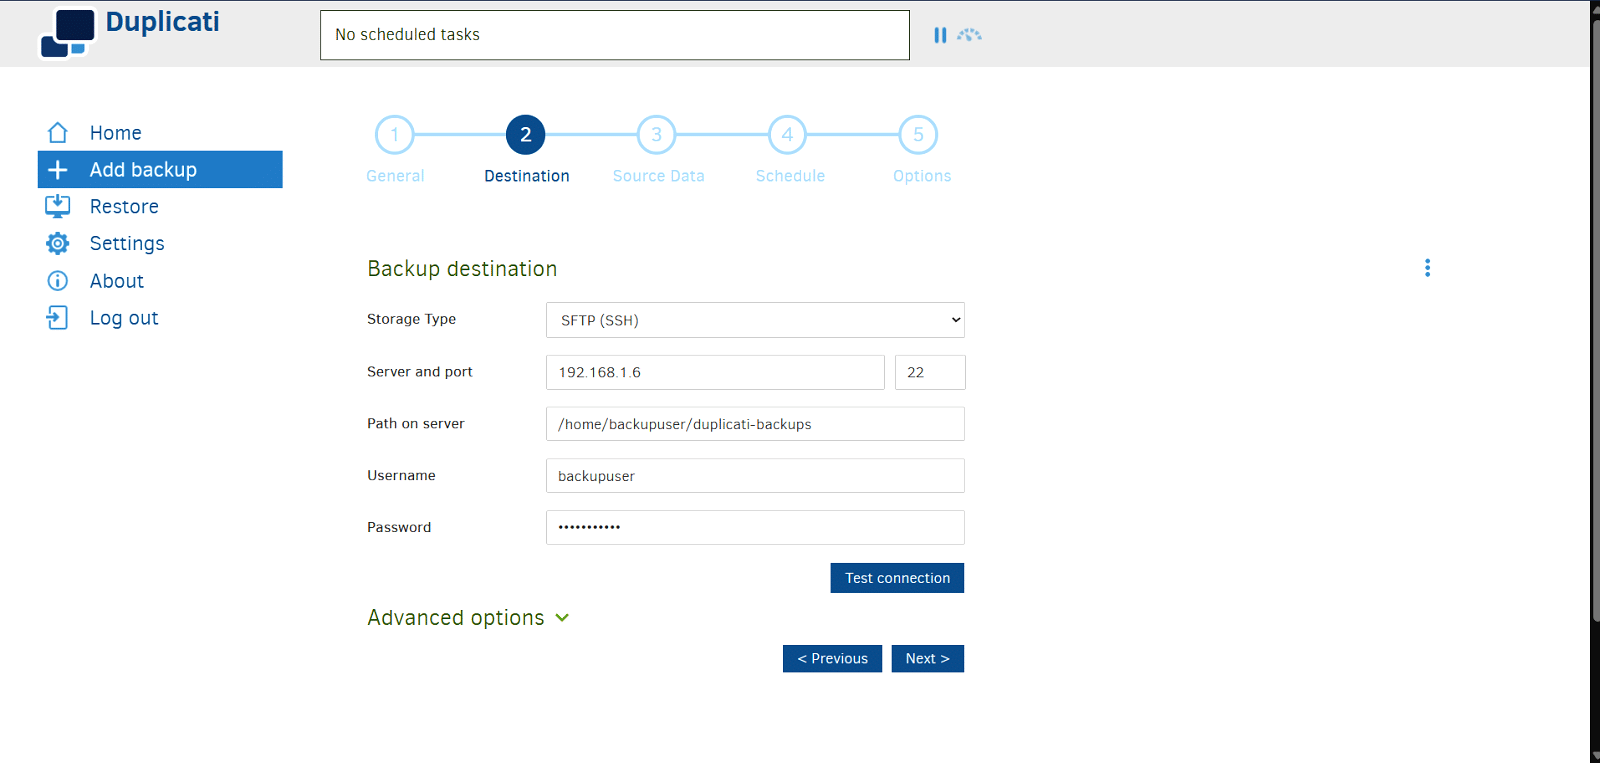
In this step, you will specify where the backup will be stored. For this setup, the destination is the Ubuntu virtual machine configured earlier. Set the storage type to SFTP (SSH), then enter the IP address of the Ubuntu machine, such as 192.168.1.6. Use the default port 22 and provide the path on the server as /home/backupuser/duplicati-backups. Enter the username as ‘backupuser’ and enter the corresponding password that was set for this account on the Ubuntu system. Click on Test connection to make sure Duplicati can reach the server. If successful, click on Next to proceed to the source folder selection.
Select source data
In this step, choose the folders on your Windows machine that you want to back up. Click on Browse and select important directories such as Documents, Pictures, or any project-specific folders. You can include multiple folders as needed. It’s best to avoid selecting system or temporary folders unless necessary. If you want to exclude certain files or file types, like .tmp or .log, you can click on Edit Filters and add the appropriate patterns; otherwise, you can leave the filters as they are. Once you’ve finalised your folder selections, click on Next to continue.
Set the backup schedule: Automating backups
To ensure your backups run regularly without needing to start them manually, this step lets you schedule the process. Enable the option labelled ‘Automatically run backups’, set the frequency to every day, and choose a time when your computer is typically powered on, such as 2:00 AM. This ensures your data is consistently protected without requiring daily action from you.
You may adjust the frequency and time as needed based on your work pattern. Duplicati must be running (either as a background service or from the system tray) for scheduled tasks to execute. Click on Next to continue.
Configure options (optional)
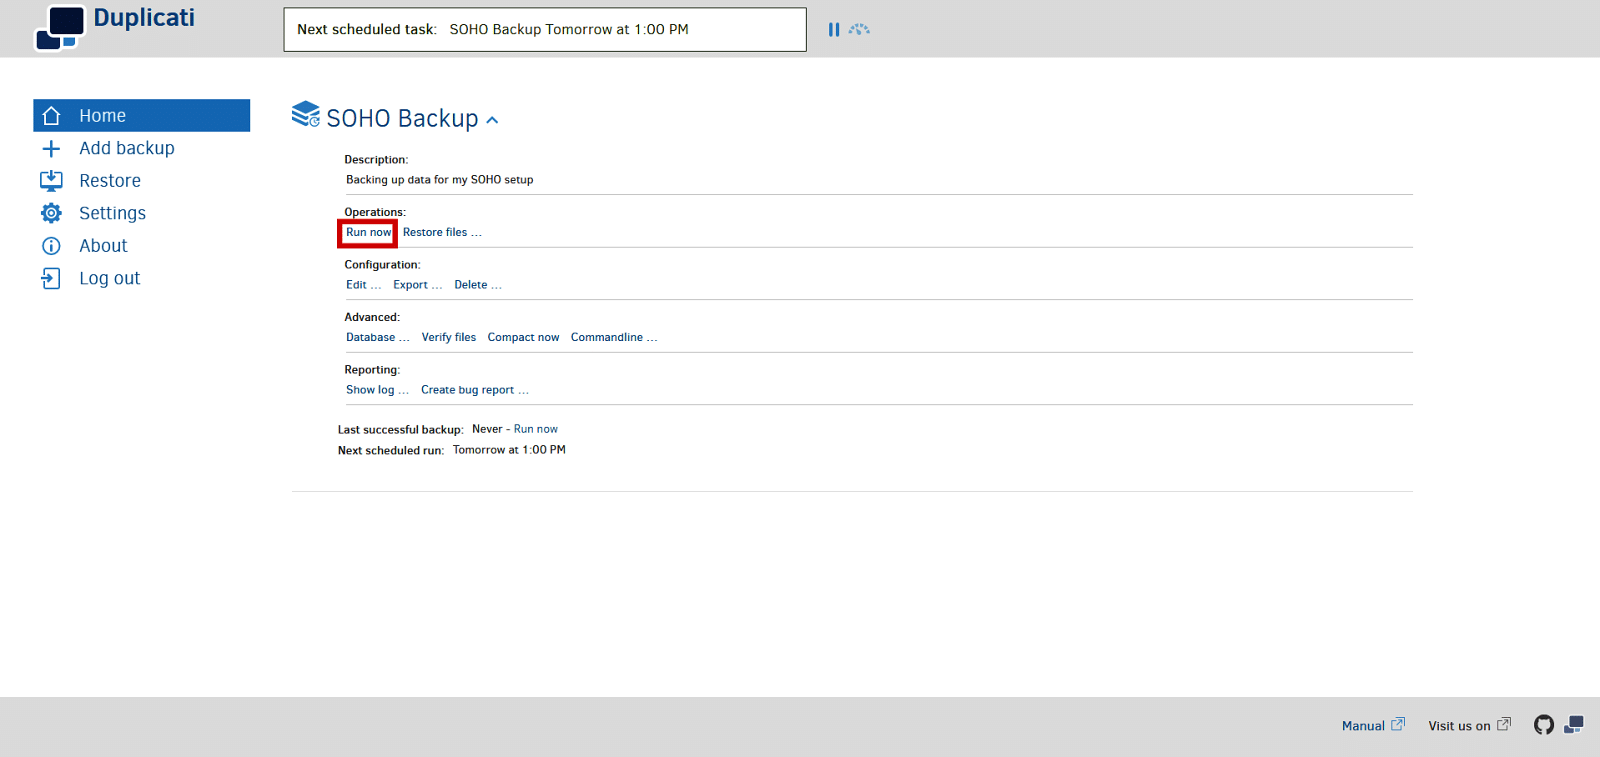
The final step includes advanced settings, most of which can be left at their default values. You may want to review a few options, such as the remote volume size, which is set to 50MB by default and is suitable unless you’re dealing with very large files. For backup retention, selecting ‘Smart Backup Retention’ is a good starting point, as it automatically manages backup versions based on age and available space. Email notifications can also be set up later once the job is created. After reviewing the settings, click on Save to complete the configuration. The new job will now appear on the main dashboard, ready to run. You can click on Run now to perform the first backup immediately. With this, your backup job is fully configured and ready to protect your data.
Running and testing backup
Once the backup job has been created, it is important to run it manually at least once to verify that everything works as expected.
Start the first backup
From the Duplicati dashboard, locate your newly created backup job. Click the dropdown arrow next to it and select ‘Run now’ to start the backup immediately.
Duplicati will begin scanning the selected folders and start uploading the encrypted backup to the Ubuntu server over SFTP. The process may take a few minutes depending on the size of your files and the speed of the network.
Monitor the backup process
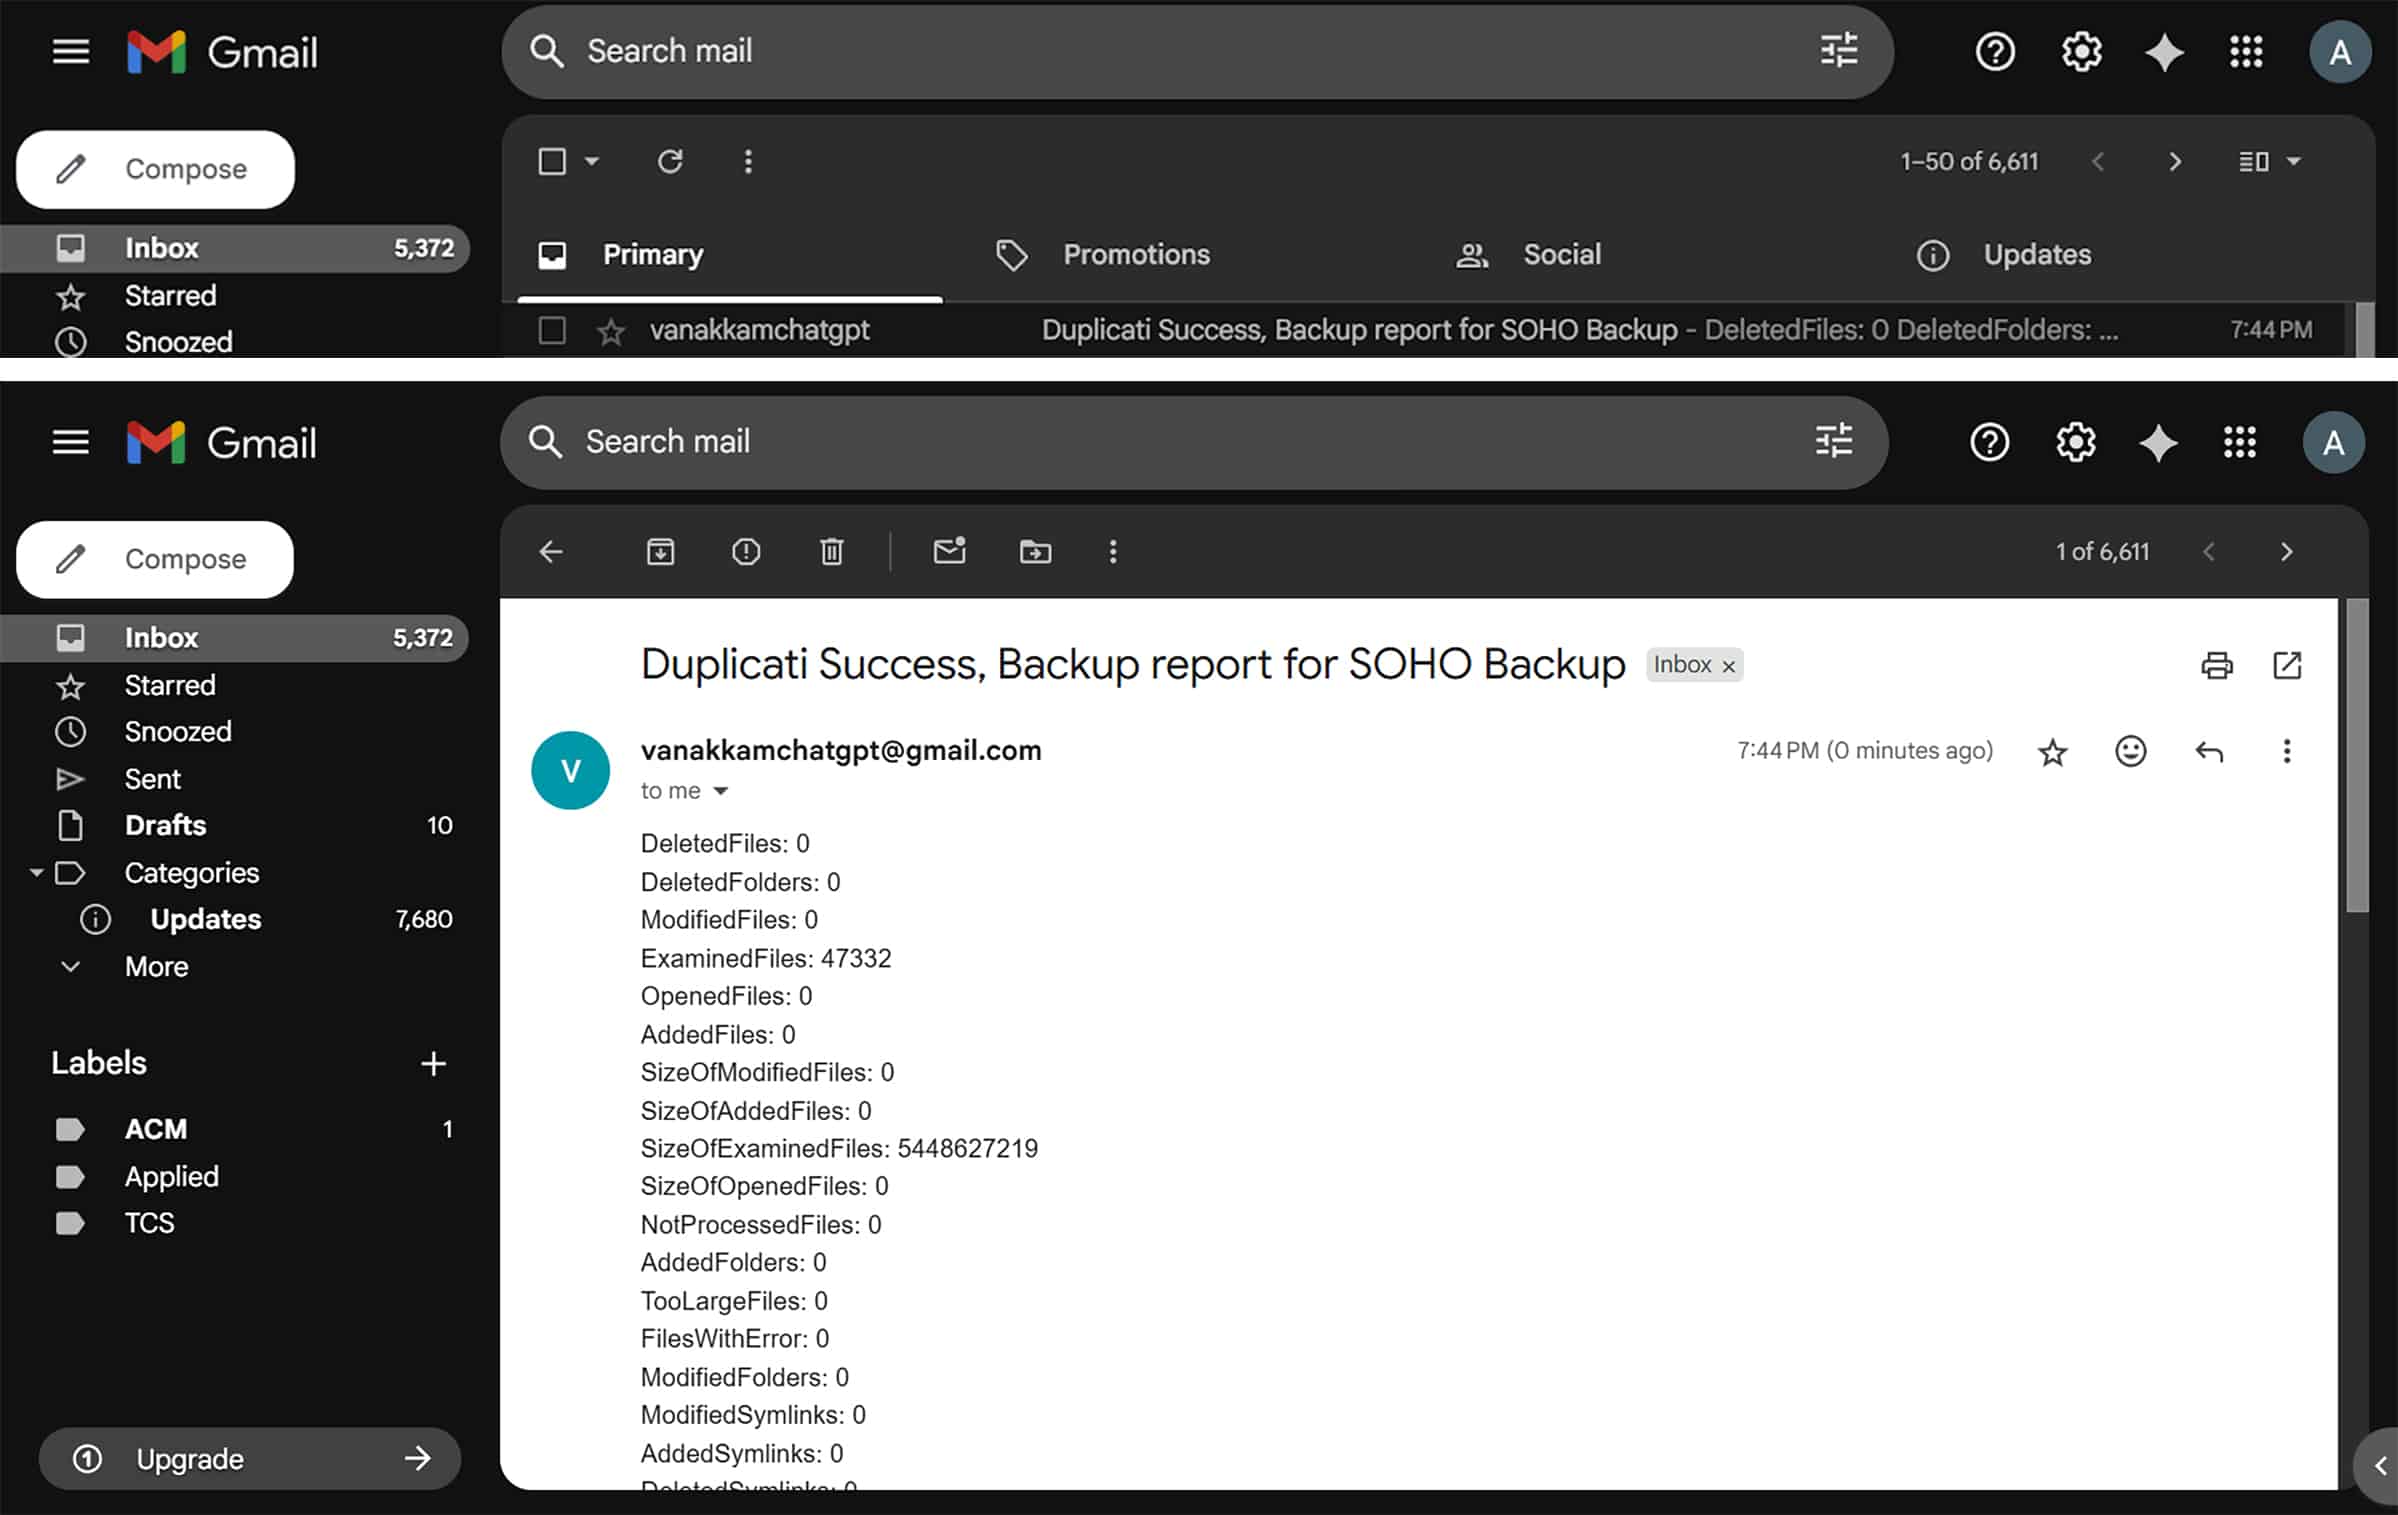
As the backup runs, you can click on the job to monitor its progress in real time. Once the process is complete, Duplicati will display a confirmation message indicating that the backup finished successfully. You can also view useful details such as the total amount of data backed up, the number of files processed, the duration of the backup, and any warnings or errors that may have occurred during the operation.
Verify files on the server
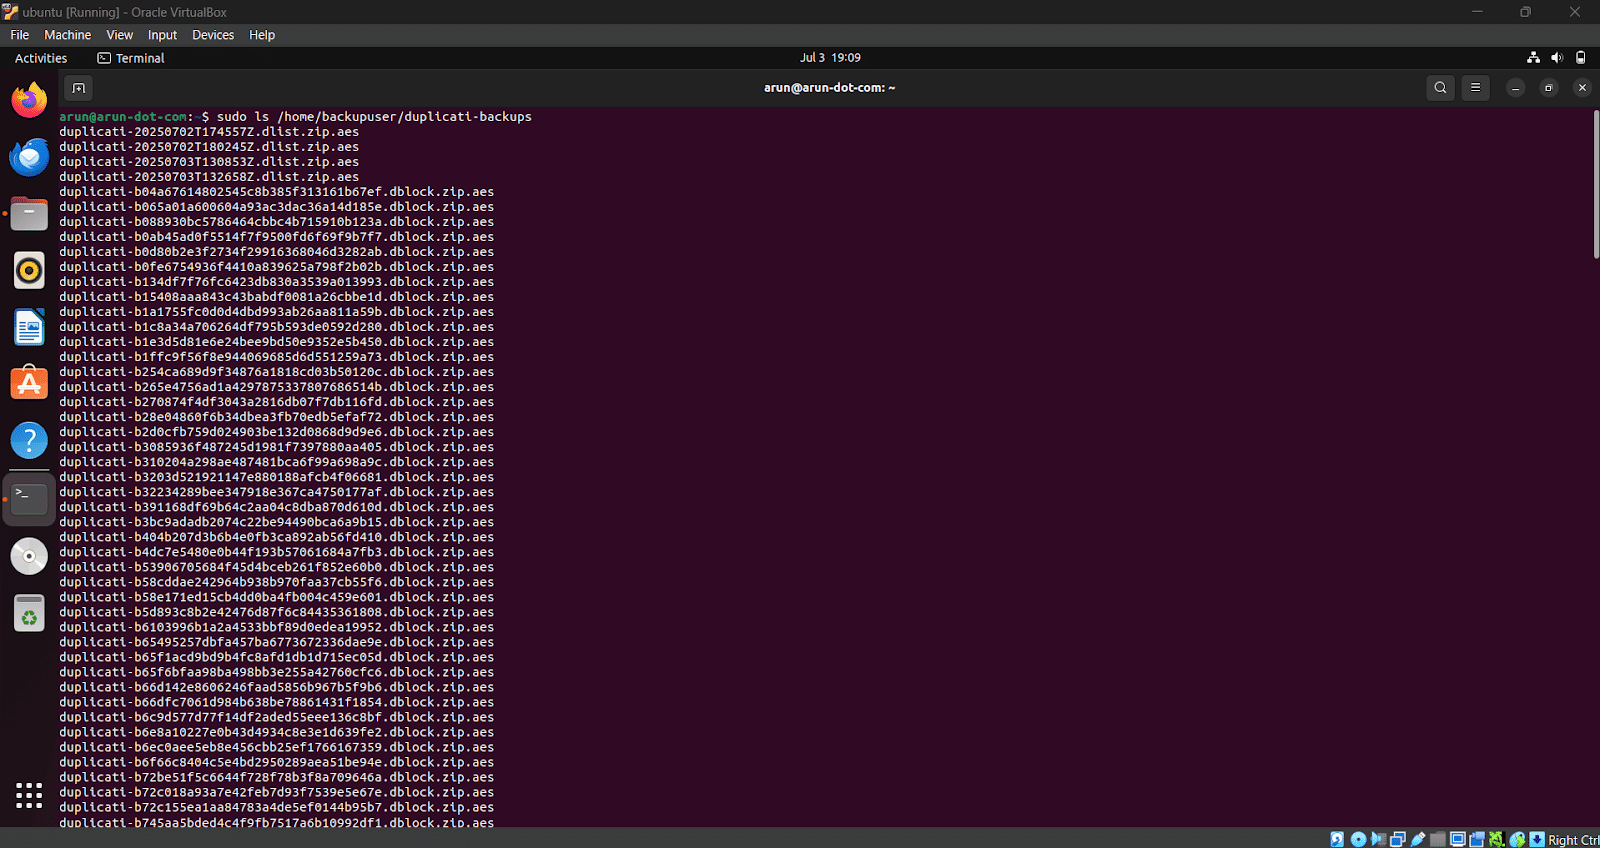
To confirm that the backup was received correctly, log in to your Ubuntu VM and navigate to the backup directory:
$ cd /home/backupuser/duplicati-backups
$ ls -lh
You should see a set of .zip.aes files and metadata files. These are the encrypted backup volumes created by Duplicati.
This confirms that your data was securely transmitted and stored.
Restoring files
A backup system is only useful if it can restore data when needed. To test this, open the Duplicati web interface, click on your backup job name, and select ‘Restore files’. When prompted, choose the option to restore from the backup files. This begins the recovery process using your most recent backup.
To select the backup location, set the storage type to SFTP (SSH), then enter the IP address of the Ubuntu machine, such as 192.168.1.6. Use the default port 22, specify the path on the server as /home/backupuser/duplicati-backups, and provide the username backupuser along with the password set for that account on the Ubuntu system. Then enter the passphrase you created and select the files you need to restore.
Duplicati allows you to restore the file either to its original location or to a different folder, which is recommended for first-time testing; select your preferred option and click on Restore. Once the restore is complete, navigate to the selected restore location and open the restored file to confirm that it is intact and usable.
This confirms that your backup job is not only storing data correctly but can also recover files when needed. With both backup and restore operations tested successfully, your system is now functionally complete.
Email notifications
It is important to be notified when a backup succeeds, fails, or is completed with warnings. Duplicati allows you to set up automated email notifications for every operation, including backups and restores. When configured globally, this setup applies to all jobs on the machine, so there is no need to repeat it for each backup task. Let’s learn how to configure email alerts using a Gmail account.
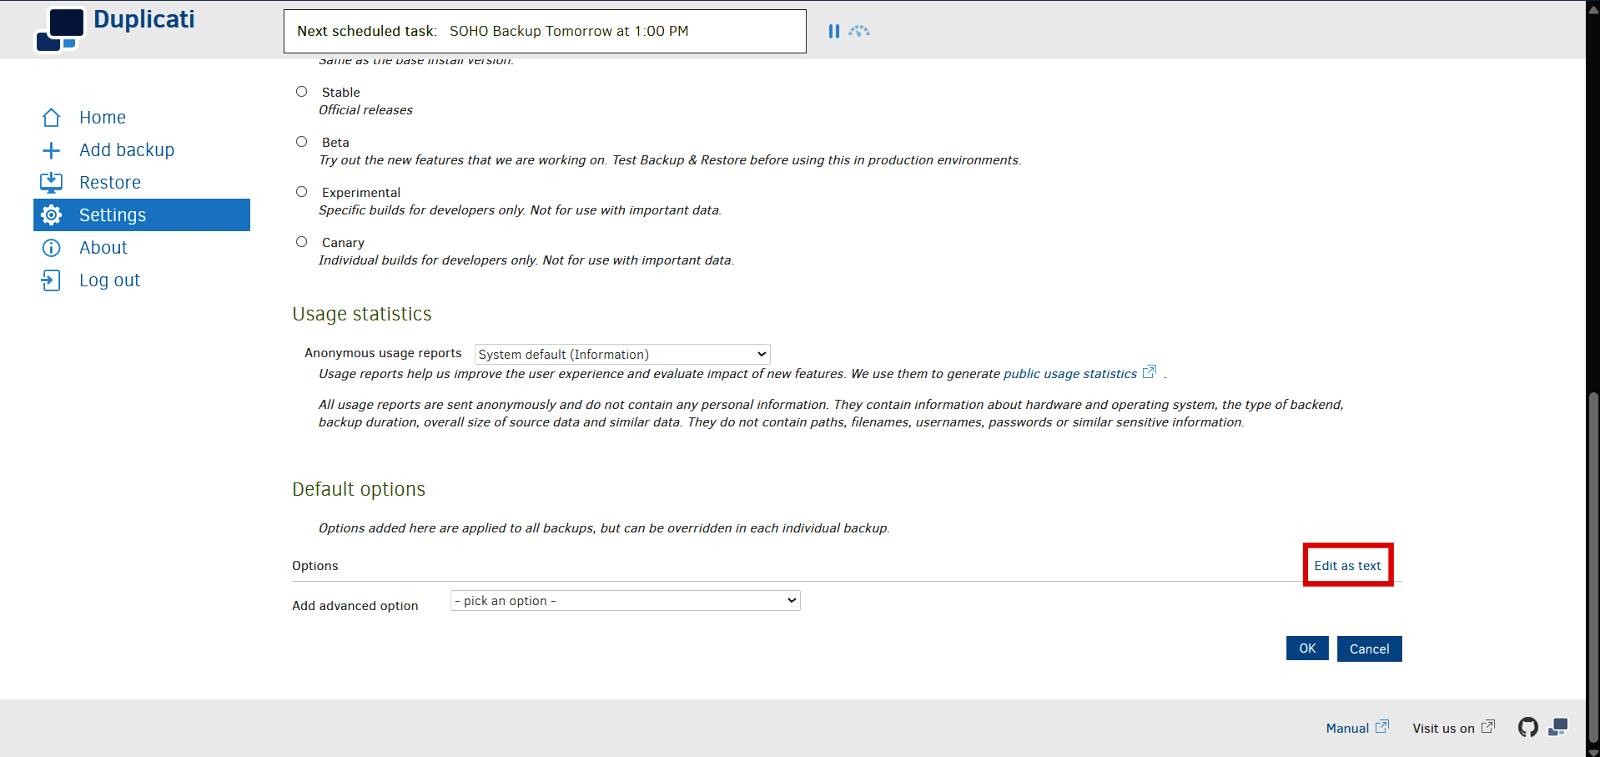
Open global settings: Open the Duplicati web interface, click on Settings in the left sidebar, scroll down to the Default options section, and click on Edit as text.
Paste email notification configuration: Copy and paste the following block into the text box:
--send-mail-url=smtp://smtp.gmail.com:587/?starttls=when-available
--send-mail-any-operation=true
--send-mail-subject=Duplicati %PARSEDRESULT%, %OPERATIONNAME% report for %backup-name%
--send-mail-to=dest_email@gmail.com
--send-mail-username=sender_email@gmail.com
--send-mail-password=sender_password
--send-mail-from= sender_email@gmail.com
Then click on Edit as list to review the individual options.
Replace placeholder values
To configure email notifications, update the following four fields in the settings. Replace dest_email@gmail.com with the email address where you want to receive backup notifications. Then, replace sender_email@gmail.com with your own Gmail address in both the username and from fields. Enter your Gmail App Password in place of sender_password—note that this should be a generated app-specific password, not your regular Gmail login. Once all fields are updated, click OK at the bottom of the screen to save the changes.
Test the setup
Run any backup job. You should receive an email summary shortly after it finishes. The message will include the result (success, error, warning), the type of operation, and the name of the job.
|
Note: Gmail requires App Passwords if 2-step verification is enabled on your account. Generate one under your Google Account → Security → App Passwords. |
With this setup, Duplicati will automatically send an email report after every operation, helping you stay informed about the health and success of your backup system.
Final verification and maintenance
Once your backup system is active and sending email notifications, it is still important to periodically check its performance and verify that your data remains recoverable. Here are some basic steps for monitoring your setup and confirming that backups are working as expected.
Review backup logs
Duplicati maintains a detailed log for each backup job, allowing you to review what happened during each run. To access the logs, open the Duplicati web interface, click on your backup job, and select ‘Show log’. You can then navigate through the General, Remote, or Errors tabs to view specific details about the backup process.
The log provides information such as the number of files backed up, total data transferred, duration of the backup, and any warnings or errors. Reviewing these logs regularly helps identify problems early.
Check backup files on server
On your Ubuntu backup server, you can inspect the stored backup files to confirm that data is arriving as expected. Use the following command to check storage usage:
$ du -sh /home/backupuser/duplicati-backups

$ ls -lh /home/backupuser/duplicati-backups
This helps ensure backups are growing over time and not stuck.
Perform periodic test restores
A backup is only useful if it can be restored. So every few weeks, select a random file from a recent backup, use Duplicati’s Restore feature to recover it, and confirm that the file opens correctly and is not corrupted. This simple habit helps ensure that your backup system remains reliable and your data can be recovered in case of a real emergency.
This guide showed how to set up a complete and reliable data backup system for a small office or home office (SOHO) using free and open source software. With this system in place, your files are safely stored, easy to recover, and protected from unexpected data loss.


