It’s as simple as this: have SSH listen on the standard port 22, and when you check your server logs, you see all sorts of random people trying to login to your server. Same thing goes for any content management system with an obvious admin URL. A good example is WordPress. Unless you do some voodoo hacks to change the location of URLs (yes, I exaggerate), it can be accessed from example.com/wp-admin/ or example.com.com/wp-login.php.
The htpasswd way!
The easiest thing to do is lock down the wp-admin folder with an htpasswd (as we showed you in an earlier article on Nginx). On Apache you follow a similar directive.
It’s even easier on a shared hosting environment. Simply login to the Web host’s admin console, fire the app icon that says something similar to “password protect directories”, password protect the wp-admin directory, and you’re done. From next time on, when you go to example.com/wp-admin/it will prompt for a second layer of authentication before it brings up the WordPress login screen.

This is good enough for most cases, however, it still doesn’t stop people from accessing example.com/wp-login.php, because the wp-login.php file is on the root of WordPress directory. (Note that in this case, once WordPress authentication is successful, it will still throw the htpasswd authentication pop-up before redirecting you to wp-admin.) Naturally, it makes many of us uncomfortable seeing people trying guess work.
Let’s take an easy example. Install the Limit Login Attempts plugin (it helps you set a limit to the number of failed logins from a particular IP address, and based on that bans it for a set period of time).
What’s interesting is you still see access attempts from random IPs even after setting the htpasswd… because from example.com/wp-login.php, the htpasswd kicks in only if the WP authentication succeeds (as I mentioned).
Open the settings page of Limit Login Attempts plugin and you see something like the following screenshot.

So, people can keep the guess-work business going as long as they keep changing their IP address after Limit Login Attempts bans their IP for a time frame.
The real obvious thing to do is password protect the wp-login.php file too. The downside is, the admin console of a shared hosting service most probably won’t have a dedicated application to handle that — the “Password Protect Directories” app seems to be only good for, well, directories.
The clue lies in the wp-admin/.htaccess file that app creates. Fire your Web host’s file manager application, open that file — it should look somewhat like this:
AuthType Basic
AuthName "protected area"
AuthUserFile /path/to/.htpasswd
AuthGroupFile /path/to/.htgroup
Require group myNewGroup
Require user myNewUser
Why not use the same username/password to protect wp-login.php. Open .htaccess file on the root directory of WordPress and append the following in it:
<Files wp-login.php>
AuthType Basic
AuthName "protected area"
AuthUserFile /path/to/.htpasswd
AuthGroupFile /path/to/.htgroup
Require group myNewGroup
Require user myNewUser
</Files>
Simple, isn’t it?
This way we save the unnecessary processing load on PHP and MySQL for unauthorised access requests. However, the Web server connection remains open (for a while, at least) for htpasswd authentication.
Apache .htaccess when you have a static IP
What is we want the Web server to close the connection with an error as soon as it detects an unauthorised access — bypassing the password prompt?
The job becomes a bit easier if you have a static IP address from where you always login. Then by appending the following directives in .htaccess files of WP’s root directory:
<Files wp-login.php>
Order Deny,Allow
Deny from all
Allow from xx.xx.xx.xx
</Files>
…and wp-admin subdirectory:
Order Deny,Allow
Deny from all
Allow from xx.xx.xx.xx
…(where xx.xx.xx.xx is your dedicated IP) you take care of the issue.
Well, if you don’t have static IPs (in case of most DSL broadband connections) or you need to login from different places (office, home, friends’ place, etc.), this is not a solution, is it? (Yes, you can login to your Web host’s backend and keep changing/appending the the new IPs in the .htaccess files, before making a pass at the WP login — a major pain in the neck, I would say.)
But this, or the htpasswd method, is the best you can do on shared hosting environments, unless your Web host also gives you SSH access.
Using Socks5 proxy
We’ll create a SSH tunnel, and use it as a socks5 proxy for Firefox to tackle the situation.
ssh -C2qTnNv -D 8888 username@example.com
After you authenticate with your password, it won’t return you the prompt (like you’d expect from a typical ssh connection.) The argument that’s important is -D 8888, which basically tells ssh to create a tunnel between port 8888 of your localhost (127.0.0.1) and the IP address of example.com. We also added the verbose mode with the -v so that we can see all activities on the session.
<<SNIP>>
debug1: Next authentication method: password
user@example.com's password:
debug1: Enabling compression at level 6.
debug1: Authentication succeeded (password).
Authenticated to example.com ([xx.xx.xx.xx]:22).
debug1: Local connections to LOCALHOST:8888 forwarded to remote address socks:0
debug1: Local forwarding listening on ::1 port 8888.
debug1: channel 0: new [port listener]
debug1: Local forwarding listening on 127.0.0.1 port 8888.
debug1: channel 1: new [port listener]
debug1: Requesting no-more-sessions@openssh.com
debug1: Entering interactive session.
<<SNIP>>
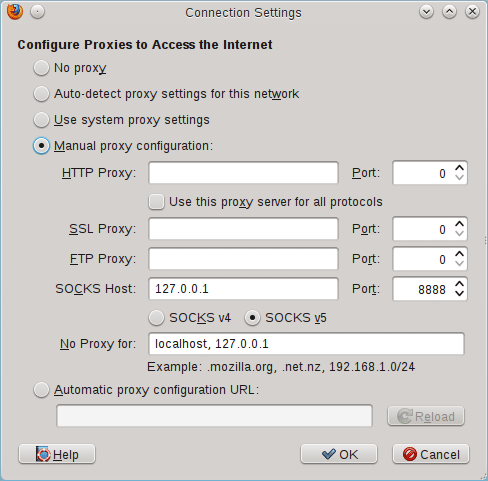
Now before we can use this tunnel to access WP login (or generally visit websites), we need to set the proxy in Firefox. Go to the browser proxy settings dialogue and enter the IP details as noted in the following screenshot.

An additional step is required if you’re using a service like CloudFlare for accelerating your website. Open about:config (by typing it in your FF’s URL bar), and filter for “dns”. Change the directive that says network.proxy.socks_remote_dns from false to trueas shown in the following screenshot.

This additional step will also send DNS queries through the tunnel (that otherwise would have resolved over your normal Internet gateway).
Now go to a service like whatismyipaddress.comand see where it says you’re located at :-)

Anyway, copy this IP (which is typically your shared server’s IP; although it’s sometimes different — for example, in case of Media Temple’s gs shared hosting setup, as I realised while writing this article) and paste it in place of xx.xx.xx.xx in the Allow from statements of .htaccess files we mentioned earlier.
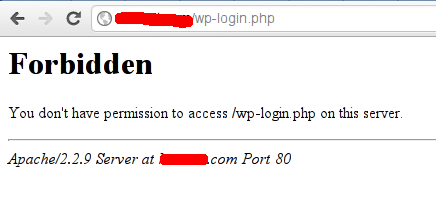
That’s it, we’re done! Launch some other browser besides Firefox, and try to access www.example.com/wp-login.phpand you should see this:

While on Firefox, the same URL gives you access to WP login screen. Neat eh?
When the Web server is Nginx
If you’re on a vps, or dedicated server, chances are you’re running nginx as a web server instead of Apache (like we are). To restrict WP logins to a specific IP address add the following location blocks to your Nginx server configuration files:
location /wp-admin {
    allow xx.xx.xx.xx;
    deny all;
}

location ~* ^/wp-login.php$ {
    allow xx.xx.xx.xx;
    deny all;
    try_files $uri =404;
    fastcgi_split_path_info ^(.+\.php)(/.+)$;
    include fastcgi_params;
    fastcgi_index index.php;
    fastcgi_param SCRIPT_FILENAME $document_root$fastcgi_script_name;
    fastcgi_pass unix:/var/run/php-fpm.sock;
}
Restart Nginx server. Henceforth, if you don’t use the socks5 proxy, you’d see this.

Note that, the fastcgi parameters will change depending on how you’ve setup your nginx configurations — so make sure you adapt the above to your settings.
While you’re on Varnish
Meanwhile, in case you’re running Varnish as a reverse proxy in front of your Web server, like we are, then adding these rules in your Web server’s config files won’t make any difference. This is because the Web server will see all requests are coming from 127.0.0.1. Although, technically you can make use of the X-Forwarded-For directives to tackle this, but why not let Varnish directly handle this? It would be faster by saving your Web server some trouble.
Open your default.vcl file, and append the following highlighted lines at the beginning of your vcl_recv section:
sub vcl_recv {
    # Ban outside access to wp-admin
    if (req.url ~ "wp-(login|admin)" && !client.ip ~ internal) {
    # Have Varnish throw the error directly.
    error 403 "Hey there sneaky pants! What are you trying to do?";
    }
# Your existing recv-routines follow...

}
Here we’re asking Varnish to throw a 403 error directly by setting an acl for wp-login.php and wp-admin. Time to put the server IP by creating this acl internal that we defined:
acl internal {
    "xx.xx.xx.xx";
}
Restart the varnish service. Here’s what you’ll see now when you try to login without creating the SSH tunnel:

That’s from our production server — don’t mind the language :-)
Like you can see, as long as you can ssh into your server to create a tunnel, you can restrict the admin access to yourself. Besides, the best part is, since SSH is an encrypted protocol, you don’t have to worry about someone sniffing for your login passwords that typically travel over an unencrypted HTTP protocol in WordPress.
Guess I’m done here. You can pretty much adapt these to any other CMS by changing a few things like wp-admin and wp-login.php with your specific admin authentication URLs. Of course, connections over VPS is another option that you can try rather than creating socks5 proxies this way.
Reference
Read this excellent article on calomel.org for a deeper understanding of socks5 proxy, and other associated Firefox about:config tricks.


Thanks for this post Atanu. I was looking for a solution to password protect wp-login.php. And faced the same issue where I have password protected wp-admin directory, and yet some attempts were being made to login, as the calls were directly to wp-login.php. Apart from this solution of password protecting wp-login.php, is there a way to prevent all direct calls to it, and allow only wp-admin to redirect to wp-login?
I personally using https and Securitron plugin for WP
Great article. I’ve also found renaming the wp-admin file to something else almost complete stops brute force attacks. They have no idea how to login any longer.
You can either rename the wp-admin folder and all dependencies on this folder ie plugins, functions,etc or just use the WP plugin rename-wp-login
Amazing post. I am looking for such security options for my clients. However on HTTP protection we need to know one more credential but it is okay when we come to a security section. Thanks for posting it. Keep it up…