 Your Web server is somehow nuked — could be anything from an attack to a silly mistake from the webmaster. Maybe the only way to get back on track is to restore the last backup? But, wait! When was the last time you took it? S*it, I forgot to take it for a while now. Are all the available backups that old?
You’ve heard that it’s a good practice if you optimise and repair MySQL DB tables to keep your WordPress install on steroids. Does that mean, you have to run a set of commands manually from the command line, or setup a one-time cron job to schedule things? Worst, what if you use a shared hosting facility where you just don’t have a way to the shell?
Yes, there are plugins for the purpose, and one of the most popular is WP-DBManager. This one has adequate features — schedule table optimise, repair and DB backups, and even email that backup. Good enough! But one essential thing is missing. Although the DB will hold all your text-based data, and assorted WordPress and plugin settings, what about the WordPress files — especially, the images that go into posts. This is where BackWPup comes in.
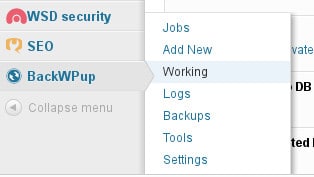
Post install it gives you a separate menu on the WordPress Dashboard with the following sub menus:
- Jobs — The tasks you have configured and enabled
- Add New — This one lets us add new tasks
- Working — Shows if a task in under progress in real-time
- Logs — Shows logs of the tasks that have already completed
- Backups — Shows the list of backups available
- Tools — Restore DB and import jobs’ settings
- Settings — Here you configure the assorted global settings associated with the plugin
Of course, we start off by adding a new task from the Add New section. However, before we start off, let’s jot down what all we need to perform:
- Scheduled DB table repair
- Scheduled DB table optimisation
- Scheduled DB backup and email/upload to remote location
- Scheduled WordPress files backup and upload to remote location
It even gives you an option to take WordPress XML backup; however, if I’m taking a DB backup, I wouldn’t really need the XML, would I?
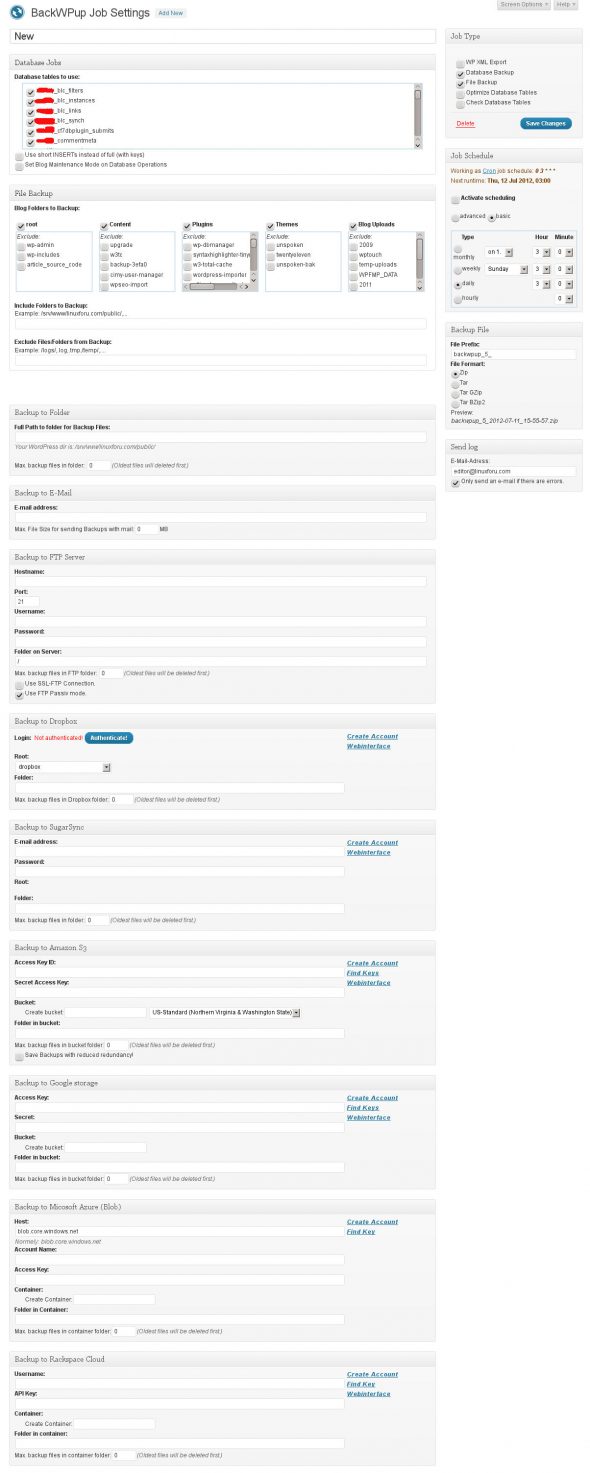
The following screenshot shows the various options available under the Add New window.
As you can see, this is a single window to all the features we need — therefore, some of the options become irrelevant the moment we decide on a job type. The Job Types are listed on the top right-hand side. You can create a single job will all the requirements (check all the options under Job Types), or create specific one job at a time. I choice to go with the latter so that I can distribute the schedules across intervals.
For both “Optimize Database Tables” and “Check Database Tables” (note: check means repair), we would simply select all the tables listed under the Database Jobs section, then check the “Activate scheduling” check box under the Job Schedule section, set the time, and hit Save Changes button under Job Type. Of course, replace the word “New” in the top form field and give your job a name for differentiating purposes.
Similarly, for “Database Bacup” job type, we select/configure all the same settings as above, scroll down to the Backup to Folder section and enter a location in the filesystem — make sure the Web server has write access to this specific directory. On it’s right is the Backup File section, where we would set a file prefix, select BZip2 from the archive format list (because it has a better compression ratio compared to zip and gzip formats). Finally, on the left side again, in the Backup to E-mail section, we provide the email address (optional, but recommended), so that after taking a backup and saving it to the backup directory, it additionally sends the DB by email too. Since LFY has a 50GB Box.com account, and Box lets you configure a folder and then assign a specific email address to it, we chose this option. But what happens when the bzipped DB size grows to GBs? Then instead of emailing the backup, we can further scroll down and chose to use any of the listed storage sources. Save once you’re happy with your selections… and done.
Finally, for the “File Backup” job type, we select the options under File Backup section in the right panel (exclude whatever directories you don’t need to take a backup of), scroll down and configure the storage sources (we use Rackspace Cloud Files; although Amazon S3 is as good and as cheap as an option), set the number of backups the service should keep (no need to keep 100s of backups; we find latest 10 to be good enough, since we schedule file backups twice a week, unlike DB backup that we do daily) and save.
This brings us to Jobs (the top submenu item under BackWPup).
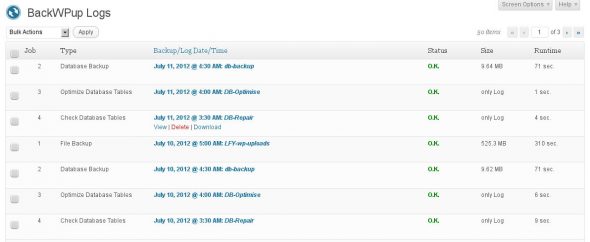
This one is a window to the list of all configured Jobs. Hovering an item lets gives you options to edit, export or run the job manually then and there. It even shows you the time when the Job will run the next time and the last time when it was run. Data in this Last Run column has a bug which sometimes, depending on its mood, shows incorrect timings. As you can see, our DB-Repair job says it was last run on June 26, when in fact it has run earlier in the morning today — refer to the screenshot of the Logs window below.
This one lists all the logs of specific jobs that have been successfully executed in the past. It lets you view or even download the logs — say, if you want to analyse if one of the jobs failed, or just what it for reference purposes. The following screenshot is an example of what information the file backup log from July 10 holds.
The BackWPup Backups submenu item is the window to all the backups that are available — even if they are stored remotely. For example, we can download the backups stored on our Rackspace Cloud Files storage from right within WordPress.
Finally, the settings submenu window is where you can fine-tune some of the options — viz., sender email address, send mail method and path (sendmail, SMTP, or PHP mail() function), location on the server to save log files, whether to gzip the logfiles or not, number of latest log files to keep, maximum number of retries for job steps and scripts, etc.
That’s more or less all that this plugin does. Overall, it’s a pretty solid all-purpose backup and DB optimisation plugin, and the excellent control over cron jobs it gives a webmaster access to is unmatchable — for example, you can configure it to use your server’s cron utility instead of default WP cron.
A piece of advice: Better explore it to your heart’s content, and adopt it to start taking your backups seriously ;-)
Feature image courtesy: Daniel Sancho. Reused under the terms of CC-BY 2.0 License.


[…] and optimisations at scheduled intervals? I”ll come back later today with the review of an all-purpose plugin that we use for this exact purpose. I need time to write :-PFeature image courtesy: Jennie. Modified and reused under the terms of […]
This is by far the most efficient review guide that I have read so far to date on wp database backup. This has really changed the way I treat wp db. I think I should I revise my priorities over “db” backup. It is a high priority “stuff”, the data!!
-Stacey
ehdf.com/solutions-and-services/storage-and-backup/remote-back-up