Many of us are curious and eager to learn how to port or flash a new version of Android to our phones and tablets. This article is the first step towards creating your own custom Android system. Here, you will learn to set up the build environment for the Android kernel and build it on Linux.
Let us start by understanding what Android is. Is it an application framework or is it an operating system? It can be called a mobile operating system based on the Linux kernel, for the sake of simplicity, but it is much more than that. It consists of the operating system, middleware, and application software that originated from a group of companies led by Google, known as the Open Handset Alliance.
Android system architecture
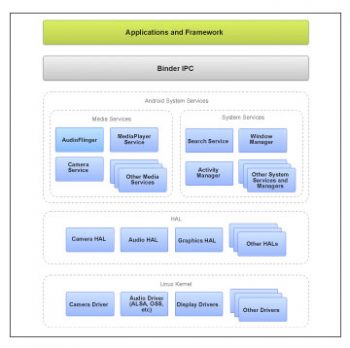
Before we begin building an Android platform, lets understand how it works at a higher level. Figure 1 illustrates how Android works at the system level.

We will not get into the finer details of the architecture in this article since the primary goal is to build the kernel. Here is a quick summary of what the architecture comprises.
Application framework: Applications written in Java directly interact with this layer.

Binder IPC: It is an Android-specific IPC mechanism.
Android system services: To access the underlying hardware application framework, APIs often communicate via system services.
HAL: This acts as a glue between the Android system and the underlying device drivers.
Linux kernel: At the bottom of the stack is a Linux kernel, with some architectural changes/additions including binder, ashmem, pmem, logger, wavelocks, different out-of-memory (OOM) handling, etc.
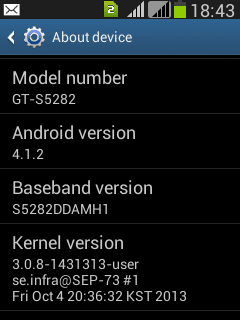
In this article, I describe how to compile the kernel for the Samsung Galaxy Star Duos (GT-S5282) with Android version 4.1.2. The build process was performed on an Intel i5 core processor running 64-bit Ubuntu Linux 14.04 LTS (Trusty Tahr). However, the process should work with any Android kernel and device, with minor modifications. The handset details are shown in the screenshot (Figure 2) taken from the Setting ->About device menu of the phone.
System and software requirements
Before you download and build the Android kernel, ensure that your system meets the following requirements:
- Linux system (Linux running on a virtual machine will also work but is not recommended). Steps explained in this article are for Ubuntu 14.04 LTS to be specific. Other distributions should also work.
- Around 5 GB of free space to install the dependent software and build the kernel.
- Pre-built tool-chain.
- Dependent software should include GNU Make, libncurses5-dev, etc.
- Android kernel source (as mentioned earlier, this article describes the steps for the Samsung Galaxy Star kernel).
- Optionally, if you are planning to compile the whole Android platform (not just the kernel), a 64-bit system is required for Gingerbread (2.3.x) and newer versions.
It is assumed that the reader is familiar with Linux commands and the shell. Commands and file names are case sensitive. Bash shell is used to execute the commands in this article.
Step 1: Getting the source code
The Android Open Source Project (AOSP) maintains the complete Android software stack, which includes everything except for the Linux kernel. The Android Linux kernel is developed upstream and also by various handset manufacturers.
The kernel source can be obtained from:
1. Google Android kernel sources: Visit https://source.android.com/source/building-kernels.html for details. The kernel for a select set of devices is available here.
2. From the handset manufacturers or OEM website: I am listing a few links to the developer sites where you can find the kernel sources. Please understand that the links may change in the future.
- Samsung: http://opensource.samsung.com/
- HTC: https://www.htcdev.com/
- Sony: Most of the kernel is available on github.
3. Developers: They provide a non-official kernel.
This article will use the second methodwe will get the official Android kernel for Samsung Galaxy Star (GT-S5282). Go to the URL http://opensource.samsung.com/ and search for GT-S5282. Download the file GT-S5282_SEA_JB_Opensource.zip (184 MB).
Lets assume that the file is downloaded in the ~/Downloads/kernel directory.
Step 2: Extract the kernel source code
Let us create a directory android to store all relevant files in the user’s home directory. The kernel and Android NDK will be stored in the kernel and ndk directories, respectively.
$ mkdir ~/android
$ mkdir ~/android/kernel
$ mkdir ~/android/ndk
Now extract the archive:
$ cd ~/Downloads/kernel

$ unzip GT-S5282_SEA_JB_Opensource.zip

$ tar -C ~/android/kernel -zxf Kernel.tar.gz
The unzip command will extract the zip archive, which contains the following files:
- Kernel.tar.gz: The kernel to be compiled.
- Platform.tar.gz: Android platform files.
- README_Kernel.txt: Readme for kernel compilation.
- README_Platform.txt: Readme for Android platform compilation.
If the unzip command is not installed, you can extract the files using any other file extraction tool.
By running the tar command, we are extracting the kernel source to ~/android/kernel. While creating a sub-directory for extracting is recommended, lets avoid it here for the sake of simplicity.
Step 3: Install and set up the toolchain
There are several ways to install the toolchain. We will use the Android NDK to compile the kernel.
Please visit https://developer.android.com/tools/sdk/ndk/index.html to get details about NDK.
For 64-bit Linux, download Android NDK android-ndk-r9-linux-x86_64-legacy-toolchains.tar.bz2 from http://dl.google.com/android/ndk/android-ndk-r9-linux-x86_64-legacy-toolchains.tar.bz2
Ensure that the file is saved in the ~/android/ndk directory.
Note: To be specific, we need the GCC 4.4.3 version to compile the downloaded kernel. Using the latest version of Android NDK will yield to compilation errors.
Extract the NDK to ~/android/ndk:
$ cd ~/android/ndk
# For 64 bit version
$ tar -jxf android-ndk-r9-linux-x86_64-legacy-toolchains.tar.bz2
Add the toolchain path to the PATH environment variable in .bashrc or the equivalent:
#Set the path for Android build env (64 bit)
export PATH=${HOME}/android/ndk/android-ndk-r9/toolchains/arm-linux-androideabi-4.4.3/prebuilt/linux-x86_64/bin:$PATH
Step 4: Configure the Android kernel
Install the necessary dependencies, as follows:
$ sudo apt-get install libncurses5-dev build-essential
Set up the architecture and cross compiler, as follows:
$ export ARCH=arm
$ export CROSS_COMPILE=arm-linux-androideabi-
The kernel Makefile refers to the above variables to select the architecture and cross compile. The cross compiler command will be ${CROSS_COMPILE}gcc which is expanded to arm-linux-androideabi-gcc. The same applies for other tools like g++, as, objdump, gdb, etc.
Configure the kernel for the device:
$ cd ~/android/kernel
$ make mint-vlx-rev03_defconfig
The device-specific configuration files for ARM architecture are available in the arch/arm/configs directory.
Executing the configuration command may throw a few warnings. You can ignore these warnings now. The command will create a .config file, which contains the kernel configuration for the device.
To view and edit the kernel configuration, run the following command:
$ make menuconfig

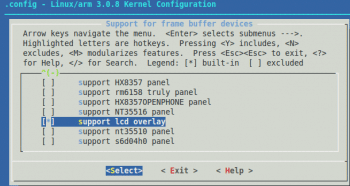
Next, lets assume you want to change lcd overlay support.
Navigate to Drivers ? Graphics ? Support for framebuffer devices. The option to support lcd overlay should be displayed as shown in Figure 3.
Skip the menuconfig step or do not make any changes if you are unsure.
Step 5: Build the kernel
Finally, we are ready to fire the build. Run the make command, as follows:
$ make zImage
If you want to speed up the build, specify the -j option to the make command. For example, if you have four processor cores, you can specify the -j4 option to make:
$ make -j4 zImage
The compilation process will take time to complete, based on the options available in the kernel configuration (.config) and the performance of the build system. On completion, the kernel image (zImage) will be generated in the arch/arm/boot/ directory of the kernel source.
Compile the modules:
$ make modules
This will trigger the build for kernel modules, and .ko files should be generated in the corresponding module directories. Run the find command to get a list of .ko files in the kernel directory:
$ find . -name *.ko
What next?
Now that you have set up the Android build environment, and compiled an Android kernel and necessary modules, how do you flash it to the handset so that you can see the kernel working? This requires the handset to be rooted first, followed by flashing the kernel and related software. It turns out that there are many new concepts to understand before we get into this. So be sure to follow the next article on rooting and flashing your custom Android kernel.
References
https://source.android.com/
https://developer.android.com/
http://xda-university.com


