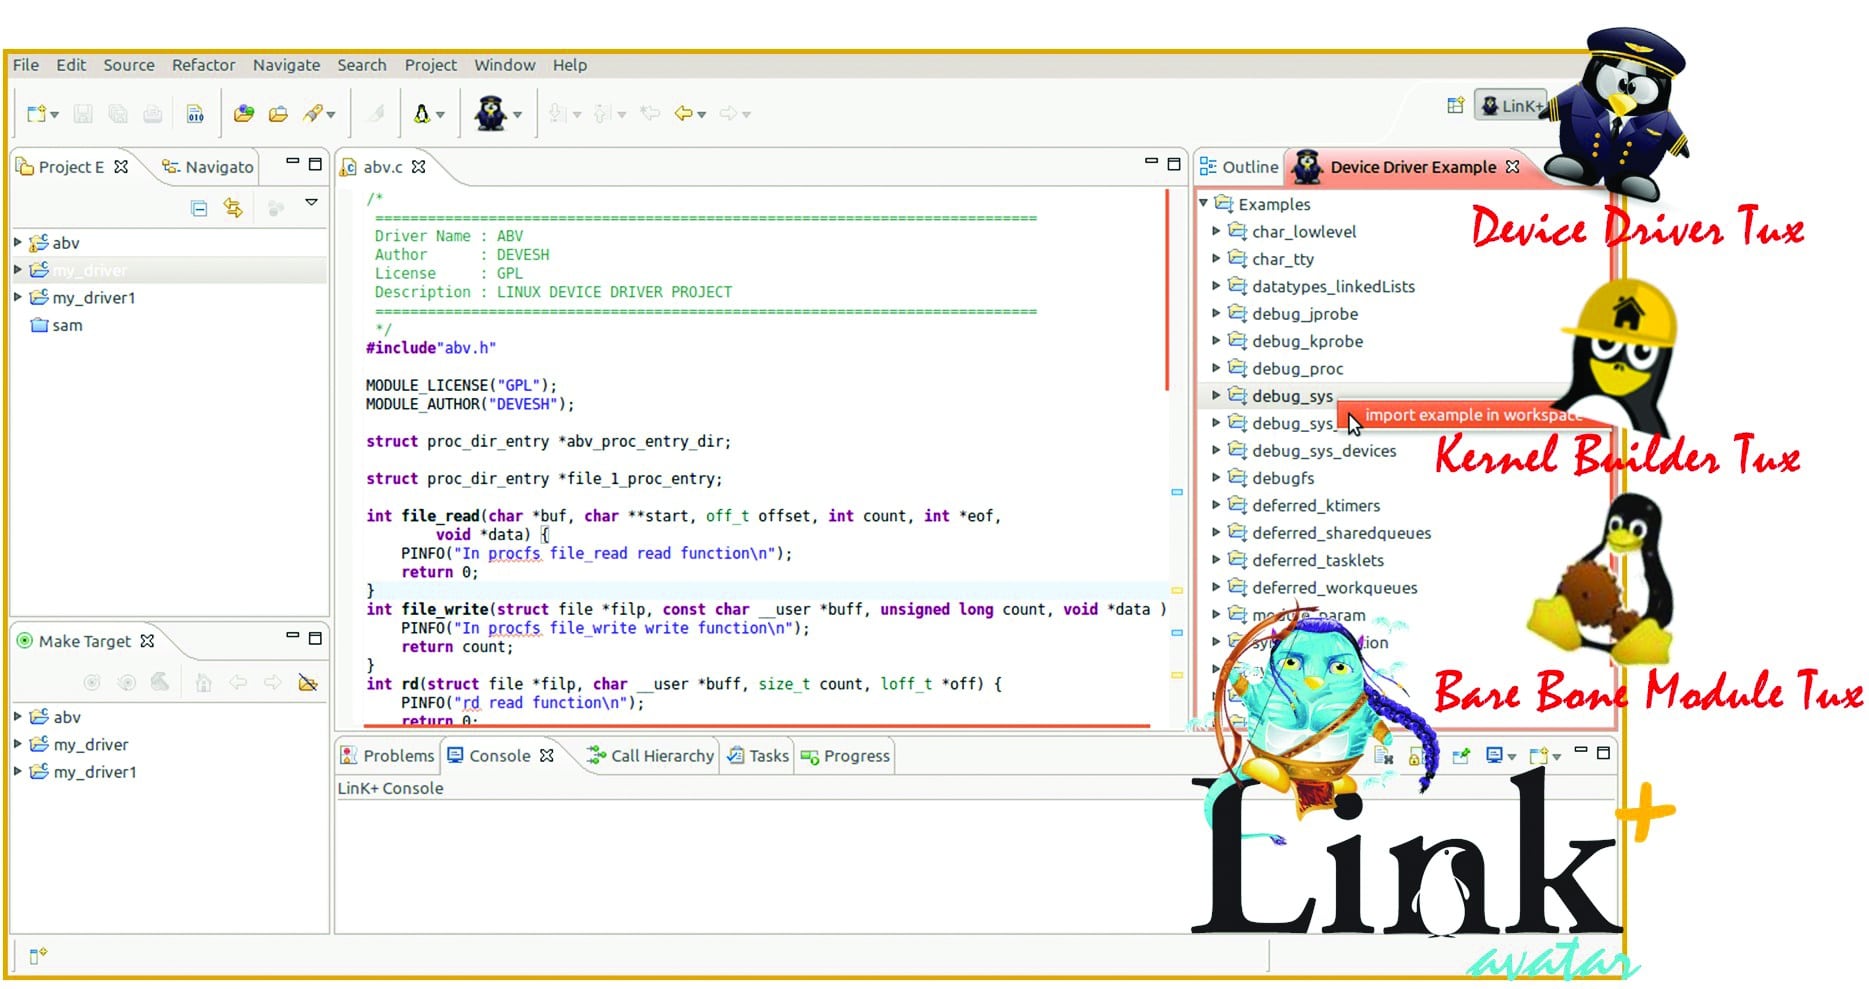
In this article, discover how Linux kernel programming can be simplified using an IDE. Lets take a look at the IDE named LinK+ which supports Linux kernel configuration, compilation and emulation, system call development and device driver development. At the end of this article, developers of Linux device drivers are sure to start loving it!
The LinK+ IDE is a simple IDE for Linux kernel developers. It is based on the Eclipse IDE and is customised for Linux kernel programming. It reduces development time and executes code in an elegant fashion. The LinK+ IDE includes various templates in the categories of character, block and network device driver sub-systems for device driver development. It includes various bus infrastructure templates and also provides Linux device driver code completion, code assistance and code navigation for developers.
Features of the LinK+ IDE
The first release of this IDE is called LinK+ Avatar and it supports the following set of features:
- Hardware architectures: x86 and x86_64
- Linux device driver auto code generation, completion and navigation
- Wizard for kernel configuration and compilation
- Reduced kernel compilation time through ccache and distcc
- QEMU emulator support for Linux kernel image emulation and debugging
- Linux system call development
- Supports both Debian and RPM Linux families
- Supports Sparse for static analysis of Linux device drivers
LinK+ IDE installation
Prerequisites for Ubuntu Linux distributions
Before installing LinK+ IDE, the following set of packages needs to be installed on your machine. You can run the command shown below:
dileep@dileepk:~$ sudo apt-get install openjdk-6-jdk libqt4-dev libncurses5 sparse qemu qemu-system openssh-server openssh-client bridge-utils iptables dnsmasq linux-headers- `uname -r`
Prerequisites for other Linux distributions are mentioned in the user manual, which you can download from the link http://sourceforge.net/projects/linkplustest/files/documentation/.
You can now install LinK+ IDE using either one of the following methods.
Method 1
Download the LinK+ IDE installer from the link https://sourceforge.net/projects/linkplustest/files/installers/.
dileep@dileepk:~$ tar -xvf LinK+\ IDE-linux.gtk.x86_64.tar.gz
dileep@dileepk:~$ cd LinK+\ IDE-linux.gtk.x86_64/
dileep@dileepk:~/LinK+\ IDE-linux.gtk.x86_64$./linkplus &
Method 2
Install LinK+ plugins. Before installing them, however, you should have a version of Eclipse cpp of the Helios variant already installed on your PC.
Start the Eclipse IDE and add the LinK+ repository by clicking on Help->Install New Software.
Then enter the URL of the updated LinK+ site (https://sourceforge.net/projects/linkplustest/files/repository/) and proceed with further installation procedures.
Method 3: Installation through Eclipse Market Place
Start the Eclipse IDE and click on Help->Eclipse Marketplace. Then, go to the Search button and in the Find space bar, type Linux Kernel Programming IDE. You can then click on the Install button to download the LinK+ plugins.
Now that you have installed the LinK+ IDE, we can start building our own projects.
The Linux kernel configuration and compilation project
Let us begin with configuring and compiling the Linux kernel, by selecting File-> New-> Project.
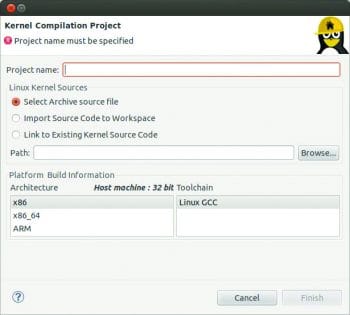
Click on the Linux Kernel Development (Link+) option and expand it to select Kernel Compilation Project before clicking on the Next button. This will open the kernel compilation wizard as shown in Figure 1, where we can enter the projects name. Then we need to select the Linux kernel source. Three options are provided: Select Archived Source Code, Import Source Code to Workspace and Link to Existing Kernel Source Code. Select one based on your requirement.
Depending on what Linux kernel source was selected, choose the path of the kernel source by clicking on the Browse button.
Next, move to the Project Build options. The LinK+ IDE is bundled with different project build options like Configuration, Compilation and Installation. These options are presented to users through multiple ways. Just right-click on the respective project in the Project Explorer view, then go to LinK to or just click on the icon of the toolbar.
In my experience, how long compilation takes depends on your host systems hardware configuration. In order to speed things up, integrate third party tools such as distcc and ccache into this IDE. To use these features in the LinK+ IDE, go to the preference page (Windows->Preference) and go to Linux Kernel Development. If you want more information on distcc and ccache, refer to the user manual as suggested earlier.
Single step execution
The LinK+ IDE also provides a one-stop solution for all configuration, compilation, installation and emulation needs. To use this feature, right-click on the respective projects in the Project Explorer view, then go to LinK to -> Single Step Execution.
This will open a wizard with three pages. The first page has configuration options, the second has compilation options and the third has the option to install on host or emulate with the QEMU file system of your kernel source.
Linux kernel emulation using QEMU
After compiling the Linux kernel image, the QEMU emulator can be used to emulate the working of the Linux kernel before installing on the host. For this process, there are two optionsLinux kernel emulation using QEMU with the file system and with the initrd image. You can download the Debian or RPM based qcow2 file system image from the Internet and use it for the emulation. Just right click on the respective project under Project Explorer and go to LinK to-> Emulation -> With File System
The QEMU remote system
LinK+ IDE provides communication with remote systems using the Eclipse Remote System Plugin. The advantage of using this plugin is that the remote systems rootfs, either running through QEMU or in the local network, will be mounted onto the IDE as a view. So transferring files to remote systems becomes easy, and the remote system shell can be viewed as a separate console in the LinK+ IDE. The complete procedure to connect with the remote systems is given in the user manual.
Linux kernel debugging using QEMU
Debugging the Linux kernel image is possible with the Eclipse CDT debugger and the QEMU emulator. Avail the debugging option by right-clicking on the respective project under Project Explorer, go to LinK to-> Emulation -> Debug with QEMU and follow the steps as mentioned in the user manual.
A project to create a Linux kernel system call
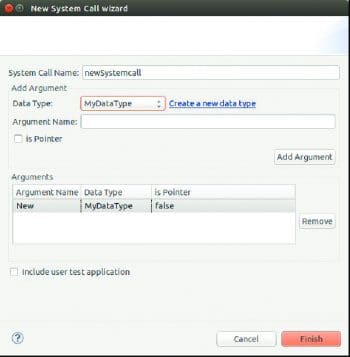
The LinK+ IDE has a wizard for adding new system calls to the kernel source. This can be done by right-clicking on the respective kernel project in the Project Explorer view, before going to LinK to -> System Call -> Add System Call. Clicking on Add System Call will open a wizard as shown in Figure 2.
Enter the name of the system call, then select the existing data type and click the Add Argument button. You can also create a new data type by clicking the Create a new data type link. If you want to test your system call with a system call application, enable the Include User Test application. It will create a user space application for system call testing. Finally, rebuild the project to make changes effective.
System call testing with QEMU
There are just two steps to test how the system call works when using QEMU. Run the newly added system call kernel image with QEMU and then copy the system call user application to the running QEMU. To do the above, go to LinK to -> System Call.

A Linux device driver development project
Linux device driver projects are created by selecting File->New->Project. Then go to Linux Kernel Development (Link+) and select Device Driver Project.
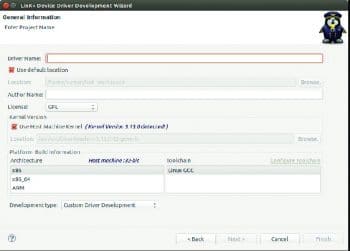
This will open a wizard that contains three pagesone covering general information, one on the kernels features and the page on driver information. You can finish the project at any point in time.
In the general information page, we need to fill the fields like authors name, license type, kernel version and, finally, select the architecture and the toolchain required for it from the Toolchain list as shown in Figure 3.
In the Development type dropdown box, there are two options: Custom Driver Development and Typical Driver Development. In the first option, select what you require but in the latter development type, a lot of features are automatically integrated.
Click on Next for other Kernel Development Features or Finish for Basic module programming. If you choose the Custom Driver Development type, follow the procedure shown below.
Advanced kernel module program and a project to create device drivers
The Linux kernel features page is shown in Figure 4 and contains the kernel features like:
- Module Param
- Delayed Works ->Kernel Timer, Tasklet, Work Queue, Shared Queue
- Synchronization->Semaphore, Spinlock and other options
- Kernel Data Types
- Debugging Mechanisms -> probing, proc, sys attributes
All the features are optional. So you can select any feature based on requirements. On selecting a feature, the left pane window options change dynamically.
Click on Next for specific information on the driver and device, or on the Finish button to create the project with the above features.
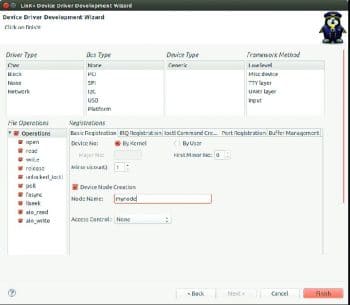
The third (and last) page has Linux device driver specific features, and is divided into two parts as shown in Figure 5.
The first half contains the types of drivers, devices and the bus type, as well as the framework method.
- In the Driver Type field, select the name of the driver from the list.
- In the Bus Type field, select the bus name from the list.
- In the Device Type field, select the devices name from the list.
- In the Framework Method field, select the name of the framework method from the list.
The second half is dynamic and depends on the users first selection. It contains the following:
- File operations: This has a list of functions. You can select zero or more functions from the list.
- Registration view: This depends on what you selected in the first half.
Basic registration tab fields are compulsory and other registration fields like IRQ, IOCTL, Port and Buffer Management are optional. Finally, click on Finish to generate the complete and specific code for the device driver.
Typical driver development
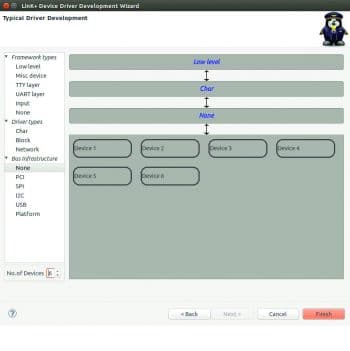
You have an option to choose Typical Driver Development in the General Information page. Select it and click Next. This opens a wizard as shown in Figure 6.
Unlike in Custom driver development, in Typical driver development you are asked only driver specific information. Based on your requirement, choose the Framework types, Driver types and Bus infrastructure from the left pane either by double-clicking on the specific type, or by dragging and dropping on to the right pane. Once this job is done, click Finish to generate the device driver code. This in turn speeds up and eases the job of a device driver developer.
Project build and utility options
By default, Build Automatically is enabled and if you want to disable this feature, select Project and uncheck Build Automatically. To build a project, right-click on that project and then click on Build Project.
The LinK+ IDE is bundled with different device driver utility options like insmod, rmmod, modprobe, modinfo, dmesg and lsmod. These options can be accessed in multiple ways. One way is to right click on the Project and in the Project Explorer view, select Link+ Driver Development, as shown in Figure 7. Or just click the LinK+ Driver Utility on Toolbar, or just right click on the Editor.

Short keys
To get the device driver utilities (insmod, rmmod, modprobe and dmesg) with short keys, press Shift+Alt+L and it will open the short keys window. Then press the first letter of the command, like d for dmesg.
Extending a project
After creating the device driver project, if you want to add features, select the project under the Project Explorer view and click on LinK+ Driver Utility on Toolbar. Then, click on Extend Project to select the additional features you want to use. All features are optional. Finally, click on the Finish button.
Compiling for other kernels
As we know, Linux device drivers are version specific. If you want to compile the device driver project for other kernels, select the project in Project Explorer view and click on LinK+ Driver Utility on Toolbar. Click on Compile For Other Kernel and follow the steps indicated.
Static analysis using Sparse
If you want to check for static analysis, this IDE allows it through the Sparse tool. Just click on LinK+ Driver Utility on Toolbar and then click on Static Analysis using Sparse. It will open the LinK+ console, which shows Sparse warnings. Markers will also appear automatically on all warnings in the editor. Click on the warning icon in the editor and the LinK+ IDE will provide a quick fix option for code assistance and completion.
Eclipse local terminal plugin
The LinK+ IDE is also bundled with the Linux terminal plugin, which is provided by the Google ELT project plugins. To open the Linux terminal in the Eclipse IDE, click on Window -> Show View -> Other -> General -> Terminal.
Code assistance and a quick-fix utility for LinK+ driver development
As we all know, development of Linux device drivers is quite cumbersome. We need to understand a lot of frameworks and data structures to build them. To ease this process, the LinK+ IDE has code assistance and code completion features.
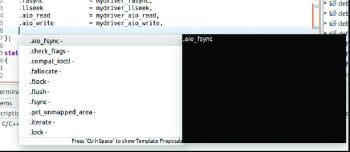
To use this feature, press Ctrl+Space in the function pointer structure to get suggestions as shown in Figure 8. You can also type a few letters of the function name, and press Ctrl+Space to prompt for a list of names that start with a particular letter.
After writing the function pointers name, the editor automatically gets an error message. In order to solve this, press Ctrl+1 or click on the error marker icon for code suggestion. We can opt for any one of the suggestions for code completion.
Examples of Linux device driver programs
The LinK+ IDE is also bundled with sample programs for Linux device drivers. To view them, go to Window->Show View->Other and then go to LinK+ Views. Then, click on the device driver examples. You can also import the example program into the workspace as a project by right-clicking on the respective example program.
This article covers the basic features provided by the LinK+ Avatar release. I hope this information will help you to kickstart Linux kernel programming. In the next issue, I will discuss more features that include support for ARM architecture, network and block device driver development.


