Rockstor is a Linux based NAS distro powered by the B-tree file system, also called BTRFS. This NAS and cloud storage platform is suitable for small to medium businesses and home users who have little IT experience, but who need several hundred gigabytes or even terabytes of data storage. The advantage of an open source DIY solution like Rockstor, compared to older NAS solutions, is that users can choose their own hardware and easily build an advanced NAS solution. Using a tailor made NAS solution offers many advantages over other options. In fact, many of these advantages form the 12 governing principles of the Rockstor project. These principles are: user empowerment, privacy, simplicity, open source, hardware agnosticism, security, ease of use, interoperability, cost effectiveness, scalability, resource-lightness and incremental development. Each of these principles (explained on the Rockstor wiki) is reflected in all aspects of the Rockstor project – from community-centric development and system requirements, to the implementation of feature sets and storage management. These principles will become clear once you deploy it for your use-case and tinker with its features.
The Rockstor NAS and cloud storage platform can be managed within a LAN or over the Web using a simple and intuitive UI. Unlike several other NAS distros like FreeNAS, Open Media Vault, NAS for free, or even NAS boxes supporting BTRFS such as Synology or Netgear Ready NAS, Rockstor is the only distro that is purely based on Linux (CentOS) and BTRFS, and is fully open source under GPLv2. Also, compared to available public cloud storage options such as Google Drive, Dropbox, etc, storing data on Rockstor is safe, secure and cost-effective. Your data lives on your devices and on your premises, and you can easily expand or reduce storage capacity by adding or removing disks from the Web UI. You can even create a hybrid workflow, combining Rockstor with public cloud storage to have versatile access to your data.

Advanced Rockstor features
Rockstor makes it easy to manage advanced BTRFS features. It offers many advantages, such as mixing and matching drives of different types and sizes (you can combine your HDDs with USBs, external hard drives, etc), adding and removing disks, and easily switching between different RAID profiles.
Rockstor builds on top of Copy on Write (CoW) features of BTRFS to provide capabilities such as Snapshots (on demand or on schedule), Clones, appliance-to-appliance replication, to name a few. Snapshots can be conveniently created, cloned, scheduled and accessed by clients using NFS or Samba. Appliance management tasks such as appliance-to-appliance replication, adding a new appliance and making appliances aware of each other can be easily done.
All of the above operations can be carried out easily over the Web UI. So, with the combination of the Web UI and the command line, users with little IT experience as well as advanced users, and everyone else in between, can easily use Rockstor.
Installation
Installing Rockstor is straightforward and very similar to CentOS or Fedora. The Quickstart guide, available with Rockstor documentation, is a good place to start. The website (http://rockstor.com) gives the download instructions. For this tutorial, I have used my production Rockstor system that runs on a HP ProLiant Microserver with four disks, and runs Rockstor version 3.8-9. You could use Oracle VirtualBox or other hypervisors like KVM, VMware, Xen, etc, for installation. If you install Rockstor on your preferred hardware (bare metal), then you will need either a CD or a bootable USB (you can either create your own or buy one from the Rockstor shop).
The Snapshot feature of Rockstor
A snapshot is the point-in-time state of a share (folder). Snapshot technology in general, and snapshot implementation of Copy-on-Write (CoW) in BTRFS (Linux) in particular, offers users simple data backup, data protection and data recovery tools.
Some possible real world scenarios that could use Snapshot technology
Imagine you are working on an important project such as writing a book or a grant proposal, editing a video you shot during your vacation, recording a podcast, editing your photos, creating a presentation, writing code or anything else of significance. You could encounter a number of problems while doing so:
1. You create your work (say four paragraphs of a proposal or a video clip), and save it. You then edit and save it again (say, you delete a paragraph or remove some video footage). Then, for some reason, you want to compare your work and need to get back the paragraph you deleted or the video footage you removed. For your document, you may have maintained a manual version control and listed down every possible change, or most likely not done it at all. On the other hand, you might have set up a backup to be saved automatically. Retrieving your video editing project could be even more difficult.
2. You are working on your project and your computer battery suddenly dies, or your computer freezes and needs a reboot; you could suddenly lose work and in case you forgot to save it, you may have to start all over again.
There could be a number of other problems that cause you to lose your work, resulting in wasted time, effort and frustration. So, what are your options? Storage systems such as Rockstor offer the Snapshots technology that is designed to solve problems like those described above. These offer not just a solution, but also allow you to create a strategy to proactively manage these issues before they arise.
With the Rockstor Snapshots feature, you have the ability to create automatic point-in-time backups of your work, irrespective of the nature of the work (whether documents, videos, music, code, presentation, etc), and also build a strategy to manage backups.
Setting up the Rockstor storage platform for Snapshots and other tasks
To start using Snapshots and other features, you need to set up pools, shares, Samba export, etc. So follow these easy steps and you will be ready to use Rockstors features. Once the Rockstor platform is installed, you can set up, configure and use it from a browser.
After the initial set-up, the next step is to create storage for your data. During installation on VirtualBox, you must have created virtual hard disks or added disks, if you are using bare metal. Now, we will go a step further and create pools and shares. A pool is essentially a collection of disks with a user defined redundancy (RAID) strategy. The size of a pool can be increased or decreased by adding or removing disks. Available RAID options are RAID 0, RAID 1, RAID 5, RAID 6 and RAID 10. And a share is essentially a chunk of storage space carved out of a pool. A share can also be thought of as a directory.
Disks
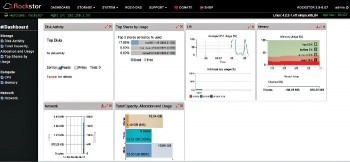
On the Rockstor Web UI, under the Storage tab, you will see the disks. Figure 2 shows the disks that are available on my Rockstor box. Notice that disk sda3 has the system created rockstor_rockstor pool containing the OS. Its recommended that this pool be left alone for the OS and not be used except for maybe small shares, if absolutely necessary. Resizing, compression or deletion of this pool is not permitted.
Pool
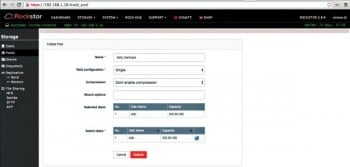
To create a pool using the Web UI, go to Storage->Pools. Click on Create Pools and specify the Name, Raid Configuration and Select Disks that should be the part of this pool. Click Submit to create the pool. Advanced users can also apply different compression and BTRFS mount options while creating a pool (or afterwards). One huge advantage that Rockstor offers here is the ability to resize a pool by easily adding or removing disks. Figure 3 shows how a pool can be created. You can see the pool data_backup’ in Figure 2.
Share
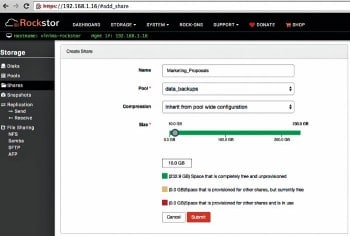
Once a pool is set up, you can create a share from your pool. To create a share, go to Storage->Shares and click Create Share. Specify the Name, Pool and Size, and click Submit. Similar to a pool, advanced users can apply compression options. Internally, shares are BTRFS sub-volumes of a given filesystem (pool). A share can be exported from the Rockstor system with NFS, Samba, AFP and SFTP protocols. There is no upper limit, except available storage, on creating shares. A share can be cloned, resized and deleted from the Web UI. For this example, I have created a share called Marketing_Proposals as shown in Figure 4.
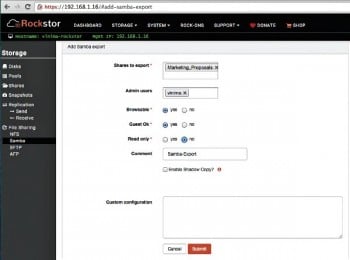
To export a share using Samba, go to the Web UI, and click File Sharing -> Samba. Click Add Samba Export and select parameters such as Shares to export, as well as permissions like Browsable, Read only, etc. For the Admin Users’ field, choose the username for your Rockstor account. For example, if the account name is admin’, select that from the drop down list. If it is your own name, choose that from the drop down list. Refer to Figure 5 for the details of my form.
Samba export of the share
Windows users can click the Enable Shadow Copy’ option. For more details on Shadow Copy’, follow the documentation at http://rockstor.com/docs/windows-shadow-copy.html. For a Mac machine (as in my case), do not click the Enable Shadow Copy’ option. After you click Submit, you can mount or access the share from a client such as your laptop.
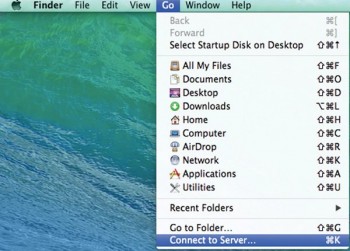
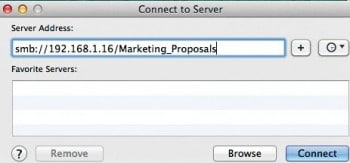
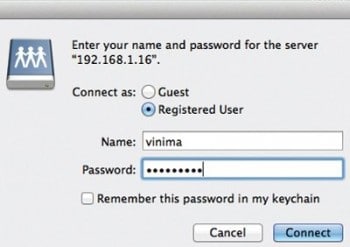
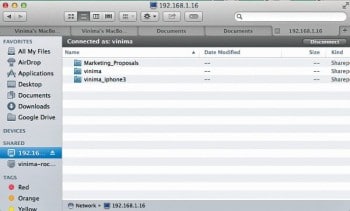
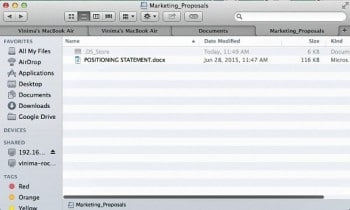
In order to mount the share, open the Finder and click Go ->Connect to Server, and type the address of the shared folder smb://192.168.1.16/Marketing_Proposals. Click Connect and the Finder will pop-up the Rockstor appliance and authentication dialogue where you enter username and password (the same username and password that you are using to access the Rockstor machine). Once the share is mounted, copy the proposal document that you are working on from your machine to this share, and we are then ready to set up snapshots and their management strategy.
You can refer to the screenshots in Figures 6 through Figure 10 for clarity.
Setting up snapshots
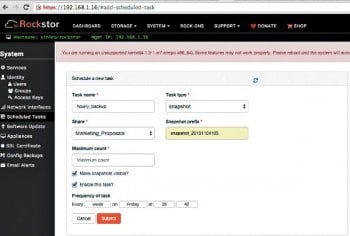
For setting automatic snapshots, go to Scheduled Tasks’ under System’ (and click Schedule a Task’) or Snapshots’ under Storage’ (and click Schedule’) of the Web UI (basically, these are two ways of getting to the same place). The images are shown in Figures 11 and 12. You can configure Rockstor to take snapshots every 30 minutes, an hour, day, week, month, year, or across multiple time periods. This way, you can recover whatever copy you had saved at a particular time.
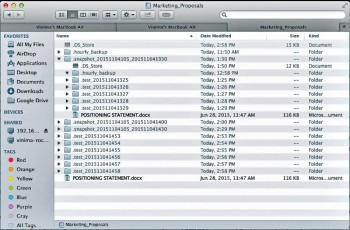
As Snapshots are created per schedule, these will start appearing inside the share (Marketing_Proposals). Going back to our example above, if you want to retrieve the paragraph you edited and removed, and compare it to your current work, you can simply retrieve your back-up from the last 30 minutes or past hour. Figure 12 shows how snapshots are visible on your mounted folder. If you click inside a folder, you will have prior versions of your snapshot. Snapshots, therefore, ensure that you not just have the current version of your work but also a trail of all prior versions saved over a period of time. Figure 11 shows how the set-up screen for a snapshot looks.

Manage your backups using snapshots
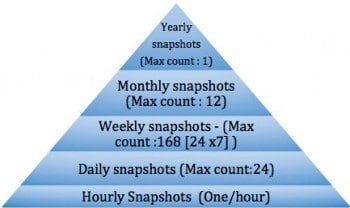
Backups can be managed by using multi-period snapshots, a technique or strategy that allows you to schedule snapshots across multiple time periods. If you are actively working on a project for a week, you may want to back up every 30 minutes or hour of your work while you are actively working on it during that week. However, once you are done, you may want to back up every month, and then every year for archival purposes. Multi-period snapshots help you achieve this self-thinning and manage your backups and storage space.
I will now describe one multi-period snapshot and self-thinning backup management strategy for the proposal document. You can modify this strategy or come up with one that fits your needs better.
While setting up a snapshot task, there is a field called Maximum count of snapshots where you can specify the maximum number of snapshots you want (Figure 11). Say you are setting up an hourly backup, and you want to back up every hour for seven days of a week, then you can set the maximum count to 250 (greater than 24 x 7) snapshots. Once the snapshot count reaches 250, the newer snapshots start overwriting the older ones. Let us also assume that your project was a week long, and for now, you are done, but may make minor edits later. So, you want to retain the 168th snapshot, carry it forward and delete the rest. Say, you set up the snapshot tasks at 10 p.m. on a Monday, so the 168th snapshot will be taken at 9 p.m. on Sunday. You can set up a weekly snapshot task for 9 p.m. of Sunday of that week and move off the daily backups.
You could also choose to carry forward this weekly snapshot for a month. And you can choose a snapshot for a particular day (say, 9 p.m. on the third Sunday of September) and delete the rest. So, now your snapshots will be taken every month. This allows you to make minor changes to your backup and then save a copy every month.
Assuming that you have no need for a monthly backup, and now you want to retain one snapshot for a month in a year for archival purposes and delete the rest, you can do that too (See Figures 13 and 14).
This way, you can start with a lot of snapshots (starting with 168 a week) when you are actively working on a project, and then just save one copy of the final version for archiving.
Similarly, you could create your own strategy for daily, weekly, monthly and yearly snapshots and backups.
References
[1] http://rockstor.com.
[2] http://rockstor.com/docs/
[3] http://forum.rockstor.com/


