


FFmpeg is a free software project that creates libraries and programs to handle multimedia data. It includes libavcodec, an audio/video codec library. FFmpeg is a complete solution for recording, converting and streaming audio and video files.
Sometimes, fans of free software have to jump through many hoops to get to the good stuff. FFmpeg is one such example. Like the VLC media player, FFmpeg can handle almost any audio or video format you throw at it. Yet, most people have not even heard about it. Once you have compiled and installed it, it will prove to be pretty useful.
FFmpeg bills itself as a complete solution to record, convert and stream audio and video. The FFmpeg project provides four simple apps – ffprobe, ffmpeg, ffplay and ffserver. Many audio/video applications use it internally. If not directly, then via mencoder, FFmpeg is used by lots of media players, browser plugins, audio/video editors and other multimedia software. This article will focus on the ffmpeg binary executable, which can be used to convert audio/video files from one format to another.
Compiling FFmpeg
Because many audio/video codecs are encumbered by software patents, GNU/Linux distributions have had to omit FFmpeg or bundle a less-capable FFmpeg version of it. Even if it were compiled with support for non-free encoders/decoders, there would be a risk of a licence violation. Recently, FFmpeg released its Version 3 with a totally native AAC encoder, but more work remains. The solution was for users to do their own compilation. The FFmpeg Wiki site has compilation steps for several distributions. The compilation process does take a while to finish, but it will eventually create the four binary executable files. Copy them to your /usr/bin directory. If you dont want to disturb the FFmpeg installation that came with your Linux distribution, then you can access the binaries by providing their full path from a different directory.
While this FFmpeg installation covers most formats, I found that it would not encode to the audio codec of the undocumented AMV format. AMV is used by many cheap Chinese-made media players. These tiny devices are primarily FM and MP3 players with the video option added as a ‘please ignore it’ extra. The video resolution is a luxurious 160×120! I bought one of these players without realising all this. Fortunately, there was a Google Code project called amv-codec-tools that provided support for AMV using an old version of FFmpeg. If you need to work with this format, then build a custom FFmpeg binary, specially made for AMV, using the following commands. Copy the amv-ffmpeg that the following steps generate to the /usr/bin directory.
git clone https://github.com/vsubhash/amv-ffmpeg.git
cd amv-ffmpeg
./configure
make
So, what can FFmpeg do?
- List supported codecs: The -codecs or -formats options will list all the codecs that are supported. Each codec is referred to by a special name, which will have to be used in your FFmpeg commands when a particular codec needs to be used. The -encoders option will list all codecs which FFmpeg can convert to, i.e., the output formats. The -decoders option will list all codecs which FFmpeg can convert from, i.e., the input formats.
- Check codecs used in a media file: FFmpeg uses the -i option to specify the input file. This will display the streams available in the file and the settings with which each stream was encoded. Do remember that file extensions can be misleading. MP4, AVI or WMV files are merely containers for multiple content streams. There is no guarantee that a WMV file will have a stream in Windows Media Audio format. It could very well have MPEG-3 audio.
ffmpeg -i duffy.ogv
- Convert a file from one format to another: Linux programs typically create OGV/OGG files. However, very few consumer electronic devices support these formats. You can use FFmpeg to convert to a device-compatible format, as it can guess the output format based on the file extension you have used.
ffmpeg -i duffy.ogv duffy.mp4
- Convert a file to AMV format: First you have to convert the video to WMV formate. Then, you can use the AMV FFMPEG binary.
ffmpeg -i duffy.ogv duffy.wmv

amv-ffmpeg -i duffy.wmv -f amv \
-s 160x120 -r 16 -ac 1 -ar 22050 -qmin 3 -qmax 3 \
tank.amv
- Explicitly specify conversion settings: When you let FFmpeg guess the output format and do the conversion, it will choose its own default codec settings. This may not always be what you want. Sometimes, you may have very different requirements. In this example, the container format is MP4. The video stream is set to the MPEG4 codec, 30 frames per second and a 500K bit rate. The audio stream is set to LAME MP3 codec, a 44.1kHz sampling rate and a 96K bit rate. Here, mpeg4 and libmp3lame are the codec names.
ffmpeg -i duffy.ogv \
-vcodec mpeg4 -s 352x480 -r 30 -b:v 500k \
-acodec libmp3lame -ar 44100 -b:a 96k \
duffy.mp4
- Extract audio from a video file: You can use the -vn option to disable the video stream and save the remaining audio stream to an MP3 file, as follows:
ffmpeg -i duffy.ogv \
-vn \
-acodec libmp3lame -ar 44100 -b:a 96k \
duffy.mp3
- Help listen to YouTube and other online video sites: I use the youtube-dl program to listen to YouTube videos. Many TV programmes, such as the Keiser Report, upload their shows to YouTube so that viewers who miss the broadcast schedule can catch up later. With an audio file, you can continue to work while you listen. To install youtube-dl, use the command sudo apt-get install youtube-dl. The first youtube-dl command here uses the -F option (uppercase F) to list all formats in which a particular video is available. The second youtube-dl command uses the -f (lowercase F) to download the video in a particular format identified by a number obtained from the previous command. Later, FFmpeg is used to convert the audio to OGG format so that it can be played with the Audacious player. Audacious has an alternative Winamp interface, which can be minimised to a teeny-weeny but entirely functional floating toolbar. If you would rather view the video, then you can try the YouTube downloader JavaScript given in my article carried in the February 2016 issue of OSFY. You can choose that option if your Net connection does not support streaming videos very well.
# list the available formats
youtube-dl -F \

# download the video in M4A audio format
youtube-dl -f 140 \


ffmpeg -i *.m4a play.ogg
audacious play.ogg & # return to prompt
- Fixe errors: recordMyDesktop is a great screen-capturing program but it sometimes creates video files with incorrect key frames. These errors can make conversions or editing difficult or impossible. FFmpeg can fix these errors if you instruct it to simply copy the audio and video streams to a new file.
ffmpeg -i duffy.ogv \
-c:v copy \
-c:a copy \
duffy-fixed.ogv
- Rotate video: Sometimes, the videos that people take from a mobile phone have been rotated 90 or 180 degrees. You can fix this by specifying a transpose filter, as follows. The transpose value is in multiples of 90.
ffmpeg -i tank.mp4 \ -vf transpose=1 \ tank-rotated.mp4
- Cut a part of a video: To extract a part of a video, you need to specify the start time using the -ss option, and the duration using the -t option (use the hh:mm:ss format). If you dont want the file to be re-encoded, then copy the streams, as shown below:
# start from 1 min 12 sec and go for 2 min 50 sec
ffmpeg -i tank.mp4 \
-ss 1:12 \
-t 2:50 \
tank-cut-recoded.mp4

ffmpeg -i tank.mp4 \
-c:v copy \
-c:a copy \
-ss 1:12 \
-t 2:50 \
tank-cut.mp4
- Append a video to another video: FFmpeg offers several methods for merging. The simplest is to use input videos that use the same codec and, preferably, the same resolution and frame rate. The following commands first create a text file containing the path names of the input files. The FFmpeg commands merge the files specified in the text file.
echo file tank-cut-recoded.mp4 > file-list.txt echo file tank.mp4 >> file-list.txt ffmpeg -f concat -i file-list.txt -c copy tank-mix.mp4
- Perform two-pass encoding: With two-pass encoding, you can get a higher quality video file with fewer artifacts. The data obtained from the first pass is recorded in a log file and then used in the second pass for a more efficient conversion.
ffmpeg -y -i duffy.ogv -f mp4 \
-pass 1 -passlogfile duffy-log-file \
-vcodec mpeg4 -s 320x240 -r 25 -b:v 512K \
-an /dev/null

ffmpeg -i duffy.ogv -f mp4 \
-pass 2 -passlogfile duffy-log-file \
-vcodec mpeg4 -s 320x240 -r 25 -b:v 512K \
-acodec libmp3lame -ar 44100 -b:a 96K \
duffy.mp4
Klaatu (of the GNU World Order podcast) once provided a great video-editing tip. First, down-sample (lower the bit rate with the same resolution) the input video and create your video edits. When the video editing project file is finalised, replace the down-sampled video file with the original, bigger video file. This way, the video editing process and your test renderings are faster. The final rendering can take hours to finish, but you do not waste much time waiting before that. You can use FFmpeg to down-sample the video.
FFmpeg automation
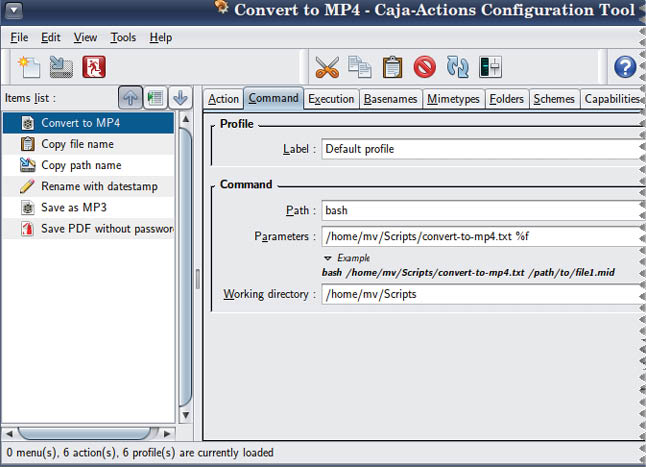
If you have Caja Actions or Nautilus Actions Configuration installed, then you can simply right-click media files to convert them. You will have to first write some BASH scripts that will automate the FFmpeg conversions. Nautilus Actions Configuration (GNOME 2/3) is available in most software repositories. My March 2016 article has steps for compiling Caja Actions (Mate).
References
[1] http://ffmpeg.org/ FFmpeg.org
[2] http://trac.ffmpeg.org/wiki/CompilationGuide FFmpeg compilation guide


FFmpeg comes in handy when you need to convert only the audio portion of a video – e.g. ffmpeg -i input.mp4 -c:v copy -c:a ac3 -b:a 640k output.mp4