

“pfsense.org has an intriguing slogan: ‘We make network security easy.’ With thousands of enterprises utilizing pfSense software, it is swiftly emerging as one of the world’s most popular open-source network security solutions. pfSense is indeed an exceptional firewall.”
pfSense software is a customised distribution of FreeBSD, specifically tailored for use as a firewall and router that is primarily managed via a Web interface. In addition to being a powerful, flexible firewall and routing platform, it includes a long list of related features and a package system that allows further expandability, without adding bloat to the base distribution.
The pfSense project was started in September 2004 by Chris Buechler and Scott Ullrich, with a growing development team. pfSense and its current logo is a copyright of Electric Sheep Fencing LLC.
Apart from pfSense downloads, pfSense.org also provides firewall appliances based on pfSense to cater to a variety of customer requirements. Other offerings include product support, professional services, official training via ‘pfSense university’ and gold membership. pfSense also has great community support.
The latest pfSense version 2.3 was released on April 12, 2016. Some interesting functional changes over the earlier version are:
- Drag-and-drop rule reordering enabled for firewall and NAT rules.
- Live CD support no more available. Live boot using a USB drive.
- Removal of support for unsecured protocols such as Single DES Encryption, Wired Equivalence Privacy (WEP) for wireless encryption, etc.
Selection of download image
For AMD or Intel 64-bit CPUs, download the image for AMD (64-bit) architecture. Do not forget to crosscheck the SHA256 checksum to verify if it’s the correct download. Create a CD from the downloaded ISO, select the required hardware and proceed to install.

Recommended hardware
Selection of hardware depends on required throughput and the various features to be used such as VPN, captive portal, additional packages, etc.
For pfSense installation, the computer system must have at least two Ethernet cards one per WAN and LAN interface. For extra segments such as DMZ/secondary WAN, additional Ethernet card(s) are required.
For writing this series of articles, I have used a system with three Ethernet cards.
Installation
Make sure that data from the hard disk being used for pfSense installation is backed up before proceeding. The installation will delete everything from the disk and create new suitable partitions.
“The basic pfSense installation is remarkably simple and straightforward. Begin by booting the system using the CD created from the ISO image and follow the prompts to answer very simple questions. Care should be taken at one step – select ‘I’ to start installation on the hard disk when prompted to choose from ‘Recovery’ and ‘Installer’ mode. Once this process is complete, reboot the system.”
Earlier versions of pfSense had live boot CD support, which is no more available. But the live boot functionality is possible using a USB drive.
The next step is to assign interfaces. For this, select the Assign Interfaces menu option at the prompt. All the Ethernet interfaces recognised by pfSense, along with their MAC IDs and their link states, will be visible. Select the appropriate interfaces for your LAN, WAN and OPT1 connections. Figure 1 depicts the set-up used for this test installation.
From the menu, proceed to ‘Set Interface IP’ and assign the LAN interface IP address. Once that is done, the box is ready to be controlled from the Web based interface. Connect to pfSense’s Web interface from the system connected to the Ethernet switch.
This system should be configured with the IP address in the range of the pfSense LAN IP.
“The system default login name is ‘admin’ and the password is ‘pfSense’. As a best practice, ensure to change your password from the ‘System’ > ‘User Manager’ > ‘Actions’ menu immediately after the first log-on.”
Configuration
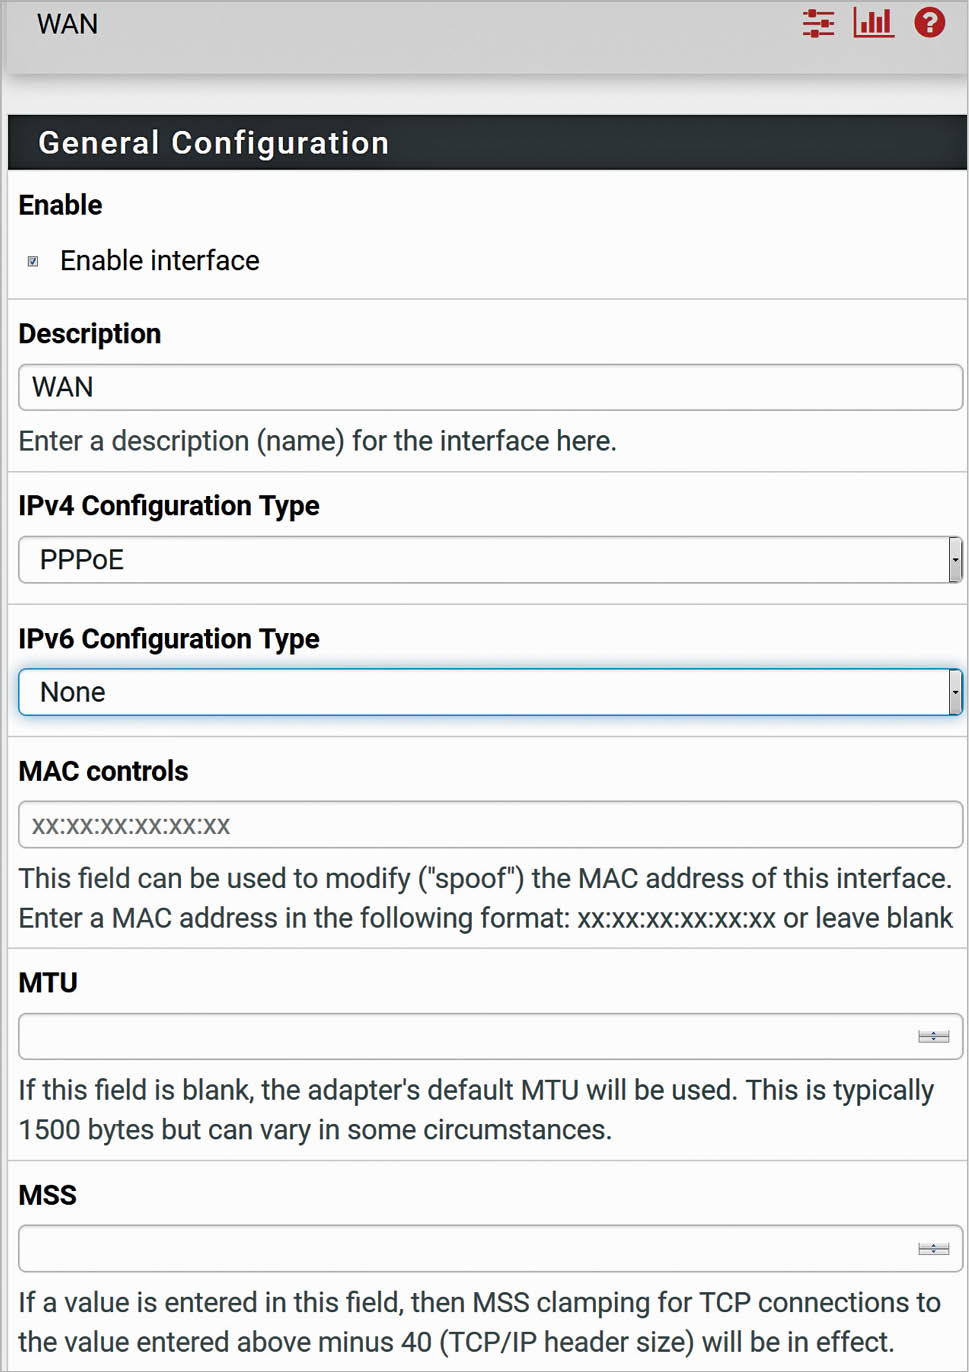
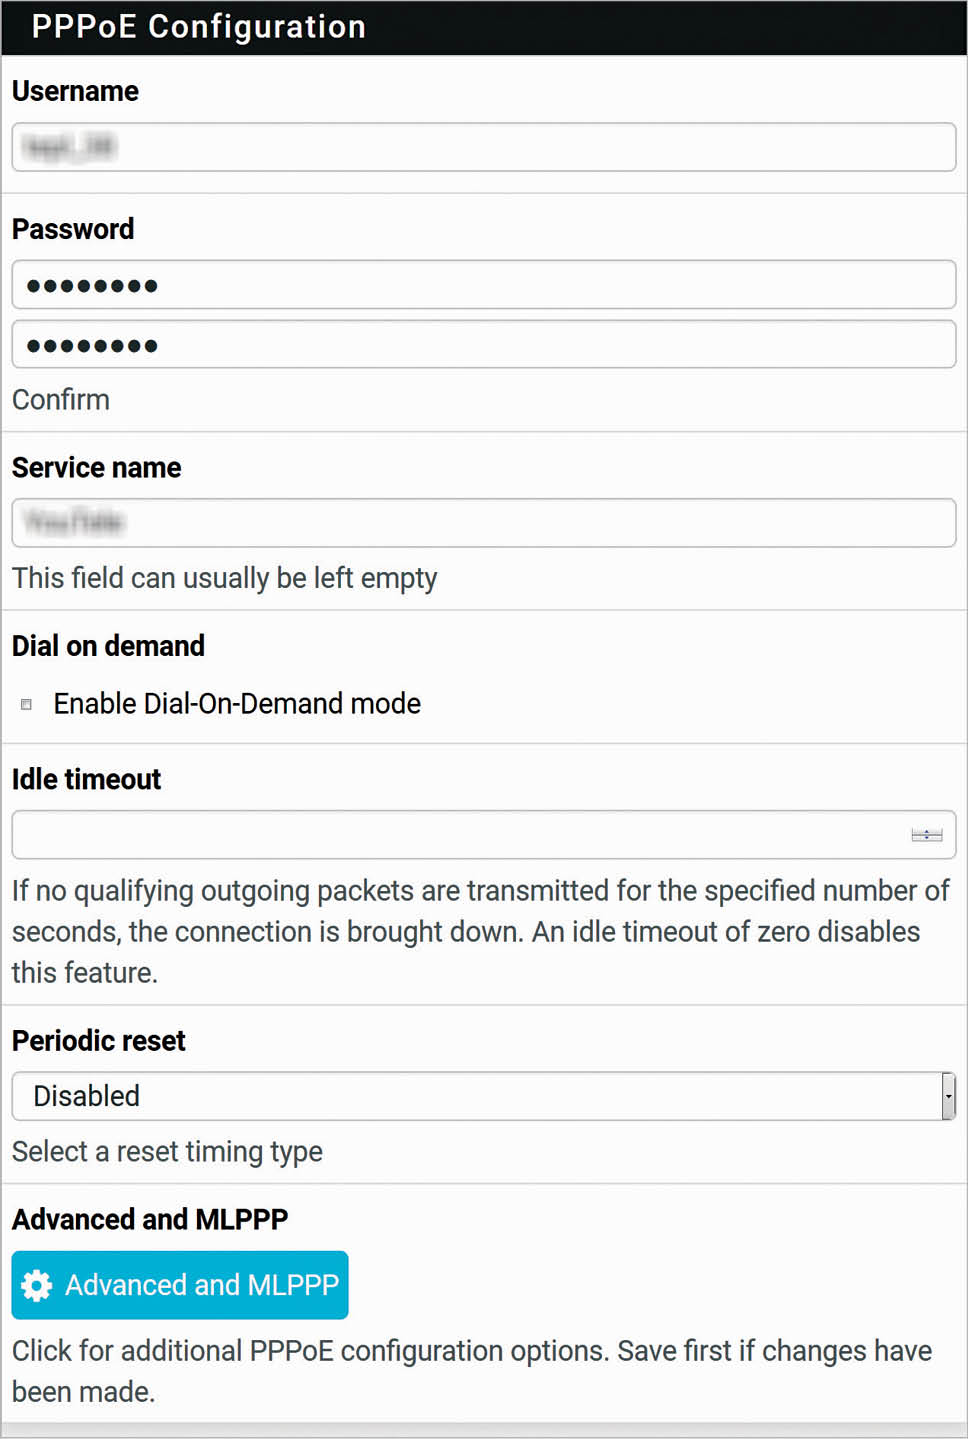
pfSense supports various WAN protocols such as DHCP, Static IP, PPP, PPTP, PPPoE, etc. In this test set-up, a PPPoE WAN connection has been used. Under Interfaces WAN PPPoE connection, fill in the user name, password, service name (optional) and save the configuration. Go through Figures 2 and 3 for detailed settings. The relevant explanation about these settings is available on the page. It is also possible to configure pfSense using System- Setup Wizard menu.
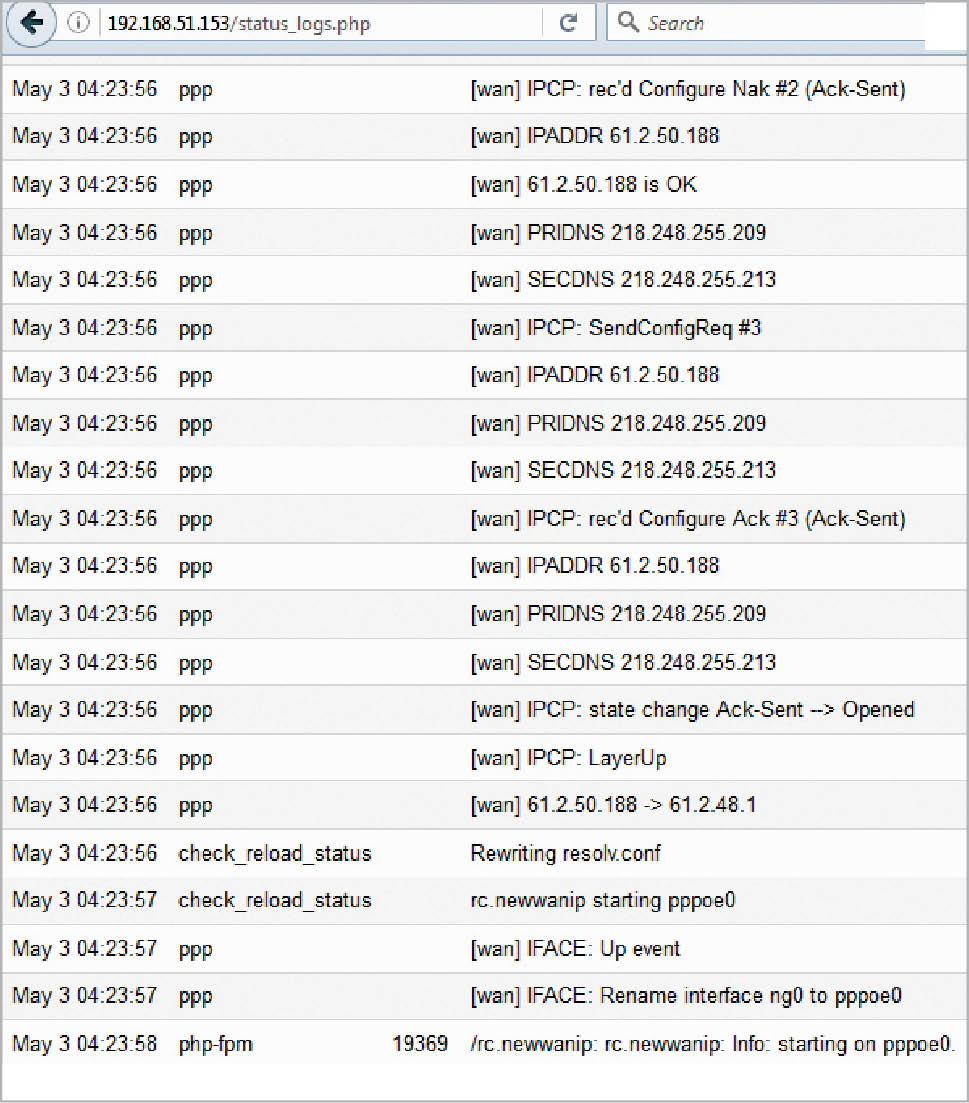
Assuming the cable from the PPPoE modem to the pfSense WAN port already exists and that the modem/Internet connection is in working condition, the Internet will connect readily. Use the logs available under Status System Logs to troubleshoot if you face any problems.
An interesting feature called Dial-On-Demand (DoD) is available for the PPPoE connection. If there is no traffic towards the Internet for Idle timeout seconds, the DoD mode will disconnect WAN, and on the next Internet request, the WAN will reconnect.
The basic pfSense LAN – WAN setup is now complete. It will help you if you browse through the pfSense Web based menu for getting acquainted with it, before continuing with further installation and configuration.
Let us take a look at several interesting pfSense features and packages.
A selection of pfSense’s inherent features
- Creating ACLs to control access from the internal IP addresses towards the external IP addresses for the required ports (services)
- Network address translation
- DHCP server
- NTP server
- ClamAV anti-virus
pfSense packages
Various packages are available for online installation from System Package Manager Available Packages menu. This menu lists all such available packages including:
- Iftop – A real-time interface monitor
- Nmap – A network exploration and security utility
- Openvpn client export – This exports pre-configured openvpn client settings for Windows and MAC
- OpenBGPD, Routed and Quagga_OSPF – Offers support for BGP, RIP V1/V2 and OSPF routing protocols
- Snort and Suricata – For intrusion detection and prevention
- Squid – This is a high performance Web proxy cache, which also supports SSL filtering
- SquidGuard – This is a Web proxy URL filter
Out of these, the most popular is Squid for caching and SquiqdGuard for website filtering.
Installation and configuration of the Squid proxy server
“Go to ‘System’ > ‘Package Manager’ > ‘Available Packages’ and click on the ‘Install’ button corresponding to Squid.
The Squid proxy will download and install automatically. Upon seeing ‘Success’ at the end of the installation screen, you’ll know that the Squid installation is complete. This will add two menu items under ‘Services’ – ‘Squid Proxy Server’ and ‘Squid Reverse Proxy’.
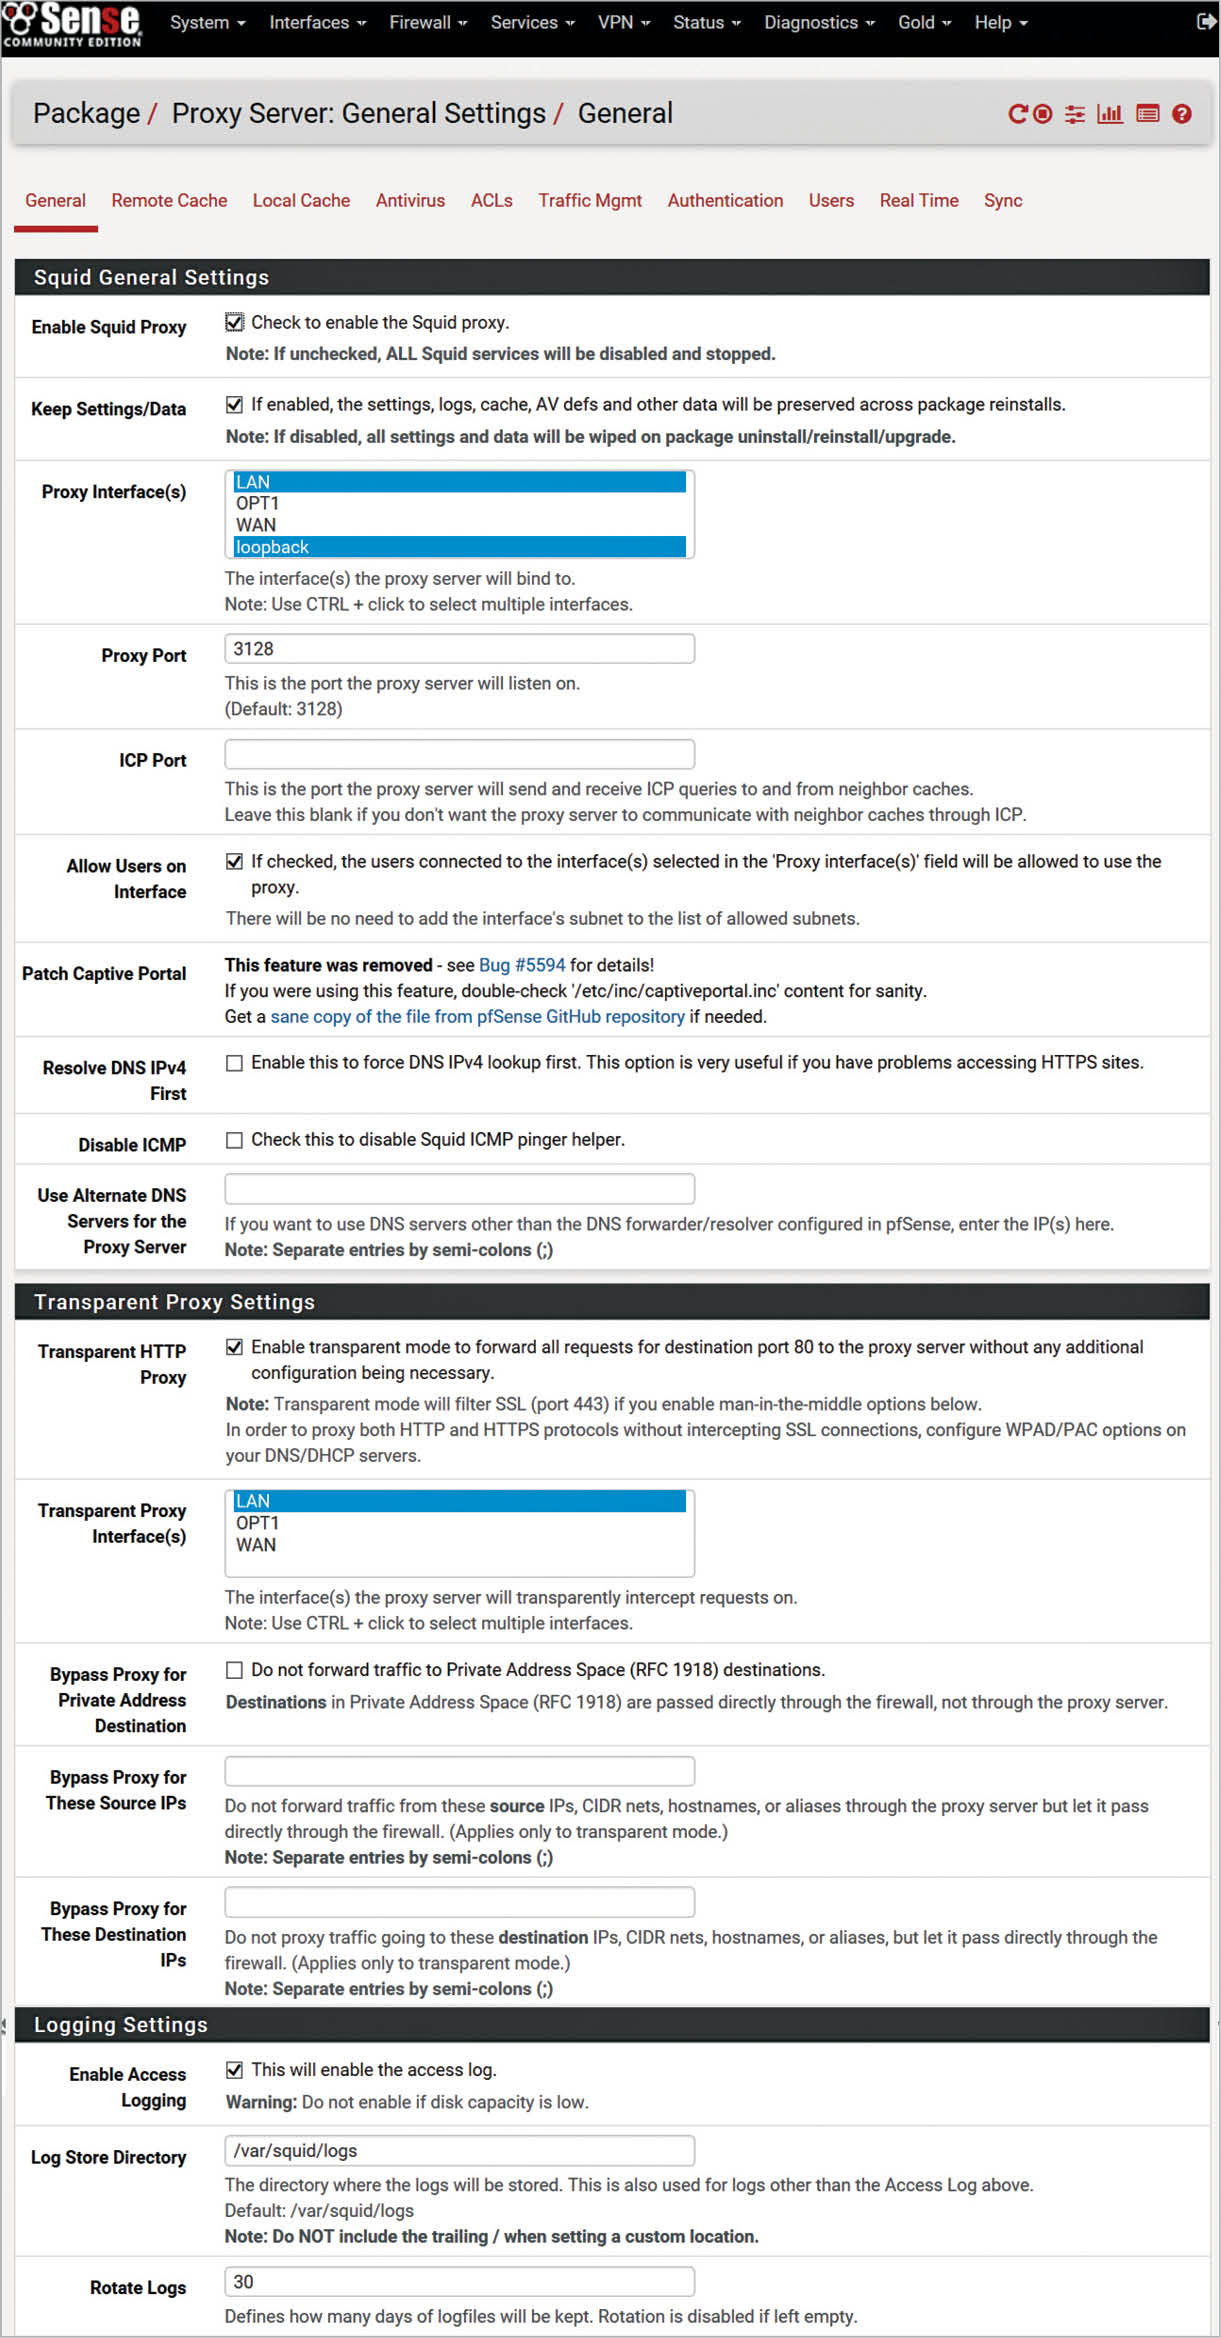
Start by navigating to ‘Services’ > ‘Squid Proxy Server’ menu. Refer to Figure 5 for detailed configuration parameters.
One by one, browse through the following sub-menus – ‘Local Cache’, ‘ACLs’, ‘Traffic Management’, ‘Authentication’, ‘Users’ – and make the desired changes or save their default settings.
This completes Squid’s configuration. Under ‘Real Time’, you can view the current Squid Access, Squid Cache tables, and if enabled, SquidGuard and ClamAV tables too.”
Installation and configuration of SquidGuard
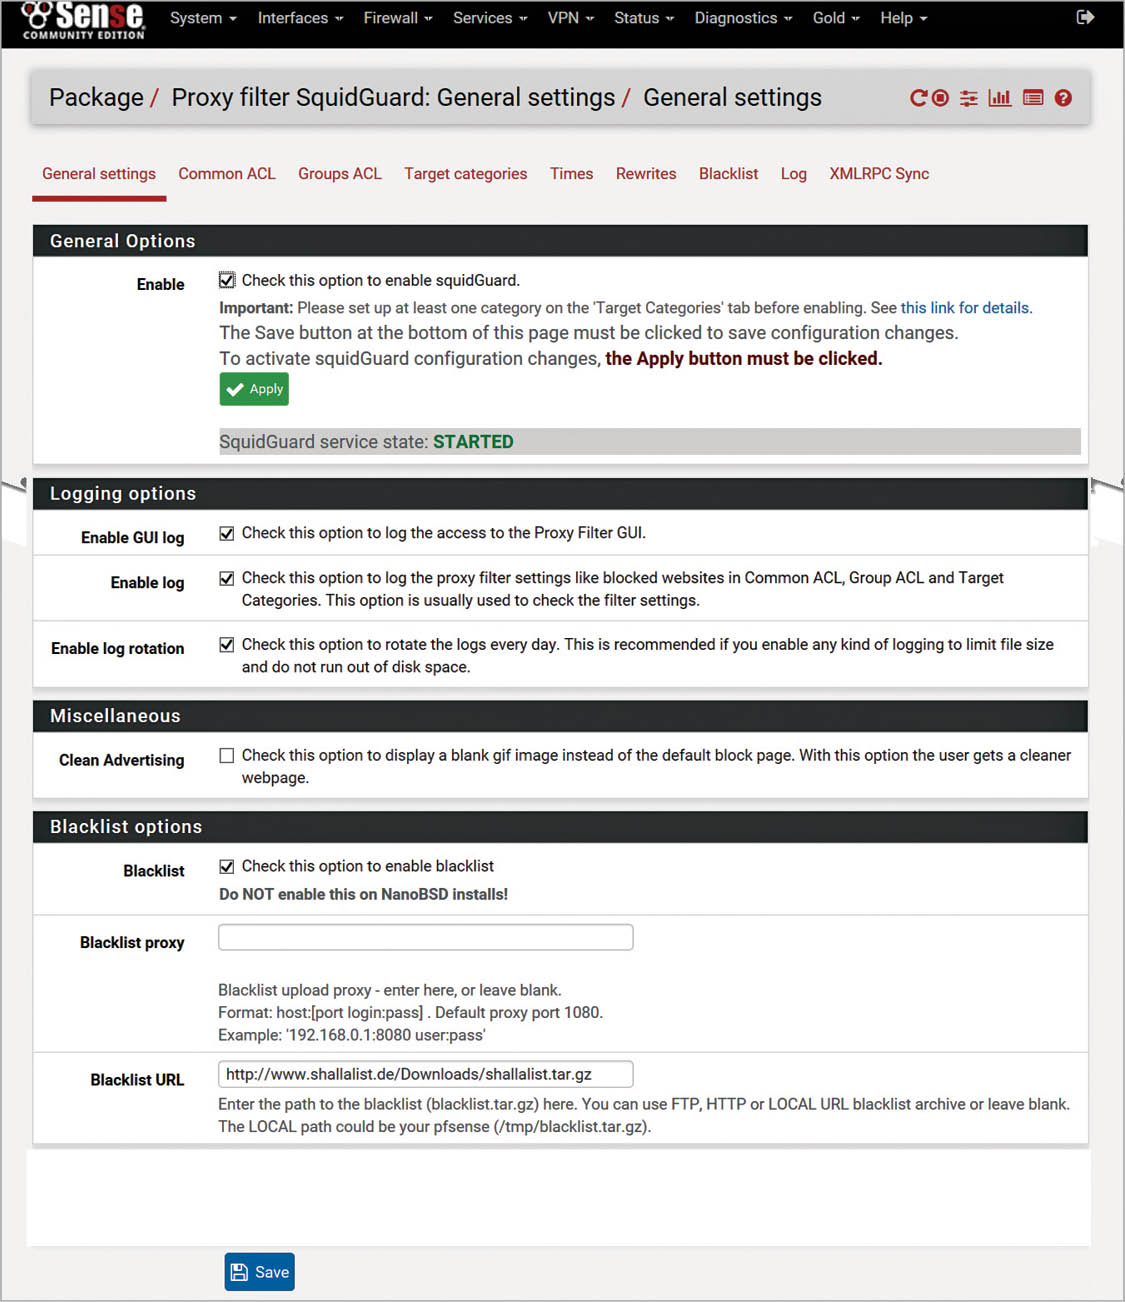
“Go back to the package manager and install SquidGuard. Successful installation will add the ‘SquidGuard Proxy Filter’ menu item under ‘Services’. Refer to Figure 6 for detailed configuration items.
To enable SquidGuard to filter out unnecessary websites, a blacklist needs to be configured and periodically updated. This can be done from ‘Services’ > ‘SquidGuard Proxy Filter’ > ‘Blacklist options’. One widely used blacklist URL is http://www.shallalist.de/Downloads/shallalist.tar.gz. Please review the terms and conditions of using the Shallalist website beforehand.
Before proceeding, please review the steps detailed at the end of this article to address known issues associated with Squid and SquidGuard.
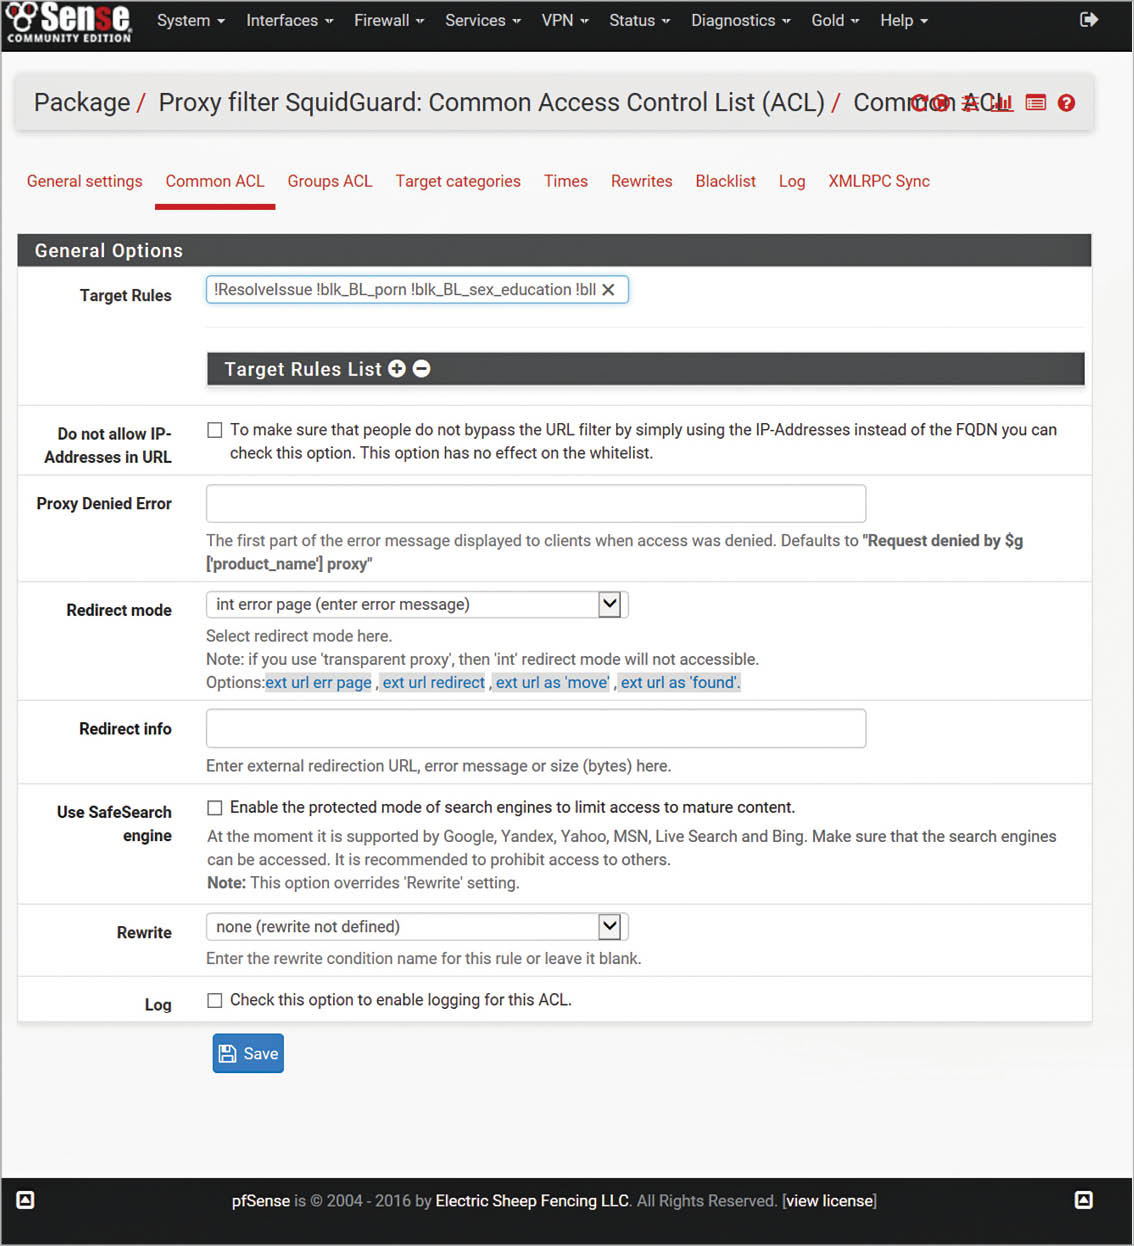
Continue updating the blacklist from the ‘Services’ > ‘SquidGuard Proxy Filter’ > ‘Blacklist’ menu by clicking on the ‘Download’ button. Once the download is completed, for initial configuration, navigate to ‘Services’ > ‘SquidGuard Proxy Filter Common ACL’ menu, expand the target rules lists by clicking the ‘+’ button, and deny access for unwanted target categories such as gambling, porn, etc. Then click on ‘Save’. Refer to Figure 7 for a configuration example.
Once configured, apply this configuration by clicking the ‘Apply’ button from the ‘Services’ > ‘SquidGuard Proxy Filter’ > ‘General’ menu.
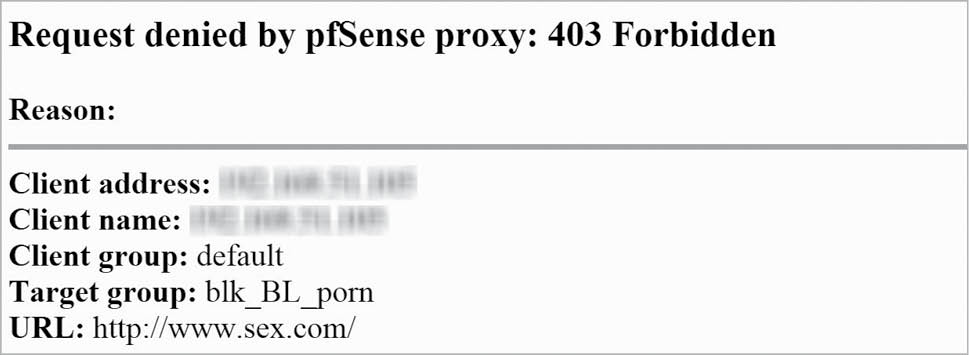
Verify that the filtering is working properly by attempting to access one of the blocked sites in the web browser. The browser should display a ‘Request denied’ error along with the reason and client IP address. Unauthorized access attempts are also logged and can be viewed from ‘SquidGuard Proxy Filter’ > ‘Logs’.”
| Enable SSH access | System ‘Advanced’ Admin Access ‘Secure Shell’ Enable Secure Shell. If required, you can define the non-standard SSH port number. |
| Shutdown/restart | Diagnostic ‘Halt/Diagnostic’ Restart |
| Check running services | ‘Status Services’ |
| Backup & Restore settings Reinstall existing packages | ‘Diagnostics’ Backup & Restore |
| Checking Interface Status Connect/Disconnect WAN | Status Interfaces |
Overcoming known Squid proxy problems
Detailed instructions and discussions related to the issue of SquidGuard not able to auto restart after system reboot are available at: https://forum.pfsense.org/index.php?topic=94312.0
For the ready reference of users, the steps from this discussion are detailed below.
1. Login to your pfSense computer using SSH and monitor cache log:
tail -f /var/squid/logs/cache.log
2. In the proxy filter SquidGuard/target categories, define a dummy custom target category. Name: Dummy. Description: Dummy custom target category (Fix: Squid and SquidGuard are not set to auto start after reboot). The remaining parameters are blank.
3. In the proxy filter SquidGuard/Common Access Control List, in Target Rules, find your dummy target category and set access to Deny to create the missing blacklist directory.
4. Go to General Settings and select Apply to activate the configuration update.
5. Your monitoring tail of cache.log will immediately start to scroll, indicating successful implementation of the workaround.
6. It is advisable to do a configuration backup (diagnostics/backup/restore).
7. Do a system restart and validate that Squid and SquidGuard services now successfully auto-start.


Hi,
great article, thanks for posting. It might also be worth checking out Linewize, we’ve built an open source cloud managed layer 7 firewall which is free to use. We provide complete visibility over internet use on a per user, device and application basis through our subscription services, all the firewall and filtering goodness is free for anyone to use. If you’re keen to have a look the install instructions are here http://linewize.com/install. Keen to know what you think.
Cheers Scott.