Telephone density in India exceeds the Internet density. Telephony, therefore, is a better means of reaching a targeted client. It certainly has greater advantages when reaching out to a largely illiterate clientele. Delve into this article if you wish to learn more about telephony and possibly do research in voice technologies.
In this article, we will learn how to install Asterisk and make an outgoing call. We will also learn how to make conference calls.
First, let us understand some basic concepts. The different methods for calling in India are:
- SIP trunk lines
- PRI lines
- GSM
SIP trunking is a Voice over Internet Protocol (VoIP) and streaming media service based on the Session Initiation Protocol (SIP). Internet telephony service providers (ITSPs) use it to deliver telephone services and unified communications to customers equipped with SIP-based private branch exchanges (IP-PBX) and unified communications facilities. Basically, trunking is transmitted voice over data. Later, we will learn how to create a SIP user and make an IVR call based on a SIP line. In India, Tata Teleservices Ltd and Reliance provide SIP trunk lines.
PRI lines are primary interface lines. Even though there is only one line that physically terminates in the customer PBX, a PRI line can receive/send 30 calls simultaneously! A PRI line is an end-to-end digital circuit.
There is also the GSM module for calling with the W400 GSM card, which is used to make calls from a GSM SIM card. From one SIM card, you can make five calls, simultaneously.

Installing Asterisk
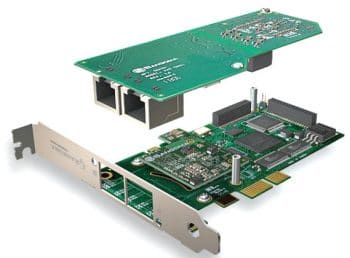
I am using the Centos 6.7 (64-bit) OS, with the Sangoma PRI card A102E with echo cancellation (see Figure 1 for the Sangoma PRI card). I have placed this card in the PCI Express slot in the server.
Before installing Asterisk and the Sangoma driver, please install Centos 6.7, 64-bit. Now, run the command yum -y kernel*. Download libpri by running:
wget http://downloads.asterisk.org/pub/telephony/libpri/old/libpri-1.4.12.tar.gz
Download the complete Dahdi Linux by running the following code:
wget http://downloads.asterisk.org/pub/telephony/dahdi-linux- complete/releases/dahdi-linux-complete- 2.6.0+2.6.0.tar.gz”
Download Asterisk by running the command given below:
wget http://downloads.asterisk.org/pub/telephony/asterisk/old-releases/asterisk-1.8.21.0.tar.gz
Install libpri by following the steps given below:
tar zxvf libpri-1.4.12.tar.gz
cd libpri-1.4.12
make clean
make
make install
Install the complete Dahdi by running the following commands:
tar zxvf dahdi-linux- complete-2.6.0+2.6.0.tar.gz
cd dahd-linux- complete-2.6.0+2.6.0
make clean
make
make install
make config
Install Asterisk by running the following commands:
tar zxvf asterisk-1.8.21.0.tar.gz
cd asterisk-1.8.21.0
make clean
./configure
make
make install
make samples(for only fresh installation)
Downloading Wanpipe
Go to cd /usr/src and download Wanpipe by running:
wget ftp://ftp.sangoma.com/linux/current_wanpipe/wanpipe-7.0.3.tgz
Install the dependencies by running the following commands:
yum -y install kernel-devel- $(uname -r) libtool* gcc
make patch perl bison gcc-c++ ncurses-devel flex libtermcap-devel autoconf*
automake*”.
Place the card properly and power on the system. Check whether the system detects the card, as follows:
lspci | grep Sangoma.
Next, check whether Dahdi detects the card Dahdi_tool. Go to the directory cd /usr/src and install Wanpipe by giving the following commands:
tar zxvf wanpipe-7.0.3.tgz
cd /wanpipe-7.0.3/
make clean.
Now run the following command:
./Setup install “
If it prompts ‘Yes’ press ‘y’ and proceed to the next level.
Note: The next step is to configure the port for PRI calls. Please note that in the E1 card, 30 channels are used for the PRI line.
Steps you need to follow to configure the port of the card
1. You will see the Wanpipe driver installation splash screen. Press ‘y’ to continue.
2. You will be presented with a dependency check with pass/fail results. If there are any failures, you must exit and install the missing dependencies manually.
3.
Press Enter to continue. Press Enter at the following screen for the default kernel source location.
If there are any error messages that result, it means some Linux kernel development packages are missing. It also means that the ‘Preparing your operating system for software packages’ step above has failed to download your kernel-development packages. If this happens, you must search online for the kernel-development packages for your kernel, and then download and install them using (rpm -i…).
Press Enter to continue.
3. Next, you will be presented with seven different options on how to install the Wanpipe driver.
Select Option 2 to install the Wanpipe driver for Asterisk.
4. You will be asked to provide the location of your Dahdi software package. If you have downloaded and installed Dahdi in /usr/src/, simply press the number pertaining to the location.
In this example, the user has Dahdi version 2.7.0 installed on the system.
If your Dahdi installation resides in another directory, press ‘m’, and then manually enter the full path. If you have multiple Dahdi versions on your system, select the correct one.
To find out which version of Dahdi is installed on your system, type dahdi_cfg -vvv in another Linux terminal.
5. The Wanpipe driver will now start to compile on your Linux operating system.
Press ‘y’ to proceed.
6. Press Enter to continue.
7. Press Enter to continue.
The example above is for an A102 2 port E1/T1 card.
8. Continue to press Enter when asked. Press ‘y’ to install Wanpipe start scripts.
9. After pressing Enter Wanpipe driver installation will complete on your server and now we are ready to start configuring the Sangoma hardware.
10. Press ‘y’ to configure all Sangoma hardware installed on the server. If you have installed Wanpipe to upgrade from a previous version, you must exit the installation process now. Because if you continue, you will overwrite all previous configurations.
11. If you have not installed your Sangoma hardware yet, you can exit the installation, install the hardware and continue by typing the wancfg_Dahdi command to start the configuration script.
12. The on-screen prompts that appear next will be unique to your Sangoma hardware and specific to your telecom settings. We will not show these screenshots here, but if you wish to see more details on what screens will show up next, please visit the specific wancfg_Dahdi pages for details.
13. After you have completed the configuration section of your Sangoma hardware, you need to restart your server.
14. Select Option 3 on your screen to save and stop Asterisk and Wanpipe (if it’s already running). Any new configuration will apply only after restarting.
15. On the same screen, select Option 2 (Yes) to proceed.
16. Select Option 1 to start Wanpipe on system boot. If your server ever reboots unintentionally, you will want the driver to automatically start in order to have your server back in production without manual intervention.
17. Select Option 1 (Yes) to have dahdi_cfg run after the Wanpipe driver starts. This step configures Wanpipe ports for Dahdi.
You can also visit the link http://wiki.freepbx.org/display/PC/Telephony+Cards+for+Asterisk for installation instructions.
After the installation and configuration of Asterisk with the Sangoma card, the LED light will glow green.
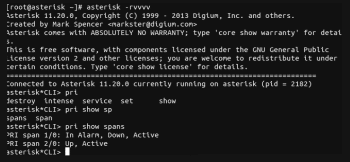
Now we begin the PRI line check and make a test call. Open the terminal and type the following:
#asterisk -rvvvvv
and type command
pri show spans.
It will show that the channel is up and active (see Figure 2).

Making a call
To make a call, type the following command:
> originate dahdi/g0/9999999999 application Playback hello-world
In the above command:
- originate is to make the call.
- dahdi/g0/ is the channel name, followed by the phone number 999999999.
- application is the command for which application or function you want to call.
You can also check the list of applications by using the command core show applications.
Playback is the application name or function name. This function is used to play a GSM or .wav file to the called number. hello-world is the data for the function named Playback. Please see Figure 3.

To make a conference call
In a terminal, run the following command:
> originate Dahdi/g0/7840086250 application Dial dahdi/g0/999999999
In this command, we use the application name Dial, and data for the dial function is the channel name with the phone number dahdi/g0/999999999.


