If you are thinking of kickstarting the development of microcontroller targets, but don’t have suitable hardware, or if you are worrying about hardware issues, here is the perfect solution for you. The GNU MCU Eclipse project comes with great features to overcome all these worries.
The GNU MCU Eclipse project, formerly known as GNU ARM Eclipse, offers a variety of plugins and components for the development of ARM targets for the Cortex-M series architecture. In this article, we’ll discuss various components offered under this project, the supported features, and the installation and usage of each. We’ll follow that up by building a simple project and emulating the Blinky code under the Qemu environment.
This project offers the following components for ARM development:
- MCU plugins to generate template code, as well as to build, flash and debug.
- Qemu, to emulate the generated outcome without the need of actual hardware, with good support for popular STM32 series targets.
- OpenOCD, to flash and debug code through JTAG probes and debugging hardware.
- Windows Build Tools, for the Linux-like make utility and basic commands like rm and echo used in makefiles.
- Packs manager, to install Keil/ARM CMSIS packs (in an experimental state, at present).
But the toolchain is not hosted under this project, and these plugins work well with standard toolchains designed for supported architecture. Let’s now take a tour of these components, their installation and usage.
Toolchain
You need a toolchain to build the code for the target architecture. For this, download the prebuilt binaries of GNU ARM Embedded Toolchain from developer.arm.com/open-source/gnu-toolchain/gnu-rm according to the host environment, i.e., Windows, Linux or Mac OS. This toolchain has a typical cycle of quarterly releases, and the latest release is 6-2017-q2-update which ships with GCC 6. From 6-2016-q4-major onwards, prebuilt binaries for 32-bit Linux have been dropped and only support for 64-bit Linux is available. However, one can build the toolchain from available sources for any host architecture. Releases up to v5-2016-q3 are also available at launchpad.net/gcc-arm-embedded, with binary support for 32-bit Linux only, and through PPA for Ubuntu distributions.
This toolchain provides various tools for development and the anatomy of generated files with the prefix ‘arm-none-eabi-‘. A few significant tools are:
- arm-none-eabi-gcc, which is a wrapper for various phases of C development
- arm-none-eabi-g++, a wrapper for various phases of C++ development
- arm-none-eabi-ld, which links several object files and libraries, generating an executable with the help of linker maps and startup code
- arm-none-eabi-as, for assembling code and to generate object files
- arm-none-eabi-cpp, for preprocessing source code
- arm-none-eabi-objcopy, to convert an executable file from elf format into bin or hex format
- arm-none-eabi-nm, to check the symbol table
- arm-none-eabi-objdump, which is to disassemble generated object files and section analysis
- arm-none-eabi-readelf, for reading the headers based on the magic number present
- arm-none-eabi-size, to check the section wise footprint of the generated executable file
- arm-none-eabi-gdb, for debugging and tracing with the help of debugging hardware
OpenOCD
This on-chip debugger utility comes with flashing and remote debugging support for various target boards. It works with different JTAG probes connected to the host with onboard or external hardware debuggers. GNU MCU Eclipse OpenOCD is a fork of the original OpenOCD and it is designed to work well with MCU plugins. Prebuilt binaries are available at gnu-mcu-eclipse.github.io/openocd/releases for various host environments.
Qemu
Qemu, informally known as ‘Quick emulator’, can execute applications built for various target architectures and can emulate full system images also. Mainline Qemu has limited support for bare metal targets (a few of the TI Stellaris family only) based on the Cortex-M architecture.
GNU MCU Eclipse Qemu is a fork of the original Qemu and comes with support for various popular targets of the STM32 Discovery and Nucleo series. Support for more targets like NXP/Freescale Freedom Kinetis series, NXP LPC series, TI Tiva series, Atmel SAM series and Infineon CPU Card/Board series is in the pipeline for future releases. Please stay tuned to gnu-mcu-eclipse.github.io/qemu/ for more updates.
Download the latest stable version of Qemu binaries from github.com/gnu-mcu-eclipse/qemu/releases, extract to a suitable location and update the path to the bin directory.
IDE with plugins
Download the latest stable version of GNU MCU Eclipse IDE for C/C++ developers from github.com/gnu-mcu-eclipse/org.eclipse.epp.packages/releases. These archives are already bundled with CDT and MCU plugins. The first major release (which is the latest one, as of now) is based on the Neon 3 release of Eclipse IDE and v4.1.1 of MCU plugins.
Alternatively, you can download the regular Eclipse IDE for C/C++ developers using the Eclipse installer or through offline archive options, and update the MCU plugins via Eclipse Market Place. For this, navigate to Help –> Eclipse Market Place, search for GNU MCU Eclipse and install the plugins.
These plugins are available at https://gnu-mcu-eclipse.netlify.com/v4-neon-updates, which can be specified for manual installation by navigating to Help –> Install New Software and adding a new repository with the above URL. This repository supersedes the earlier plugins of v3.x hosted at http://gnuarmeclipse.sourceforge.net/updates.
The plugins come with support for various targets from the STM32 series, the NXP/Freescale Kinetis series of boards and are capable of the following:
- Generating template projects
- Building the code with the help of a cross toolchain
- Flashing and debugging code using OpenOCD, J-Link or CodeRed modes
- Emulating using Qemu in the absence of hardware
To map the necessary components with the installed plugins, go to Windows –> Preferences –> MCU and fill the suitable locations of Toolchain, OpenOCD, Qemu, etc, to enable project wizards to make use of the tools available in these directories.
Note: Actual components like Toolchain, OpenOCD and Qemu need to be installed individually, as mentioned in earlier sections. This plugin set just supports the above components in a friendly mode.
Project templates
The installed plugins (prebundled or manually installed via Market Place) enable project wizards for the STM32 Fxxx series, Freescale Kinetis KLxx series, Analog Devices’ ADuCM36X family of boards and a template for the generic Cortex-M series target. These wizards help us to create empty projects or Blinky templates with vendor-specific abstraction APIs and target-specific options under Project settings.
Blinky demo
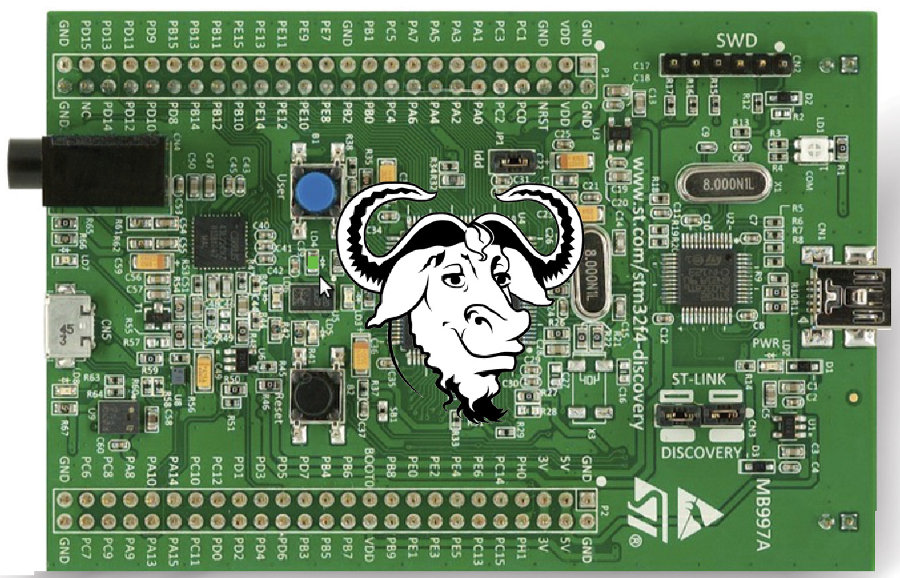
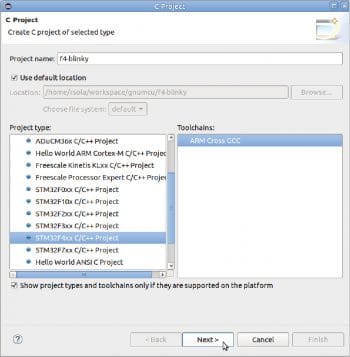
Let’s try a Blinky demo for the STM32 F4 Discovery target. This board is equipped with four user LEDs, one user pushbutton, an onboard accelerometer, USB OTG connector, an audio interface and pin out for other interfaces. OpenOCD works well with the onboard ST-Link hardware for debugging purposes. Create a new C project using File –> New –> C Project. Next, choose STM32F4xx C/C++ project as Type and give it a suitable name, say f4-blinky, as shown in Figure 1.
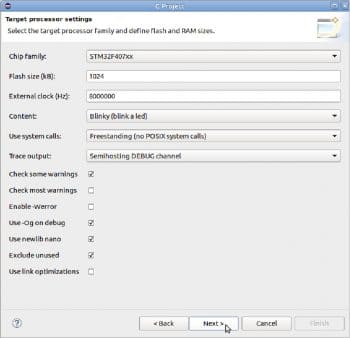
In the next wizard, choose the desired MCU chip according to the target board and configure other parameters like Flash memory size, clock speed, etc. Choose the Blinky template under Content type, and leave other options with default values for the initial work as shown in Figure 2. Follow default values for Folder settings and select configurations in the next two wizards. In the final wizard, provide the path of the bin directory under the extracted toolchain and hit Finish to complete the set-up process.
Right-click on the generated project, i.e., f4-blinky under the Project Explorer pane, and then click on Build Project. On successfully completing the build, you can see the following console output:
Finished building target: f4-blinky.elf

Invoking: GNU ARM Cross Create Flash Image

arm-none-eabi-objcopy -O ihex “f4-blinky.elf” “f4-blinky.hex” Finished building: f4-blinky.hex

Invoking: GNU ARM Cross Print Size

arm-none-eabi-size --format=berkeley “f4-blinky.elf”

text data bss dec hex filename

8599 160 420 9179 23db f4-blinky.elf

Finished building: f4-blinky.siz
Project settings
Once the project is generated, you can tune various options for the preprocessor, C/C++ compiler, linker, etc. For this, right-click on the project, and go to Properties –> C/C++ Build –> Settings.
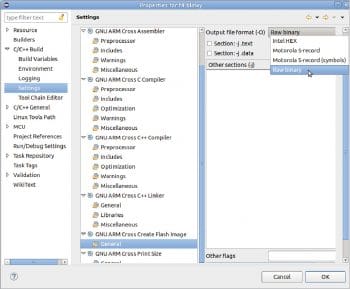
Under the Tool Settings tab, you can choose various options like Target, Assembler, Compiler, Linker, Flash, etc. Plugins will generate suitable options of the toolchain for each selection. For example, if you want to generate a Flash image in Raw Binary format instead of Intel HEX, choose the output file format under GNU ARM Cross Create Flash Image –> Output File Format. Likewise, you can play around with various options under this tab view and check the selected values under ‘All Options’ expected for various tools in CLI mode. This way you can also learn about the various options to be used with a toolchain in simple interactive steps.
Flashing the code – Run/Debug
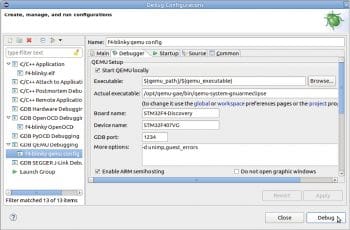
Once project settings are customised, rebuild the project. Right click the project and navigate to Debug –> Debug As –> Debug Configurations. Double-click on GDB QEMU Debugging to generate a new configuration (for the first time only). Under the Debugger tab, fill in the Board name as STM32F4-Discovery and Device name as STM32F407VG, as shown in Figure 4. You can try this with other board names as listed by qemu-system-gnuarmeclipse -M ? and other device (MCU cores) names as listed by qemu-system-gnuarmeclipse -mcu ?
Now, launch the GDB session by hitting the Debug option. The Eclipse perspective will be changed to debug mode and you can try various debug options like suspend, resume, terminate, step into, step over, step return, etc. Also, you can watch the state of variables, breakpoints and registers. You can also watch peripheral registers if the packs plugin and target-specific packs are installed.
Similarly, if you are flashing the code on a real target, create an OpenOCD configuration and fill in the config options as -f board/stm32f4discovery.cfg under the Debugger tab, and launch an OpenOCD session. You may rename the generated configuration in a convenient way. You can specify a suitable OpenOCD script name for other targets under the config options.
Once the debug session is launched, you will observe that the selected LED is blinking for a given time interval on the real target or on the graphical window enabled by Qemu emulation, and semi-hosting output from the target under the Console tab. At present, the Qemu based simulator supports LED blinking and button-pressing only; to test other peripherals, you need to go for a real target.
If you are not planning to trace the code, step by step, or watch the intermediate snapshots, right click on the project and select Run Configurations under the Run As sub-menu. This executes code directly on a real target or under Qemu. Run and debug sessions can also be launched using the available menu options or toolbar options.
RISC-V architecture support
RISC-V, pronounced as RISC five, is an open instruction set architecture that is based on RISC principles. It enables open hardware design in a better way as the ISA is patent-free, unlike other architectures, and many CPU designs are available under the BSD licence. Several projects based on the RISC-V architecture are hosted at github.com/riscv like the toolchain, debugger, emulator and Linux kernel port, file system, standard libraries, etc. The GNU MCU Eclipse project comes with added support for this open architecture through the plugins of v4.x onwards.
Since the project code, necessary libraries, toolchain and plugins are open under this environment, you can choose the desired versions of the toolchain and debugger from any repository of your choice. This helps in getting a better understanding of the whole development cycle and the anatomy of each phase, as well as the generated outcome. You can try these steps and explore further!


