


This article takes a quick look at the need for VM migration, its benefits, steps to develop an experimental test-bed for a cloud VM migration environment, and trends in virtualisation technology.
Cloud computing inherits one of the key features provided by server virtualisation called virtual machine (VM) migration. VM migration is defined as: “The process of transferring a VM from a physical machine to a target data centre server to achieve load balancing, fault tolerance, server consolidation and server maintenance.”
Need for VM migration in cloud computing
A cloud admin can execute VM migration in a cloud data center when any of the following happens:
- Server overload: When a source server is overloaded, a set of the VMs from this server is migrated to an underloaded server using any VM migration technique.
- Server maintenance: Any cloud data center’s maintenance is a continuous process. Hence, whenever there is a need for server maintenance, VMs from the source server are migrated to another data centre.
- Server fault: Whenever there is a server fault, VMs are migrated from the faulty server to the target server.
Benefits of VM migration
- The most important benefit of VM live migration is increased uptime and reduced downtime. A carefully designed virtualised environment provides the maximum possible uptime for any application.
- Another important benefit is that it enables energy-saving, making it an environment-friendly process. You can easily consolidate your virtual machines based on the load and usage to a smaller number of hypervisors during off-hours. Once the virtual machines are migrated, you can power off the unused hypervisors.
- Other benefits include an easy hardware/software upgrade process by moving the VM between different hypervisors. Once you have the capability of moving virtual machines freely between different physical servers the benefits are countless. A word of caution, though – VM migration needs proper and detailed planning.
System requirements to set up the VM migration environment
A virtualisation environment can be implemented using the KVM hypervisor. The system requirements for running virtual machines are highlighted below.
Host system requirements: The minimum host system requirement is 2GB of RAM plus additional RAM for VMs, 6GB disk space for the host plus the required disk space for the VMs.
3.2 KVM hypervisor requirements:
The KVM hypervisor requires:
- An Intel processor with the Intel VT-x and Intel 64 virtualisation extensions for x86-based systems; or
- An AMD processor with the AMD-V and the AMD64 virtualisation extensions. Virtualisation extensions (Intel VT-x or AMD-V) are required for full virtualisation. The following command can be used to verify whether the system supports CPU virtualisation or not:
$ grep -E ‘svm|vmx’ /proc/cpuinfo
Creating your first virtual machine
The process of VM creation can be divided into the five steps that are listed below.
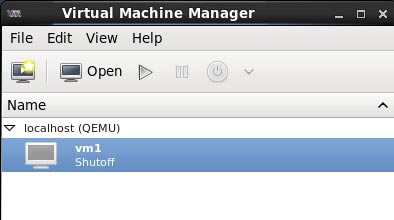
Step 1: Open the virtual machine manager graphical tool by typing virt-manager in a terminal. A screenshot of the virt-manager graphical tool connected to the local hypervisor QEMU-KVM is shown in Figure 1.

Step 2: Install guest VM by clicking on ‘new’, then enter the name of your guest machine. In my test-bed, it is named ‘vm2’ to create the instance of an Ubuntu VM. I am also using the NFS server to install the guest OS shown in Figure 2.
Step 3: To eliminate the overhead of the VM’s disk storage during the migration process, implement the NFS server which stores the guest OS virtual machine’s .iso image.
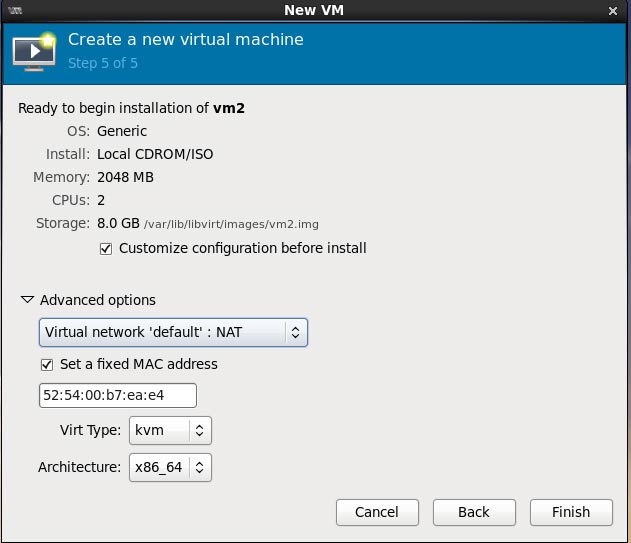
Step 4: The VM is configured with a range of RAM from 1GB to 8GB and Network Address Translation (NAT) as a network interface. A screenshot of the VM with RAM of 2GB and NAT configuration is given in Figure 3.
The purpose of NAT networking configuration for virtual machines is that it enables network access from the host operating system machine.
Step 5: Connect to the destination remote server.
The connectivity from the source server to the destination with IP address 172.20.0.3 is made using the Secure Shell (SSH) method. Now, click on ‘begin installation’; the remaining steps are the same as those of the standard installation of Ubuntu OS, as shown in Figure 4.

Migrating the virtual machine using QEMU-KVM hypervisor
The steps to perform VM migration using KVM hypervisor are as follows.
Step 1: A secure SSH link is set up between the source and the target server.
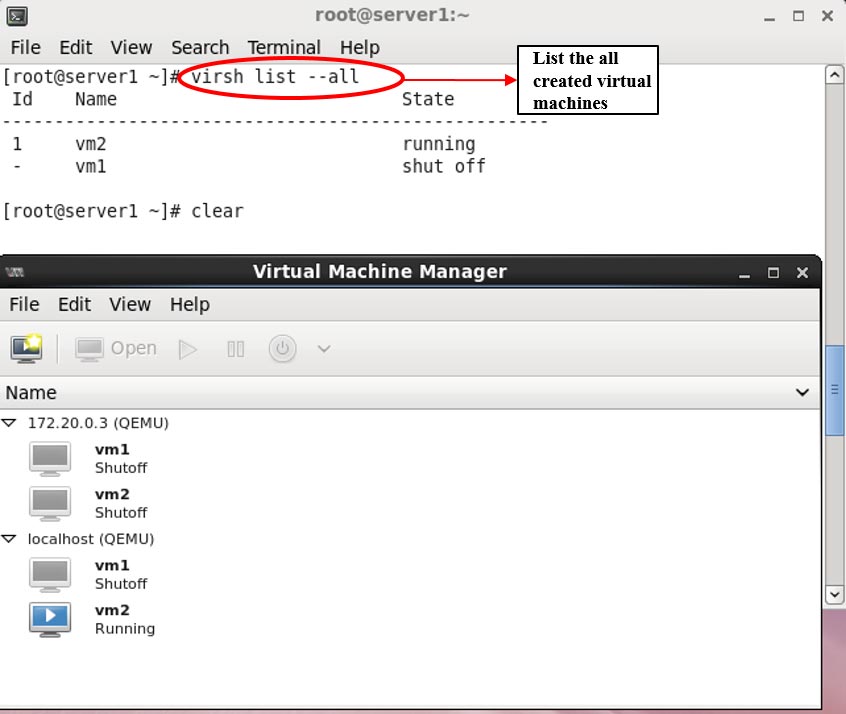
Step 2: A VM is started at the source host, and the channel bandwidth parameter is configured for the QEMU-KVM hypervisor. The list of the newly deployed virtual machines is shown in Figure 5, and it can be checked using the following command:
$ virsh list – all
Step 3: Cloud workload benchmarks are executed on the VMs. Now initiate the VM migration process using the following command, as shown in Figure 6:
$ virsh migrate -- live vm2 qemu+ssh://server3.eexample.com/system
Future of migration technology in cloud computing
VM migration is a fundamental operation for cloud computing virtualisation. In a cloud computing data centre, pre-copy VM migration is the most popularly used technique due to its robust and reliable nature.

Recently, a new paradigm of virtualisation technology called containerisation has started attracting considerable attention. In containerisation, applications can share their host OS kernel and contain only the required binaries and libraries, thus making them lighter compared to VMs.


