Schools the world over are closed due to the COVID-19 pandemic. In such a scenario, methods have to be found to engage students in meaningful learning experiences. This series of articles will discuss Moodle, a popular free and open source learning management system (licensed under the GNU General Public License) used to run online courses. In fact, it is one of the most popular LMSs in the world.
The world is going through difficult times. Mankind has faced similar challenges time and again, overcome them, and often come up with new technologies that have not only solved the then existing problems, but have also made a long term impact on the planet. Consider the inventions made during World War 2 — nuclear energy, computers, rockets, etc. Today, we are being challenged by a global pandemic that has affected us in many different ways.
The educational sector is one of the worst hit. With schools and colleges closed for many months, online education has been taken up by many of these institutions. For a country like India, with tens of millions of children studying in schools and colleges, conducting online classes is a tough ask. There are technological, psychological and pedagogical challenges to overcome. Lack of Internet connectivity as well as the unavailability of televisions and smart devices are some of the tech challenges. For many children, it is difficult to learn from video lectures alone. The isolated feeling of learning alone at home is a huge psychological challenge too. It is difficult to simulate a classroom environment when students are in different parts of the city or country.

From a teacher’s viewpoint, what are the pedagogical challenges faced while running online courses? An excellent history teacher may not know how to record a video. An excellent Malayalam teacher might be a poor communicator in front of the camera without his students. It is also difficult for teachers to measure the level of attentiveness of students while attending online classes. Yes! Conducting online classes is a huge challenge for teachers.
But luckily, technology offers us many solutions to counter this challenge. A relatively high Internet bandwidth in recent years, and software like video editing tools and Learning Management Systems (LMS) are some of the technological advances that are helping teachers conduct online classes more effectively. In this series of articles, we will introduce some Moodle plugins that will help educators conduct online classes far more effectively.
Plugins add features and functionality to software. We believe online education is going to be more and more relevant in the post-COVID world. Some Moodle plugins are Interactive Content – H5P, BigBlueButtonBN, MooTyper, etc. We are sure the use of these plugins will make online education more interactive and effective.
Interactive Content – H5P is a plugin used to add H5P based interactive content to Moodle. This plugin is maintained by Frode Petterson, Thomas Marstrander, Pål Jørgensen and Svein-Tore Griff With. But before we begin to discuss the installation of this plugin, here’s a bit more about Moodle. An article on two other Moodle plugins —CodeRunner and Virtual Programming Lab (VPL)—used to create online virtual programming labs has appeared earlier in OSFY. You can find it at https://www.opensourceforu.com/2018/08/useful-moodle-plugins-for-programming-language-instructors/ in the OSFY portal.
Let us first install Moodle locally in our system. We need a XAMPP server (a free and open source Web server consisting of Apache HTTP server, MariaDB database, and support for PHP and Perl programming languages) to do that. But an easy method is to use the Bitnami Moodle Stack installer consisting of Moodle and XAMPP provided by Bitnami, now owned by VMware. The installer file is about 190MB and the installation process is very smooth. All you have to do is click Next and provide an admin user name and a password when prompted. This way your systems can have Moodle locally.
However, please note that the Moodle copy installed in your system in this way is not accessible by the outside world. You have to create a Moodle server for this. But we make the assumption that your college or school has a Moodle server, and you have a role such as a teacher or course creator assigned to you, so that you can create courses and edit course content (Moodle has various roles like Admin, Teacher, Course Creator, Student, etc, with varying levels of privileges). But no need to worry if your institute hasn’t thought about setting up a Moodle server for online courses, yet. You can try the features of all the plugins in the local copy of your Moodle, and be ready when your institute set up a Moodle server. In fact, one of us (Manoj) tested all the plugin activities in his Moodle server, and the other (Deepu) tried the same on his local copy of Moodle and found that both work the same.
Moreover, we urge you to do all these activities on your local copy while learning, so that no potential harm is done on your up and running Moodle server, if it exists.
Now that we have Moodle in our system, let us add two more users and assign them the roles of a teacher and a student, so that the teacher can add content to courses and add students to it. Once again, there is a warning! Please do all this in the local copy of your Moodle and not on the Moodle server maintained by your institute. Open a browser of your choice and type the URL, http://127.0.0.1/moodle/login/index.php. You will be taken to the local copy of Moodle and prompted for your user name and password. As of now you only have a single admin user name and password provided during the installation. On entering this user name and password you will be taken to the dashboard of the local copy of Moodle.
Now let us add a new user as a teacher to Moodle. Go to Dashboard>Site administration>Users>Accounts>Add a new user in Moodle. Let us call our teacher Guru. Choose the authentication method as Manual accounts and provide a password also. Notice that since we haven’t set up an email server, this is the only possible method to create new users. Repeat the same process for adding a user named Shishya. Let us now try to create a course titled H5P101 on Moodle. Go to Dashboard>Site administration>Courses>Manage courses and categories>Add a new course in Moodle and provide the course full name and short name as H5P101. Provide a course start date and end date, and choose the course format as Weekly. Now we have a course titled H5P101 on the local copy of Moodle. Go to Dashboard>Courses>H5P101>Participants in Moodle, select the button Enrol users and add the user Guru as a teacher. Notice that the default role is that of a student. Students can be added later by the teacher. Our plan is to add H5P interactive content to this course by logging in as the teacher Guru. But before doing so, we need to install the Interactive Content – H5P plugin on Moodle.

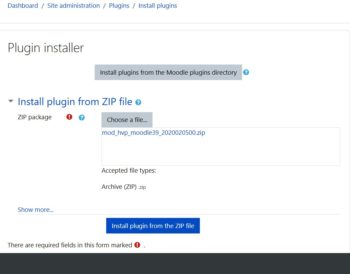
First, download the zipped installation file of the Interactive Content – H5P plugin named mod_hvp_moodle39_2020020500.zip from https://moodle.org/plugins/mod_hvp. Now, go to Dashboard>Site administration>Plugins>Install plugins in Moodle. Figure 1 shows this window for installing plugins.
Now, drag and drop the zipped installation file of the Interactive Content – H5P plugin downloaded earlier. Click on the button Install plugin from the ZIP file and you will be taken to the installation window of this plugin. In that window, click on the button Continue when prompted, and then the Interactive Content – H5P plugin will be successfully installed in your Moodle. Now log out from Moodle as the admin user, so that we can log in again as the teacher called Guru and add some H5P interactive content to the course H5P101. After logging in as Guru, add the user Shishya as a student to the course by going to Dashboard>
My courses>H5P101>Participants in Moodle and clicking the button Enrol users. Figure 2 shows the participant page of the course H5P101.
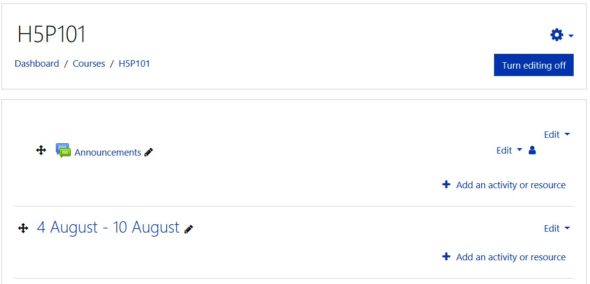
Let us add some H5P interactive content to the course as the teacher Guru. Notice that a user with the privilege Student cannot add or edit any activity in a course. Go to Dashboard>Courses>H5P101 in Moodle and click the button Turn editing on. Figure 3 shows the top of the course page for the course H5P101. You can see the button has changed to Turn editing off, and you should remember to turn editing off later. Since we have used a weekly format for the course, we can see the course being divided into a number of weeks in Figure 3.
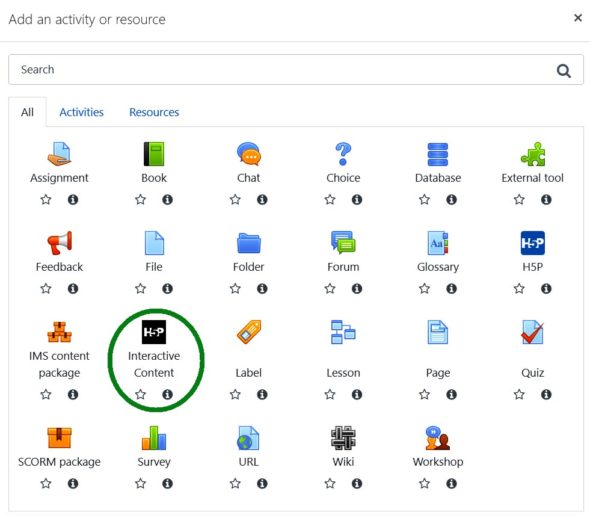
On the right side of the beginning block and all the blocks corresponding to each week of the course, you can see a link named ‘Add an activity or resource’, which allows us to add activities and resources to this Moodle course. Let us add an H5P interactive activity in the beginning block itself. By pressing on this link named ‘Add an activity or resource’, we will get the selection window shown in Figure 4, listing a lot of Moodle activities and resources. This figure shows us the number of options provided by Moodle while running an online course. We assure you that with such a rich set of activities and resources, you can run a highly interactive and informative online course. But in this article, we are interested in just one such activity, the H5P interactive content, marked with a bold green circle in Figure 4 to avoid any confusion.
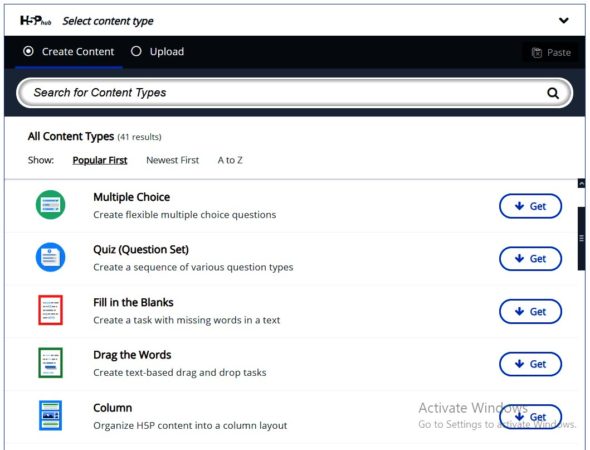
By choosing the option H5P Interactive Content, you will be taken to a page with the window shown in Figure 5. This figure shows some of the interactive content offered by H5P. By scrolling down you can see a lot of H5P interactive content like Interactive Video, Course Presentation, Multiple Choice, Quiz (Question Set), Fill in the Blanks, Drag the Words, etc. This again tells us about the rich set of options provided by Moodle and H5P to create interactive and informative online courses. For want of space, we will demonstrate and discuss just one of these options, Quiz (Question Set), which allows different question types in the quiz. Click on the button Get shown in Figure 5, and you will see a window with a brief description, demo and an Install button. After installation you will see a button named Use, which can be clicked to use this particular option.
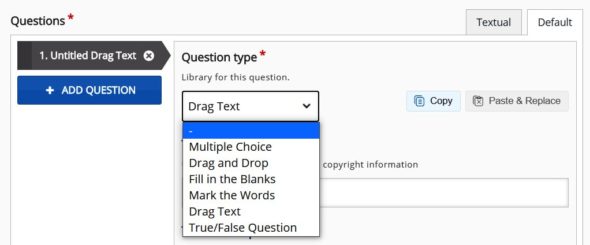
Notice that these steps need to be taken only once in the beginning for each option in the H5P interactive content list. From the second time onwards, we can simply click on the necessary option to include that activity. For this activity, we need to provide some mandatory information like Title, Progress indicator (whether to use a textual message or dots), Pass percentage, and at least one question. We named our quiz ‘A Difficult Quiz’, and have chosen a textual progress indicator. It is possible to provide a background image, if required. We have given a sky blue image as the background for the quiz. We have set the pass percentage at 10. Now, we need to add some questions to this quiz. Figure 6 shows the default mode for setting questions, which tells us that the possible question types for a Quiz (Question Set) include Multiple Choice, Drag and Drop, Fill in the Blanks, Mark the Words, Drag Text and True/False Questions.
As an example, we will create a sample quiz with three questions — one fill in the blanks question, one true or false question, and one multiple choice question. First, let us add a fill in the blanks question. You have to choose the question type as Fill in the Blanks. A title is mandatory for each question. We have titled this question as ‘Do you know this proverb?’. We are sure all of you have heard about the famous proverb ‘A stitch in time saves nine’. The fill in the blanks question will look like the following: ‘A stitch in time saves ______’. You can set the question as shown in Figure 7. As you can see from the figure, the question is asked as follows, ‘A stitch in time saves *Nine/nine/NINE*’. Whatever comes within the two asterisk (*) symbols will form the blank part in the question. If there are multiple correct answers, then they can be separated by a forward slash (/). In this example, ‘Nine’, ‘nine’ and ‘NINE’ are the three correct answers. Notice that, answers like, ‘9’, ‘nin’, ‘NinE’, ‘three’, ‘two’, etc, will all be treated as wrong answers.
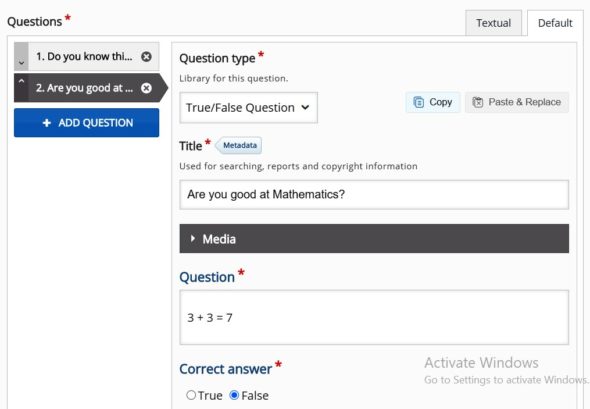
Now let us add the second question, which is a true or false question. To do so, click on the button ADD QUESTION. Now, choose the question type as True/False Question. We have given the title (which is mandatory) for this question as ‘Are you good at Mathematics?’. Figure 8 shows setting up a true or false question. It is clear from this figure that the question is ‘3 + 3 = 7’. From Figure 8, it is also clear that you have to choose the correct answer for this question, either True or False. In this case, the answer is False, so that radio button is selected.
Now let us add a third and final question to this quiz — a multiple choice question. To do so, click on the button ADD QUESTION again. Now, choose the question type as Multiple Choice. We have given the title (which is mandatory) for this question as ‘A Tough Math Problem’.
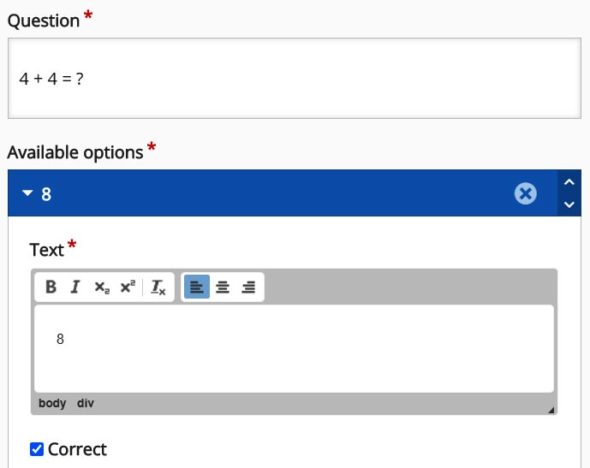
Notice that it is slightly more complicated to set up a multiple choice question. Figure 9 shows the question as, ‘4 + 4 =?’ and one of the options for the answer is 8. Notice carefully that since this option is the correct response, it is ticked as Correct. By default, two options can be added as an answer for a multiple choice question from the box while setting up such questions. But, if required, you can add more options as possible answers by clicking the button ADD OPTION. We have added four options to this question. Now that we have added three questions to our example quiz, we can go down the page and click on any one of the two buttons to finalise the quiz — Save and return to course (which will take you to the course page) or Save and display (which will take you to the quiz created). This quiz can be edited later, if required.
One great advantage with Moodle is the freedom to customise your tests. Even though we can proceed with the default settings while creating tests, a lot of freedom is offered to you so that you can conduct quizzes the way you like. For example, after a user finishes a test you can decide whether to show the result or not. Similarly, you can decide whether to show the solutions or not. You can also allow a user to reattempt questions and, if necessary, you can provide the user with immediate feedback after each attempt. It would be difficult to list out all the options available in Moodle and the Interactive Content – H5P plugin, so that customised tests can be given to different groups of users. But with some patience, you will be able to do wonders.
Now that our teacher Guru has created an example test, let us logout and login again as the student, Shishya, to try out the test. Login as Shishya and go to Dashboard>My courses>H5P101 and you will see a link titled ‘A Difficult Quiz’ in the beginning block itself. Click on it and you will be taken to the first question. Notice that the questions are asked in a random order. So, if you take the test a second time, the order of the questions may change.
As mentioned earlier, there is a lot of interactive content that can be added by the Interactive Content – H5P plugin in Moodle. But before we wind up our discussion, we would like to reiterate the warning given by the development team of Interactive Content – H5P. Let us quote from the home page of Interactive Content – H5P, “Note that it is currently possible for people with programming skills to cheat in H5P interactions and obtain the full score without knowing the correct answers. H5Ps must not be used for exams or similar.” So, it is absolutely important not to use H5P for evaluation. You should only use it to make your classes interactive and make the learning process fun. If you want to carry out evaluation with Moodle, then there are a lot of time tested methods and activities to do so.


