

Learn about how Manim, a Python library, converts code into captivating animations, and why it has become the preferred choice for educators, developers, and content creators worldwide.
Modern educational videos in mathematics and science often feature stunning animations that turn complex ideas into visual masterpieces. Equations flow dynamically, geometric figures evolve seamlessly, and algorithms come alive through elegant motion—making learning both engaging and intuitive.
Traditionally, educators depended on costly proprietary tools like Adobe After Effects or specialised mathematical visualisers with steep learning curves and high licensing fees. These barriers often left creative educators confined to static presentations and textbook-based explanations.
Today, the open source revolution has transformed this space with Manim—a Python library that makes high-quality educational animations accessible to all. Originally built by Grant Sanderson for his 3Blue1Brown channel, Manim has grown into a powerful engine enabling anyone with basic programming skills to create professional grade visualisations.
Understanding Manim’s architecture
Before creating animations, it’s important to understand Manim’s core components.
- Scenes: The canvas and timing controller for animations.
- Mobjects: Mathematical objects representing visual elements.
- Animations: Transformations defining how objects change over time.
- Rendering pipeline: Converts code into high-quality video files.
Scene structure
Manim operates on a scene-based architecture, where every animation is defined as a Python class inheriting from Scene.
Its key characteristics are:
- Must contain a construct() method.
- Acts as both a spatial canvas and a timing controller.
- Provides specialised scene types for different contexts.
Here’s an example scene structure:
class BasicDemo(Scene):
def construct(self):
# Scene initialization
title = Text(“Manim Architecture”)
# Animation sequence
self.play(Write(title))
self.wait(2)
You can refer to Figure 1 for the output.

Mobjects (Mathematical objects)
Mobjects represent all the visual elements in Manim animations.
Basic primitives are:
- Geometric shapes → Circle(), Square(), Arrow(), Polygon()
- Text rendering → Text(), Tex() (with LaTeX support)
- Graphs and plots → Axes(), FunctionGraph(), NumberPlane()
Advanced constructs are:
- 3D objects → ThreeDAxes(), Surface(), ParametricSurface()
- Custom graphics → SVGMobject(), ImageMobject()
Grouping mechanisms are:
- Vertical grouping for synchronised animations → VGroup()
- General grouping for treating multiple objects as one → Group()
Animation system:
Animations define high-level transformations, not frame-by-frame changes.
General animations are:
- Create() → Object creation animation
- Transform() → Morph one object into another
- FadeIn() / FadeOut() → Opacity transitions
- Write()→ Text-specific writing animation
Timing control is as follows:
- self.play() → Executes animation sequences
- self.wait() → Adds pause or delay
- run_time → Controls animation speed
Setting up Manim on Linux
To install and run Manim, we need Python 3.7 or higher, FFmpeg (for video encoding), LaTeX (for mathematical typesetting) and Cairo (for graphics rendering).
Let us start with dependency installation.
For Ubuntu/Debian:
sudo apt update
sudo apt install python3 python3-pip python3-venv
sudo apt install ffmpeg sox libcairo2-dev pkg-config
sudo apt install texlive-full pandoc
For Arch Linux:
sudo pacman -S python python-pip ffmpeg
sudo pacman -S texlive-most cairo
For Fedora:
sudo dnf install python3 python3-pip ffmpeg
sudo dnf install texlive cairo-devel
For a virtual environment setup, create an isolated environment:
python3 -m venv manim-env
source manim-env/bin/activate
pip install --upgrade pip setuptools wheel
To install Manim, type:
pip install manim
For installation verification, use the following code:
manim --version
manim checkhealth
Common solutions are:
- Missing LaTeX → Install texlive-full package
- Cairo errors → Install libcairo2-dev development headers
- FFmpeg issues → Verify PATH and installation
For directory structure setup, organise project directories:
mkdir -p ~/manim-projects/{scripts,media,assets}

cd ~/manim-projects/scripts
Creating your first animation
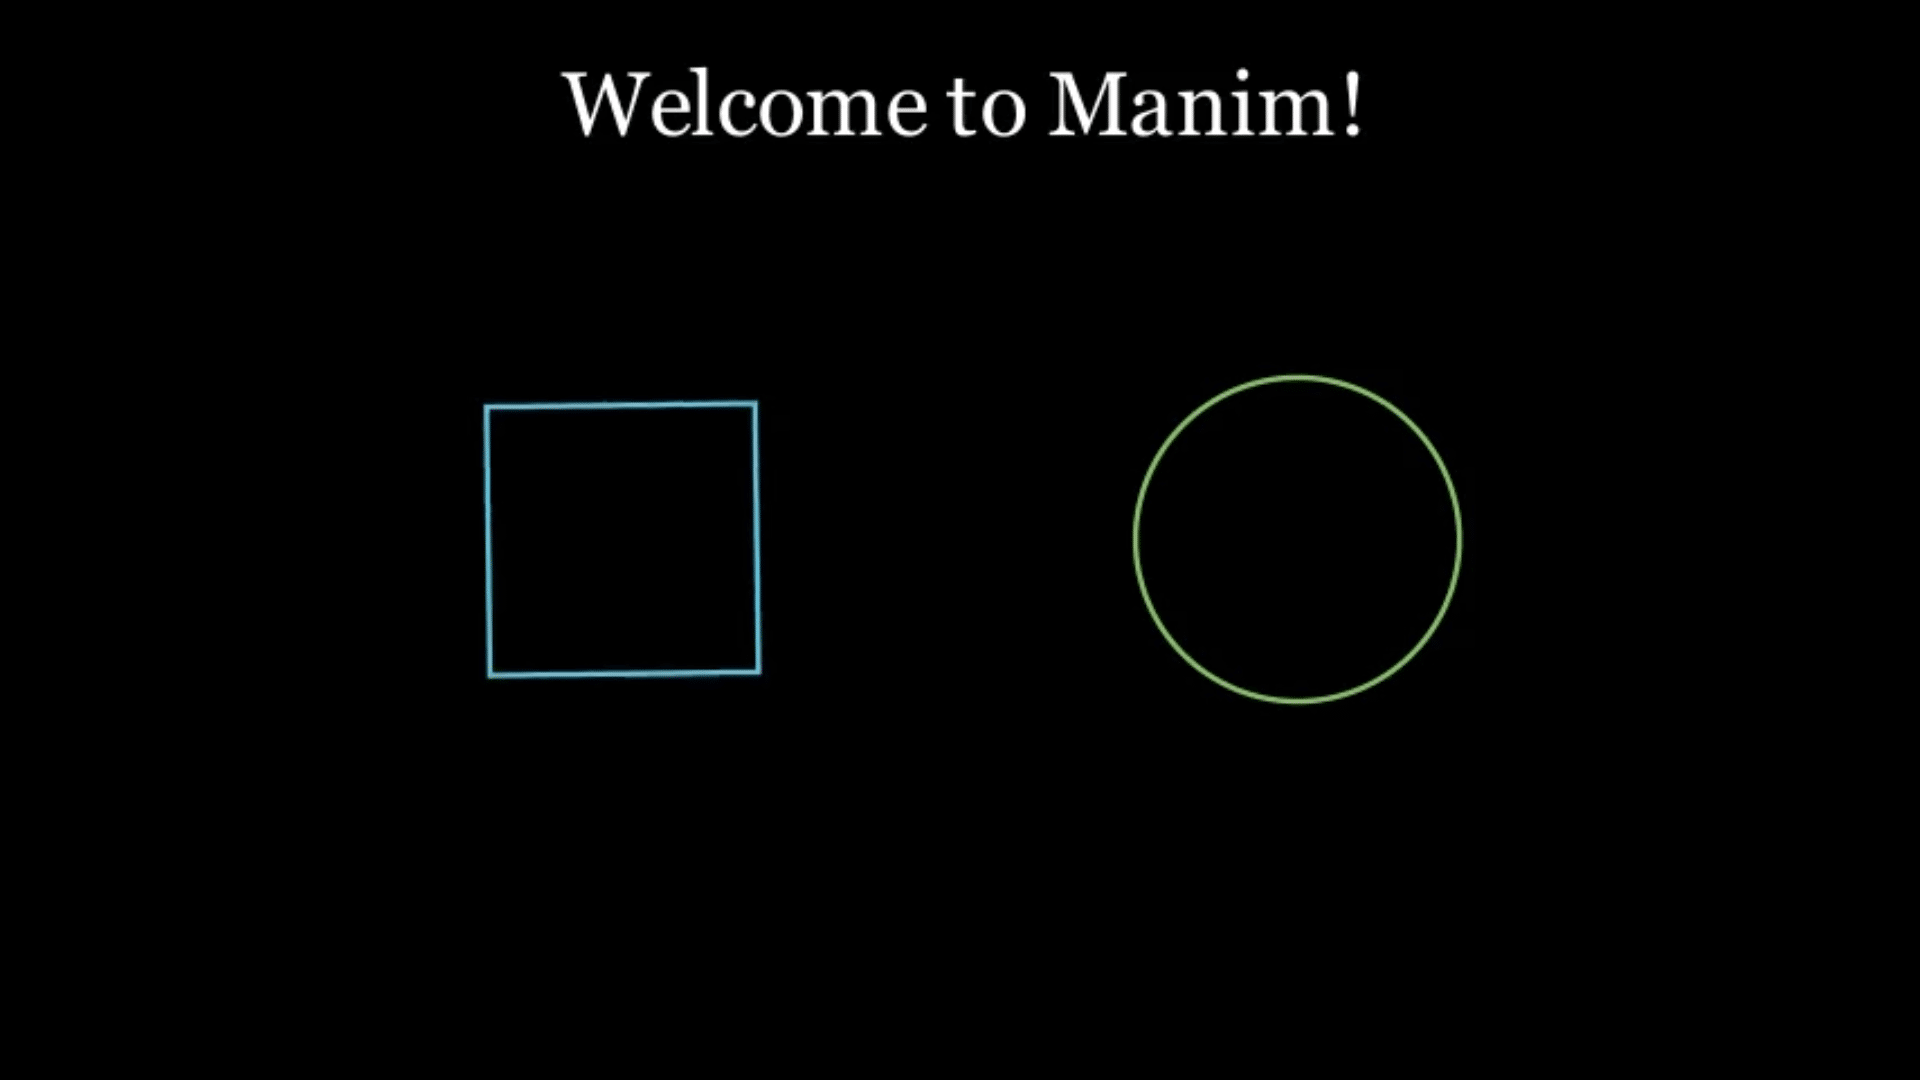
For basic scene creation, create a file first_animation.py:
from manim import *
class BasicShapes(Scene):
def construct(self):
# Object creation
welcome_text = Text(“Welcome to Manim!”)
square = Square(side_length=2, color=BLUE)
circle = Circle(radius=1.2, color=GREEN)
# Positioning
welcome_text.to_edge(UP, buff=0.5)
square.shift(LEFT * 2.5)
circle.shift(RIGHT * 2.5)
# Animation sequence
self.play(Write(welcome_text))
self.play(Create(square), Create(circle))
self.play(square.animate.rotate(PI/4))
self.play(circle.animate.set_color(YELLOW))
self.play(Transform(square, circle))
self.wait(2)
The output of the above code can be seen Figure 2.
For basic rendering, use:
manim -pql first_animation.py BasicShapes
The flag meanings are:
-p — Preview (auto-open video)
-q — Quality (l=low, m=medium, h=high)
-l — Low quality (480p, fast rendering)
Quality options are:
-ql — 480p (development)
-qm — 720p (standard)
-qh — 1080p (production)
-qk – 4K (high-end)
Essential positioning is as follows:
- to_edge(UP/DOWN/LEFT/RIGHT) — Align to
screen edges - next_to(object, direction) — Position relative to other objects
- shift(vector) — Move by specified amount
- move_to(position) — Move to exact coordinates
Coordinate system is:
- Origin (0,0) at screen centre
- Positive X extends right
- Positive Y extends up
- Standard vectors: UP, DOWN, LEFT, RIGHT, ORIGIN
Algorithm and data structure visualisation
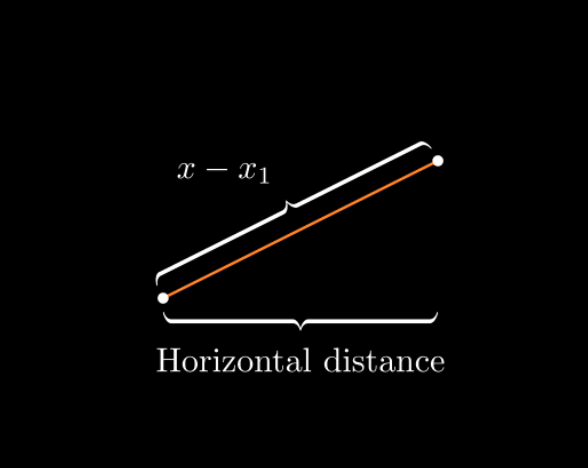
For horizontal distance, use the following code:
from manim import *

class BraceAnnotation(Scene):

def construct(self):

dot = Dot([-2, -1, 0])

dot2 = Dot([2, 1, 0])

line = Line(dot.get_center(), dot2.get_center()).set_color(ORANGE)

b1 = Brace(line)

b1text = b1.get_text(“Horizontal distance”)

b2 = Brace(line, direction=line.copy().rotate(PI / 2).get_unit_vector())

b2text = b2.get_tex(“x-x_1”)

self.add(line, dot, dot2, b1, b2, b1text, b2text)
You can refer to Figure 3 for the output of the above code.
For vector arrow, use:
from manim import *


class VectorArrow(Scene):

def construct(self):

dot = Dot(ORIGIN)

arrow = Arrow(ORIGIN, [2, 2, 0], buff=0)

numberplane = NumberPlane()

origin_text = Text(‘(0, 0)’).next_to(dot, DOWN)

tip_text = Text(‘(2, 2)’).next_to(arrow.get_end(), RIGHT)

self.add(numberplane, dot, arrow, origin_text, tip_text)
The output of the above code is given in Figure 4.
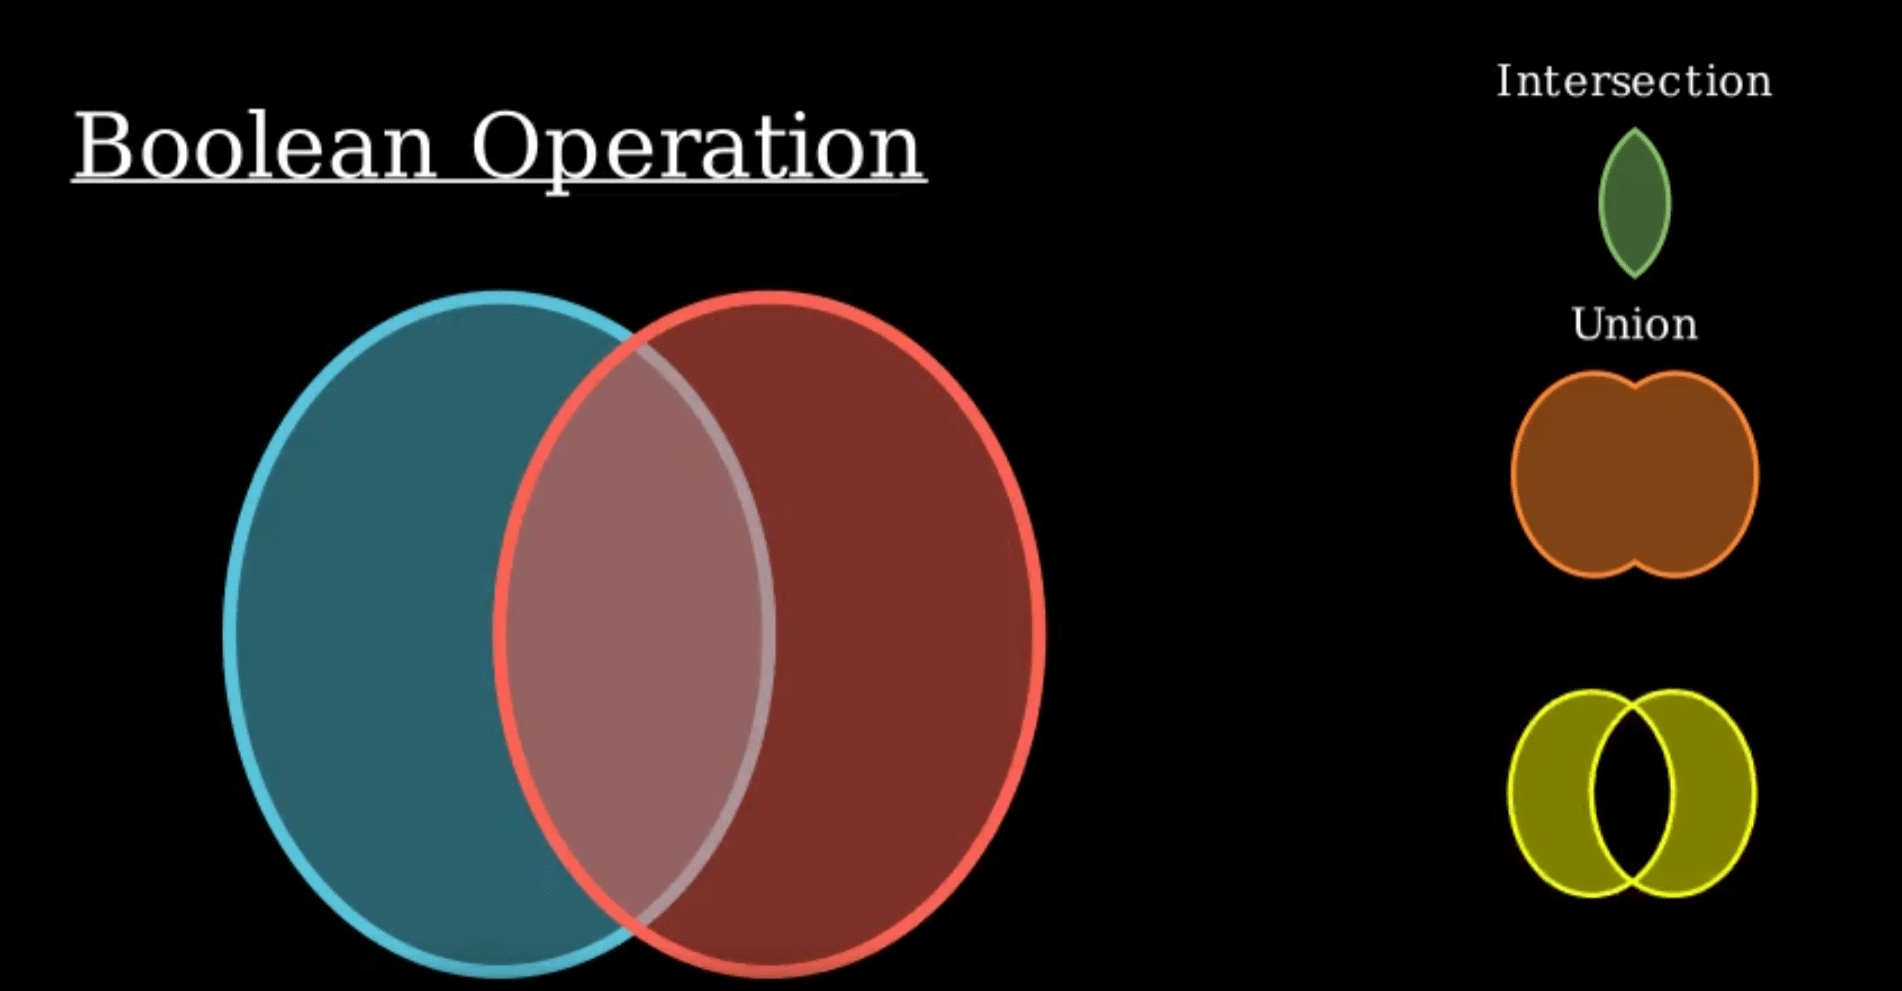
The code for Boolean operations is:
from manim import *

class BooleanOperations(Scene):

def construct(self):

ellipse1 = Ellipse(

width=4.0, height=5.0, fill_opacity=0.5, color=BLUE, stroke_width=10

).move_to(LEFT)

ellipse2 = ellipse1.copy().set_color(color=RED).move_to(RIGHT)

bool_ops_text = MarkupText(“<u>Boolean Operation</u>”).next_to(ellipse1, UP * 3)

ellipse_group = Group(bool_ops_text, ellipse1, ellipse2).move_to(LEFT * 3)

self.play(FadeIn(ellipse_group))

i = Intersection(ellipse1, ellipse2, color=GREEN, fill_opacity=0.5)

self.play(i.animate.scale(0.25).move_to(RIGHT * 5 + UP * 2.5))

intersection_text = Text(“Intersection”, font_size=23).next_to(i, UP)

self.play(FadeIn(intersection_text))

u = Union(ellipse1, ellipse2, color=ORANGE, fill_opacity=0.5)

union_text = Text(“Union”, font_size=23)

self.play(u.animate.scale(0.3).next_to(i, DOWN, buff=union_text.height * 3))

union_text.next_to(u, UP)

self.play(FadeIn(union_text))

e = Exclusion(ellipse1, ellipse2, color=YELLOW, fill_opacity=0.5)

exclusion_text = Text(“Exclusion”, font_size=23)

self.play(e.animate.scale(0.3).next_to(u, DOWN, buff=exclusion_text.height * 3.5))

exclusion_text.next_to(e, UP)

self.play(FadeIn(exclusion_text))

d = Difference(ellipse1, ellipse2, color=PINK, fill_opacity=0.5)

difference_text = Text(“Difference”, font_size=23)

self.play(d.animate.scale(0.3).next_to(u, LEFT, buff=difference_text.height * 3.5))

difference_text.next_to(d, UP)

self.play(FadeIn(difference_text))
The output of Boolean operations can be seen in Figure 5.
Best practices and optimisation
For performance optimisation, follow this development workflow:
- Use –ql flag for rapid iteration.
- Cache scenes to avoid re-rendering.
- Break large projects into smaller scenes.
Organise code as follows:
# config.py
from manim import *

CUSTOM_BLUE = “#1E3A8A”

CUSTOM_GREEN = “#10B981”

TITLE_SCALE = 0.8

# main_animation.py

from manim import *

from config import *
For collaborative development, the version control setup should be:
- Use -ql flag for rapid iteration.
- Cache scenes to avoid re-rendering.
- Break large projects into smaller scenes.
Code organisation should be:
git init manim-project

echo “media/” >> .gitignore

echo “__pycache__/” >> .gitignore

echo “*.pyc” >> .gitignore
An optimised project structure is:
manim-project/

├── scenes/

│ ├── intro.py

│ ├── algorithms.py

│ └── conclusion.py

├── assets/

│ ├── images/

│ └── sounds/

├── config.py

└── README.md
Manim transforms the challenging task of creating professional animations into an accessible, code-driven workflow that aligns perfectly with open source principles. By leveraging Python’s ecosystem and running natively on Linux systems, it provides animation capabilities that extend far beyond mathematical content into the programming, science, engineering, business, and creative domains.


