Last month, we discussed application servers, and in particular, the GlassFish app server. This month we will look at how to get started with GlassFish version 2 on Debian GNU/Linux. For other distributions, the procedure will be almost the same.
Installation of GlassFish
GlassFish v2 requires JDK 1.5 or a later version. So if you are using Fedora 9 or Ubuntu 8.4, you already have OpenJDK 6. You can check the version of Java with the java -version command at a terminal prompt. This command will print the available version of Java on your system. For example, on my system the available version of Java is 1.4.2 as can be seen from the following terminal output:
mca05@debian:~$ java -version
java version "1.4.2"
gij (GNU libgcj) version  4.1.2  20061115  (prerelease)  (Debian 4.1.1-20)
Copyright (C) 2006 Free Software Foundation, Inc.
This is free software; see the source for copyright conditions. There is NO warranty; not even for MERCHANTABILITY or FITNESS FOR A PARTICULAR PURPOSE.
So I have to install JDK 1.5 or later before installing and configuring GlassFish. Verify that your /etc/apt/sources.list file has the following entries and you are connected to the Internet:
deb http://security.debian.org/ etch/updates main contrib non-free
deb http://ftp.debian.org/debian etch main contrib non-free
deb-src http://ftp.debian.org/debian etch main contrib non-free
Then simply run the following command:
apt-get install sun-java5-jdk
It will install JDK 1.5 or above on your system. Now that we have successfully completed the basic requirements, download the GlassFish jar file and issue the following command:
java -jar -Xmx=256 glassfish-installer-v2ur2-b04-linux.jar
This command will show a licence agreement window—it’s dual licensed under CDDL and GPL. After accepting the licence it will create a directory named glassfish in your current working directory. After the installation is complete, we need to set it up before being able to use it.
Configuration and set-up
To set up GlassFish navigate to the glassfish directory from the terminal. Here you will see a file named setup.xml. This file is the input file for ant builder scripts that will configure GlassFish. setup.xml contains the following configuration property elements:
<property name="domain.name" value="domain1"/>
<property name="instance.name" value="server"/>
<property name="admin.user" value="admin"/>
<property name="admin.password" value="adminadmin"/>
<property name="admin.port" value="4848"/>
<property name="instance.port" value="8080"/>
<property name="orb.port" value="3700"/>
<property name="imq.port" value="7676"/>
<property name="https.port" value="8181"/>
<property name="glassfish.license" value="LICENSE.txt"/>
<property name="glassfish.zipfile" value="../glassfish-image-pe.zip"/>
<property name="glassfish.release.name" value="glassfish"/>
<property name="glassfish_pe.release.name" value="glassfish-pe"/>
<property name="glassfish.class" value="glassfish.class"/>
<property name="persistence-location" value="${install.home}/../glassfish-persistence"/>
<property name="glassfish-persistence.zipfile" value="glassfish-persistence-image.zip"/>
<property name="install.home" value="${basedir}"/>
<property name="glassfish_persistence.class" value="glassfish_persistence.class"/>
<property name="jarpack-task.jar" value="${install.home}/lib/Pack200Task.jar"/>
<property name="adminpassfile" value="${install.home}/passfile"/>
<property name="asadmin.prefs.file" value="${install.home}/config/asadminenv.conf"/>
<property name="asadmin.default.profile" value="developer"/>
<property name="asadmin.default.secure" value="false"/>
Before setting up the server, you need to make some changes in the property values according to your preferences. First of all, change the default admin.password property, which by default is set as ‘adminadmin’ (see line 5 in the above snippet). You need to remember this password, as it will be used for login and deploying applications later. You can also change the ports on which the admin and applications will listen. Change them accordingly if they conflict with services that listen on the same ports.
After making changes in the configuration file, it’s time to start the build process. I will recommend a set-up process such that in the future you can easily update GlassFish with its new releases.
We will move glassfish to /opt/glassfish-v2, and then create a soft-link (ln -s /opt/glassfish-v2 /opt/glassfish) such that in the future we can easily upgrade it. Make the ant builder script executable by issuing the following command:
chmod u+x /opt/glassfish/lib/ant/bin/ant
Now, to start the build process, issue the following command:
/opt/glassfish/lib/ant/bin/ant -f setup.xml
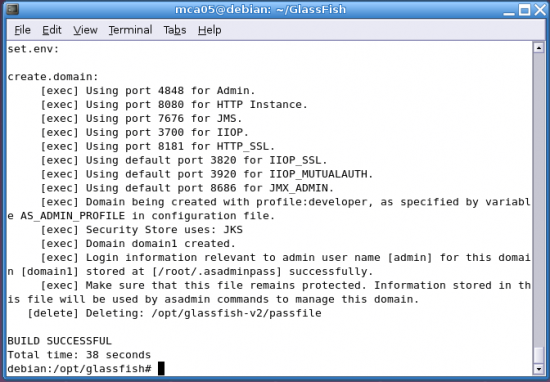
You should soon get a ‘build successful’ message as shown in Figure 1.
To start the server and check whether it is installed and configured successfully, issue the following command:
/opt/glassfish/bin/asadmin start-domain
…and point your browser to http://localhost:4848. You should get a login page as shown in Figure 2. If you don’t, then recheck the whole procedure for the possible error.
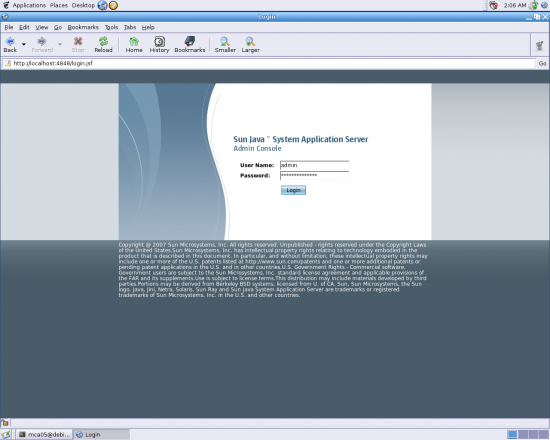
For login, use the password you have applied for the admin.password property earlier.
Developing a simple Web application
In this section I will develop a simple dynamic Web application based on the Model View Controller (MVC) design pattern, which will generate prime numbers for its clients. An MVC design pattern divides an application into the following components:
- Model: The content or the actual data (or logic)
- View: The presentation of data to the clients
- Controller: It controls the application—for example, calling the model for business logic and then forwarding the request to ‘view’ for its presentation.
The Web application will be based on servlets and JSP. In very simple terms, servlets are server side applications that can dynamically extend the functionality of a Web server, and JSP is a presentation technology based on servlets. If you want to know more details about servlets and JSP then I’d recommend doing a Google search for the answers.
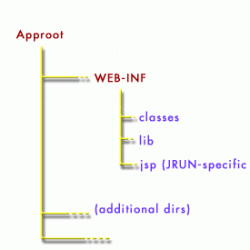
Typical Web application development on an app server requires a directory structure like in Figure 3. Here, Approot is the root directory for our Web application. It contains the default page that will be served by the server to its clients.
In addition, it contains a special directory named WEB-INF. This is the directory where our Web application-specific files will be stored. WEB-INF contains the following files and folders:
- The deployment descriptor file named
web.xml. - A
classesfolder that contains the model and controller classes of our MVC Web application - A
libfolder that contains third-party jar files - A
jspfolder that is JRUN specific; it will not be used in our sample application.
For our prime number generator Web application, create a directory structure as shown below:
- The top-level directory
Approotcontains the default pageindex.html, theimgdirectory (which contains the images used inindex.html),result.jsp(view of our MVC Web application), and theWEB-INFdirectory. WEB-INFcontains classes and theweb.xmlfile (a deployment descriptor file used by the server to map servlet names to its classes).
There is no need of lib and jsp directories, as we are not using third-party jar files or jrun.
The default page for the prime number generating Web application, index.html, looks like what’s shown below:
<html>
<!-- Some sample html-->
<head>
<title>Prime number generator Web Service</Title>
</head>
<body>
<h1 align="center">Prime number generator Web Service</h1>
<center>
<img src="images/index.bmp" width="130" height="150"/>
</center>
<center>
<form method="GET" action="PrimeSearcher.do" enctype="multipart/form-data">
<b>Enter the number till which you need prime numbers:</b>
<input type="text" name="number" size="5"/><br/>
</center>
<br />
<center>
<input type="SUBMIT" value="GENERATE PRIMES"/>
</center>
<br />
<br />
<br />
</form>
</body>
</html>
This index.html is presented to clients who access the Web application. As you can see in the above snippet, the method is GET and the action servlet is PrimeSearcher.do. PrimeSearcher.do is just a name given to our controller servlet and .do is just a convention. The GET method indicates that whenever a client clicks the GENERATE PRIME button, the doGet method of the servlet is called.
The deployment descriptor file, web.xml looks like what’s given below:
<web-app xmlns="http://java.sun.com/xml/ns/j2ee" xmlns:xsi="http://www.w3.org/2001/XMLSchema-instance"
xsi:schemaLocation="http://java.sun.com/xml/ns/j2ee/web-app_2._4.xsd" version="2.4">
<servlet>
<servlet-name>PrimeSearcher</servlet-name>
<servlet-class>Controller</servlet-class>
</servlet>
<servlet-mapping>
<servlet-name>PrimeSearcher</servlet-name>
<url-pattern>/PrimeSearcher.do</url-pattern>
</servlet-mapping>
</web-app>
The deployment descriptor file web.xml is specific to a Web application, and the app server uses it to map servlet names to its classes. Each Web application has its own web.xml file. It maps the servlet names to servlet classes—for example, in our application, PrimeSearcher.do is mapped to PrimeSearcher, and PrimeSearcher is mapped to Controller class.
The ‘view’ part of our Web application is a JSP page (result.jsp) that generates output for its client. It looks like the following:
<%@ page import="java.util.*"%>
<html>
<body>
<h1 align="center">Prime Number generator View</h1>
<p>
<%
   Iterator it= (Iterator)request.getAttribute("primes");
      out.append("primes are:"+"<br>");
      while(it.hasNext())
      {
         out.println(""+it.next()+"<br>");
      }
%>
</body>
</html>
This result.jsp is internally translated into a servlet by the container. The JSP gets the attribute named primes attached to the HttpRequest object by the Controller. This primes attribute is an iterator that contains the prime numbers generated by the model class.
The Controller code is shown below:
/*********controller.java**************/
import java.io.*;
import java.util.*;
import javax.servlet.*;
import javax.servlet.http.*;
public class Controller extends HttpServlet {
public void doGet(HttpServletRequest req, HttpServletResponse res)
throws ServletException, IOException {
Long num= new Long(req.getParameter("number"));
Iterator it=  model.generatePrime(num.longValue()).iterator();
req.setAttribute("primes", it);
RequestDispatcher view= req.getRequestDispatcher("view.jsp");
view.forward(req, res);
}
private Model model  = new Model();
}
It is a simple servlet class that extends HttpServlet. It takes the help of the Model class to generate the prime numbers. This Model class contains the actual logic to generate primes. The code looks like this:
/***************Model.java*************/
import java.util.ArrayList;
import java.util.Iterator;
import java.util.List;

public class Model {

   List generatePrime(long l)
   {
      long number=2;
      List primes= new ArrayList();
      primes.add(number);
      long sqrt ;
         while(number<l)
         {
            number++;
            if(checkPrime(number)==true)
               {
                  primes.add(number);
               }
         }
         return primes;
      }
      boolean checkPrime(long l)
      {
         long sqrt=(long) Math.sqrt(l);
            for (long i = 2; i <= sqrt; i += 1) {
            if (l % i == 0)
               return false;
            else
            ;
      }
      return true;
   }
}
This Model class contains the actual logic to generate primes, and returns a list of generated prime numbers to the Controller.
To understand the entire functionality, assume that when a client requests our Web application to generate primes, then the request will be transferred to the controller class that gets the number entered by the client from the HttpRequest object. This number is passed to a model class, which actually generates prime numbers and has the real logic of our application. The model class returns a list that contains prime numbers. The Controller class gets the iterator of this list and attaches this iterator as an attribute to the HttpRequest object, and forwards the remaining functionality to the ‘view’ of our application, which is a JSP file. ‘View’ gets this iterator object and generates a page containing the generated prime numbers.
Deploying the Web application on GlassFish
First of all, compile the Controller and Model classes using javaee.jar in classpath. The GlassFish lib folder contains this javaee.jar, which in turn contains the servlet API.
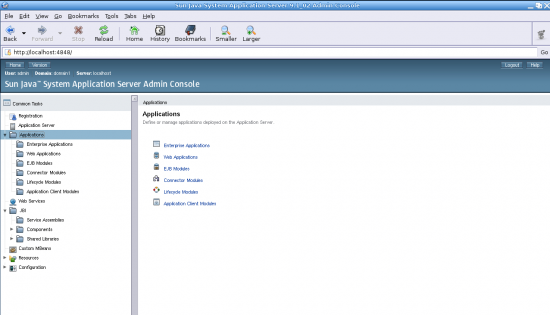
After compiling the controller and model Java files, it’s time to deploy the Web application. First copy the Controller and Model .class files in the classes folder of the WEB-INF directory. Then start the GlassFish server and log in. Go to the applications branch of the tree as shown in Figure 4.
Then go to the Web application branch. Check the radio button for “Local packaged file or directory…” and click the ‘browse’ button (Figure 5).
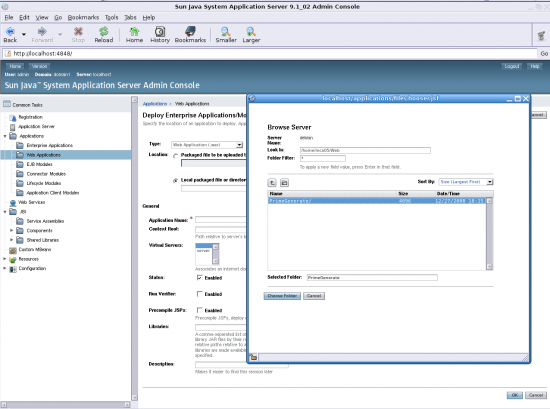
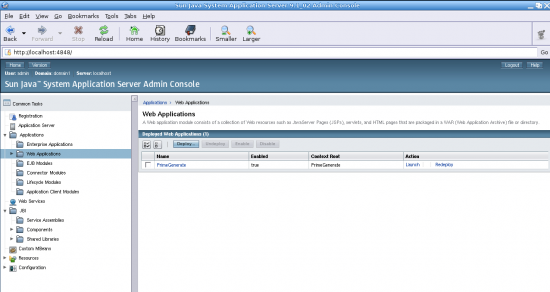
It will show a ‘directory chooser’. Choose the prime generator (folder) that contains our Web application. Then click on the OK button. That’s it! You have successfully deployed the application and will see a page like what’s shown in Figure 6.
Running the Web application
Finally, it’s time to run the application. Simply click the launch link (see Figure 6).
You will see the default page of our application as shown in Figure 7.
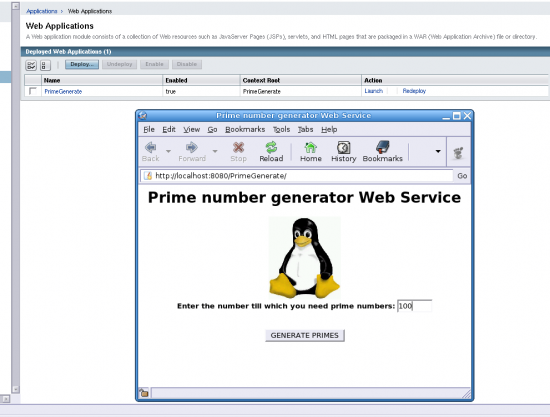
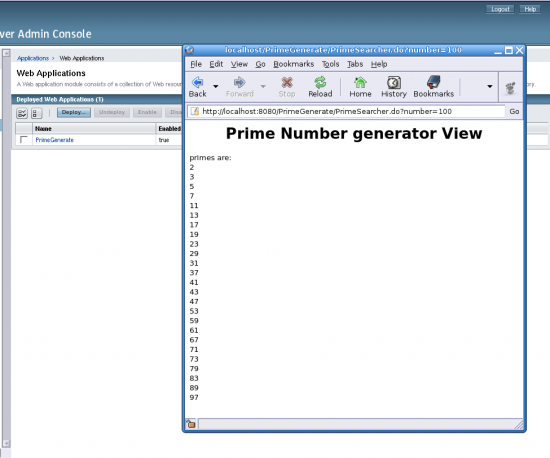
Enter the number up to which you need prime numbers to be sorted out. Click the “Generate Primes” button and you will get the primes as shown in Figure 8.
That’s it for now and happy development with GlassFish and Java EE!


Very nice article.
Thanks Alot
Very nice article.
Thanks Alot
useful example and I could run my first test of glassfish, java web application
Few corrections..
In HTML file, please correct the placement of <center> and <form> tags
In JSP file, controller.java is name of file and class name has Controller.java and similar issue was with model class.