This article gives you hands-on experience in setting up a User-Mode Linux (UML) kernel and getting it up on a running Linux OS. We see how to share files between the host Linux and guest Linux, via the network and other methods. We also cover building a custom kernel, building modules for the UML kernel, inserting them into the running UML kernel, and debugging the kernel and modules with GDB.
UML gives you the advantage of running Linux on top of a Linux distribution, without the need of privileged access. It is run in the form of an unprivileged user program, giving the end user power to play with the OS. The Linux kernel, once compiled to the UML architecture, creates a machine-dependent binary which can execute itself, and launch the UML kernel.
UML was developed by Jeff Dike, and has been part of the vanilla Linux kernel since version 2.6.0. It is very useful for kernel developers to quickly test new code; and for administrators, to build sandbox Linux virtual machines and honeypots, while deploying new services without disturbing the production environment. Most steps mentioned in this document are distribution-agnostic, and can be tried on any Linux machine with the x86 or x86_64 architectures.
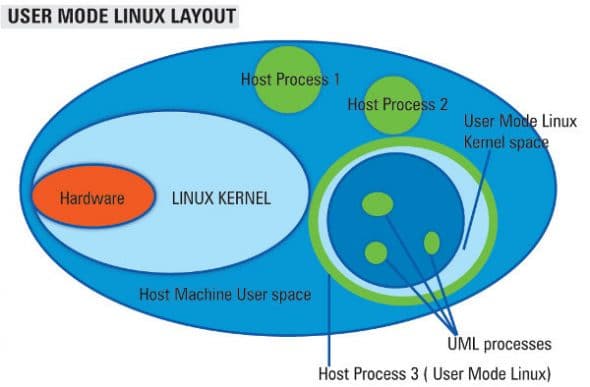
Figure 1 depicts a conceptual layout of UML in relation to the hardware, host kernel and user-space.

Requirements for setting up UML
The basic requirements for setting up UML are:
- Access to a Linux machine with x86 or x86_64 architecture (with or without root access)
- The Linux kernel build environment pre-installed (GCC, make, etc)
- A downloaded kernel source tarball (version 2.6.x) from kernel.org (I used 2.6.35-rc3 in this article)
- A root filesystem (can be created, or you can download one from here. Creating a rootfs from scratch is beyond the scope of this article.)
Building the UML kernel and modules
Extract the kernel source archive:
$ tar -jxvf linux-2.6.35-rc3.tar.bz2
Enter the directory in which it was extracted (I’m using /code/kernel/lfy/), and issue the following command to compile the kernel for the UML architecture (view Figure 2).
$ ARCH=um make menuconfig

ARCH defines the architecture for which the kernel is to be compiled; in this case, “um” stands for user mode.
The make menuconfigcommand gives us an ncurses-based interface in which we can configure build options for the UML kernel. See Figure 3.

To enable us to debug the kernel, we need to enable the following options:
- Compile the kernel with debugging info (see Figure 4).
- Compile the kernel with frame pointers.
- ‘Enable loadable module support’ in the main menu.

Once you’ve chosen these options and saved the configuration, proceed with kernel compilation. (If you aren’t familiar with the process in general, you may want to refer to one of the many “kernel compilation how-to” pages on the Web.) Issue this specific make command to compile the kernel:
$ ARCH=um make
Once the kernel compilation is done, you should have a binary named linuxcreated in the same directory; see Figure 5.

Kernel modules need to be installed in a directory (of the host system), so that we can later copy them to the /lib/modules/ path inside the UML system. In my case, the target directory is /code/kernel/lfy/mods.
$ ARCH=um make modules_install INSTALL_MOD_PATH=/code/kernel/lfy/mods
Extending the root filesystem (optional)
As mentioned in the requirements section, we’re using a downloaded root filesystem file for the UML kernel. If the compiled kernel modules you need to copy are many, or you need to copy other, large, files into the UML filesystem, then you probably need more space in the downloaded root filesystem. You can quickly resize the filesystem with the following three-step procedure:
- Add space at the end of the filesystem file:
$ dd if=/dev/zero count=1024 bs=1024k >> FedoraCore6-AMD64-root_fs
This adds 1 GB to the end of the root filesystem file. Be careful to use the
>>(the double greater-than) redirection operator to append to it; if you use the single greater-than symbol, the rootfs will actually be an empty 1 GB file. - Do a forced check of the filesystem:
$ e2fsck -f FedoraCore6-AMD64-root_fs
- Resize the filesystem to use the added space:
$ resize2fs FedoraCore6-AMD64-root_fs
First boot of UML
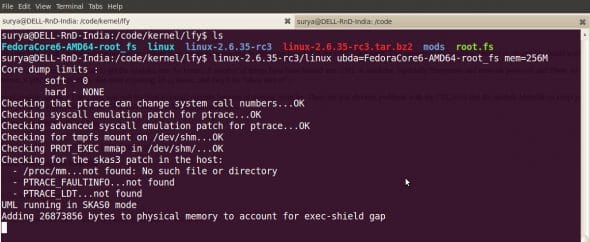
Now we are ready to boot UML for the first time.
- Boot a UML instance with the following command-line (shown in Figure 6):
$ linux-2.6.35.rc3/linux ubda=FedoraCore6-AMD64-root_fs mem=256M

Figure6: Booting UML In this command-line,
ubdaspecifies the filesystem image that is to be used as the root filesystem. If you need to pass more than one filesystem image, use arguments likeubdb,ubdc, etc. The optionalmemparameter specifies the memory (RAM) that is allocated to the UML (it defaults to 128M if not specified). - Access the host filesystem in the UML instance, and copy the previously compiled kernel modules to UML’s filesystem. This can be done in various ways; I am highlighting a couple of methods here.
hostfsmethod (root access not required):hostfsis a UML filesystem that provides access to the host system files. Once the UML system is booted, execute the following steps:- Create a directory in the UML instance, where you will mount the host filesystem:
# mkdir /host
- Mount the host directory that contains the modules built for the UML kernel:
# mount none /host -t hostfs -o /code/kernel/lfy/mods
- Once the host directory is mounted, copy the module files to
/lib/modulesof the UML instance, with a simplecpcommand.
- Create a directory in the UML instance, where you will mount the host filesystem:
- Network update method (root access required): A network update involves setting up a bridge between the host and the UML system. Once the network is set up, files can be copied over the network using
scpor an NFS share from the host, mounted in the UML system. Execute the following steps:- On the host, you will need to have the
bridge-utilspackage installed. You can download the source code and compile it in your host OS. After that, run the following steps (in the same order):# brctl addbr br0 (create bridge br0) # tunctl -u `id -u surya` (create a tap device, and assign permissions to a normal user; replace with username of your desired ordinary user account.) # ifconfig eth0 0.0.0.0 promisc up (set the system network interface and the tap interface in promiscuous mode) # ifconfig tap1 0.0.0.0 promisc up # brctl addif br0 eth0 (add system interface to the bridge) # brctl addif br0 tap1 (add tap device to the bridge) # ifconfig br0 up (bring up the br0 device with DHCP -- see note below)
- Once the above setup is done, the UML instance can be restarted with the following modified command line:
$ linux-2.6.35.rc3/linux ubda=FedoraCore6-AMD64-root_fs mem=256M eth0=tuntap, tap1
- As mentioned, use
scpto copy the modules, or create an NFS share from the host, mount it in the UML instance, and copy the modules.
- On the host, you will need to have the
Note: This setup assumes that there is a running DHCP server in the host’s network. If this is not the case, interface br0 on the host and eth0 in the UML guest have to be assigned static IP addresses. We need to remember that the UML system lies in the same network as the host system, in this setup. We follow this model of setting up the network because if administrators want to provide sandboxed UML test environments for users who need full privileges, they would either need the UML instances to be on the same network as the host, or would need to configure a custom iptables setup.
Debugging the Linux kernel in UML
Since UML is considered to be an application, it can be debugged with the standard GDB debugger, as follows.
Load the linux binary in GDB:
$ gdb linux-2.6.35.rc3/linux
This gives us a gdb prompt. Since we could not specify the command-line arguments for the UML instance on the GDB command-line, we set the arguments here (the eth0 argument is assuming that you have set up bridged network access between the host and the UML instance, as described above):
$ set args ubda=FedoraCore6-AMD64-root_fs mem=256M eth0=tuntap,tap1
Figure 7 illustrates the UML kernel being booted from within GDB. Once we passed the arguments with the set args command, we placed a breakpoint on the start_kernel()function in the kernel code, and then instructed GDB to run the program. As you can see, after UML initialisation, GDB stopped execution when it reached the breakpoint.

If you did not start UML in the GDB debugger, you can also attach GDB to the UML guest later:
# gdb linux-2.6.35-rc3/linux 2666
(Here, 2666 is the PID of the UML instance. See Figure 8 for an illustration of attaching GDB to a running UML instance.)

Compiling custom modules for UML
If you have written a custom kernel module that you need to insert into the running UML kernel, the module needs to be compiled for the UML architecture, with the same kernel version with which UML is running.
Your Makefile could look like what’s shown below:
obj-m := uml-mod.o
	KPATH := /code/kernel/lfy/mods/lib/modules/2.6.35-rc3/build
	PWD := $(shell pwd)
all:
	$(MAKE) -C $(KPATH) SUBDIRS=$(PWD) modules
Here, KPATH defines the path of the UML kernel source. Remember to pass ARCH=um with the make command:
# ARCH=um make
This will compile your custom kernel module for the UML kernel. Once the module is compiled successfully, you can copy the .ko file from the host system to the UML using hostfs or networking, as given above, and you can then insert it into the running UML kernel.
Debugging modules with UML
Loadable modules are a great advantage in the Linux kernel. Pieces of kernel code can be dynamically plugged in and out of the running kernel. However, a few of these modules with bugs can cause problems with the system, and need to be debugged.
s these modules are inserted in the kernel at a later stage, GDB has no knowledge of the relevant symbol information, or the location of the module in memory. We need to feed this information to GDB, once the module is loaded, in order to debug the module.
GDB has a command, add-symbol-file, which takes the .ko module file (which you are trying to debug) as its first argument, and the address of the .text section of the module as the second argument. The .text address can be obtained from /sys/module/<modulename>/sections/.text.
Let’s consider an example, using the module loop.ko. In the UML instance:
- Insert the module
loop.koin the UML kernel. (If it is not compiled, you can recompileloop.koand copy it to the UML system.)# insmod/modprobe loop.ko
- Obtain the address from
/sys/module/loop/sections/.text(see Figure 9):# cat /sys/module/loop/sections/.text
- To debug the
loop.komodule, we need to prepare a sample image file and format it, ready to be mounted at a later stage:# dd if=/dev/zero of=fs.img count=2 bs=1024k # mkfs.ext3 fs.img
On the host system:
- In a different terminal window (which you started the UML instance from), find the process ID of the UML instance.
- Attach GDB to the running UML instance, specifying the PID. For example:
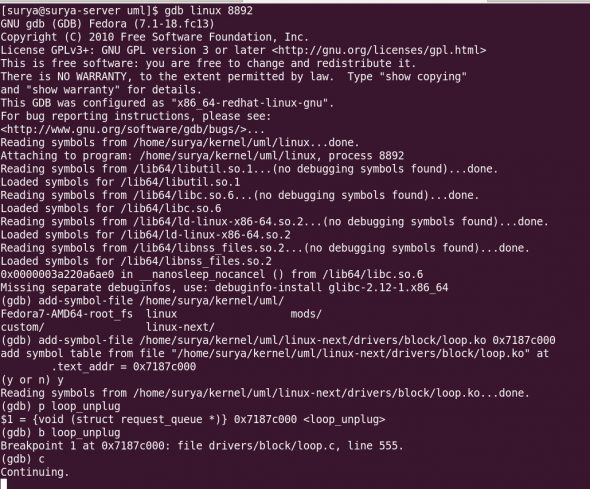
$ gdb uml-linux-image 8892
- In GDB, load the debug symbol information for the module:
add-symbol-file /code/kernel/lfy/linux-kernel/drivers/block/loop.ko 0x7187c000
(The last argument here is the
.textaddress of the loop module, obtained in the second step we ran in the UML instance, above.) - Test whether the module is properly loaded:
p loop_unplug
(
loop_unplugis a function in thedrivers/block/loop.cfile. This GDB command should show the.textaddress we used earlier. Once you see the.textaddress, it implies you are able to access the module through GDB.) - Now, put a breakpoint on the
loop_unplug()function:# b loop_unplug
- Finally, type
cat thegdbprompt, to continue running until the breakpoint is encountered.
Figure 10 illustrates the above steps.

Back in the UML instance, we can activate our breakpoint with the following steps:
# mkdir test
# mount -o loop fs.img test
This should hit the breakpoint in the running GDB instance in the host system. We can then view and debug the code of the module.
The purpose of this article was to provide an introduction to UML, and a step-by-step guide to setting up a UML system and debugging the kernel and modules. The methods mentioned in this article are one of the many available to set up and play around with UML. For more knowledge on the topic, you can subscribe to the UML mailing lists or visit the UML home page.


