Here’s how we do it
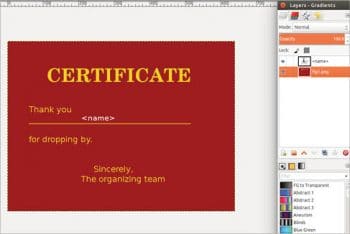
1) Create or download a certificate template (the background image for your certificate). Open your certificate template using GIMP (right-click on the file and open with GNU Image Manipulation Program), or you could alternatively open GIMP and open your file from there using File -> Open. For this demo, we are using a template with a red background and some text.
2) Now type some dummy text where you expect the name of the participant, contest, etc, to appear. To keep it simple, let us have only one text <name>. To do this, click on the A button in the GIMP toolbox (it is usually on the left side), and then click and drag your mouse over the image so that a rectangular box appears right above the line. You can type the text here – placement is crucial because the participants’ names will be substituted in this location. You can change the font size in the menu above the box and drag the box at its sides, for proper alignment.
3) If you look at the layer toolbox (it is normally on the right side, and if not, it can be opened using Windows -> Dockable Dialogs -> Layers) you should now see two layers, one labelled ‘Background’ and the other with <name>. If it is so, you are on the right track.
Now save the file with Ctrl + S, and exit GIMP.
We now need to get the file with the participants’ names ready. Any format can be used, but in this case, we will use a normal text file. Enter all names, one per line and save the file.
Here comes the coding part. The code given below comes with explanations given as comments (beginning with #):
#!/usr/bin/env python
from gimpfu import *
# this is the important module for coding in python GIMP
import os # for file/folder paths
def run(*args):
template_file, list_file, output_folder = args
# the data is sent is unpacked into 3 variables
# this is where we will store our auto-generated certificates
output_folder = os.path.expanduser('~/' + output_folder)
if not os.path.exists(output_folder):
os.makedirs(output_folder)
# create the output directory, if its not there already
# this number is used for avoiding collisions when
# 2 people have the same name
# if there are 2 people named X,
# one file will have a name containing X1, the other X2 etc.
i = 0
with open(list_file, 'r') as list: # open the file for reading
for name in list:
# for each line do something i.e for each name in the list
i += 1
bg_image = pdb.gimp_file_load(template_file, template_file)
# load the certificate
# create a reference to the name layer in the certificate
name_layer = filter(lambda x: x.name == '<name>', bg_image.layers)[0]
# change below 2 values in brackets if needed
pdb.gimp_text_layer_set_font(name_layer, 'Comic Sans MS')
pdb.gimp_text_layer_set_font_size(name_layer, 20, 0)
# set the required name in the certificate
pdb.gimp_text_layer_set_text(name_layer, name)
# We can save only one layer at time, so merge them
merged = pdb.gimp_image_merge_visible_layers(bg_image, 0)
# save file as <name><some number>
output_filename = name + str(i) + '.png'
#relative path
output_filename = os.path.join(output_folder, output_filename)
#absolute path
# save the file as a PNG image
pdb.file_png_save_defaults(bg_image, merged, output_filename, output_filename)
print 'Finished'
# this is an important part, without this,
# the plug-in will not appear in GIMP
# first line is the name that appears in the title bar
# second line is the menu hierarchy
# the '[' starting from the third line provides the selection # tools for selecting the files/directories we # need
# the last line calls the run() method defined above
register(
<span class="hljs-string">'certificate_generator'</span>, <span class="hljs-string">""</span>, <span class="hljs-string">""</span>, <span class="hljs-string">""</span>, <span class="hljs-string">""</span>, <span class="hljs-string">""</span>, <span class="hljs-string">"<Toolbox>/Xtns/Languages/Python-Fu/_Certificate-Generator"</span>, <span class="hljs-string">""</span>, [ (PF_FILE, <span class="hljs-string">"arg0"</span>, <span class="hljs-string">"Certificate Template file"</span>, <span class="hljs-string">""</span>), (PF_FILE, <span class="hljs-string">"arg1"</span>, <span class="hljs-string">"Data File"</span>, <span class="hljs-string">""</span>), (PF_STRING, <span class="hljs-string">"arg2"</span>, <span class="hljs-string">"Output directory (created relative to user home)"</span>, <span class="hljs-string">""</span>), ]
],
[],
run
)
main()
Save the script as <your_script_name>.py. There are a number of places to save it but the one that worked out for me was /usr/lib/gimp/2.X/plug-ins. Here, 2.X is the GIMP version installed in your system.
Type the following command to give executable permissions to your script:
//switch to the directory
cd /usr/lib/gimp/2.X/plug-ins
//give permissions
sudo chmod +x <your_script_name>.py
Now, to run it:
1. Open GIMP
2. Navigate to Filters->Python-fu->Certificate Generator
There it is! A window appears asking for the path to the template, list file and output directory.
These can be typed or selected using the file browser.
Click ‘OK’ to run the script and the certificates are generated in the output directory specified.


Additional notes
If the plugin does not appear in GIMP, run GIMP from the /usr/lib/gimp/2.X/plug-ins directory; if there are any errors, they are shown in the terminal. Also try running the file as follows:
$ python <your_script_name>.py.
It should only show an error related to gimpfu; if not, try to fix the error shown.
The text is black in colour here. For additional information on how to change the background/foreground and how to view the plugins in GIMP, head over to References.
While creating the text layer in GIMP (the <name> one), create the rectangle large enough for the longest possible name.
References
[1] https://choboprogrammer.wordpress.com/2010/12/17/writing-python-script-for-gimp/#more-7
[2] http://coderazzi.net/python/gimp/pythonfu.html


