Many of us want to browse anonymously on our laptops, mobile phones and tablets, or on console devices that not only do not have an Ethernet/LAN connection but also cannot run Tor. What if you cannot install Tor or do not want to on your work computer? If you want to use Tor but don’t have the time or ability to run it on your computer, this article is for you.
Tor, more commonly known as The Onion Router, allows you to anonymously use the Internet by concealing your real identity. It protects you from any traffic analysis as well as network spying. The Tor network encrypts the data into multiple layers and hides the origin of a Web page request. As you know, every Internet packet goes through three layers of relays before reaching its destination. This makes it much harder for the server being accessed to figure out the identity and origin of the request. It is an excellent way to gain access to certain websites that are blocked.
Prerequisites
You’ll need a few things to make you own Tor proxy router:
- Raspberry Pi model B+ (or B) – Ethernet
- Ethernet cable
- Wi-Fi adapter
- SD card (4GB or greater) with Raspbian on it. You can either copy the Raspbian image onto it or buy a ready-made Raspbian card
- Power supply for your Pi
- USB Console cable (optional)—this makes it a little easier to debug the system
- A case for your Pi (optional)
- An SD or microSD card reader (optional)
Setting up Raspberry Pi
When you buy a Raspberry Pi, it does not necessarily come with an SD card. The SD card is important because this is where the Raspberry Pi keeps its operating system, and also where you will store your documents and programs.
Even if your Raspberry Pi comes with an operating system, it is always good to update it to the latest version. Remember, putting the operating system in the Raspberry Pi will wipe all the data. Hence, it is advised to have a USB drive for your documents, so that when you install a new version of the operating system, you don’t have the complication of copying them off somewhere safe before reformatting the SD card.
If your Raspberry Pi did not have an SD card, then the minimum size you should get is 4GB; but get a bigger one if you think you will need the space. It is always advisable to get a bigger size SD card.


Downloading the image
The operating system that will be installed onto the SD card must be downloaded from the official Raspberry Pi website. This will usually be a Zip file, which then extracts to an image file of type .img. Whatever image file you download, the actual installation process will be the same.
There are numerous OSs that you can install on your Raspberry Pi. If you are a beginner, you’ll probably want to stick with one of the Linux distributions, but which one should you choose? Being an open source OS, you can take one of the existing distributions and add things to it or configure it in a certain way before packaging it up as another distribution option for anyone to use. This is how the most common Raspberry Pi distribution, ‘Raspbian’, came into existence. After downloading the .zip Raspbian file, unzip it to get the image file (.img) for writing to your SD card.
Writing the image to the SD card
Please visit the official Raspberry Pi website, to get the correct procedure.
1. Linux: https://www.raspberrypi.org/documentation/installation/installing-images/linux.md
2. OSX: https://www.raspberrypi.org/documentation/installation/installing-images/mac.md
3. Windows: https://www.raspberrypi.org/documentation/installation/installing-images/windows.md
Booting and configuring Raspberry Pi
Once you have the OS installed on your SD card, it’s time to set up your Raspberry Pi to boot it up for the first time. To do this, use a tool called Raspi-Config, which automatically runs when you boot your Raspberry Pi for the first time. This starts before the operating system, and so you have to use the cursor keys and the Enter key to navigate through the menu system.
Using the whole SD card
This may sound a bit weird, but by default, the Raspberry Pi only uses as much of the SD card as the operating system requires. This means that even though you might have used a larger SD card, all its resources won’t be used. To fix this, so that all the space on the SD card can be used, use the up/down cursor keys to select the ‘expand_rootfs’ menu option and hit Enter. Once you do that, a script will run and you will get the following confirmation:
Using Full Screen of the monitor:
Raspberry Pi, by default, doesn’t use the full screen of your monitor; it just appears in the middle portion of the screen. This is not true of all monitors, but if it happens, then selecting the option to Disable Overscan may fix this for you. Use the left and right cursor keys to make your selection and then hit Return. If after disabling Overscan, you cannot see the left edge of the screen, then check the section ‘Running Raspi_Config After Booting’.
Booting into the desktop
Raspberry Pi, by default, boots you into the command line interface. So, to boot into the desktop, select the Boot_behaviour option; then, select ‘Yes’ and press Enter.
Testing the Internet connection
Using the Ethernet cable: The fastest way to get your Raspberry Pi connected is to use an Ethernet patch cable and just plug it into the back of your router. As soon as you plug your Pi in, you should see the network LEDs start to glow. If that doesn’t happen, it means your router is not configured to DHCP (Dynamic Host Configuration Protocol). You can fix that by going to your router’s settings in the computer to which it is already connected, and enabling the option that configures DHCP for your router.
Setting up Wi-Fi using the command line: Open the terminal, and use the following commands:
sudo nano /etc/network/interfaces

auto lo
iface lo inet loopback
iface eth0 inet dhcp
allow-hotplug wlan0
auto wlan0
iface wlan0 inet dhcp
wpa-ssid “your_ssid”
wpa-psk “your_password”
You have to make changes in the last two lines, changing your_ssid and your_password to the passwords of your Wi-Fi connection and SSID, respectively. After changing that, press Ctrl + x to save the file. Restart your Raspberry Pi and you will see it connect to your Wi-Fi as it boots up.
To find the IP address of your Raspberry Pi, open the terminal and type the following command:
sudo ifconfig
Next, at the wlan0, you will see inet address, which is your Pi’s IP address.


Installing Tor
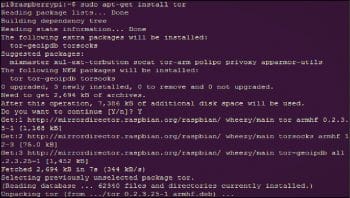
Now, let’s install TOR—the onion routing software—step by step. Log in to your Raspberry Pi by Ethernet or Wi-Fi, and open the terminal:
sudo apt-get update
sudo apt-get install tor
Now edit the TOR config file by running the following command:
sudo nano /etc/tor/torrc
Next, write the following code to it, right below the FAQ option:
Log notice file /var/log/tor/notices.log
VirtualAddrNetwork 10.192.0.0/10
AutomapHostsSuffixes .onion,.exit
AutomapHostsOnResolve 1
TransPort 9040
TransListenAddress 192.168.42.1
DNSPort 53
DNSListenAddress 192.168.42.1

TORConfig.jpg
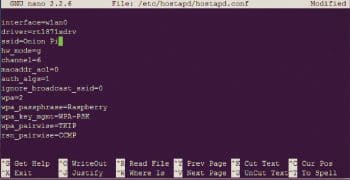
Now, change the host access point to something else, which we’ll call Onion Pi for now. Don’t forget to set a good password—you should not use the default option here!
sudo nano /etc/hostapd/hostapd.conf
We now need to change our IP routing tables so that connections via the Wi-Fi interface (wlan0) will be routed through the Tor software. Type the following commands to flush the old rules from the IP NAT table:
sudo iptables -F
sudo iptables -t nat -F
Type the following to route all DNS (UDP Port 53) from the interface wlan0 to the internal Port 53:
sudo iptables -t nat -A PREROUTING -i wlan0 -p udp --dport 53 -j REDIRECT --to-ports 53
Type the following to route all TCP traffic from the interface wlan0 to Port 9040:
sudo iptables -t nat -A PREROUTING -i wlan0 -p tcp --syn -j REDIRECT --to-ports 9040
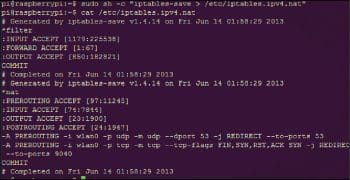
Next, check that the IP tables are right with the following command:
sudo iptables -t nat -L
IPtables.jpg
Now, if it all went well, save the IP tables to the old NAT file using the following command:
sudo sh -c “iptables-save > /etc/iptables.ipv4.nat”
It will automatically get loaded when the networking is set up on reboot. Next, let’s create our log file, which is very handy for debugging, with the code given below:
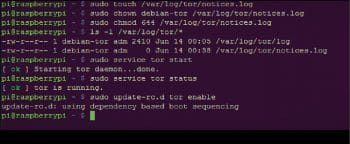
sudo touch /var/log/tor/notices.log
sudo chown debian-tor /var/log/tor/notices.log
sudo chmod 644 /var/log/tor/notices.log
You can check it with the following command:
ls -l /var/log/torls -l /var/log/tor
To start the Tor service manually, use the following:
sudo service tor start
To check if Tor is actually running, use the command given below:
sudo service tor status
Finally, to make it start on boot, use the following command:
sudo update-rc.d tor enable
To test the anonymity of our Tor proxy, you could simply click on Onion Pi, which is available in your Wi-Fi list, and type the password you entered at the time of setting up the hostapd configuration file.
To check that the proxy is working, visit a website like http://www.whatsmyip.org, which will display your IP address as it sees it and also the matching domain name, if available. The IP address should not be from your Internet provider — in fact, if you reload the page, it should change!


Hello my friends , greetings from Brazil, great tutorial and timing , I ‘ ve just made the same tutorial and it was very good to read that is just like you.
Congratulations and keep the good work.